- •Using Help
- •About online Help
- •Navigating in Help
- •Using bookmarks, the table of contents, the index, and Find
- •Contents
- •Introduction
- •Welcome
- •Registration
- •Installing Adobe Photoshop and ImageReady
- •Getting started
- •If you are new to Photoshop:
- •If you are an experienced Photoshop user:
- •If you want to focus on Web features:
- •If you want to concentrate on photo editing and retouching:
- •If you want to focus on productivity features:
- •Using the printed documentation
- •Using online Help
- •Using tool tips
- •Using Web resources
- •About Adobe Online
- •Using Adobe Online
- •Accessing Adobe Online through the Help menu
- •Other learning resources
- •Customer support
- •Customer support on Adobe Online
- •Additional customer support resources
- •An Overview of Adobe Photoshop
- •Explore state-of-the-art tools
- •Edit images with ease
- •Enjoy unlimited creative options
- •Create compelling Web designs
- •Enjoy precise typographic control
- •Stay ahead of deadlines
- •Automate repetitive tasks
- •Maintain color precisely
- •What’s New in Photoshop 7.0
- •Meet every challenge
- •Stay competitive
- •Take advantage of tighter-than-ever integration
- •Looking at the Work Area
- •About the work area
- •Using the toolbox
- •Toolbox overview (1 of 3)
- •Toolbox overview (2 of 3)
- •Toolbox overview (3 of 3)
- •Using the tools
- •Using the tool pointers
- •Using the tool options bar
- •Using the palette well (Photoshop)
- •Using tool presets (Photoshop)
- •Using palettes
- •Changing the palette display
- •Docking palettes together
- •Customizing your workspace
- •Using pop-up sliders
- •Using pop-up palettes
- •Using the Info palette (Photoshop)
- •Using context menus
- •Viewing images
- •Changing the screen display mode
- •Using the document window
- •Navigating the view area
- •Magnifying and reducing the view
- •Correcting mistakes
- •Reverting to a previous version of an image
- •About the History palette
- •Using the History palette
- •Setting history options (Photoshop)
- •Making a snapshot of an image (Photoshop)
- •Painting with a state or snapshot of an image (Photoshop)
- •Duplicating images
- •Using rulers
- •Using columns (Photoshop)
- •Using the measure tool (Photoshop)
- •Using guides and the grid
- •Working with Extras
- •Displaying status information (Photoshop)
- •Annotating images (Photoshop)
- •Adding notes and audio annotations
- •Opening and editing annotations
- •Jumping between applications
- •Jumping between Photoshop and ImageReady
- •Jumping to other applications (ImageReady)
- •Previewing an image in a browser
- •Managing libraries with the Preset Manager (Photoshop)
- •Setting preferences
- •Resetting all warning dialogs
- •Monitoring operations
- •Using plug-in modules
- •Assigning scratch disks
- •Getting Images into Photoshop and ImageReady
- •About bitmap images and vector graphics
- •About image size and resolution
- •Changing image size and resolution
- •Displaying image size information
- •About resampling
- •Choosing an interpolation method
- •Changing the pixel dimensions of an image
- •Changing the print dimensions and resolution of an image (Photoshop)
- •Determining a recommended resolution for an image (Photoshop)
- •Scanning images
- •Importing scanned images
- •Importing an image using the TWAIN interface
- •Importing images using WIA (Windows Image Acquisition) Support
- •Scanning using the resolution setting (Photoshop)
- •Optimizing the dynamic range of the scan (Photoshop)
- •Eliminating unwanted color casts (Photoshop)
- •Creating new images
- •Opening and importing images
- •Opening PostScript artwork
- •Importing PICT resources (Mac OS)
- •Using the File Browser (Photoshop)
- •About workgroup management
- •Getting started with workgroup management
- •Logging on and off WebDAV servers
- •Saving changes to the server
- •Working with Color
- •About color modes and models (Photoshop)
- •HSB model
- •RGB model
- •RGB mode
- •CMYK model
- •CMYK mode
- •L*a*b model
- •Lab mode
- •Bitmap mode
- •Grayscale mode
- •Duotone mode
- •Indexed Color mode
- •Multichannel mode
- •Color gamuts (Photoshop)
- •Adjusting the monitor display
- •Specifying 8-bit color display (Photoshop)
- •Making previews display more quickly (Photoshop)
- •Adjusting color display for cross-platform variations
- •Channels and bit depth (Photoshop)
- •About color channels
- •About bit depth
- •Converting between bit depths
- •Converting between color modes (Photoshop)
- •Converting between Grayscale and Bitmap modes (Photoshop)
- •Making Grayscale and Bitmap mode conversions
- •Converting to indexed color (Photoshop)
- •Conversion options for indexed-color images (Photoshop)
- •Palette type
- •Number of colors
- •Color inclusion and transparency
- •Dithering
- •Customizing indexed color tables (Photoshop)
- •Using the color table to edit colors and assign transparency
- •Saving and loading color tables
- •Producing Consistent Color (Photoshop)
- •About color management
- •Do you need color management?
- •Creating a viewing environment for color management
- •Setting up color management
- •About working spaces
- •About color management policies
- •Working with policy warnings and messages
- •Customizing color management settings
- •Specifying working spaces
- •Specifying color management policies
- •Customizing advanced color management settings
- •Specifying a color management engine
- •Specifying a rendering intent
- •Using dither
- •Desaturating monitor colors
- •Blending RGB colors
- •Saving and loading color management settings
- •Synchronizing color management between applications
- •Calibrating versus characterizing a monitor
- •About monitor calibration settings
- •Calibrating with Adobe Gamma (Windows)
- •Entering custom CMYK settings
- •Specifying ink colors
- •Specifying dot gain
- •Adjusting the separation type and black generation
- •Printing a hard proof
- •Making Color and Tonal Adjustments
- •Basic steps for correcting images
- •1. Calibrate your monitor.
- •2. Check the scan quality and tonal range.
- •3. Adjust the tonal range.
- •4. Adjust the color balance.
- •5. Make other special color adjustments.
- •6. Sharpen the edges of the image.
- •Checking scan quality and tonal range (Photoshop)
- •Using the color adjustment tools
- •Making color adjustments
- •Seeing the color values of pixels (Photoshop)
- •Saving and reapplying settings
- •Comparing corrections in CMYK and RGB (Photoshop)
- •Identifying out-of-gamut colors (Photoshop)
- •Using the Levels dialog box
- •Using Levels to set highlights, shadows, and midtones
- •Using Levels to adjust color (Photoshop)
- •Using the Curves dialog box (Photoshop)
- •Using target values to set highlights and shadows (Photoshop)
- •Setting auto correction options (Photoshop)
- •Adjusting the gamma value of an image (ImageReady)
- •About the color wheel
- •Using the Color Balance command (Photoshop)
- •Using the Hue/Saturation command
- •Using the Replace Color command (Photoshop)
- •Using the Selective Color command (Photoshop)
- •Making quick overall adjustments to an image
- •Using the Brightness/Contrast command
- •Using the Auto Levels command
- •Using the Auto Contrast command
- •Using the Auto Color command (Photoshop)
- •Using the Variations command
- •Applying special color effects to images
- •Using the Desaturate command
- •Using the Invert command
- •Using the Equalize command (Photoshop)
- •Using the Threshold command (Photoshop)
- •Using the Posterize command (Photoshop)
- •Using the Gradient Map command (Photoshop)
- •Sharpening images
- •Selecting
- •About selections
- •Making pixel selections
- •Using the Select menu
- •Using the marquee tools
- •Using the lasso, polygonal lasso, and magnetic lasso tools
- •Setting options for the lasso, polygonal lasso, and magnetic lasso tools
- •Using the magic wand tool
- •Using the Color Range command (Photoshop)
- •Creating selections from slices (ImageReady)
- •Adjusting pixel selections
- •Moving, hiding, or inverting a selection
- •Adjusting selections manually
- •Adjusting selections numerically
- •Softening the edges of a selection
- •Moving, copying, and pasting selections and layers
- •Copying selections or layers
- •Using drag and drop to copy between applications
- •Using the Clipboard to copy between applications
- •Using the Snap command
- •Saving and loading selections
- •Deleting selections
- •Removing fringe pixels from a selection (Photoshop)
- •Extracting objects from their background (Photoshop)
- •Transforming and Retouching
- •Changing the size of the work canvas
- •Cropping images
- •Transforming perspective while cropping (Photoshop)
- •Transforming objects in two dimensions
- •Specifying what to transform
- •Setting the reference point
- •Applying transformations
- •Using the Free Transform command
- •Transforming objects in three dimensions
- •Transforming and manipulating objects
- •Modifying the preview image
- •Setting 3D rendering options
- •Cloning and repairing images
- •Using the clone stamp tool
- •Using the pattern stamp tool
- •Using the healing brush tool (Photoshop)
- •Using the patch tool (Photoshop)
- •Retouching images
- •Using the smudge tool
- •Using the focus tools
- •Using the toning tools
- •Using the sponge tool
- •Using the Liquify command
- •Using the Liquify dialog box
- •Distorting images
- •Freezing and thawing areas
- •Reconstructing distortions
- •Saving and loading distortions
- •Drawing
- •About drawing and painting
- •Drawing shapes and paths
- •About the drawing tools
- •Creating shape layers
- •Creating a work path (Photoshop)
- •Creating rasterized shapes
- •Using the shape tools
- •Setting shape tool options
- •Using preset shapes (Photoshop)
- •Controlling a shape as you draw it
- •Using the pen tools (Photoshop)
- •Drawing with the pen tool
- •Drawing curves with the pen tool
- •Drawing with the freeform pen tool
- •Editing shape layers
- •Using the Paths palette (Photoshop)
- •Editing paths (Photoshop)
- •About anchor points, direction lines, direction points, and components
- •Selecting paths (Photoshop)
- •Moving, reshaping, and deleting path segments
- •Moving, reshaping, copying, and deleting path components
- •Aligning and distributing path components
- •Adding, deleting, and converting anchor points
- •Managing paths (Photoshop)
- •Converting between paths and selection borders (Photoshop)
- •Converting paths to selection borders
- •Converting selection borders to paths
- •Adding color to paths (Photoshop)
- •Filling paths with color
- •Stroking to paint path borders
- •Painting
- •Using the painting tools (Photoshop)
- •Using the painting tools (ImageReady)
- •Erasing
- •Using the eraser tool
- •Using the magic eraser tool
- •Using the background eraser tool (Photoshop)
- •Using the Auto Erase option
- •Using the art history brush tool (Photoshop)
- •Working with brushes
- •Using the Brushes palette (Photoshop)
- •Selecting preset brushes
- •Customizing brush tips (Photoshop)
- •About brush dynamics (Photoshop)
- •Specifying brush shape dynamics (Photoshop)
- •Specifying brush scattering (Photoshop)
- •Creating textured brushes (Photoshop)
- •Creating dual brushes (Photoshop)
- •Specifying color dynamics (Photoshop)
- •Specifying paint dynamics (Photoshop)
- •Adding noise to brush strokes (Photoshop)
- •Using wet brush edges (Photoshop)
- •Creating airbrush effects (Photoshop)
- •Smoothing brush strokes (Photoshop)
- •Protecting texture in brush strokes (Photoshop)
- •Copying textures between tools (Photoshop)
- •Clearing brush options (Photoshop)
- •Creating and managing preset brushes (Photoshop)
- •Setting options for painting and editing tools
- •Selecting a blending mode
- •Using the gradient tool (Photoshop)
- •Specifying the gradient transparency
- •Managing gradients
- •Using the paint bucket tool
- •Filling and stroking selections and layers
- •Filling a selection or layer with colors or patterns
- •Stroking a selection or layer with color
- •Creating and managing patterns
- •Managing patterns (Photoshop)
- •Using the Pattern Maker
- •Generating patterns
- •Previewing patterns
- •Reviewing tiles and pattern previews
- •Specifying pattern smoothness and detail
- •Choosing foreground and background colors
- •Using color settings in the toolbox
- •Using the eyedropper tool
- •Using the Color palette
- •Using the Swatches palette
- •Using the Adobe Color Picker
- •Specifying a color using numeric values
- •Using Web-safe colors
- •Recognizing nonprintable colors (Photoshop)
- •Choosing custom colors (Photoshop)
- •Choosing a custom color system (Photoshop)
- •Using other color pickers
- •Using Channels and Masks
- •About channels
- •Using the Channels palette (Photoshop)
- •Viewing channels
- •Changing the display of the palette
- •Selecting and editing channels
- •Managing channels (Photoshop)
- •Rearranging and renaming channels
- •Duplicating channels
- •Splitting channels into separate images
- •Merging channels
- •Deleting channels
- •Mixing color channels (Photoshop)
- •Adding spot colors (Photoshop)
- •About spot colors
- •Creating spot channels
- •Modifying spot channels
- •Adjusting overlapping spot colors
- •Using channel calculations to blend layers and channels (Photoshop)
- •Using the Apply Image command
- •Using the Calculations command
- •About the Add and Subtract blending modes
- •About masks (Photoshop)
- •Creating temporary masks in Quick Mask mode (Photoshop)
- •Storing masks in alpha channels
- •About alpha channels (Photoshop)
- •Creating alpha channels (Photoshop)
- •Saving a mask selection
- •Modifying alpha channels (Photoshop)
- •Loading a selection into an image
- •Using Layers
- •About layers
- •Using the Layers palette
- •Creating layers and layer sets
- •About the background layer
- •Adding layers and layer sets
- •Working with layered images
- •Selecting layers
- •Displaying the contents of layers
- •Duplicating layers
- •Changing the stacking order of layers
- •Linking layers
- •Repositioning the contents of layers
- •Locking layers
- •Unifying layers (ImageReady)
- •Sampling from layers
- •Managing layers
- •Renaming layers
- •Color coding layers
- •Rasterizing layers
- •Deleting layers
- •Merging layers
- •Flattening all layers
- •Setting opacity and blending options
- •Setting layer opacity
- •Choosing a blending mode
- •Filling new layers with a neutral color
- •Specifying knockout options
- •Restricting blending to channels (Photoshop)
- •Grouping blend effects
- •Specifying a range for blending layers (Photoshop)
- •Using layer effects and styles
- •About layer effects and styles
- •Applying preset styles
- •Creating custom styles
- •Displaying layer styles
- •Editing styles
- •Modifying layer effects with contours (Photoshop)
- •Applying global lighting
- •Creating and managing preset styles
- •Copying and pasting styles
- •Scaling layer effects (Photoshop)
- •Removing layer effects
- •Converting layer styles to layers
- •Masking layers
- •About masking layers
- •Creating and editing layer masks
- •Creating and editing vector masks
- •Unlinking layers and masks
- •Applying and discarding layer masks
- •Selecting opaque areas on a layer
- •Creating clipping groups
- •Applying Filters for Special Effects
- •Loading images and textures
- •Using texture and glass surface controls
- •Tips for creating special effects
- •Choosing a Lighting Effects type
- •Choosing a Lighting Effects style
- •Using a Lighting Effects texture
- •Using Type
- •About type
- •Creating type
- •About using the type tools (Photoshop)
- •Entering point type
- •Entering paragraph type
- •Creating a type selection border (Photoshop)
- •Working with type layers
- •Editing text in type layers
- •Rasterizing type layers
- •Changing type layer orientation
- •Specifying anti-aliasing
- •Converting between point type and paragraph type
- •Warping type layers
- •Creating a work path from type (Photoshop)
- •Converting type to shapes (Photoshop)
- •Formatting characters
- •Selecting characters
- •Using the Character palette
- •Choosing a font
- •Choosing a type size
- •Changing the type color
- •Specifying leading
- •Specifying kerning and tracking
- •Adjusting horizontal or vertical scale
- •Specifying baseline shift
- •Changing case
- •Making characters superscript or subscript
- •Applying underline and strikethrough
- •Using ligatures and old style numerals
- •Using fractional character widths
- •Viewing text using the operating system layout
- •Rotating vertical type
- •Checking for spelling errors (Photoshop)
- •Finding and replacing text (Photoshop)
- •Formatting paragraphs
- •Selecting paragraphs and showing the Paragraph palette
- •Aligning and justifying type
- •Indenting paragraphs
- •Changing space above or below paragraphs
- •Specifying hanging punctuation
- •Adjusting hyphenation
- •Preventing unwanted word breaks
- •Adjusting spacing
- •Working with composition
- •About composition methods
- •Choosing a composition method
- •Setting options for Chinese, Japanese, and Korean type (Photoshop)
- •Displaying CJK type options
- •Adjusting tsume
- •Specifying how leading is measured
- •Using tate-chuu-yoko
- •Specifying left and right underlining
- •Working with Japanese composition
- •Using burasagari
- •Designing Web Pages
- •About designing Web pages with Photoshop and ImageReady
- •Creating and viewing slices
- •About slices
- •Types of slices
- •Creating user slices
- •Creating layer-based slices
- •Converting auto slices to user slices
- •Viewing slices
- •Selecting and modifying slices
- •Using the Slice palette (ImageReady)
- •Selecting slices
- •Moving and resizing user slices
- •Dividing user slices and auto slices
- •Duplicating slices
- •Combining slices (ImageReady)
- •Arranging user slices and layer-based slices
- •Aligning user slices (ImageReady)
- •Distributing user slices (ImageReady)
- •Deleting user slices and layer-based slices
- •Locking slices (Photoshop)
- •Specifying slice options
- •Viewing slice options
- •Choosing a content type
- •Specifying slice names
- •Specifying slice background colors
- •Assigning a URL to an Image slice
- •Resizing and moving slices using numeric coordinates
- •Specifying browser messages
- •Adding HTML text to a slice
- •Optimizing slices
- •Linking slices (ImageReady)
- •Creating and viewing image maps (ImageReady)
- •Creating image maps
- •Converting layer-based image maps to tool-based image maps
- •Viewing image maps
- •Selecting and modifying image maps (ImageReady)
- •Using the Image Map palette (ImageReady)
- •Selecting image maps
- •Duplicating image maps
- •Arranging image maps
- •Aligning tool-based image maps
- •Distributing tool-based image maps
- •Deleting image maps
- •Specifying image map options (ImageReady)
- •Selecting an image map type (ImageReady)
- •Creating Web photo galleries (Photoshop)
- •Customizing and creating Web photo gallery styles (Photoshop)
- •About Web photo gallery styles
- •Customizing Web photo gallery styles
- •Creating new Web photo gallery styles
- •Using tokens in Web photo gallery styles
- •Creating Rollovers and Animations (ImageReady)
- •About working with layers in rollovers and animations
- •Editing layers in rollover states and animation frames
- •Unifying and matching layers rollovers and animations
- •Using the Rollovers palette
- •Creating and editing rollovers
- •About rollovers
- •Creating slices for rollovers
- •Creating rollover states
- •Editing rollover states
- •Previewing rollover states
- •Adding animation to rollover states
- •Applying and creating rollover styles
- •Copying and pasting rollover states
- •Duplicating rollover states
- •Rearranging and deleting rollover states
- •Creating and editing animations
- •About animation
- •Using the Animation palette
- •Adding frames
- •Selecting frames
- •Editing frames
- •Rearranging and deleting frames
- •Copying and pasting frames
- •Tweening frames
- •Specifying looping
- •Specifying delay for frames
- •Adding layers to frames
- •Setting the frame disposal method
- •Flattening frames into layers
- •Viewing animations
- •Optimizing animations
- •Viewing animated images in Photoshop
- •Saving animations
- •Saving animations as animated GIFs
- •Saving animations as QuickTime movies
- •Opening animated GIFs
- •Opening QuickTime movies as animations
- •About optimization
- •Optimizing images
- •Using the Save for Web dialog box (Photoshop)
- •Working with slices in the Save for Web dialog box (Photoshop)
- •Using the Optimize palette (ImageReady)
- •Viewing optimized images (ImageReady)
- •Applying optimization settings
- •Optimization options for GIF and PNG-8 formats
- •Optimization options for JPEG format
- •Optimization options for PNG-24 format
- •Optimization options for WBMP format
- •Saving and resetting optimization settings
- •Resizing the image during optimization (Photoshop)
- •Controlling optimization (ImageReady)
- •Setting optimization preferences (ImageReady)
- •Using weighted optimization
- •About masks and weighted optimization
- •Using masks to modify JPEG quality
- •Using masks to modify GIF lossiness
- •Using masks to modify dithering
- •Using masks to modify color reduction
- •Optimizing colors in GIF and PNG-8 images
- •Viewing a color table
- •Generating a color table
- •Changing the display of the color table
- •Adding new colors to the color table
- •Including black and white in a color table
- •Selecting colors
- •Shifting colors
- •Shifting to Web-safe colors
- •Mapping colors to transparency
- •Locking colors in the color table
- •Deleting colors from the color table
- •Loading and saving color tables
- •Using master palettes (ImageReady)
- •Working with hexadecimal values for color
- •Viewing hexadecimal values for colors in the Info palette
- •Copying colors as hexadecimal values
- •Using a droplet to automate optimization settings (ImageReady)
- •Saving optimized images
- •Setting output options
- •Using the Output Settings dialog box
- •Setting HTML output options
- •Setting slice output options
- •Setting image map output options (ImageReady)
- •Setting background options
- •Adding title and copyright information to Web pages
- •Saving and Exporting Images
- •Saving images
- •Exporting images in ZoomView format (Photoshop)
- •Photoshop format
- •Photoshop 2.0 (Photoshop)
- •AVI (ImageReady)
- •Photoshop EPS
- •Photoshop DCS 1.0 and 2.0 (Photoshop)
- •EPS TIFF or EPS PICT Preview (Photoshop)
- •Filmstrip
- •JPEG
- •PICT File
- •PICT Resource
- •Pixar
- •QuickTime Movie (ImageReady)
- •Raw (Photoshop)
- •Scitex CT (Photoshop)
- •Targa
- •TIFF
- •Adding digital copyright information
- •Before adding a watermark
- •Embedding digital watermarks
- •Using the Watermark Durability setting
- •Using the signal strength meter
- •Creating multiple-image layouts (Photoshop)
- •Creating contact sheets
- •Creating picture packages
- •Customizing picture package layouts
- •Placing Photoshop images in other applications (Photoshop)
- •Using image clipping paths to create transparency
- •Printing image clipping paths
- •Exporting paths to Adobe Illustrator
- •Object linking and embedding (OLE) (Windows only)
- •Printing (Photoshop)
- •About printing
- •Printing images
- •Positioning and scaling images
- •Setting output options
- •Selecting halftone screen attributes
- •Printing part of an image
- •Choosing a print encoding method
- •Printing vector graphics
- •Using color management when printing
- •Creating color traps
- •Printing duotones
- •About duotones
- •Modifying the duotone curve
- •Specifying overprint colors
- •Saving and loading duotone settings
- •Viewing individual printing plates
- •Printing duotones
- •Exporting duotone images to other applications
- •Printing color separations
- •Automating Tasks
- •About actions
- •Using the Actions palette
- •Recording actions
- •Creating a new action
- •Recording paths (Photoshop)
- •Inserting stops
- •Setting modal controls
- •Excluding commands
- •Inserting nonrecordable commands (Photoshop)
- •Specifying an output folder (ImageReady)
- •Recording image size options (ImageReady)
- •Inserting optimization settings for selected slices (ImageReady)
- •Playing actions
- •Setting playback options (Photoshop)
- •Editing actions
- •Rearranging actions and commands
- •Recording additional commands
- •Rerecording and duplicating actions and commands
- •Deleting actions and commands
- •Changing action options
- •Managing actions in the Actions palette
- •Saving and loading actions (Photoshop)
- •Saving actions (ImageReady)
- •Organizing sets of actions (Photoshop)
- •Using the Batch command (Photoshop)
- •Using droplets
- •Creating a droplet from an action
- •Creating droplets for use on different operating systems
- •Editing droplets (ImageReady)
- •Using droplets to automate optimization settings (ImageReady)
- •Using the Automate commands (Photoshop)
- •External automation
- •Creating templates for data-driven graphics (ImageReady)
- •About data-driven graphics
- •Using variables
- •Using data sets
- •Previewing data-driven graphics
- •Saving templates for use with other Adobe products
- •Macintosh Shortcuts
- •Viewing
- •Selecting and moving objects
- •Painting
- •Editing
- •Path editing*
- •Slicing and Optimizing
- •Windows Shortcuts
- •Viewing
- •Selecting and moving objects
- •Painting
- •Editing
- •Path editing*
- •Slicing and Optimizing
- •Legal Notices
- •Copyright
- •Index
Adobe Photoshop Help |
Working with Color |
|
|
|
|
Using Help | Contents | Index |
Back |
86 |
Working with Color
About color modes and models (Photoshop)
A color mode determines the color model used to display and print images. Photoshop bases its color modes on established models for describing and reproducing color. Common models include HSB (hue, saturation, brightness); RGB (red, green, blue); CMYK (cyan, magenta, yellow, black); and CIE L*a*b*. Photoshop also includes modes for specialized color output such as Indexed Color and Duotone. ImageReady uses RGB mode to work with images.
In addition to determining the number of colors that can be displayed in an image, color modes affect the number of channels and the file size of an image.
You can set up the Info palette so that you can select any tool, position the pointer over any part of an image, and determine the color value under the pointer. You can
customize the Info palette and color samplers to express color values using HSB, RGB, CMYK, Lab, or Grayscale modes without changing the mode of the image itself. (See “Seeing the color values of pixels (Photoshop)” on page 133 and the procedure to change Info palette options in “Using the Info palette (Photoshop)” on page 32.)
HSB model
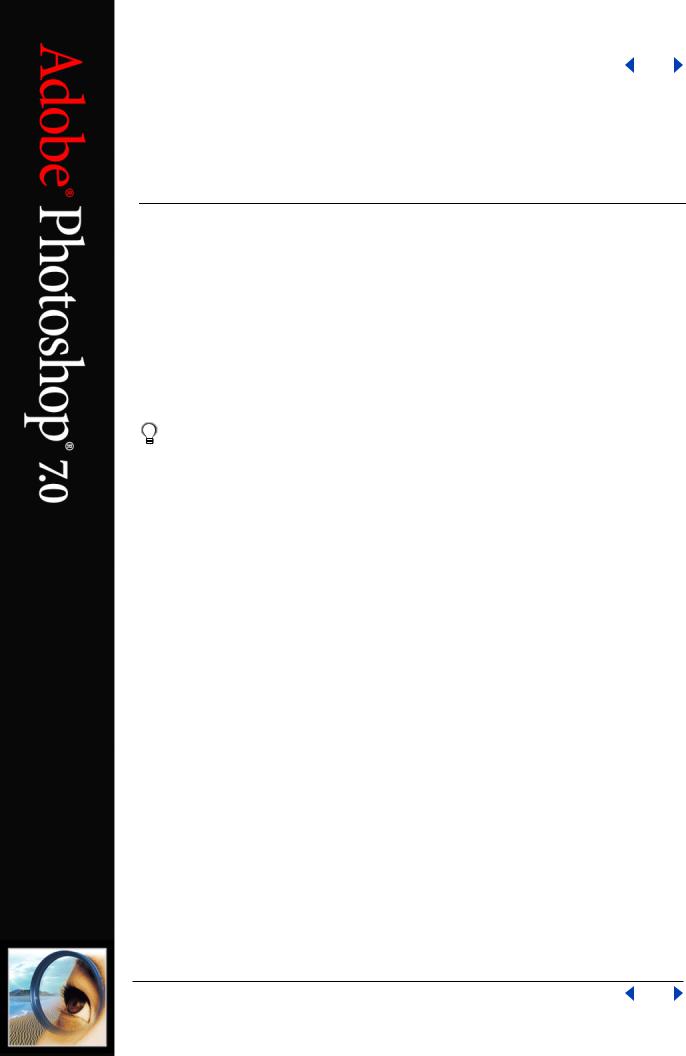
Based on the human perception of color, the HSB model describes three fundamental characteristics of color:
•Hue is the color reflected from or transmitted through an object. It is measured as a location on the standard color wheel, expressed as a degree between 0° and 360°.
In common use, hue is identified by the name of the color such as red, orange, or green.
•Saturation, sometimes called chroma, is the strength or purity of the color. Saturation represents the amount of gray in proportion to the hue, measured as a percentage from 0% (gray) to 100% (fully saturated). On the standard color wheel, saturation increases from the center to the edge.
•Brightness is the relative lightness or darkness of the color, usually measured as a percentage from 0% (black) to 100% (white).
Using Help | Contents | Index |
Back |
86 |
Adobe Photoshop Help |
Working with Color |
|
|
|
|
Using Help | Contents | Index |
Back |
87 |
Although you can use the HSB model in Photoshop to define a color in the Color palette or Color Picker dialog box, there is no HSB mode available for creating and editing images.
A
B
C
D
HSM model:
A. Saturation B. Hue C. Brightness D. All hues
RGB model
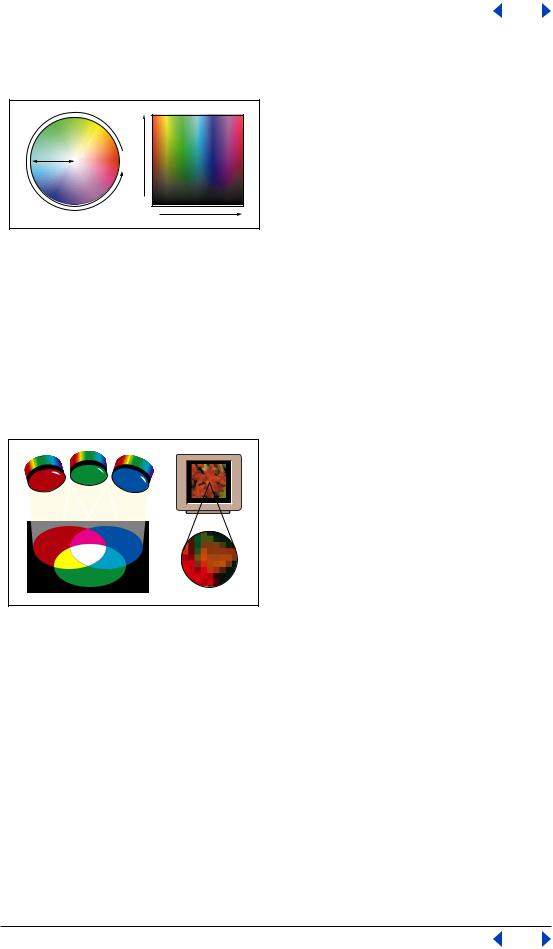
A large percentage of the visible spectrum can be represented by mixing red, green, and blue (RGB) colored light in various proportions and intensities. Where the colors overlap, they create cyan, magenta, yellow, and white.
Because the RGB colors combine to create white, they are also called additive colors. Adding all colors together creates white—that is, all visible wavelengths are transmitted back to the eye. Additive colors are used for lighting, video, and monitors. Your monitor, for example, creates color by emitting light through red, green, and blue phosphors.
Additive colors (RGB)
RGB mode
Photoshop’s RGB mode uses the RGB model, assigning an intensity value to each pixel ranging from 0 (black) to 255 (white) for each of the RGB components in a color image. For example, a bright red color might have an R value of 246, a G value of 20, and a B value of 50. When the values of all three components are equal, the result is a shade of neutral gray. When the value of all components is 255, the result is pure white; when the value is 0, pure black.
RGB images use three colors, or channels, to reproduce up to 16.7 million colors on-screen; the three channels translate to 24 (8 x 3) bits of color information per pixel. (In 16-bit-per- channel images, this translates to 48 bits per pixel, with the ability to reproduce many more colors.) In addition to being the default mode for new Photoshop images, the RGB model is used by computer monitors to display colors. This means that when working in color modes other than RGB, such as CMYK, Photoshop uses RGB mode for display on-screen.
Using Help | Contents | Index |
Back |
87 |
Adobe Photoshop Help |
Working with Color |
|
|
|
|
Using Help | Contents | Index |
Back |
88 |
Although RGB is a standard color model, the exact range of colors represented can vary, depending on the application or display device. Photoshop’s RGB mode varies according to the working space setting that you have specified in the Color Settings dialog box.
(See “About working spaces” on page 106.)
CMYK model
The CMYK model is based on the light-absorbing quality of ink printed on paper. As white light strikes translucent inks, certain visible wavelengths are absorbed while others are reflected back to your eyes.
In theory, pure cyan (C), magenta (M), and yellow (Y) pigments should combine to absorb all light and produce black. For this reason these colors are called subtractive colors. Because all printing inks contain some impurities, these three inks actually produce a muddy brown and must be combined with black (K) ink to produce a true black. (K is used instead of B to avoid confusion with blue.) Combining these inks to reproduce color is called four-color process printing.
The subtractive (CMY) and additive (RGB) colors are complementary colors. Each pair of subtractive colors creates an additive color, and vice versa.
Subtractive colors (CMYK)
CMYK mode
In Photoshop’s CMYK mode, each pixel is assigned a percentage value for each of the process inks. The lightest (highlight) colors are assigned small percentages of process ink colors, the darker (shadow) colors higher percentages. For example, a bright red might contain 2% cyan, 93% magenta, 90% yellow, and 0% black. In CMYK images, pure white is generated when all four components have values of 0%.
Use the CMYK mode when preparing an image to be printed using process colors. Converting an RGB image into CMYK creates a color separation. If you start with an RGB image, it’s best to edit first and then convert to CMYK. In RGB mode, you can use the Proof Setup commands to simulate the effects of a CMYK conversion without changing the actual image data. (See “Soft-proofing colors” on page 113.) You can also use CMYK mode to work directly with CMYK images scanned or imported from high-end systems.
Although CMYK is a standard color model, the exact range of colors represented can vary, depending on the press and printing conditions. Photoshop’s CMYK mode varies according to the working space setting that you have specified in the Color Settings dialog box. (See “About working spaces” on page 106.)
Using Help | Contents | Index |
Back |
88 |
Adobe Photoshop Help |
Working with Color |
|
|
|
|
Using Help | Contents | Index |
Back |
89 |
L*a*b model
The L*a*b color model is based on the model proposed by the Commission Internationale d’Eclairage (CIE) in 1931 as an international standard for color measurement. In 1976, this model was refined and named CIE L*a*b.
L*a*b color is designed to be device independent, creating consistent color regardless of the device (such as a monitor, printer, computer, or scanner) used to create or output the image.
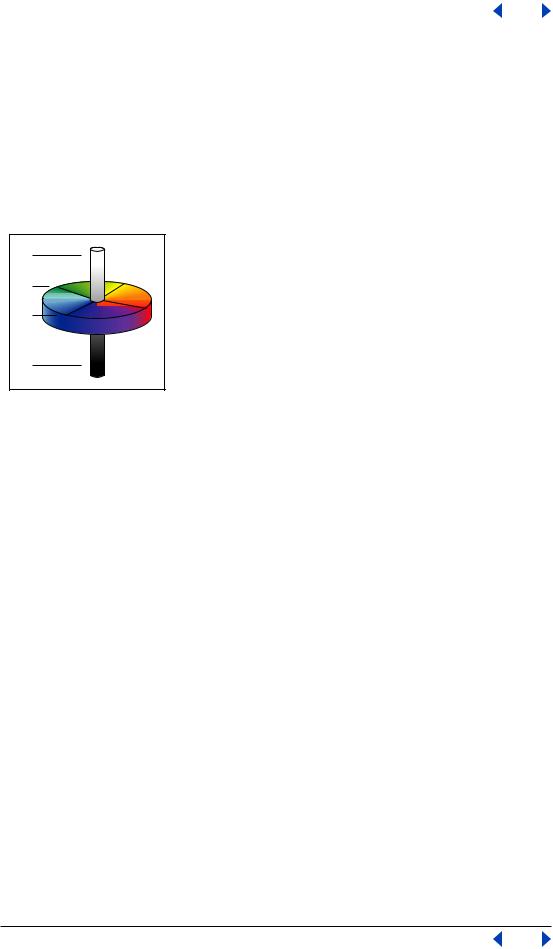
L*a*b color consists of a luminance or lightness component (L) and two chromatic components: the a component (from green to red) and the b component (from blue to yellow).
A |
B |
C |
D
L*a*b* model:
A. Luminance=100 (white) B. Green to red component C. Blue to yellow component D. Luminance=0 (black)
Lab mode
In Photoshop, Lab mode (the asterisks are dropped from the name) has a lightness component (L) that can range from 0 to 100. In the color picker, the a component (greenred axis) and the b component (blue-yellow axis) can range from +128 to –128. In the Color palette, the a component and the b component can range from +120 to –120.
You can use Lab mode to work with Photo CD images, edit the luminance and the color values in an image independently, move images between systems, and print to PostScript Level 2 and Level 3 printers. To print Lab images to other color PostScript devices, convert to CMYK first.
Lab color is the intermediate color model Photoshop uses when converting from one color mode to another.
Bitmap mode
This mode uses one of two color values (black or white) to represent the pixels in an image. Images in Bitmap mode are called bitmapped 1-bit images because they have a bit depth of 1. (See “Specifying 8-bit color display (Photoshop)” on page 91.)
Grayscale mode
This mode uses up to 256 shades of gray. Every pixel of a grayscale image has a brightness value ranging from 0 (black) to 255 (white). Grayscale values can also be measured as percentages of black ink coverage (0% is equal to white, 100% to black). Images produced using black-and-white or grayscale scanners typically are displayed in Grayscale mode.
Using Help | Contents | Index |
Back |
89 |