- •Using Help
- •About online Help
- •Navigating in Help
- •Using bookmarks, the table of contents, the index, and Find
- •Contents
- •Introduction
- •Welcome
- •Registration
- •Installing Adobe Photoshop and ImageReady
- •Getting started
- •If you are new to Photoshop:
- •If you are an experienced Photoshop user:
- •If you want to focus on Web features:
- •If you want to concentrate on photo editing and retouching:
- •If you want to focus on productivity features:
- •Using the printed documentation
- •Using online Help
- •Using tool tips
- •Using Web resources
- •About Adobe Online
- •Using Adobe Online
- •Accessing Adobe Online through the Help menu
- •Other learning resources
- •Customer support
- •Customer support on Adobe Online
- •Additional customer support resources
- •An Overview of Adobe Photoshop
- •Explore state-of-the-art tools
- •Edit images with ease
- •Enjoy unlimited creative options
- •Create compelling Web designs
- •Enjoy precise typographic control
- •Stay ahead of deadlines
- •Automate repetitive tasks
- •Maintain color precisely
- •What’s New in Photoshop 7.0
- •Meet every challenge
- •Stay competitive
- •Take advantage of tighter-than-ever integration
- •Looking at the Work Area
- •About the work area
- •Using the toolbox
- •Toolbox overview (1 of 3)
- •Toolbox overview (2 of 3)
- •Toolbox overview (3 of 3)
- •Using the tools
- •Using the tool pointers
- •Using the tool options bar
- •Using the palette well (Photoshop)
- •Using tool presets (Photoshop)
- •Using palettes
- •Changing the palette display
- •Docking palettes together
- •Customizing your workspace
- •Using pop-up sliders
- •Using pop-up palettes
- •Using the Info palette (Photoshop)
- •Using context menus
- •Viewing images
- •Changing the screen display mode
- •Using the document window
- •Navigating the view area
- •Magnifying and reducing the view
- •Correcting mistakes
- •Reverting to a previous version of an image
- •About the History palette
- •Using the History palette
- •Setting history options (Photoshop)
- •Making a snapshot of an image (Photoshop)
- •Painting with a state or snapshot of an image (Photoshop)
- •Duplicating images
- •Using rulers
- •Using columns (Photoshop)
- •Using the measure tool (Photoshop)
- •Using guides and the grid
- •Working with Extras
- •Displaying status information (Photoshop)
- •Annotating images (Photoshop)
- •Adding notes and audio annotations
- •Opening and editing annotations
- •Jumping between applications
- •Jumping between Photoshop and ImageReady
- •Jumping to other applications (ImageReady)
- •Previewing an image in a browser
- •Managing libraries with the Preset Manager (Photoshop)
- •Setting preferences
- •Resetting all warning dialogs
- •Monitoring operations
- •Using plug-in modules
- •Assigning scratch disks
- •Getting Images into Photoshop and ImageReady
- •About bitmap images and vector graphics
- •About image size and resolution
- •Changing image size and resolution
- •Displaying image size information
- •About resampling
- •Choosing an interpolation method
- •Changing the pixel dimensions of an image
- •Changing the print dimensions and resolution of an image (Photoshop)
- •Determining a recommended resolution for an image (Photoshop)
- •Scanning images
- •Importing scanned images
- •Importing an image using the TWAIN interface
- •Importing images using WIA (Windows Image Acquisition) Support
- •Scanning using the resolution setting (Photoshop)
- •Optimizing the dynamic range of the scan (Photoshop)
- •Eliminating unwanted color casts (Photoshop)
- •Creating new images
- •Opening and importing images
- •Opening PostScript artwork
- •Importing PICT resources (Mac OS)
- •Using the File Browser (Photoshop)
- •About workgroup management
- •Getting started with workgroup management
- •Logging on and off WebDAV servers
- •Saving changes to the server
- •Working with Color
- •About color modes and models (Photoshop)
- •HSB model
- •RGB model
- •RGB mode
- •CMYK model
- •CMYK mode
- •L*a*b model
- •Lab mode
- •Bitmap mode
- •Grayscale mode
- •Duotone mode
- •Indexed Color mode
- •Multichannel mode
- •Color gamuts (Photoshop)
- •Adjusting the monitor display
- •Specifying 8-bit color display (Photoshop)
- •Making previews display more quickly (Photoshop)
- •Adjusting color display for cross-platform variations
- •Channels and bit depth (Photoshop)
- •About color channels
- •About bit depth
- •Converting between bit depths
- •Converting between color modes (Photoshop)
- •Converting between Grayscale and Bitmap modes (Photoshop)
- •Making Grayscale and Bitmap mode conversions
- •Converting to indexed color (Photoshop)
- •Conversion options for indexed-color images (Photoshop)
- •Palette type
- •Number of colors
- •Color inclusion and transparency
- •Dithering
- •Customizing indexed color tables (Photoshop)
- •Using the color table to edit colors and assign transparency
- •Saving and loading color tables
- •Producing Consistent Color (Photoshop)
- •About color management
- •Do you need color management?
- •Creating a viewing environment for color management
- •Setting up color management
- •About working spaces
- •About color management policies
- •Working with policy warnings and messages
- •Customizing color management settings
- •Specifying working spaces
- •Specifying color management policies
- •Customizing advanced color management settings
- •Specifying a color management engine
- •Specifying a rendering intent
- •Using dither
- •Desaturating monitor colors
- •Blending RGB colors
- •Saving and loading color management settings
- •Synchronizing color management between applications
- •Calibrating versus characterizing a monitor
- •About monitor calibration settings
- •Calibrating with Adobe Gamma (Windows)
- •Entering custom CMYK settings
- •Specifying ink colors
- •Specifying dot gain
- •Adjusting the separation type and black generation
- •Printing a hard proof
- •Making Color and Tonal Adjustments
- •Basic steps for correcting images
- •1. Calibrate your monitor.
- •2. Check the scan quality and tonal range.
- •3. Adjust the tonal range.
- •4. Adjust the color balance.
- •5. Make other special color adjustments.
- •6. Sharpen the edges of the image.
- •Checking scan quality and tonal range (Photoshop)
- •Using the color adjustment tools
- •Making color adjustments
- •Seeing the color values of pixels (Photoshop)
- •Saving and reapplying settings
- •Comparing corrections in CMYK and RGB (Photoshop)
- •Identifying out-of-gamut colors (Photoshop)
- •Using the Levels dialog box
- •Using Levels to set highlights, shadows, and midtones
- •Using Levels to adjust color (Photoshop)
- •Using the Curves dialog box (Photoshop)
- •Using target values to set highlights and shadows (Photoshop)
- •Setting auto correction options (Photoshop)
- •Adjusting the gamma value of an image (ImageReady)
- •About the color wheel
- •Using the Color Balance command (Photoshop)
- •Using the Hue/Saturation command
- •Using the Replace Color command (Photoshop)
- •Using the Selective Color command (Photoshop)
- •Making quick overall adjustments to an image
- •Using the Brightness/Contrast command
- •Using the Auto Levels command
- •Using the Auto Contrast command
- •Using the Auto Color command (Photoshop)
- •Using the Variations command
- •Applying special color effects to images
- •Using the Desaturate command
- •Using the Invert command
- •Using the Equalize command (Photoshop)
- •Using the Threshold command (Photoshop)
- •Using the Posterize command (Photoshop)
- •Using the Gradient Map command (Photoshop)
- •Sharpening images
- •Selecting
- •About selections
- •Making pixel selections
- •Using the Select menu
- •Using the marquee tools
- •Using the lasso, polygonal lasso, and magnetic lasso tools
- •Setting options for the lasso, polygonal lasso, and magnetic lasso tools
- •Using the magic wand tool
- •Using the Color Range command (Photoshop)
- •Creating selections from slices (ImageReady)
- •Adjusting pixel selections
- •Moving, hiding, or inverting a selection
- •Adjusting selections manually
- •Adjusting selections numerically
- •Softening the edges of a selection
- •Moving, copying, and pasting selections and layers
- •Copying selections or layers
- •Using drag and drop to copy between applications
- •Using the Clipboard to copy between applications
- •Using the Snap command
- •Saving and loading selections
- •Deleting selections
- •Removing fringe pixels from a selection (Photoshop)
- •Extracting objects from their background (Photoshop)
- •Transforming and Retouching
- •Changing the size of the work canvas
- •Cropping images
- •Transforming perspective while cropping (Photoshop)
- •Transforming objects in two dimensions
- •Specifying what to transform
- •Setting the reference point
- •Applying transformations
- •Using the Free Transform command
- •Transforming objects in three dimensions
- •Transforming and manipulating objects
- •Modifying the preview image
- •Setting 3D rendering options
- •Cloning and repairing images
- •Using the clone stamp tool
- •Using the pattern stamp tool
- •Using the healing brush tool (Photoshop)
- •Using the patch tool (Photoshop)
- •Retouching images
- •Using the smudge tool
- •Using the focus tools
- •Using the toning tools
- •Using the sponge tool
- •Using the Liquify command
- •Using the Liquify dialog box
- •Distorting images
- •Freezing and thawing areas
- •Reconstructing distortions
- •Saving and loading distortions
- •Drawing
- •About drawing and painting
- •Drawing shapes and paths
- •About the drawing tools
- •Creating shape layers
- •Creating a work path (Photoshop)
- •Creating rasterized shapes
- •Using the shape tools
- •Setting shape tool options
- •Using preset shapes (Photoshop)
- •Controlling a shape as you draw it
- •Using the pen tools (Photoshop)
- •Drawing with the pen tool
- •Drawing curves with the pen tool
- •Drawing with the freeform pen tool
- •Editing shape layers
- •Using the Paths palette (Photoshop)
- •Editing paths (Photoshop)
- •About anchor points, direction lines, direction points, and components
- •Selecting paths (Photoshop)
- •Moving, reshaping, and deleting path segments
- •Moving, reshaping, copying, and deleting path components
- •Aligning and distributing path components
- •Adding, deleting, and converting anchor points
- •Managing paths (Photoshop)
- •Converting between paths and selection borders (Photoshop)
- •Converting paths to selection borders
- •Converting selection borders to paths
- •Adding color to paths (Photoshop)
- •Filling paths with color
- •Stroking to paint path borders
- •Painting
- •Using the painting tools (Photoshop)
- •Using the painting tools (ImageReady)
- •Erasing
- •Using the eraser tool
- •Using the magic eraser tool
- •Using the background eraser tool (Photoshop)
- •Using the Auto Erase option
- •Using the art history brush tool (Photoshop)
- •Working with brushes
- •Using the Brushes palette (Photoshop)
- •Selecting preset brushes
- •Customizing brush tips (Photoshop)
- •About brush dynamics (Photoshop)
- •Specifying brush shape dynamics (Photoshop)
- •Specifying brush scattering (Photoshop)
- •Creating textured brushes (Photoshop)
- •Creating dual brushes (Photoshop)
- •Specifying color dynamics (Photoshop)
- •Specifying paint dynamics (Photoshop)
- •Adding noise to brush strokes (Photoshop)
- •Using wet brush edges (Photoshop)
- •Creating airbrush effects (Photoshop)
- •Smoothing brush strokes (Photoshop)
- •Protecting texture in brush strokes (Photoshop)
- •Copying textures between tools (Photoshop)
- •Clearing brush options (Photoshop)
- •Creating and managing preset brushes (Photoshop)
- •Setting options for painting and editing tools
- •Selecting a blending mode
- •Using the gradient tool (Photoshop)
- •Specifying the gradient transparency
- •Managing gradients
- •Using the paint bucket tool
- •Filling and stroking selections and layers
- •Filling a selection or layer with colors or patterns
- •Stroking a selection or layer with color
- •Creating and managing patterns
- •Managing patterns (Photoshop)
- •Using the Pattern Maker
- •Generating patterns
- •Previewing patterns
- •Reviewing tiles and pattern previews
- •Specifying pattern smoothness and detail
- •Choosing foreground and background colors
- •Using color settings in the toolbox
- •Using the eyedropper tool
- •Using the Color palette
- •Using the Swatches palette
- •Using the Adobe Color Picker
- •Specifying a color using numeric values
- •Using Web-safe colors
- •Recognizing nonprintable colors (Photoshop)
- •Choosing custom colors (Photoshop)
- •Choosing a custom color system (Photoshop)
- •Using other color pickers
- •Using Channels and Masks
- •About channels
- •Using the Channels palette (Photoshop)
- •Viewing channels
- •Changing the display of the palette
- •Selecting and editing channels
- •Managing channels (Photoshop)
- •Rearranging and renaming channels
- •Duplicating channels
- •Splitting channels into separate images
- •Merging channels
- •Deleting channels
- •Mixing color channels (Photoshop)
- •Adding spot colors (Photoshop)
- •About spot colors
- •Creating spot channels
- •Modifying spot channels
- •Adjusting overlapping spot colors
- •Using channel calculations to blend layers and channels (Photoshop)
- •Using the Apply Image command
- •Using the Calculations command
- •About the Add and Subtract blending modes
- •About masks (Photoshop)
- •Creating temporary masks in Quick Mask mode (Photoshop)
- •Storing masks in alpha channels
- •About alpha channels (Photoshop)
- •Creating alpha channels (Photoshop)
- •Saving a mask selection
- •Modifying alpha channels (Photoshop)
- •Loading a selection into an image
- •Using Layers
- •About layers
- •Using the Layers palette
- •Creating layers and layer sets
- •About the background layer
- •Adding layers and layer sets
- •Working with layered images
- •Selecting layers
- •Displaying the contents of layers
- •Duplicating layers
- •Changing the stacking order of layers
- •Linking layers
- •Repositioning the contents of layers
- •Locking layers
- •Unifying layers (ImageReady)
- •Sampling from layers
- •Managing layers
- •Renaming layers
- •Color coding layers
- •Rasterizing layers
- •Deleting layers
- •Merging layers
- •Flattening all layers
- •Setting opacity and blending options
- •Setting layer opacity
- •Choosing a blending mode
- •Filling new layers with a neutral color
- •Specifying knockout options
- •Restricting blending to channels (Photoshop)
- •Grouping blend effects
- •Specifying a range for blending layers (Photoshop)
- •Using layer effects and styles
- •About layer effects and styles
- •Applying preset styles
- •Creating custom styles
- •Displaying layer styles
- •Editing styles
- •Modifying layer effects with contours (Photoshop)
- •Applying global lighting
- •Creating and managing preset styles
- •Copying and pasting styles
- •Scaling layer effects (Photoshop)
- •Removing layer effects
- •Converting layer styles to layers
- •Masking layers
- •About masking layers
- •Creating and editing layer masks
- •Creating and editing vector masks
- •Unlinking layers and masks
- •Applying and discarding layer masks
- •Selecting opaque areas on a layer
- •Creating clipping groups
- •Applying Filters for Special Effects
- •Loading images and textures
- •Using texture and glass surface controls
- •Tips for creating special effects
- •Choosing a Lighting Effects type
- •Choosing a Lighting Effects style
- •Using a Lighting Effects texture
- •Using Type
- •About type
- •Creating type
- •About using the type tools (Photoshop)
- •Entering point type
- •Entering paragraph type
- •Creating a type selection border (Photoshop)
- •Working with type layers
- •Editing text in type layers
- •Rasterizing type layers
- •Changing type layer orientation
- •Specifying anti-aliasing
- •Converting between point type and paragraph type
- •Warping type layers
- •Creating a work path from type (Photoshop)
- •Converting type to shapes (Photoshop)
- •Formatting characters
- •Selecting characters
- •Using the Character palette
- •Choosing a font
- •Choosing a type size
- •Changing the type color
- •Specifying leading
- •Specifying kerning and tracking
- •Adjusting horizontal or vertical scale
- •Specifying baseline shift
- •Changing case
- •Making characters superscript or subscript
- •Applying underline and strikethrough
- •Using ligatures and old style numerals
- •Using fractional character widths
- •Viewing text using the operating system layout
- •Rotating vertical type
- •Checking for spelling errors (Photoshop)
- •Finding and replacing text (Photoshop)
- •Formatting paragraphs
- •Selecting paragraphs and showing the Paragraph palette
- •Aligning and justifying type
- •Indenting paragraphs
- •Changing space above or below paragraphs
- •Specifying hanging punctuation
- •Adjusting hyphenation
- •Preventing unwanted word breaks
- •Adjusting spacing
- •Working with composition
- •About composition methods
- •Choosing a composition method
- •Setting options for Chinese, Japanese, and Korean type (Photoshop)
- •Displaying CJK type options
- •Adjusting tsume
- •Specifying how leading is measured
- •Using tate-chuu-yoko
- •Specifying left and right underlining
- •Working with Japanese composition
- •Using burasagari
- •Designing Web Pages
- •About designing Web pages with Photoshop and ImageReady
- •Creating and viewing slices
- •About slices
- •Types of slices
- •Creating user slices
- •Creating layer-based slices
- •Converting auto slices to user slices
- •Viewing slices
- •Selecting and modifying slices
- •Using the Slice palette (ImageReady)
- •Selecting slices
- •Moving and resizing user slices
- •Dividing user slices and auto slices
- •Duplicating slices
- •Combining slices (ImageReady)
- •Arranging user slices and layer-based slices
- •Aligning user slices (ImageReady)
- •Distributing user slices (ImageReady)
- •Deleting user slices and layer-based slices
- •Locking slices (Photoshop)
- •Specifying slice options
- •Viewing slice options
- •Choosing a content type
- •Specifying slice names
- •Specifying slice background colors
- •Assigning a URL to an Image slice
- •Resizing and moving slices using numeric coordinates
- •Specifying browser messages
- •Adding HTML text to a slice
- •Optimizing slices
- •Linking slices (ImageReady)
- •Creating and viewing image maps (ImageReady)
- •Creating image maps
- •Converting layer-based image maps to tool-based image maps
- •Viewing image maps
- •Selecting and modifying image maps (ImageReady)
- •Using the Image Map palette (ImageReady)
- •Selecting image maps
- •Duplicating image maps
- •Arranging image maps
- •Aligning tool-based image maps
- •Distributing tool-based image maps
- •Deleting image maps
- •Specifying image map options (ImageReady)
- •Selecting an image map type (ImageReady)
- •Creating Web photo galleries (Photoshop)
- •Customizing and creating Web photo gallery styles (Photoshop)
- •About Web photo gallery styles
- •Customizing Web photo gallery styles
- •Creating new Web photo gallery styles
- •Using tokens in Web photo gallery styles
- •Creating Rollovers and Animations (ImageReady)
- •About working with layers in rollovers and animations
- •Editing layers in rollover states and animation frames
- •Unifying and matching layers rollovers and animations
- •Using the Rollovers palette
- •Creating and editing rollovers
- •About rollovers
- •Creating slices for rollovers
- •Creating rollover states
- •Editing rollover states
- •Previewing rollover states
- •Adding animation to rollover states
- •Applying and creating rollover styles
- •Copying and pasting rollover states
- •Duplicating rollover states
- •Rearranging and deleting rollover states
- •Creating and editing animations
- •About animation
- •Using the Animation palette
- •Adding frames
- •Selecting frames
- •Editing frames
- •Rearranging and deleting frames
- •Copying and pasting frames
- •Tweening frames
- •Specifying looping
- •Specifying delay for frames
- •Adding layers to frames
- •Setting the frame disposal method
- •Flattening frames into layers
- •Viewing animations
- •Optimizing animations
- •Viewing animated images in Photoshop
- •Saving animations
- •Saving animations as animated GIFs
- •Saving animations as QuickTime movies
- •Opening animated GIFs
- •Opening QuickTime movies as animations
- •About optimization
- •Optimizing images
- •Using the Save for Web dialog box (Photoshop)
- •Working with slices in the Save for Web dialog box (Photoshop)
- •Using the Optimize palette (ImageReady)
- •Viewing optimized images (ImageReady)
- •Applying optimization settings
- •Optimization options for GIF and PNG-8 formats
- •Optimization options for JPEG format
- •Optimization options for PNG-24 format
- •Optimization options for WBMP format
- •Saving and resetting optimization settings
- •Resizing the image during optimization (Photoshop)
- •Controlling optimization (ImageReady)
- •Setting optimization preferences (ImageReady)
- •Using weighted optimization
- •About masks and weighted optimization
- •Using masks to modify JPEG quality
- •Using masks to modify GIF lossiness
- •Using masks to modify dithering
- •Using masks to modify color reduction
- •Optimizing colors in GIF and PNG-8 images
- •Viewing a color table
- •Generating a color table
- •Changing the display of the color table
- •Adding new colors to the color table
- •Including black and white in a color table
- •Selecting colors
- •Shifting colors
- •Shifting to Web-safe colors
- •Mapping colors to transparency
- •Locking colors in the color table
- •Deleting colors from the color table
- •Loading and saving color tables
- •Using master palettes (ImageReady)
- •Working with hexadecimal values for color
- •Viewing hexadecimal values for colors in the Info palette
- •Copying colors as hexadecimal values
- •Using a droplet to automate optimization settings (ImageReady)
- •Saving optimized images
- •Setting output options
- •Using the Output Settings dialog box
- •Setting HTML output options
- •Setting slice output options
- •Setting image map output options (ImageReady)
- •Setting background options
- •Adding title and copyright information to Web pages
- •Saving and Exporting Images
- •Saving images
- •Exporting images in ZoomView format (Photoshop)
- •Photoshop format
- •Photoshop 2.0 (Photoshop)
- •AVI (ImageReady)
- •Photoshop EPS
- •Photoshop DCS 1.0 and 2.0 (Photoshop)
- •EPS TIFF or EPS PICT Preview (Photoshop)
- •Filmstrip
- •JPEG
- •PICT File
- •PICT Resource
- •Pixar
- •QuickTime Movie (ImageReady)
- •Raw (Photoshop)
- •Scitex CT (Photoshop)
- •Targa
- •TIFF
- •Adding digital copyright information
- •Before adding a watermark
- •Embedding digital watermarks
- •Using the Watermark Durability setting
- •Using the signal strength meter
- •Creating multiple-image layouts (Photoshop)
- •Creating contact sheets
- •Creating picture packages
- •Customizing picture package layouts
- •Placing Photoshop images in other applications (Photoshop)
- •Using image clipping paths to create transparency
- •Printing image clipping paths
- •Exporting paths to Adobe Illustrator
- •Object linking and embedding (OLE) (Windows only)
- •Printing (Photoshop)
- •About printing
- •Printing images
- •Positioning and scaling images
- •Setting output options
- •Selecting halftone screen attributes
- •Printing part of an image
- •Choosing a print encoding method
- •Printing vector graphics
- •Using color management when printing
- •Creating color traps
- •Printing duotones
- •About duotones
- •Modifying the duotone curve
- •Specifying overprint colors
- •Saving and loading duotone settings
- •Viewing individual printing plates
- •Printing duotones
- •Exporting duotone images to other applications
- •Printing color separations
- •Automating Tasks
- •About actions
- •Using the Actions palette
- •Recording actions
- •Creating a new action
- •Recording paths (Photoshop)
- •Inserting stops
- •Setting modal controls
- •Excluding commands
- •Inserting nonrecordable commands (Photoshop)
- •Specifying an output folder (ImageReady)
- •Recording image size options (ImageReady)
- •Inserting optimization settings for selected slices (ImageReady)
- •Playing actions
- •Setting playback options (Photoshop)
- •Editing actions
- •Rearranging actions and commands
- •Recording additional commands
- •Rerecording and duplicating actions and commands
- •Deleting actions and commands
- •Changing action options
- •Managing actions in the Actions palette
- •Saving and loading actions (Photoshop)
- •Saving actions (ImageReady)
- •Organizing sets of actions (Photoshop)
- •Using the Batch command (Photoshop)
- •Using droplets
- •Creating a droplet from an action
- •Creating droplets for use on different operating systems
- •Editing droplets (ImageReady)
- •Using droplets to automate optimization settings (ImageReady)
- •Using the Automate commands (Photoshop)
- •External automation
- •Creating templates for data-driven graphics (ImageReady)
- •About data-driven graphics
- •Using variables
- •Using data sets
- •Previewing data-driven graphics
- •Saving templates for use with other Adobe products
- •Macintosh Shortcuts
- •Viewing
- •Selecting and moving objects
- •Painting
- •Editing
- •Path editing*
- •Slicing and Optimizing
- •Windows Shortcuts
- •Viewing
- •Selecting and moving objects
- •Painting
- •Editing
- •Path editing*
- •Slicing and Optimizing
- •Legal Notices
- •Copyright
- •Index
Adobe Photoshop Help |
Looking at the Work Area |
|
|
|
|
Using Help | Contents | Index |
Back |
38 |
•Select the area you want to restore, and choose Edit > Fill. For Use, choose History, and click OK. (See “Filling and stroking selections and layers” on page 249.)
Note: To restore the image with a snapshot of the initial state of the document, choose History Options from the Palette menu and make sure that the Automatically Create First Snapshot option is on.
Reverting to a previous version of an image
The History palette lets you jump to any recent state of the image created during the current working session. Each time you apply a change to an image, the new state of that image is added to the palette.
For example, if you select, paint, and rotate part of an image, each of those states is listed separately in the palette.You can then select any of the states, and the image will revert to how it looked when that change was first applied. You can then work from that state.
About the History palette
Note the following guidelines when using the History palette:
•Program-wide changes, such as changes to palettes, color settings, actions, and preferences, are not changes to a particular image and so are not added to the History palette.
•By default, the History palette lists the previous 20 states. Older states are automatically deleted to free more memory for Photoshop. To keep a particular state throughout your work session, make a snapshot of the state. For more information, see “Making a snapshot of an image (Photoshop)” on page 40.
•Once you close and reopen the document, all states and snapshots from the last working session are cleared from the palette.
•By default, a snapshot of the initial state of the document is displayed at the top of the palette.
•States are added from the top down. That is, the oldest state is at the top of the list, the most recent one at the bottom.
•Each state is listed with the name of the tool or command used to change the image.
•By default, selecting a state dims those below. This way you can easily see which changes will be discarded if you continue working from the selected state. For information on customizing the history options, see “Setting history options (Photoshop)” on page 40.
•By default, selecting a state and then changing the image eliminates all states that come after.
•If you select a state and then change the image, eliminating the states that came after, you can use the Undo command to undo the last change and restore the eliminated states.
•By default, deleting a state deletes that state and those that came after it. If you choose the Allow Non-Linear History option, deleting a state deletes just that state. For more information, see “Setting history options (Photoshop)” on page 40.
Using Help | Contents | Index |
Back |
38 |
Adobe Photoshop Help |
Looking at the Work Area |
|
|
|
|
Using Help | Contents | Index |
Back |
39 |
Using the History palette
You can use the History palette to revert to a previous state of an image, to delete an image’s states, and in Photoshop, to create a document from a state or snapshot.
A
B
C
D
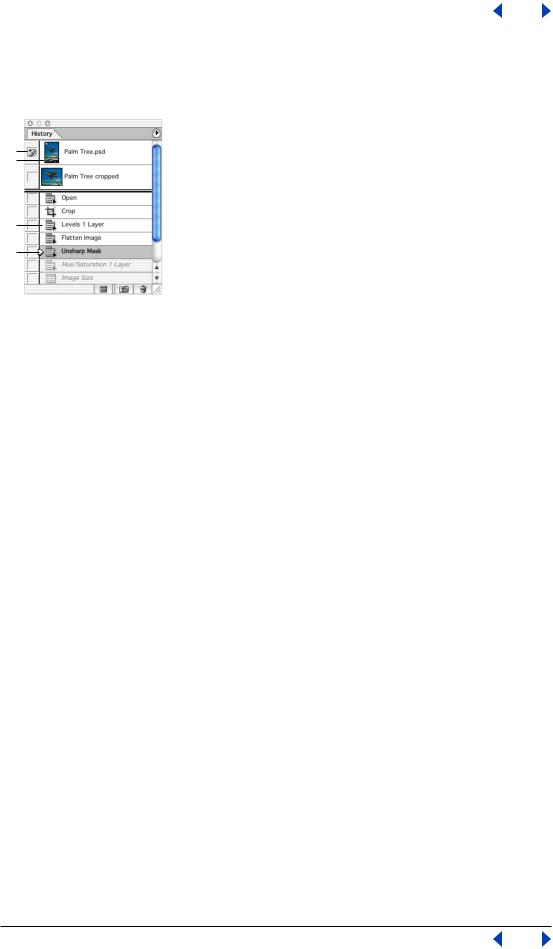
Photoshop History palette:
A. Sets the source for the history brush B. Thumbnail of a snapshot C. History state D. History state slider
To display the History palette:
Choose Window > History, or click the History palette tab.
To revert to a previous state of an image:
Do any of the following:
•Click the name of the state.
•Drag the slider at the left of the state up or down to a different state.
•(Photoshop) Choose Step Forward or Step Backward from the palette menu or the Edit menu to move to the next or previous state.
To delete one or more states of the image (Photoshop):
Do one of the following:
•Click the name of the state, and choose Delete from the History palette menu to delete that change and those that came after it.
•Drag the state to the Trash button to delete that change and those that came after it.
•Choose Clear History from the palette menu to delete the list of states from the History palette, without changing the image. This option doesn’t reduce the amount of memory used by Photoshop.
•Hold down Alt (Windows) or Option (Mac OS), and choose Clear History from the palette menu to purge the list of states from the History palette without changing the image. If you get a message that Photoshop is low on memory, purging states is useful, since the command deletes the states from the Undo buffer and frees up memory.
Important: This action cannot be undone.
•Choose Edit > Purge > Histories to purge the list of states from the History palette for all open documents.
Important: This action cannot be undone.
Using Help | Contents | Index |
Back |
39 |
Adobe Photoshop Help |
Looking at the Work Area |
|
|
|
|
Using Help | Contents | Index |
Back |
40 |
To delete all of an image’s states (ImageReady):
Choose Clear Undo/Redo History from the History palette menu.
Important: This action cannot be undone.
To create a new document from the selected state or snapshot of the image (Photoshop):
Do one of the following:
•Drag a state or snapshot onto the New Document button .
•Select a state or snapshot, and click the New Document button.
•Select a state or snapshot, and choose New Document from the History palette menu. The history list for the newly created document will be empty.
To save one or more snapshots or image states for use in a later editing session, create a new file for each state you save, and save each in a separate file. When you reopen
your original file, plan to open the other saved files also. You can drag each file’s initial snapshot to the original image and thus access the snapshots again from the original image’s History palette.
To replace an existing document with a selected state (Photoshop):
Drag the state onto the document.
Setting history options (Photoshop)
You can specify the maximum number of items to include in the History palette and set other options that customize the way you work with the palette.
To set history options:
1Choose History Options from the History palette menu.
2Select an option:
•Automatically Create First Snapshot to automatically create a snapshot of the initial state of the image when the document is opened.
•Automatically Create New Snapshot When Saving to generate a snapshot every time you save.
•Allow Non-Linear History to make changes to a selected state without deleting the states that come after. Normally, when you select a state and change the image, all states that come after the selected one are deleted. This enables the History palette to display a list of the editing steps in the order you made them. By recording states in a nonlinear way, you can select a state, make a change to the image, and delete just that state. The change will be appended at the end of the list.
•Show New Snapshot Dialog By Default to force Photoshop to prompt you for snapshot names even when using the buttons on the palette.
Making a snapshot of an image (Photoshop)
The Snapshot command lets you make a temporary copy (or snapshot) of any state of the image.The new snapshot is added to the list of snapshots at the top of the History palette. Selecting a snapshot lets you work from that version of the image.
Using Help | Contents | Index |
Back |
40 |
Adobe Photoshop Help |
Looking at the Work Area |
|
|
|
|
Using Help | Contents | Index |
Back |
41 |
Snapshots are similar to the states listed in the History palette, but they offer additional advantages:
•You can name a snapshot to make it easy to identify.
•Snapshots can be stored for an entire work session.
•You can compare effects easily. For example, you can take a snapshot before and after applying a filter. Then select the first snapshot, and try the same filter with different settings. Switch between the snapshots to find the settings you like best.
•With snapshots, you can recover your work easily. When you experiment with a complex technique or apply an action, take a snapshot first. If you’re not satisfied with the results, you can select the snapshot to undo all the steps.
Important: Snapshots are not saved with the image—closing an image deletes its snapshots. Also, unless you select the Allow Non-Linear History option, selecting a snapshot and changing the image deletes all of the states currently listed in the History palette.
To create a snapshot:
1Select a state.
2To automatically create a snapshot, click the New Snapshot button on the History palette, or if Automatically Create New Snapshot When Saving is selected in the history options, choose New Snapshot from the History palette menu.
3To set options when creating a snapshot, choose New Snapshot from the History palette menu, or Alt-click (Windows) or Option-click (Mac OS) the New Snapshot button.
4Enter the name of the Snapshot in the Name text box.
5For From, select the snapshot contents:
•Full Document to make a snapshot of all layers in the image at that state.
•Merged Layers to make a snapshot that merges all layers in the image at that state.
•Current Layer to make a snapshot of only the currently selected layer at that state.
To select a snapshot:
Do any of the following:
•Click the name of the snapshot.
•Drag the slider at the left of the snapshot up or down to a different snapshot.
To rename a snapshot:
Double-click the snapshot and enter a name.
To delete a snapshot:
Do one of the following:
•Select the snapshot, and choose Delete from the palette menu.
•Select the snapshot, and click the Trash button .
•Drag the snapshot to the Trash button.
Using Help | Contents | Index |
Back |
41 |