


Adobe Photoshop Help |
Using Layers |
|
|
|
|
Using Help | Contents | Index |
Back |
295 |
Flattening all layers
In a flattened image, all visible layers are merged into the background, which greatly reduces the file size. Flattening an image discards all hidden layers and fills the remaining transparent areas with white. In most cases, you won’t want to flatten a file until you have finished editing the individual layers.
Note: Converting an image between some color modes flattens the file. Be sure to save a copy of your file that includes all layers if you want to edit the original image after the conversion.
To flatten an image:
1Make sure that all the layers you want to keep are visible.
2Choose Layer > Flatten Image, or choose Flatten Image from the Layers palette menu.
Tracking file size
File size depends on the pixel dimensions of an image and the number of layers contained in the image. Images with more pixels may produce more detail when printed, but they require more disk space to store and may be slower to edit and print. You should keep track of your file sizes to make sure the files are not becoming too large for your purposes. If the file is becoming too large, reduce the number of layers in the image or change the image size.
You can view file size information for an image at the bottom of the application window (Windows) or document window (Mac OS). For more information, see “Displaying file and image information” on page 48.
Setting opacity and blending options
A layer’s opacity and blending options determine how its pixels interact with pixels on other layers.
Setting layer opacity
A layer’s opacity determines to what degree it obscures or reveals the layer beneath it.
A layer with 1% opacity appears nearly transparent, while one with 100% opacity appears completely opaque.
To specify opacity for a layer or layer set:
1 Select a layer or layer set in the Layers palette.
Note: You cannot change the opacity of a background layer or a locked layer.
2 Do one of the following:
•In the Layers palette, enter a value in the Opacity text box or drag the Opacity pop-up slider.
•(Photoshop) Double-click a layer thumbnail, choose Layer > Layer Style > Blending Options, or choose Blending Options from the Layers palette menu. Enter a value in the Opacity text box or drag the Opacity pop-up slider.
Note: To view blending options for a text layer in Photoshop, choose Layer > Layer Style > Blending Options, or choose Blending Options from the Layers palette menu.
Using Help | Contents | Index |
Back |
295 |

Adobe Photoshop Help |
Using Layers |
|
|
|
|
Using Help | Contents | Index |
Back |
296 |
•(ImageReady) Double-click a layer thumbnail, and enter a value in the Opacity text box or drag the Opacity pop-up slider.
Choosing a blending mode
A layer’s blending mode determines how its pixels blend with underlying pixels in the image. You can create a variety of special effects using blending modes.
By default, the blending mode of a layer set is Pass Through, which means that the layer set has no blending properties of its own.When you choose a different blending mode for a layer set, you effectively change the order in which the entire image is composited. All of the layers in the layer set are composited first.The composited layer set is then treated as a single image, and blended with the rest of the image using the selected blending mode. Thus, if you choose a blending mode other than Pass Through for the layer set, none of the adjustment layers or layer blending modes inside the layer set will apply to layers outside the set.
For a description of each blending mode, see “Selecting a blending mode” on page 241.
Note: There is no Clear blending mode for layers. In addition, the Color Dodge, Color Burn, Darken, Lighten, Difference, and Exclusion modes are unavailable for Lab images.
To specify a blending mode for a layer or layer set:
1Select a layer or layer set in the Layers palette.
2Choose a blending mode:
•In the Layers palette, choose an option from the Blend Mode pop-up menu.
•(Photoshop) Double-click a layer thumbnail, choose Layer > Layer Style > Blending Options, or choose Blending Options from the Layers palette menu. Choose an option from the Blend Mode pop-up menu.
Note: To view blending options for a text layer in Photoshop, choose Layer > Layer Style > Blending Options, or choose Blending Options from the Layers palette menu.
•(ImageReady) Double-click a layer thumbnail, and choose an option from the Blend Mode pop-up menu.
Filling new layers with a neutral color
Some filters (such as the Lighting Effects filter) cannot be applied to layers with no pixels. Selecting Fill with Mode-neutral color in the New Layer dialog box resolves this problem by first filling the layer with a preset, neutral color. The neutral color is assigned based on the layer’s blending mode and is invisible. If no effect is applied, filling with a neutral color has no effect on the remaining layers. The Fill with Neutral Color option is not available for layers that use the Normal, Dissolve, Hue, Saturation, Color, or Luminosity modes.
Specifying fill opacity
In addition to setting opacity for a layer, which affects any layer styles and blending modes applied to the layer, you can specify a fill opacity for layers. Fill opacity affects pixels painted in a layer or shapes drawn on a layer without affecting the opacity of any layer effects that have been applied to the layer.
Using Help | Contents | Index |
Back |
296 |
Adobe Photoshop Help |
Using Layers |
|
|
|
|
Using Help | Contents | Index |
Back |
297 |
To specify fill opacity for a layer:
Do one of the following:
•(Photoshop) In the Layers palette, enter a value in the Fill Opacity text box or drag the Fill Opacity pop-up slider.
•(Photoshop) Double-click a layer thumbnail, choose Layer > Layer Style > Blending Options, or choose Blending Options from the Layers palette menu. Enter a value in the Fill Opacity text box.
Note: To view blending options for a text layer in Photoshop, choose Layer > Layer Style > Blending Options, or choose Blending Options from the Layers palette menu.
•(ImageReady) Choose Window > Layer Options/Style, and enter a value in the Fill Opacity text box. If the Fill Opacity text box is not showing, choose Show Options from the Layer Options palette menu or click the Show Options button  on the palette’s tab.
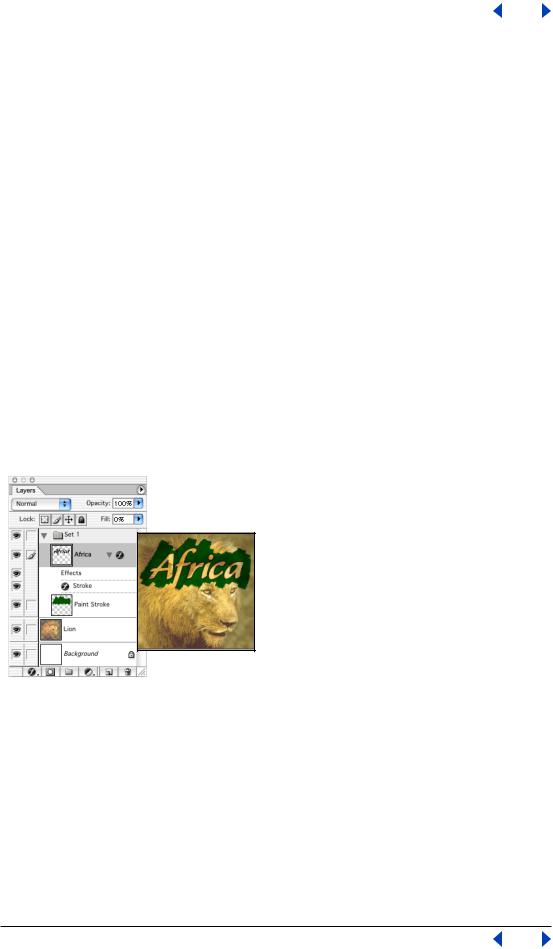
Specifying knockout options
Knockout options let you specify which layers “punch through” to reveal content from other layers. For example, you can use a text layer to knock out a color adjustment layer and reveal a portion of the image using the original colors.
To create a knockout effect, you need to decide which layer will create the shape of the knockout, which layers will be punched through, and which layer will be revealed. If you want to reveal a layer other than the Background, you can place the layers you want to use in a layer set or clipping group.
Africa text with shallow knockout to lion layer
To create a knockout:
1 Do one of the following in the Layers palette:
•Place layer that will create the knockout above the layers that will be punched through, and make the layer you want to reveal the Background. (Choose Layer > New > Background from Layer to convert a regular layer to the Background.)
•Place the layers you want to use in a layer set. The top layer in the set will punch through to the bottom layer in the set or the Background. If you want to reveal the Background, make sure the blending mode of the layer set is set to Pass Through (the default).
Using Help | Contents | Index |
Back |
297 |
Adobe Photoshop Help |
Using Layers |
|
|
|
|
Using Help | Contents | Index |
Back |
298 |
•Place the layers you want to use in a clipping group. The top layer in the group will punch through to the bottom layer in the group or the Background. (See “Creating clipping groups” on page 319.) If you want to reveal the bottom layer in the group, make sure the Blend Clipped Layers as Group option for the bottom layer is selected. (See “Grouping blend effects” on page 299.)
2Select the top layer (the layer that will create the the knockout).
3Do one of the following:
•(Photoshop) Double-click a layer thumbnail, choose Layer > Layer Style > Blending Options, or choose Blending Options from the Layers palette menu.
Note: To view blending options for a text layer, choose Layer > Layer Style > Blending Options, or choose Blending Options from the Layers palette menu.
•(ImageReady) Choose Window > Layer Options/Style. In the Layer Options palette, if the advanced options are not showing, choose Show Options from the palette menu or click the Show Options button  to view all of the options.
4 Choose an option from the Knockout pop-up menu:
•Shallow to knock out to the first possible stopping point such as the bottom of the layer set or clipping group containing the knockout option.
•Deep to knock out to the Background. If there is no Background, Deep knocks out to transparency.
5Lower the fill opacity or change the blending mode to create the knockout effect. (See “Specifying fill opacity” on page 296 and “Choosing a blending mode” on page 296.)
6Click OK.
Restricting blending to channels (Photoshop)
You can restrict blending effects to a specified channel when blending a layer or layer set. By default, all channels are included when blending a layer or layer set. The channel selections vary based on the type of image you are editing. For example, if you are editing a RGB image, the channel choices are R, G, and B. If you are editing a CMYK image, the channel choices are C, M, Y, and K. (See “About color channels” on page 93.) When using an RGB image, for example, you can choose to exclude the Red channel from blending; in the composite image, only information contained in the Green and Blue channels are affected.
To exclude channels from blending:
1 Double-click a layer thumbnail, choose Layer > Layer Style > Blending Options, or choose Blending Options from the Layers palette menu.
Note: To view blending options for a text layer, choose Layer > Layer Style > Blending Options, or choose Blending Options from the Layers palette menu.
2 In the Advanced Blending section of the Layer Style dialog box, deselect any channels you do not want to include when the layer is blended.
Using Help | Contents | Index |
Back |
298 |