

Adobe Photoshop Help |
Designing Web Pages |
|
|
|
|
Using Help | Contents | Index |
Back |
368 |
Designing Web Pages
About designing Web pages with Photoshop and ImageReady
When designing Web pages using Adobe Photoshop and Adobe ImageReady, keep in mind the tools and features that are available in each application.
•Photoshop provides tools for creating and manipulating static images for use on the Web. You can divide an image into slices, add links and HTML text, optimize the slices, and save the image as a Web page.
•ImageReady provides many of the same image-editing tools as Photoshop. In addition, it includes tools and palettes for advanced Web processing and creating dynamic Web images like animations and rollovers.
When you save an image for use as a Web page, you can choose to generate an HTML file. This file contains information that tells a Web browser what to display when it loads the page. It can contain pointers to images (in the form of GIF, PNG, JPEG, and WBMP files), HTML text, linking information, and JavaScript code for creating rollover effects.
You can integrate your Web production process by opening Photoshop files directly in Adobe GoLive. Slices, URLs, and other Web features in Photoshop files are accessible in GoLive for management and editing.You can also open Photoshop files in GoLive as page templates. Page templates display as a shaded preview and provide a visual guide for building a Web page in GoLive. For more information on using GoLive, see the Adobe GoLive User Guide.
Note: You can preview most Web effects directly in Photoshop or ImageReady. However, the appearance of an image on the Web depends on the operating system, color display system, and browser used to display the image. Be sure to preview images in different browsers, on different operating systems, and with different color bit depths.
(See “Previewing an image in a browser” on page 53.)
Creating and viewing slices
A slice is a rectangular area of an image that you can use to create links, rollovers, and animations in the resulting Web page. Dividing an image into slices lets you selectively optimize it for Web viewing.
Using Help | Contents | Index |
Back |
368 |

Adobe Photoshop Help |
Designing Web Pages |
|
|
|
|
Using Help | Contents | Index |
Back |
369 |
About slices
You use slices to divide a source image into functional areas. When you save the image as a Web page, each slice is saved as an independent file that contains its own settings, color palette, links, rollover effects, and animation effects. You can use slices to achieve faster download speeds. Slices are also advantageous when working with images that contain different types of data. For example, if one area of an image needs to be optimized in GIF format to support an animation, but the rest of the image is better optimized in JPEG format, you can isolate the animation using a slice.
A B
C D
Web page divided into slices:
A. Image slice B. Layer-based slice C. No Image slice D. Slice that contains a rollover
You set how the Photoshop or ImageReady application generates HTML code for aligning slices—either using tables or cascading style sheets—in the Output Settings dialog box. You can also set how slice files are named. (See “Setting output options” on page 442.)
Types of slices
Slices you create using the slice tool are called user slices; slices you create from a layer are called layer-based slices. When you create a new user slice or layer-based slice, additional auto slices are generated to account for the remaining areas of the image. In other words, auto slices fill the space in the image that is not defined by user slices or layer-based slices. Auto slices are regenerated every time you add or edit user slices or layer-based slices.
User slices, layer-based slices, and auto slices look different—user slices and layer-based slices are defined by a solid line, while auto slices are defined by a dotted line. In addition, each type of slice displays a distinct icon. You can choose to show or hide auto slices, which makes your work with userand layer-based slices easier to view.
A subslice is a type of auto slice that is generated when you create overlapping slices. Subslices indicate how the image will be divided when you save the optimized file. Although subslices are numbered and display a slice symbol, you cannot select or edit them separately from the underlying slice. Subslices are regenerated every time you arrange the stacking order of slices.
Creating user slices
You can create user slices with the slice tool or from guides, and in ImageReady, from a selection.
Using Help | Contents | Index |
Back |
369 |
Adobe Photoshop Help |
Designing Web Pages |
|
|
|
|
Using Help | Contents | Index |
Back |
370 |
To create a slice with the slice tool:
1Select the slice tool  . Any existing slices automatically display in the document window.
2Choose a style setting in the options bar:
•Normal to determine slice proportions by dragging.
•Fixed Aspect Ratio to set a height-to-width ratio. Enter whole numbers or decimals for the aspect ratio. For example, to create a slice twice as wide as it is high, enter 2 for the width and 1 for the height.
•Fixed Size to specify the slice’s height and width. Enter pixel values in whole numbers.
3 Drag over the area where you want to create a slice. Shift-drag to constrain the slice to a square. Alt-drag (Windows) or Option-drag (Mac OS) to draw from the center. Use snap to align a new slice to a guide or another slice in the image. (See “Moving and resizing user slices” on page 374.)
To create slices from guides:
1Add guides to an image. (See “Using guides and the grid” on page 45.)
2Do one of the following:
•(Photoshop) Select the slice tool, and click Slices From Guides in the options bar.
•(ImageReady) Choose Slices > Create Slices from Guides.
When you create slices from guides, any existing slices are deleted.
To create a slice from a selection (ImageReady):
1Select a portion of the image.
2Choose Select > Create Slice from Selection.
ImageReady creates a user slice based on the selection marquee. If the selection is feathered, the slice covers the full selection (including the feathered edges). If the selection is nonrectangular, the slice covers a rectangular area large enough to enclose the full selection.
Creating layer-based slices
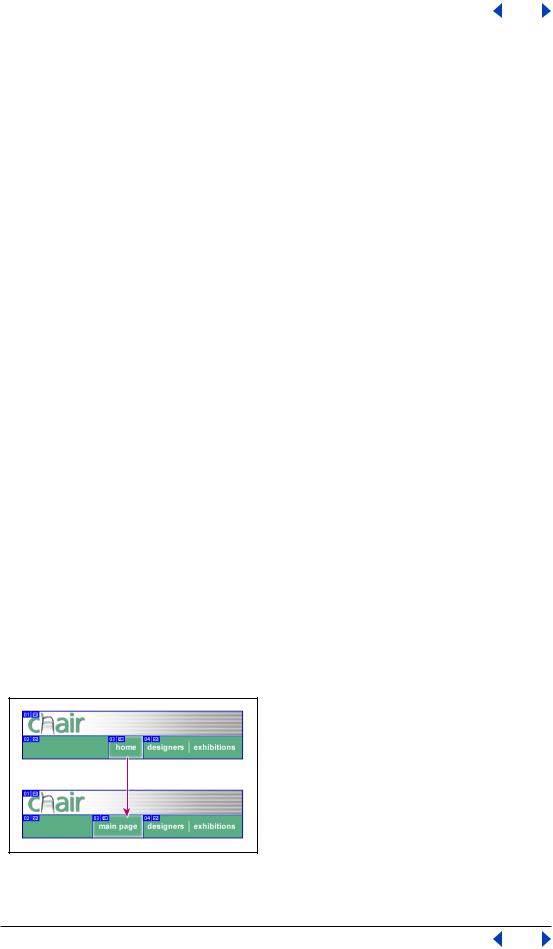
When you create a slice from a layer, the slice area encompasses all the pixel data in the layer. If you move the layer or edit the layer’s content, the slice area automatically adjusts to encompass the new pixels.
Example of how a layer-based slice is updated when the source layer is modified
Using Help | Contents | Index |
Back |
370 |
Adobe Photoshop Help |
Designing Web Pages |
|
|
|
|
Using Help | Contents | Index |
Back |
371 |
Layer-based slices are especially useful when working with rollovers. If you apply an effect to the layer—such as a drop shadow or glow—to create a rollover state, the slice automatically adjusts to encompass the new pixels. However, do not use a layer-based slice when you plan to move the layer over a large area of the image during an animation, because the slice dimension may exceed a useful size.
To create a slice from a layer:
1Select a layer in the Layers palette.
2Choose Layer > New Layer Based Slice.
Converting auto slices to user slices
You can move, duplicate, combine, divide, resize, delete, arrange, align, and distribute user slices. You can also apply different optimization settings to user slices. In contrast, all auto slices in an image are linked and share the same optimization settings. This is because auto slices are regenerated every time you create or edit a user slice or layer-based slice.
Converting an auto slice to a user slice prevents it from being changed when regeneration occurs. Dividing, combining, linking, and setting options for auto slices automatically converts them to user slices.
To convert an auto slice to a user slice:
1Select an auto slice. In ImageReady, you can select multiple slices. (See “Selecting slices” on page 373.)
2Do one of the following:
•(Photoshop) With the slice select tool selected, click Promote to User Slice in the options bar.
•(ImageReady) Choose Slices > Promote to User-slice(s).
Converting layer-based slices to user slices
Because a layer-based slice is tied to the pixel content of a layer, the only way to move, combine, divide, resize, and align it is to edit the layer. You can convert a layer-based slice to a user slice to unlink it from the layer.
To convert a layer-based slice to a user slice:
1Select a layer-based slice. In ImageReady, you can select multiple slices. (See “Selecting slices” on page 373.)
2Do one of the following:
•(Photoshop) Click Promote to User Slice in the options bar.
•(ImageReady) Choose Slices > Promote to User-slice(s).
Viewing slices
You can view slices in Photoshop, the Photoshop Save for Web dialog box, and ImageReady.The following characteristics can help you identify and differentiate between slices:
Slice lines Define the boundary of the slice. Solid lines indicate that the slice is a user slice or layer-based slice; dotted lines indicate that the slice is an auto slice.
Using Help | Contents | Index |
Back |
371 |

Adobe Photoshop Help |
Designing Web Pages |
|
|
|
|
Using Help | Contents | Index |
Back |
372 |
Slice colors Differentiate user slices and layer-based slices from auto slices. By default, user slices and layer-based slices have blue symbols, while auto slices have gray symbols.
In addition, ImageReady and the Photoshop Save for Web dialog box use color adjustments to dim unselected slices. These adjustments are for display purposes only and do not affect the final image’s color. By default, the color adjustment for auto slices is twice the amount of that for user-slices.
Slice numbers Slices are numbered from left to right and top to bottom, beginning in the upper left corner of the image. If you change the arrangement or total number of slices, slice numbers are updated to reflect the new order.
Slice symbols Indicate whether a user slice has Image |
or No Image |
content; |
if the slice is a layer-based slice ; if the slice is linked |
; or if the slice includes a rollover |
|
effect  .
.
To show or hide slices:
Do one of the following:
•Choose View > Show > Slices. To hide and show slices along with other items, use the Extras command. For more information, see “Working with Extras” on page 47.
•(ImageReady) Click the Toggle Slices Visibility button  .
.
To show or hide auto slices:
Do one of the following:
•Select the slice select tool, and click Show Auto Slices or Hide Auto Slices in the options bar.
•(ImageReady) Choose View > Show > Auto Slices.
To show or hide slice numbers (Photoshop):
1 Do one of the following:
• In Windows and Mac OS 9.x, choose Edit > Preferences > Guides, Grid, & Slices.
• In Mac OS X, choose Photoshop > Preferences > Guides, Grid, & Slices.
2 Under Slices, click Show Slice Numbers.
To show or hide slice numbers and slice symbols (ImageReady):
1Choose Edit > Preferences > Slices.
2Under Numbers and Symbols, select a size for display symbols:
•None to display no numbers or symbols.
•The small icon to display small numbers and symbols.
•The large icon to display large numbers and symbols.
3 For Opacity, enter a value, or choose a value from the pop-up slider to change the opacity of the numbers and symbols display.
To show slice lines only (ImageReady):
1Choose Edit > Preferences > Slices.
2Under Slice Lines, select Show Lines Only.
Using Help | Contents | Index |
Back |
372 |