

Adobe Photoshop Help |
Making Color and Tonal Adjustments |
|
|
|
|
Using Help | Contents | Index |
Back |
144 |
Setting auto correction options (Photoshop)
The Auto Correction Options dialog box lets you automatically adjust the overall tonal range of an image, specify clipping percentages, and assign color values to shadows, midtones, and highlights. You can apply the settings during a single use of the Levels dialog box or Curves dialog box, or you can save the settings for future use with the Levels, Auto Levels, Auto Contrast, Auto Color, and Curves commands.
To set auto correction options:
1Click Options in the Levels dialog box or Curves dialog box.
2Specify the algorithm you want Photoshop to use to adjust the overall tonal range of an image:
•Enhance Monochromatic Contrast clips all channels identically. This preserves the overall color relationship while making highlights appear lighter and shadows appear darker. The Auto Contrast command uses this algorithm.
•Enhance Per Channel Contrast maximizes the tonal range in each channel to produce a more dramatic correction. Because each channel is adjusted individually, Enhance Per Channel Contrast may remove or introduce color casts. The Auto Levels command uses this algorithm.
•Find Dark & Light Colors finds the average lightest and darkest pixels in an image and uses them to maximize contrast while minimizing clipping. The Auto Color command uses this algorithm.
3Select Snap Neutral Midtones if you want Photoshop to find an average nearly neutral color in an image and then adjust the gamma values to make the color neutral. The Auto Color command uses this algorithm.
4To specify how much to clip black and white pixels, enter percentages in the Clip text boxes. A value between 0.5% and 1% is recommended.
By default, Photoshop clips the black and white pixels by 0.5%—that is, it ignores the first 0.5% of either extreme when identifying the lightest and darkest pixels in the image. This ensures that white and black values are based on representative rather than extreme pixel values.
5To assign color values to the darkest, neutral, and lightest areas of an image, click a color swatch. For guidelines on setting color values, see “Using target values to set highlights and shadows (Photoshop)” on page 141.
6Do one of the following:
•To save the settings for use in the current Levels or Curves dialog box, click OK. If you subsequently click the Auto button, Photoshop will reapply the same settings to the image.
•To save the settings as the default, select Save as Defaults, then click OK. The next time you open the Levels or Curves dialog box, you can apply the same setting by clicking the Auto button.The default clipping percentages are also used by the Auto Level, Auto Contrast, and Auto Color commands.
Using Help | Contents | Index |
Back |
144 |
Adobe Photoshop Help |
Making Color and Tonal Adjustments |
|
|
|
|
Using Help | Contents | Index |
Back |
145 |
Adjusting the gamma value of an image (ImageReady)
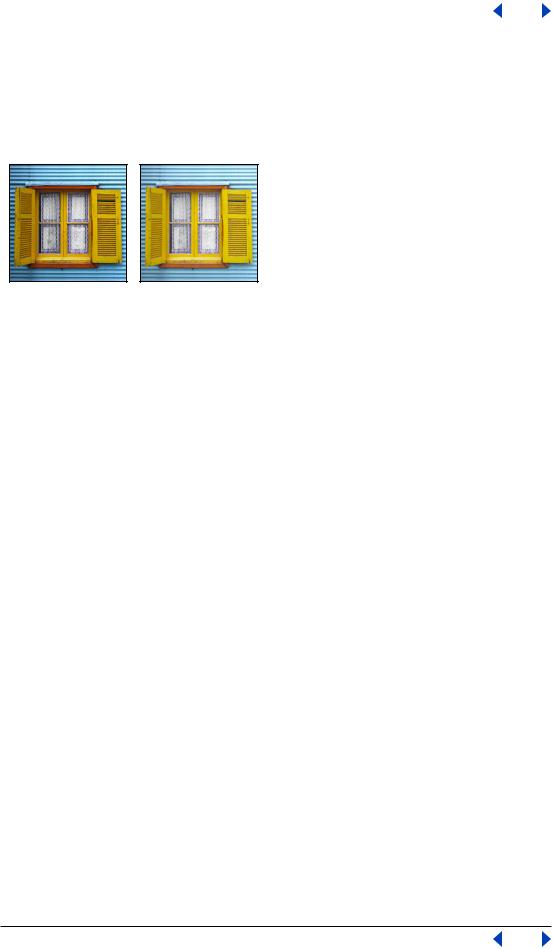
Gamma measures the brightness of midtone values produced by a device (often a monitor). A higher gamma value yields an overall darker image. Windows systems use a higher gamma value than Mac OS systems, with the result that the same image is noticeably darker on a Windows system than on a Mac OS system.
Image with Windows gamma and Mac OS gamma
Designers, particularly those who use Mac OS systems to create images that will be viewed primarily on Windows systems, must consider the issue of cross-platform gamma. You can modify the gamma value of an image to compensate for the differences between Windows and Mac OS monitors.
Note: The Gamma dialog box modifies the pixel values in an image. By contrast, the View > Preview commands adjust the appearance of the image on your monitor but do not change the image’s pixel values.
To adjust the gamma value automatically:
1Choose Image > Adjustments > Gamma.
2Select Preview to preview the adjustment in the image.
3Adjust the gamma:
•Select Windows to Macintosh to adjust gamma for display in Mac OS.
•Select Macintosh to Windows to adjust gamma for display in Windows.
Note: Images created in Photoshop 4.0 or earlier use Mac OS gamma value (1.8) by default and should be adjusted for display in Windows (unless gamma was adjusted when the image was created). Images created in Photoshop 5.0 or later use Windows gamma value (2.2) by default and will be at the correct gamma for display in Windows with no adjustment.
To adjust the gamma value manually:
1Choose Image > Adjustments > Gamma.
2Select Preview to preview the adjustment in the image.
3Drag the Gamma slider, or enter a value in the text box between 0.1 and 9.99. The Gamma slider measures the amount of change from the current gamma value. (The slider does not indicate the actual gamma value.)
Using Help | Contents | Index |
Back |
145 |
Adobe Photoshop Help |
Making Color and Tonal Adjustments |
|
|
|
|
Using Help | Contents | Index |
Back |
146 |
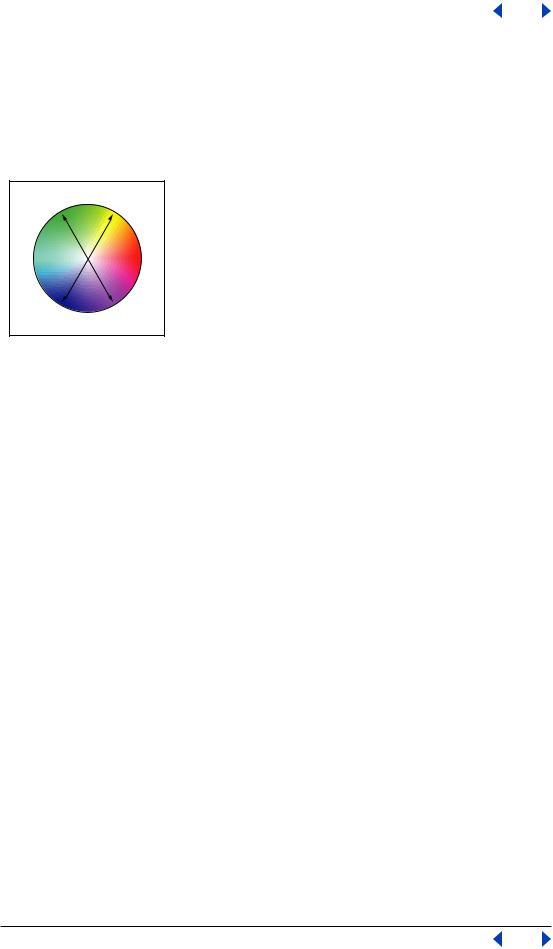
About the color wheel
Because there are numerous ways to achieve similar results in color balance, it’s useful to consider the type of image you have and the effect you want to produce. If you’re new to adjusting color components, it helps to keep a diagram of the color wheel on hand. You can use the color wheel to predict how a change in one color component affects other colors and also how changes translate between RGB and CMYK color models.
A
F 
 C
C
D
Color wheel:
A. Green B.Yellow C. Red D. Magenta E. Blue F. Cyan
For example, you can decrease the amount of any color in an image by increasing the amount of its opposite on the color wheel—and vice versa. Similarly, you can increase and decrease a color by adjusting the two adjacent colors on the wheel, or even by adjusting the two colors adjacent to its opposite.
In a CMYK image, you can decrease magenta either by decreasing the amount of magenta or its complement (by adding cyan and yellow). You can even combine these two corrections, minimizing their effect on overall lightness. In an RGB image, you can decrease magenta by removing red and blue or by adding green. All of these adjustments result in an overall color balance containing less magenta.
Using the Color Balance command (Photoshop)
The Color Balance command changes the overall mixture of colors in an image for generalized color correction.
To use the Color Balance command:
1Make sure the composite channel is selected in the Channels palette. This command is available only when you’re viewing the composite channel.
2Open the Color Balance dialog box. (See “Making color adjustments” on page 132.)
3Select Shadows, Midtones, or Highlights to select the tonal range on which you want to focus the changes.
4Select Preserve Luminosity to prevent changing the luminosity values in the image while changing the color. This option maintains the tonal balance in the image.
5Drag a slider toward a color you want to increase in the image; drag a slider away from a color you want to decrease in the image.
The values above the color bars show the color changes for the red, green, and blue channels. (For Lab images, the values are for the a and b channels.) Values can range from –100 to +100.
Using Help | Contents | Index |
Back |
146 |
Adobe Photoshop Help |
Making Color and Tonal Adjustments |
|
|
|
|
Using Help | Contents | Index |
Back |
147 |
Using the Hue/Saturation command
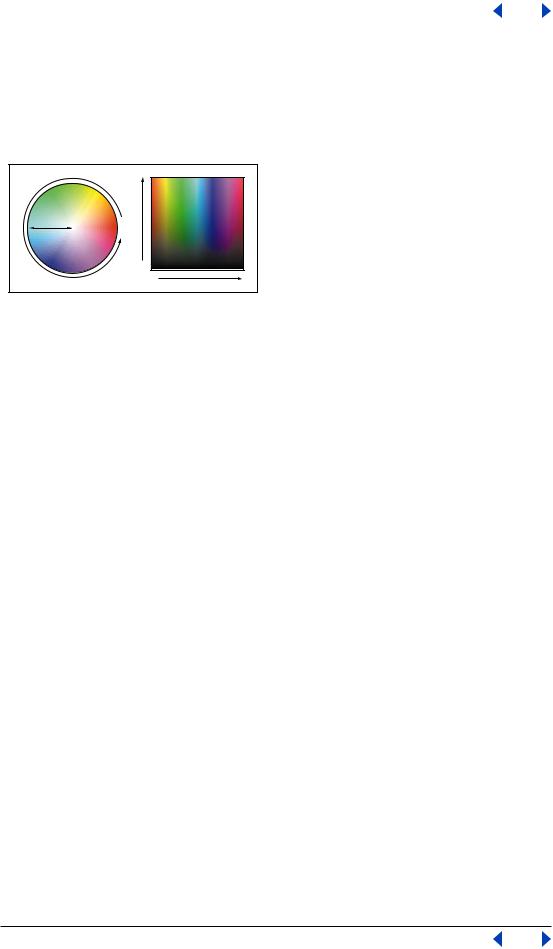
The Hue/Saturation command lets you adjust the hue, saturation, and lightness of the entire image or of individual color components in an image. Adjusting the hue, or color, represents a move around the color wheel. Adjusting the saturation, or purity of the color, represents a move across its radius.
A
B
C
D
Color wheel and radius of color wheel:
A. Saturation B. Hue C. Brightness D. Hues
You can also use the Colorize option to add color to a grayscale image converted to RGB, or to an RGB image—for example, to make it look like a duotone by reducing its color values to one hue.
To use the Hue/Saturation command:
1 Open the Hue/Saturation dialog box. (See “Making color adjustments” on page 132.)
The two color bars in the dialog box represent the colors in their order on the color wheel. The upper color bar shows the color before the adjustment; the lower bar shows how the adjustment affects all of the hues at full saturation.
2 (Photoshop) For Edit, choose which colors to adjust:
•Choose Master to adjust all colors at once.
•Choose one of the other preset color ranges listed for the color you want to adjust. An adjustment slider appears between the color bars, which you can use to edit any
range of hues. (For information on how to modify the slider’s range, see the instructions following this procedure.)
3 For Hue, enter a value or drag the slider until the colors appear as you want.
The values displayed in the text box reflect the number of degrees of rotation around the wheel from the pixel’s original color. A positive value indicates clockwise rotation, a negative value counterclockwise rotation. Values can range from –180 to +180.
4 For Saturation, enter a value or drag the slider to the right to increase the saturation or to the left to decrease it.
The color shifts away from or toward the center of the wheel, relative to the beginning color values of the selected pixels. Values can range from –100 to +100.
5 For Lightness, enter a value or drag the slider to the right to increase the lightness or to the left to decrease it. Values can range from –100 to +100.
Using Help | Contents | Index |
Back |
147 |
Adobe Photoshop Help |
Making Color and Tonal Adjustments |
|
|
|
|
Using Help | Contents | Index |
Back |
148 |
To modify the range of an adjustment slider (Photoshop):
1Choose an individual color from the Edit menu in the dialog box.
2Do any of the following to the adjustment slider:
•Drag one of the white triangles to adjust the amount of color fall-off without affecting the range.
•Drag the area between the triangle and the vertical bar to adjust the range without affecting the amount of fall-off.
•Drag the center area to move the entire adjustment slider, selecting a different
color area.
•Drag one of the vertical white bars next to the dark gray area to adjust the range of the color component. Increasing the range decreases the fall-off, and vice versa.
•Ctrl-drag (Windows) or Command-drag (Mac OS) the color bar so that a different color is in the center of the bar.
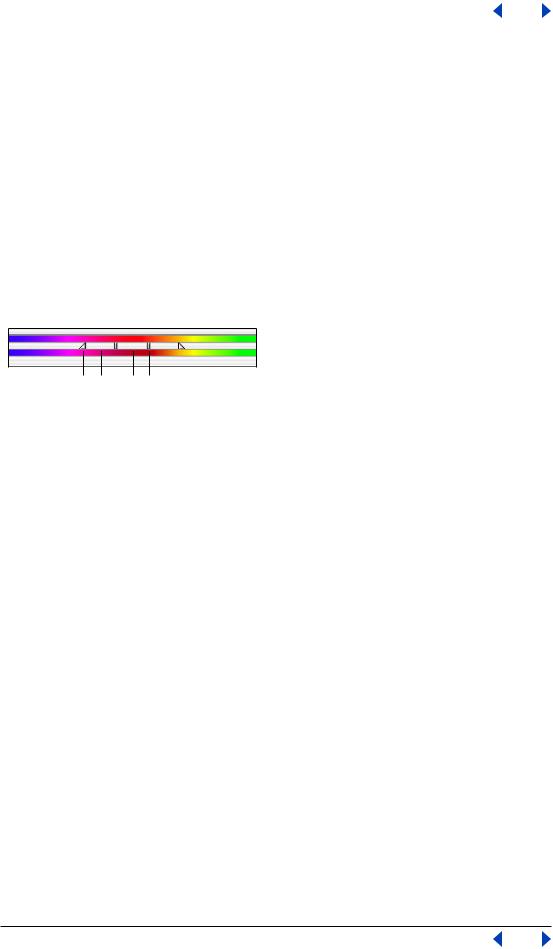
A B C D
Hue/Saturation adjustment slider:
A.Adjusts fall-off without affecting range B.Adjusts range without affecting fall-off C.Moves entire slider D. Adjusts range of color component
If you modify the adjustment slider so that it falls into a different color range, the name changes to reflect this. For example, if you choose Yellow and alter its range so that it falls in the red part of the color bar, the name changes to Red 2.You can convert up to six of the individual color ranges to varieties of the same color range (for example, Red through Red 6).
Note: By default, the range of color selected when you choose a color component is 30° wide, with 30° of fall-off on either side. Setting the fall-off too low can produce banding in the image.
3 To edit the range by choosing colors from the image, select the eyedropper tool  in the dialog box and click in the image. Use the eyedropper + tool to add to the range; use the eyedropper – tool to subtract from the range.
While the eyedropper tool is selected, you can also press Shift to add to the range or Alt (Windows) or Option (Mac OS) to subtract from it.
To colorize a grayscale image or create a monotone effect:
1(Photoshop) If you are colorizing a grayscale image, choose Image > Mode > RGB Color to convert the image to RGB.
2Open the Hue/Saturation dialog box. (See “Making color adjustments” on page 132.)
3Select Colorize.The image is converted to the hue of the current foreground color, if the foreground color is not black or white. The lightness value of each pixel does not change.
4Use the Hue slider to select a new color if desired. Use the Saturation and Lightness sliders to adjust the saturation and lightness of the pixels.
Using Help | Contents | Index |
Back |
148 |