


Adobe Photoshop Help |
|
Drawing |
|
|
|
Using Help | Contents | Index |
Back |
205 |
Controlling a shape as you draw it
You can use the following modifier keys to manipulate a shape while dragging:
•Hold down the spacebar to move the shape without changing its size or proportions.
•(ImageReady) Hold down Shift to constrain a rectangle or rounded rectangle to a square, to constrain an ellipse to a circle, or to constrain the line angle to a multiple of 45°.
Using the pen tools (Photoshop)
You can create or edit straight lines, curves, or freeform lines and shapes using the pen tools. The pen tools can be used in conjunction with the shape tools to create complex shapes.
Drawing with the pen tool
The pen tool lets you create straight lines and smooth flowing curves with greater precision than is possible with the freeform pen tool. For most users, the pen tool provides the best control and greatest accuracy for drawing.
To draw with the pen tool:
1Select the pen tool  .
.
2Set the following tool-specific options:
•To add an anchor point when you click a line segment and delete an anchor point when you click it, select Auto Add/Delete in the options bar. (See “Adding, deleting, and converting anchor points” on page 216.)
•To preview path segments as you draw, click the inverted arrow  next to the shape buttons in the options bar, and select Rubber Band.
3Position the pen pointer where you want to begin to draw, and click to define the first anchor point.
4Click or drag to set anchor points for additional segments. (See “Drawing straight segments with the pen tool” on page 205 and “Drawing curves with the pen tool” on page 206.)
5Complete the path:
•To end an open path, Ctrl-click (Windows) or Command-click (Mac OS) away from the path.
•To close a path, position the pen pointer over the first anchor point. A small loop appears next to the pen tip when it is positioned correctly. Click to close the path.
For more information on closed and open paths, see “About anchor points, direction lines, direction points, and components” on page 210.
Drawing straight segments with the pen tool
The simplest segment you can draw with the pen tool is a straight segment, made by clicking to create anchor points.
Using Help | Contents | Index |
Back |
205 |
Adobe Photoshop Help |
|
Drawing |
|
|
|
Using Help | Contents | Index |
Back |
206 |
To draw straight segments:
1Position the pen pointer where you want the straight segment to begin, and click to define the first anchor point.
2Click again where you want the first segment of the straight line to end, or Shift-click to constrain the angle of the segment to a multiple of 45°.
3Continue clicking to set anchor points for additional segments. The last anchor point is always a solid square, indicating it is selected. Previously defined anchor points become hollow squares as you add further anchor points. If the Auto Add/Delete option is selected, you can click an existing point to delete it.
Drawing curves with the pen tool
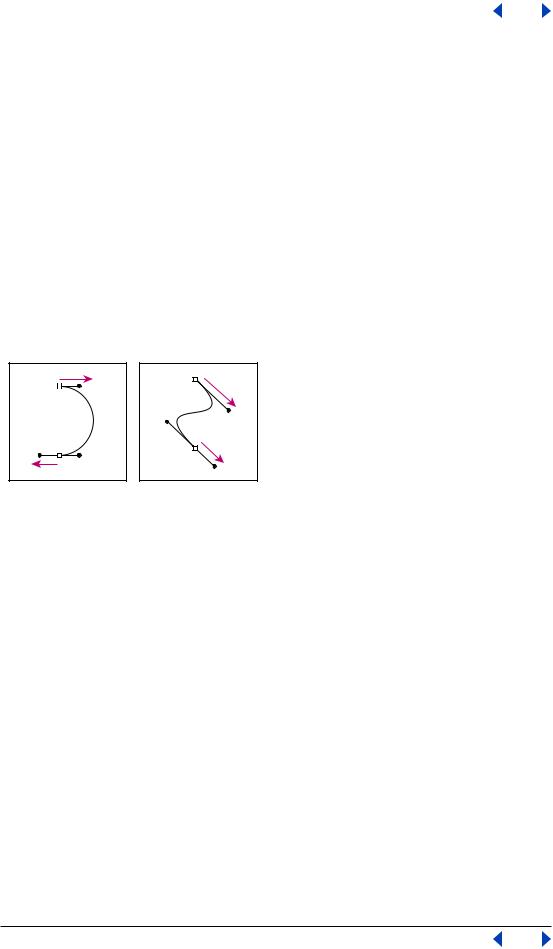
You create curves by dragging the pen tool in the direction you want the curve to go. Keep these guidelines in mind when drawing curves:
•Always drag the first direction point in the direction of the bump of the curve, and drag the second direction point in the opposite direction to create a single curve. Dragging both direction points in the same direction creates an “S” curve.
Drag in the opposite direction to create a smooth curve. Drag in the same direction to create an “S” curve.
•When drawing a series of smooth curves, draw one curve at a time, placing anchor points at the beginning and end of each curve, not at the tip of the curve. Use as few anchor points as possible, placing them as far apart as possible. This decreases the file size and reduces the potential for printing errors.
For more information on how paths are constructed, see “About anchor points, direction lines, direction points, and components” on page 210.
To draw a curve:
1Position the pointer where you want the curve to begin, and hold down the mouse button. The first anchor point appears, and the pointer changes to an arrowhead.
2Drag in the direction you want the curve segment to be drawn. As you drag, the pointer leads one of two direction points. Hold down the Shift key to constrain the tool to multiples of 45°, and release the mouse button once you have positioned the first direction point.
Using Help | Contents | Index |
Back |
206 |
Adobe Photoshop Help |
|
Drawing |
|
|
|
Using Help | Contents | Index |
Back |
207 |
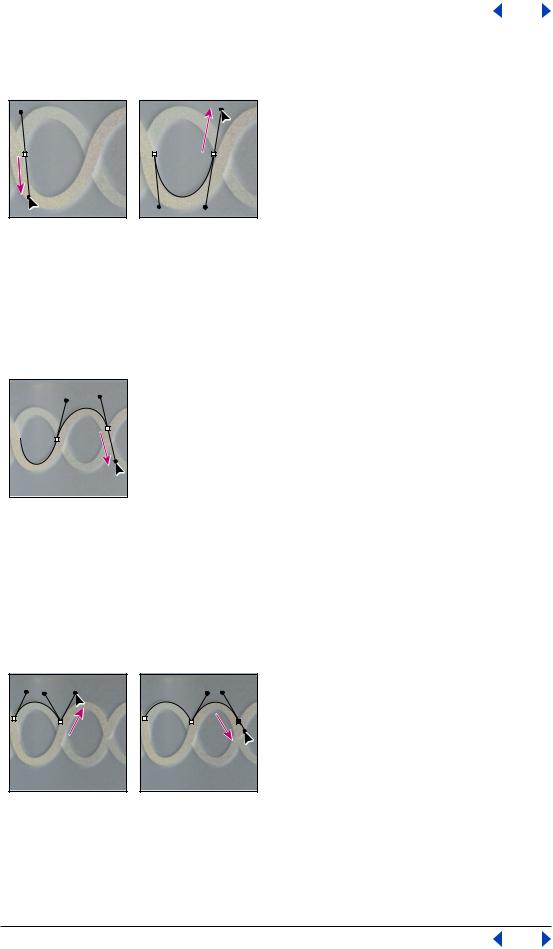
The length and slope of the direction line determine the shape of the curve segment. You can adjust one or both sides of the direction line later.
Drag in the direction of the curve to set the first anchor point. Drag in the opposite direction to complete the curve segment.
3Position the pointer where you want the curve segment to end, and drag in the opposite direction to complete the segment.
4Do one of the following:
•To draw the next segment of a smooth curve, position the pointer where you want the next segment to end, and drag away from the curve.
Drag away from the curve to create the next segment.
•To change the direction of the curve sharply, release the mouse button, then Alt-drag (Windows) or Option-drag (Mac OS) the direction point in the direction of the curve. Release Alt (Windows) or Option (Mac OS) and the mouse button, reposition the pointer where you want the segment to end, and drag in the opposite direction to complete the curve segment.
•To break out the direction lines of an anchor point, Alt-drag (Windows) or Option-drag (Mac OS) the lines.
Alt-drag or Option-drag the direction point toward the curve. Release the key, and drag in the opposite direction.
Using Help | Contents | Index |
Back |
207 |

Adobe Photoshop Help |
|
Drawing |
|
|
|
Using Help | Contents | Index |
Back |
208 |
Drawing with the freeform pen tool
The freeform pen tool lets you draw as if you were drawing with a pencil on paper. Anchor points are added automatically as you draw. You do not determine where the points are positioned, but you can adjust them once the path is complete.
The magnetic pen is an option of the freeform tool that lets you draw a path that snaps to the edges of defined areas in your image. You can define the range and sensitivity of the snapping behavior, as well as the complexity of the resulting path. The magnetic pen and magnetic lasso tools share many of the same options.
To draw with the freeform pen tool:
1Select the freeform pen tool  .
.
2To control how sensitive the final path is to the movement of your mouse or stylus, click the inverted arrow  next to the shape buttons in the options bar, and enter a value between 0.5 and 10.0 pixels for Curve Fit. A higher value creates a simpler path with fewer anchor points.
3Drag the pointer in the image. As you drag, a path trails behind the pointer. When you release the mouse, a work path is created.
4To continue the existing freehand path, position the freeform pen pointer on an endpoint of the path, and drag.
5To complete the path, release the mouse. To create a closed path, click the initial point of the path (a circle appears next to the pointer when it is aligned). For more information on closed and open paths, see “About anchor points, direction lines, direction points, and components” on page 210.
To draw using the magnetic pen options:
1 To convert the freeform pen tool to the magnetic pen tool  , select Magnetic in the options bar, or click the inverted arrow next to the shape buttons in the options bar, select Magnetic, and set the following:
•For Width, enter a pixel value between 1 and 256. The magnetic pen detects edges only within the specified distance from the pointer.
•For Contrast, enter a percentage value between 1 and 100 to specify the contrast between pixels required to be considered an edge. Use a higher value for low contrast images.
•For Frequency, enter a value between 5 and 40 to specify the rate at which the pen sets anchor points. A higher value anchors the path in place more quickly.
•If you are working with a stylus tablet, select or deselect Pen Pressure. When this option is selected, an increase in pen pressure causes the width to decrease.
2Click in the image to set the first fastening point.
3To draw a freehand segment, move the pointer or drag along the edge you want to trace.
The most recent segment of the border remains active. As you move the pointer, the active segment snaps to the strongest edge in the image, connecting the pointer to the last fastening point. Periodically, the magnetic pen adds fastening points to the border to anchor previous sections.
Using Help | Contents | Index |
Back |
208 |