

Adobe Photoshop Help |
|
Painting |
|
|
|
Using Help | Contents | Index |
Back |
244 |
Using the gradient tool (Photoshop)
The gradient tool creates a gradual blend between multiple colors. You can choose from preset gradient fills or create your own.
Note: The gradient tool cannot be used with images in Bitmap, indexed-color, or 16-bits per channel mode.
Applying a gradient fill
You fill an area with a gradient by dragging in the image. The starting point (where the mouse is pressed) and ending point (where the mouse is released) affect the gradient appearance, depending on the gradient tool used.
To apply a gradient fill:
1To fill part of the image, select the desired area. Otherwise, the gradient fill is applied to the entire active layer.
2Select the gradient tool  .
.
3Choose a gradient fill in the options bar:
•Click the triangle next to the gradient sample to pick a preset gradient fill.
•Click inside the gradient sample to view the Gradient Editor. Select a preset gradient fill, or create a new gradient fill. Then click OK. (See “Creating smooth gradient fills” on page 245.)
4 Select an option for applying the gradient fill in the options bar:
•Linear gradient  to shade from the starting point to the ending point in a straight line.
•Radial gradient  to shade from the starting point to the ending point in a circular pattern.
•Angle gradient  to shade in a counterclockwise sweep around the starting point.
•Reflected gradient  to shade using symmetric linear gradients on either side of the starting point.
•Diamond gradient  to shade from the starting point outward in a diamond pattern. The ending point defines one corner of the diamond.
5 Do the following in the options bar:
•Specify a blending mode and opacity for the paint. (See “Setting options for painting and editing tools” on page 241.)
•To reverse the order of colors in the gradient fill, select Reverse.
•To create a smoother blend with less banding, select Dither.
•To use a transparency mask for the gradient fill, select Transparency. (See “Specifying the gradient transparency” on page 246.)
6 Position the pointer in the image where you want to set the starting point of the gradient, and drag to define the ending point. To constrain the line angle to a multiple of 45°, hold down Shift as you drag.
Using Help | Contents | Index |
Back |
244 |
Adobe Photoshop Help |
|
Painting |
|
|
|
Using Help | Contents | Index |
Back |
245 |
Creating smooth gradient fills
The Gradient Editor dialog box lets you define a new gradient by modifying a copy of an existing gradient. You can also add intermediate colors to a gradient, creating a blend between more than two colors.
A
B
C
D E
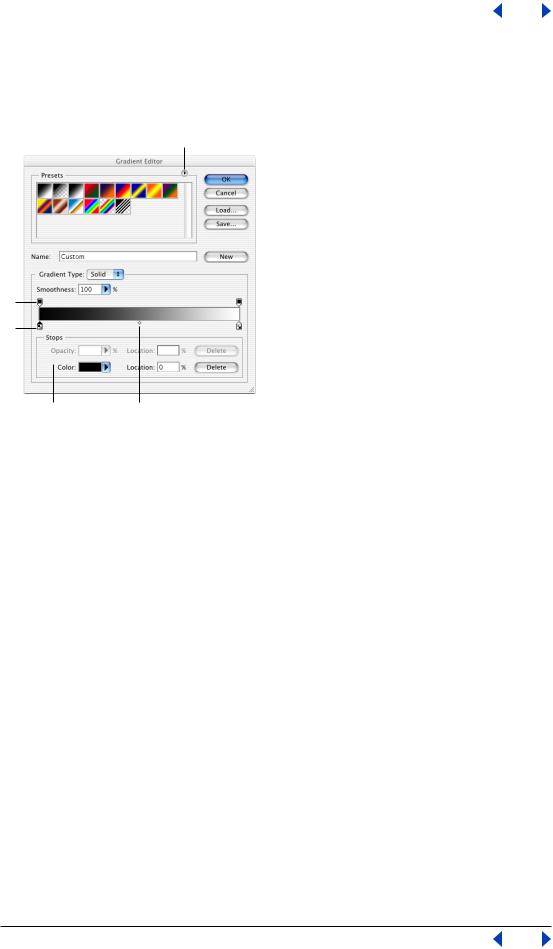
Gradient Editor dialog box:
A. Palette menu B. Opacity stop C. Color stop D. Adjust values or delete the selected opacity or color stop E. Midpoint
To create a smooth gradient:
1Select the gradient tool  .
.
2Click inside the gradient sample in the options bar to display the Gradient Editor dialog box.
3To base the new gradient on an existing gradient, select a gradient in the Presets section of the dialog box.
4Choose Solid from the Gradient Type pop-up menu.
5To define the starting color of the gradient, click the left color stop under the gradient bar. The triangle above the stop turns black, indicating that the starting color is being edited.
6To choose a color, do one of the following:
•Double-click the color stop, or click the color swatch in the Stops section of the dialog box. Choose a color, and click OK. For information on choosing a color, see “Using the Adobe Color Picker” on page 261.
•Choose an option from the Color pop-up menu in the Stops section of the dialog box.
•Position the pointer over the gradient bar (the pointer turns into the eyedropper), and click to sample a color, or click anywhere in the image to sample a color from the image.
7 To define the ending color, click the right color stop under the gradient bar. Then choose a color as described in step 5.
Using Help | Contents | Index |
Back |
245 |
Adobe Photoshop Help |
|
Painting |
|
|
|
Using Help | Contents | Index |
Back |
246 |
8 To adjust the location of the starting point or ending point, do one of the following:
•Drag the corresponding color stop left or right to the location you want.
•Click the corresponding color stop, and enter a value for Location in the Stops section of the dialog box. A value of 0% places the point at the far left end of the gradient bar, a value of 100% at the far right end.
9To adjust the location of the midpoint (where the gradient displays an even mix of the starting and ending colors), drag the diamond below the gradient bar to the left or right, or click the diamond and enter a value for Location.
10To delete the color stop you are editing, click Delete.
11To set the smoothness for the entire gradient, enter a value in the Smoothness text box, or drag the Smoothness pop-up slider.
12If desired, set transparency values for the gradient. (See “Specifying the gradient trans- parency” on page 246.)
13Enter a name for the new gradient.
14To save the gradient as a preset, click New after you have finished creating the gradient.
Note: New presets are saved in a Preferences file so that they persist between editing sessions. If this file is deleted or damaged, or if you reset presets to the default library, the new presets will be lost. To permanently save new presets, save them in a library. (See “Managing gradients” on page 248.)
To add intermediate colors to a gradient:
In the Gradient Editor dialog box, click below the gradient bar to define another color stop. Specify the color and adjust the location and midpoint for the intermediate point as you would for a starting or ending point. To remove an intermediate color, drag the color stop down and off the gradient bar, or select the color stop and click the Delete button.
Specifying the gradient transparency
Each gradient fill contains settings that control the opacity of the fill at different locations on the gradient. For example, you can set the starting color to 100% opacity and have the fill gradually blend into an ending color with 50% opacity. The checkerboard pattern indicates the amount of transparency in the gradient preview.
To specify the gradient transparency:
1Create a gradient as described in steps 1 through 10 of “Creating smooth gradient fills” on page 245.
2To adjust the starting opacity, click the left opacity stop above the gradient bar. The triangle below the stop turns black, indicating that the starting transparency is being edited.
3In the Stops section of the dialog box, enter a value in the Opacity text box, or drag the Opacity pop-up slider.
4To adjust the opacity of the endpoint, click the right transparency stop above the gradient bar. Then set the opacity as described in step 3.
Using Help | Contents | Index |
Back |
246 |
Adobe Photoshop Help |
|
Painting |
|
|
|
Using Help | Contents | Index |
Back |
247 |
5 To adjust the location of the starting or ending opacity, do one of the following:
• Drag the corresponding opacity stop to the left or right.
• Select the corresponding opacity stop, and enter a value for Location.
6 To adjust the location of the midpoint opacity (the point midway between the starting and ending opacities), do one of the following:
•Drag the diamond above the gradient bar to the left or right.
•Select the diamond and enter a value for Location.
7To delete the opacity stop you are editing, click Delete.
8To add an intermediate opacity to the mask, click above the gradient bar to define a new opacity stop.You can then adjust and move this opacity as you would for a starting or ending opacity. To remove an intermediate opacity, drag its transparency stop up and off the gradient bar.
9To create a preset gradient, enter a name in the Name text box and click New. This creates a new gradient preset with the transparency setting you specified.
Creating noise gradient fills
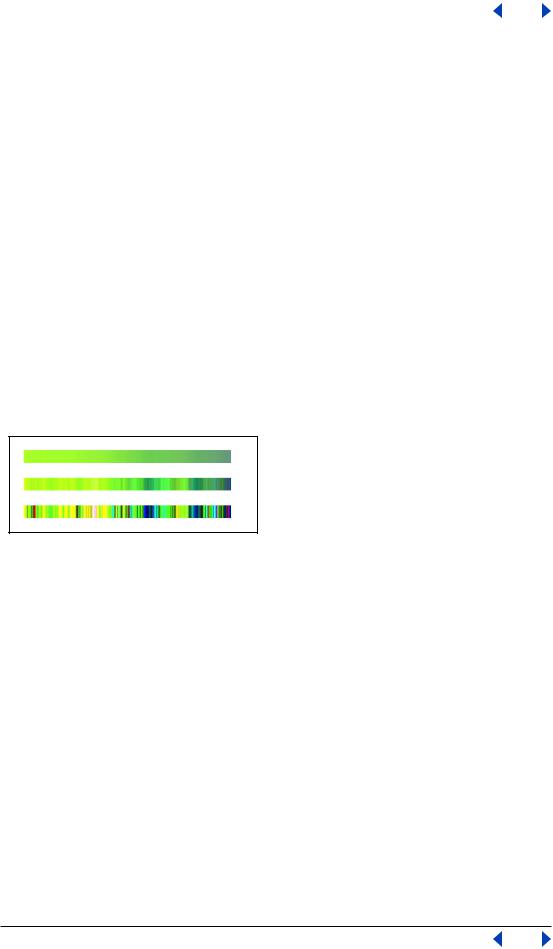
In addition to creating smooth gradients, the Gradient Editor dialog box lets you define a new noise gradient. A noise gradient is a gradient that contains randomly distributed colors within the range of colors that you specify.
A
B
C
Gradient with different Noise values:
A. 10% noise B. 50% noise C. 90% noise
To create a noise gradient:
1Select the gradient tool  .
.
2Click in the gradient sample in the options bar to display the Gradient Editor dialog box.
3To base the new gradient on an existing gradient, select a gradient in the Presets section of the dialog box.
4Choose Noise from the Gradient Type pop-up menu.
5To set the roughness for the entire gradient, enter a value in the Roughness text box, or drag the Roughness pop-up slider.
6To define the color model, choose a color model from the Color Model list.
7To adjust the range of colors, drag the sliders. For each color component of the color model you’ve selected, you can drag the sliders to define the range of acceptable values. For example, if you choose the HSB model, you can restrict the gradient to blue-green hues, high saturation, and medium brightness.
8Set the options to restrict colors or to add transparency.
Using Help | Contents | Index |
Back |
247 |