

Adobe Photoshop Help |
Getting Images into Photoshop and ImageReady |
|
|
|
|
Using Help | Contents | Index |
Back |
78 |
The Anti-aliased PICT dialog box indicates the current file size and dimensions. To change the image dimensions, enter new values for Width and Height. The file size is then updated. To maintain image proportions, select Constrain Proportions.
You can choose Grayscale or RGB color mode for an anti-aliased PICT file.
Importing PICT resources (Mac OS)
The PICT Resource module lets you read PICT resources from a file—for example, from another application. To open a PICT resource, choose File > Import > PICT Resource.
To preview a resource, click Preview. Click the arrow buttons to step forward and backward through the resources. Note that the number displayed for Resource refers to the resource’s position in ascending order in the resource fork and not to the resource’s identification number.
Note: In Photoshop, you can also open a file in the PICT Resource file format by choosing File > Open, choosing All Documents from the Show pop-up menu, selecting the file you want to open, choosing PICT Resource from the Format pop-up menu, and clicking Open. However, the Open command automatically opens the first resource in the file and does not display any other PICT resources in the file.
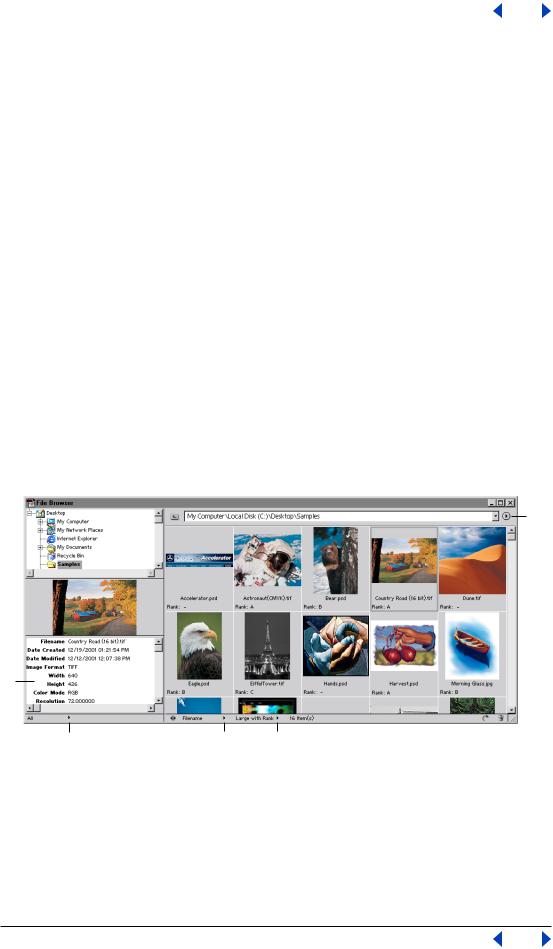
Using the File Browser (Photoshop)
File Browser lets you view, sort, and process image files. You can use the File Browser to perform tasks such as creating new folders; renaming, moving, and deleting files; and rotating images. You can also view individual file information and data imported from your digital camera.
B
A
C D E
The Photoshop File Browser:
A. File information B. File Browser palette menu C. File information pop-up menu D. Sort By pop-up menu E. View By pop-up menu
Displaying the File Browser Choose File > Browse or Window > File Browser. By default, the File Browser is displayed in the palette well. To display the File Browser in a separate window, choose Show in Separate Window from the palette menu. For more information on using palettes in the palette well, see “Using the palette well (Photoshop)” on page 26.
Using Help | Contents | Index |
Back |
78 |

Adobe Photoshop Help |
Getting Images into Photoshop and ImageReady |
|
|
|
|
Using Help | Contents | Index |
Back |
79 |
Using the File Browser palette menu Click the triangle  in the upper right corner of the palette to access commands for working with layers. If the palette is docked in the palette well, click the triangle on the palette tab.
Navigating in the File Browser Double-click a folder to view its contents. To show or hide folders on the right side of the palette, choose the Show Folders from the palette menu. A check mark indicates that folders are showing.
Changing the display of files Choose a thumbnail display option from the palette menu, or click the View By pop-up menu at the bottom of the File Browser and choose a display option.
Sorting files Click the Sort By pop-up menu at the bottom of the File Browser, and choose a sorting option.
Ranking files Ranking lets you manually control the sort order of files. To specify a rank, choose the Large Thumbnail with Rank display option, click in the Rank field, type a letter, and press Enter (Windows) or Return (Mac OS). Alternately, right click (Windows) or Control-click (Mac OS) a thumbnail and choose a rank from the context menu.
Note: To rank multiple files, select multiple thumbnails and then choose a rank from the context menu.
Displaying file information Click the File Information pop-up menu at the bottom of the File Browser, and select one of the following: All to view all image information for a file; or EXIF to view image information imported from your digital camera. For more information, see “Adding file information (Photoshop)” on page 459.
Selecting and deselecting files On the right side of the palette, click a thumbnail to select the file, or Shift-click to select multiple files. To select all files in the current folder, choose Select All from the palette menu. To deselect all files, choose Deselect All from the palette menu.
Opening files Select the file or files you want to open, and do one of the following: select a file and press Enter (Windows) or Return (Mac OS); double-click a selected file; drag the selected file or files out of the File Browser; or choose Open from the palette menu.
When the File Browser is docked in the palette well, double-clicking a file or selecting a file and pressing Enter (Windows) or Return (Mac OS) opens the image and closes the File Browser. To keep the File Browser open, hold down Alt (Windows) or Option (Mac OS) when you double-click the file, press Enter (Windows), or press Return (Mac OS).
Renaming files and folders On the right side of the palette, click a filename or folder name, or select a file or folder and choose Rename from the palette menu. Then type a new name, and press Enter (Windows) or Return (Mac OS).
Note: To move to the next filename, press Tab. To move to the previous filename, press Shift+Tab.
Renaming files in batches To rename all the files in a folder, make sure that no files are selected. To rename a subset of files in a folder, select the files you want to rename. Then choose Batch Rename from the palette menu, and set the following options:
•For Destination Folder, select where you want to place the renamed files: in the same folder or in a different folder. If you select Move to New Folder, click Browse to select a different folder.
Using Help | Contents | Index |
Back |
79 |

Adobe Photoshop Help |
Getting Images into Photoshop and ImageReady |
|
|
|
|
Using Help | Contents | Index |
Back |
80 |
•For File Naming, choose elements from the pop-up menus or enter text into the fields. The specified elements and text will be combined to create the new filename.
•For Compatibility, select the operating systems with which you want renamed files to be compatible. The current operating system is selected by default, and you cannot deselect it.
Deleting files Select the file or files you want to delete, and do one of the following: click the Trash button, drag the files to the Trash button  , press the Delete key, or choose Delete from the palette menu.
Creating new folders Choose New Folder from the palette menu, type a name, and press Enter (Windows) or Return (Mac OS).
Moving and copying files To move a file, drag it to a different folder; to copy a file, Altdrag (Windows) or Option-drag (Mac OS) it to a different folder.
Rotating images Select one or more files, and do one of the following: choose a rotation option from the palette menu; click the Rotate button  to rotate the images clockwise by 90 degrees; or Alt-click (Windows) or Option-click (Mac OS) the Rotate button
  to rotate the images counter-clockwise by 90 degrees.
Refreshing the view When you rename a file, the order of files in the File Browser is not automatically updated. To refresh the view, choose Refresh Desktop View from the palette menu. Closing and reopening the File Browser also refreshes the view.
Displaying files in the Windows Explorer or Mac OS Finder Choose Reveal Location in Explorer (Windows) or Reveal Location in Finder (Mac OS) from the palette menu.
Purging the cache The cache stores thumbnail and file information to make loading times quicker when you return to a previously viewed folder. To purge the cache and free disk space, choose Purge Cache from the palette menu.
Note: Purging the cache deletes ranking and thumbnail information.
Exporting the cache Exporting the cache allows you to burn a CD without having to generate thumbnails. To export the cache, choose Export Cache from the palette menu. The cache is exported to the current folder in the File Browser.
Placing files
You can use the File > Place command to place artwork into a new layer in an image.
In Photoshop, you can place PDF, Adobe Illustrator, and EPS files; in ImageReady, you can place files in any supported format, with the exception of Photoshop (PSD) files containing CMYK images.
When you place a PDF, Adobe Illustrator, or EPS file, it is rasterized; you cannot edit text or vector data in placed artwork. Keep in mind that artwork is rasterized at the resolution of the file into which it is placed.
To place a PDF, Adobe Illustrator, or EPS file (Photoshop):
1Open the Photoshop image into which you want to place the artwork.
2Choose File > Place, select the file you want to place, and click Place.
3If you are placing a PDF file that contains multiple pages, select the page you want to place in the provided dialog box, and click OK.
Using Help | Contents | Index |
Back |
80 |
Adobe Photoshop Help |
Getting Images into Photoshop and ImageReady |
|
|
|
|
Using Help | Contents | Index |
Back |
81 |
The placed artwork appears inside a bounding box at the center of the Photoshop image. The artwork maintains its original aspect ratio; however, if the artwork is larger than the Photoshop image, it is resized to fit.
4 If desired, reposition the placed artwork by doing one or more of the following:
•Position the pointer inside the bounding box of the placed artwork, and drag.
•In the options bar, enter a value for X to specify the distance between the center point of the placed artwork and the left edge of the image. Enter a value for Y to specify the distance between the center point of the placed artwork and the top edge of the image.
•To adjust the center point of the placed artwork, drag the center point to a new location, or click a handle on the center point icon  in the options bar.
5 If desired, scale the placed artwork by doing one or more of the following:
•Drag one of the handles at the corners or sides of the bounding box. Hold down Shift as you drag a corner handle to constrain the proportions.
•In the options bar, enter values for W and H to specify the width and height of the artwork. By default, these options represent scale as a percentage; however, you can enter another unit of measurement. To constrain the proportions of the artwork, click the Constrain Proportions icon  ; the option is on when the icon has a white background.
6 If desired, rotate the placed artwork by doing one or more of the following:
•Position the pointer outside the bounding box of the placed artwork (the pointer turns into a curved arrow), and drag.
•In the options bar, enter a value (in degrees) for the Rotation option  .
.
The artwork rotates around the center point of the placed artwork. To adjust the center point, drag it to a new location, or click a handle on the Center Point icon  in the options bar.
7If desired, skew the placed artwork by holding down Ctrl (Windows) or Command (Mac OS), and dragging a side handle of the bounding box.
8Set the Anti-alias option in the options bar as desired. To blend edge pixels during rasterization, select the Anti-alias option. To produce a hard-edged transition between edge pixels during rasterization, deselect the Anti-alias option.
9To commit the placed artwork to a new layer, do one of the following:
•Click the OK button  in the options bar.
•Press Enter or Return.
To cancel the placement, click the Cancel button  in the options bar, or press Esc.
To place a file (ImageReady):
1Open the ImageReady image into which you want to place the file.
2Choose File > Place, select the file you want to place, and click Open.
3Select offset options:
•From the Horizontal pop-up menu, choose an option for placing the file horizontally with respect to the image. In the Pixels text box, enter the number of pixels to offset the placed image horizontally.
Using Help | Contents | Index |
Back |
81 |