

Adobe Photoshop Help |
Transforming and Retouching |
|
|
|
|
Using Help | Contents | Index |
Back |
188 |
Setting 3D rendering options
You can set the resolution and anti-aliasing of rendered images and specify whether to show the background from the original image in the 3D preview.
To set 3D rendering options:
1Click Options in the 3D Transform dialog box.
2Do any of the following:
•For Resolution, choose the quality of the rendered image.The setting has little effect on the image quality of cubes, but will produce smoother curved surfaces in cylinders and spheres.
•For Anti-aliasing, choose the level of anti-aliasing to apply to the rendered image.
•Select Display Background to include the portions of the original image outside of the wire frame in the preview and with the rendered image.Turn this option off to separate the transformed object from the original background.
Cloning and repairing images
You can use the clone stamp tool, pattern stamp tool, healing brush tool, and patch tool to clone pixels and repair images.
Using the clone stamp tool
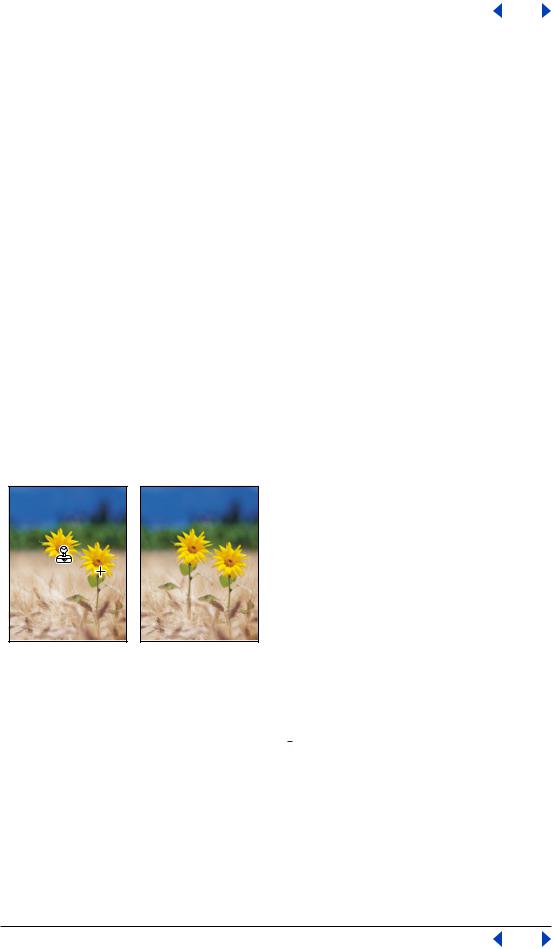
The clone stamp tool takes a sample of an image, which you can then apply over another image or part of the same image. Each stroke of the tool paints on more of the sample.
Example of altering an image with the cloning tool
To use the clone stamp tool:
1 Select the clone stamp tool  , and do the following in the options bar:
•Choose a brush and set brush options. (See “Working with brushes” on page 228.)
•Specify a blending mode, opacity, and flow. (See “Setting options for painting and editing tools” on page 241.)
•Determine how you want to align the sampled pixels. If you select Aligned, you can release the mouse button without losing the current sampling point. As a result, the sampled pixels are applied continuously, no matter how many times you stop and resume painting. If you deselect Aligned, the sampled pixels are applied from the initial sampling point each time you stop and resume painting.
Using Help | Contents | Index |
Back |
188 |
Adobe Photoshop Help |
Transforming and Retouching |
|
|
|
|
Using Help | Contents | Index |
Back |
189 |
•Select Use All Layers to sample data from all visible layers; deselect Use All Layers to sample only from the active layer.
2 Set the sampling point by positioning the pointer in any open image and Alt-clicking (Windows) or Option-clicking (Mac OS).
Note: If you are sampling from one image and applying to another, both images must be in the same color mode.
3 Drag in the image.
Using the pattern stamp tool
The pattern stamp tool lets you paint with a pattern. You can select a pattern from the pattern libraries or create your own patterns.
To use the pattern stamp tool:
1 Select the pattern stamp tool  , and do the following in the options bar:
•Choose a brush and set brush options. (See “Working with brushes” on page 228.)
•Specify a blending mode, opacity, and flow. (See “Setting options for painting and editing tools” on page 241.)
•Select a pattern from the Pattern pop-up palette. (See “Creating and managing patterns” on page 252.)
•Determine how you want to align the sampled pixels. If you select Aligned, you can release the mouse button without losing the current sampling point. As a result, the sampled pixels are applied continuously, no matter how many times you stop and resume painting. If you deselect Aligned, the sampled pixels are applied from the initial sampling point each time you stop and resume painting.
•Select Impressionist to apply the pattern with an impressionistic effect.
2 Drag in the image.
Using the healing brush tool (Photoshop)
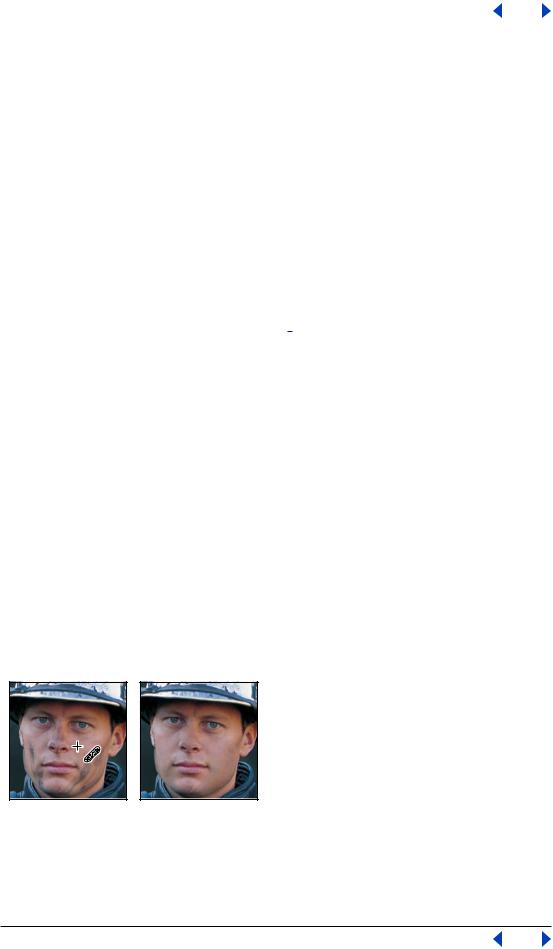
The healing brush tool lets you correct imperfections, causing them to disappear into the surrounding image. Like the cloning tools, you use the healing brush tool to paint with sampled pixels from an image or pattern. However, the healing brush tool also matches the texture, lighting, and shading of the sampled pixels to the source pixels. As a result, the repaired pixels blend seamlessly into the rest of the image.
Sampled pixels and healed image
Using Help | Contents | Index |
Back |
189 |

Adobe Photoshop Help |
Transforming and Retouching |
|
|
|
|
Using Help | Contents | Index |
Back |
190 |
To use the healing brush tool:
1Select the healing brush tool  .
.
2Click the brush sample in the options bar and set brush options in the pop-up palette:
•For more information on the Diameter, Hardness, Spacing, Angle, and Roundness options, see “Customizing brush tips (Photoshop)” on page 230.
•If you’re using a pressure-sensitive digitizing tablet, choose an option from the Size menu to vary the size of the healing brush over the course of a stroke. Choose Pen Pressure to base the variation on the pen pressure. Choose Stylus Wheel to base the variation on the position of the pen thumbwheel. Choose Off to not vary the size.
3 Choose a blending mode from the Mode pop-up menu in the options bar:
• Choose Replace to preserve noise, film grain, and texture at the edges of the brush stroke.
• For more information on the Normal, Multiply, Screen, Darken, Lighten, Color, and Luminosity modes, see “Selecting a blending mode” on page 241.
4 Choose a source to use for repairing pixels in the options bar: Sampled to use pixels from the current image, or Pattern to use pixels from a pattern. If you chose Pattern, select a pattern from the Pattern pop-up palette. (See “Creating and managing patterns” on page 252.)
Note: The Pattern option is not available for 16-bit images.
5 Determine how you want to align the sampled pixels:
•If you select Aligned in the options bar, you can release the mouse button without losing the current sampling point. As a result, the sampled pixels are applied continuously, no matter how many times you stop and resume painting.
•If you deselect Aligned in the options bar, the sampled pixels are applied from the initial sampling point each time you stop and resume painting.
6 For the healing brush tool in sampling mode, set the sampling point by positioning the pointer in any open image and Alt-clicking (Windows) or Option-clicking (Mac OS).
Note: If you are sampling from one image and applying to another, both images must be in the same color mode unless one of the images is in Grayscale mode.
7 Drag in the image.
The sampled pixels are melded with the existing pixels each time you release the mouse button. Look in the status bar to view the status of the melding process.
If there is a strong contrast at the edges of the area you want to heal, make a selection before you use the healing brush tool. The selection should be bigger than the area
you want to heal but precisely follow the boundary of contrasting pixels. When you paint with the healing brush tool, the selection will prevent colors from bleeding in from the outside.
Using Help | Contents | Index |
Back |
190 |
Adobe Photoshop Help |
Transforming and Retouching |
|
|
|
|
Using Help | Contents | Index |
Back |
191 |
Using the patch tool (Photoshop)
The patch tool lets you repair a selected area with pixels from another area or a pattern. Like the healing brush tool, the patch tool matches the texture, lighting, and shading of the sampled pixels to the source pixels. You can also use the patch tool to clone isolated areas of an image.
When repairing with pixels from the image, select a small area to produce the best result.
Sampled pixels and source pixels
Patched image
To repair an area using sampled pixels:
1Select the patch tool  .
.
2Do one of the following:
•Drag in the image to select the area you want to repair, and select Source in the options bar.
•Drag in the image to select the area from which you want to sample, and select Destination in the options bar.
Note: You can also make a selection prior to selecting the patch tool.
3 To adjust the selection, do one of the following:
•Shift-drag in the image to add to the existing selection.
•Alt-drag (Windows) or Option-drag (Mac OS) in the image to subtract from the existing selection.
•Alt-Shift-drag (Windows) or Option-Shift-drag (Mac OS) in the image to select an area intersected by the existing selection.
Using Help | Contents | Index |
Back |
191 |