

Adobe Photoshop Help |
Transforming and Retouching |
|
|
|
|
Using Help | Contents | Index |
Back |
194 |
To use the sponge tool:
1Select the sponge tool  .
.
2Do the following in the options bar:
•Choose a brush and set brush options. (See “Working with brushes” on page 228.)
•Select how to change the color: Saturate to intensify the color’s saturation; Desaturate to dilute the color’s saturation.
•Specify the flow for the tool. (See “Specifying opacity, flow, strength, or exposure” on page 243.)
3 Drag over the part of the image you want to modify.
Using the Liquify command
The Liquify command lets you interactively scramble, push, pull, rotate, reflect, pucker, and bloat any area of an image. The distortions you create can be subtle or drastic, which makes the Liquify command a powerful tool for retouching images as well as creating artistic effects.
Note: The Liquify command is available only for 8-bit images in RGB Color, CMYK Color, Lab Color, and Grayscale image modes.
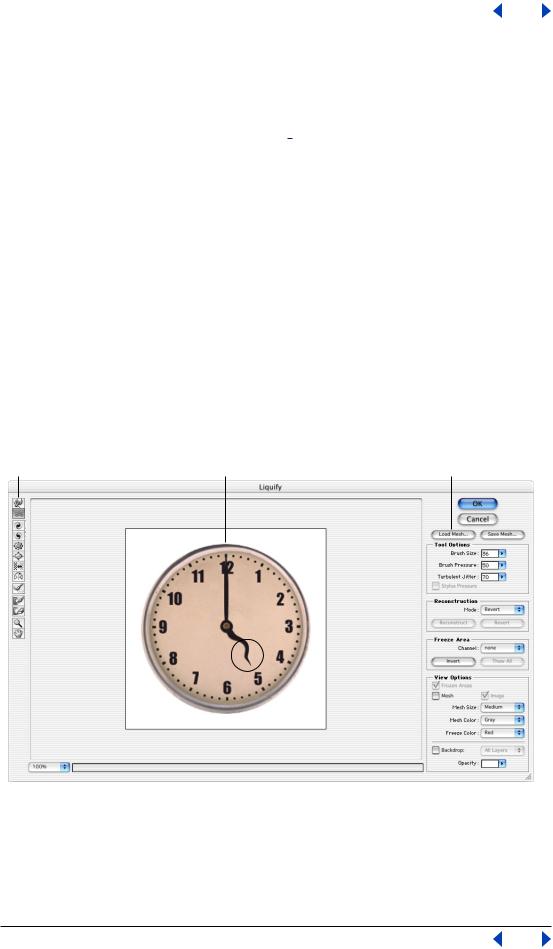
Using the Liquify dialog box
The Liquify dialog box provides tools and options for distorting an image.
A B C
Liquify dialog box:
A. Toolbox B. Preview image C. Options
Displaying the Liquify dialog box Choose Filter > Liquify.
Using Help | Contents | Index |
Back |
194 |

Adobe Photoshop Help |
Transforming and Retouching |
|
|
|
|
Using Help | Contents | Index |
Back |
195 |
Magnifying and reducing the preview image Select the zoom tool  in the Liquify dialog box, and click or drag in the preview image to zoom in; hold down Alt (Windows) or Option (Mac OS), and click or drag in the preview image to zoom out. Alternatively, you can specify a magnification level in the Zoom text box at the bottom of the dialog box.
Navigating in the preview image Select the hand tool  in the Liquify dialog box, and drag in the preview image. Alternately, hold down the spacebar, and drag in the preview image.
Using a mesh Adding a mesh helps you see and keep track of distortions. To add a mesh, select Mesh in the View Options section of the dialog box, and choose a mesh size, mesh color, and freeze color. To hide the mesh, deselect Mesh.
When Mesh is selected, you can show or hide the preview image. Select Image in the View Options section of the dialog box to show the preview image; deselect Image to view only the mesh.
Displaying layers in the preview image To show only the active layer in the preview image, deselect Add Backdrop (Windows) or Backdrop (Mac OS) in the View Options section of the dialog box. To show additional layers in the preview image, select Add Backdrop (Windows), or Backdrop (Mac OS), specify an overlay opacity, and choose an option from the pop-up menu.
Note: Only the active layer is distorted, even if other layers are displayed.
Distorting images
Several tools in the Liquify dialog box distort the brush area when you hold down the mouse button or drag. The distortion is concentrated at the center of the brush area, and the effect intensifies as you hold down the mouse button or repeatedly drag over an area.
To distort an image:
1Select the layer you want to distort. To change only part of the current layer, select that area.
2Choose Filter > Liquify.
Note: If a type layer, or a shape layer is selected, you must rasterize the layer before proceeding, making the type or shape uneditable. To distort type without rasterizing the type layer, use the Warp options for the type tool.
3Freeze areas of the image that you don’t want to alter. (See “Freezing and thawing areas” on page 196.)
4In the Tool Options section of the dialog box, do the following:
•Specify a brush size and brush pressure. Using a low brush pressure makes changes occur more slowly, so it’s easier to stop them at exactly the right moment.
•Specify a Turbulent Jitter to control how tightly the turbulence tool scrambles pixels.
•(Photoshop) Select Stylus Pressure to use pressure readings from a stylus tablet. (This option is available only when you are working with a stylus tablet.) When Stylus
Pressure is selected, the brush pressure for the tools is the stylus pressure multiplied by the Brush Pressure value.
Using Help | Contents | Index |
Back |
195 |
Adobe Photoshop Help |
Transforming and Retouching |
|
|
|
|
Using Help | Contents | Index |
Back |
196 |
5 Use any of the following tools to distort the preview image:
•The warp tool  pushes pixels forward as you drag.
•The turbulence tool  smoothly scrambles pixels. It is useful for creating fire, clouds, waves, and similar effects.
•The twirl clockwise tool  rotates pixels clockwise as you hold down the mouse button or drag.
•The twirl counterclockwise tool  rotates pixels counterclockwise as you hold down the mouse button or drag.
•The pucker tool  moves pixels toward the center of the brush area as you hold down the mouse button or drag.
•The bloat tool  moves pixels away from the center of the brush area as you hold down the mouse button or drag.
•The shift pixels tool  moves pixels perpendicular to the stroke direction. Drag to move pixels to the left, and Alt-drag (Windows) or Option-drag (Mac OS) to move pixels to the right.
•The reflection tool  copies pixels to the brush area. Drag to reflect the area perpendicular to the direction of the stroke (to the left of the stroke). Alt-drag (Windows) or Option-drag (Mac OS) to reflect the area in the direction opposite to that of the stroke (for example, the area above a downward stroke). Usually, Alt-dragging or Optiondragging gives better results when you have frozen the area you want to reflect.
Use overlapping strokes to create an effect similar to a reflection in water.
Shift-click with the warp, shift pixels, and reflection tools to create the effect of dragging in a straight line from the previous point you clicked.
6After distorting the preview image, you can use the reconstruct tool  or other controls to fully or partially reverse the changes or to change the image in new ways. (See “Reconstructing distortions” on page 197.)
7Do one of the following:
•Click OK to close the Liquify dialog box and apply the changes to the active layer.
•Click Cancel to close the Liquify dialog box without applying changes to the layer.
•Hold down Alt (Windows) or Option (Mac OS) and click Reset to revert all distortions to the preview image.
You can use the Edit > Fade command to create additional effects. (See “Blending filter effects (Photoshop)” on page 322.)
Freezing and thawing areas
You can use tools or alpha channels to freeze areas of the preview image to protect them from further changes, or to thaw the frozen areas.
Certain reconstruction modes change unfrozen areas in relation to the distortions in frozen areas. (See “Reconstructing distortions” on page 197.) You can hide or show the mask for frozen areas, change the mask color, and use a Brush Pressure option to create partial freezes and thaws.
Using Help | Contents | Index |
Back |
196 |

Adobe Photoshop Help |
Transforming and Retouching |
|
|
|
|
Using Help | Contents | Index |
Back |
197 |
To define which areas can be edited:
Do any of the following in the Liquify dialog box:
•To use the freeze tool  to protect an area in the preview image from further editing, select the tool and drag over the area. Shift-click to freeze in a straight line between the current point and the previous point that you clicked or Shift-clicked.
The degree of freezing depends on the current brush pressure. If the frozen areas mask is displayed, the tint of the mask indicates the degree of freezing. If the brush pressure is less than 100%, you can fully freeze an area by dragging more than once. If you use other tools to distort and reconstruct partially frozen areas, the effects are proportionate to the degree of freezing. For example, if you drag the warp tool over an area that is 50% frozen and continue dragging over an unfrozen area, the frozen area shows half the distortion that occurs in the unfrozen area.
•To use an alpha channel to define a frozen area, choose the channel from the Channel menu in the Freeze Area section of the dialog box.
•To thaw a frozen area, making it editable, select the thaw tool  , and drag over the area. Shift-click to thaw in a straight line between the current point and the previous point that you clicked or Shift-clicked. Brush pressure has the same effect on the thaw tool as it has on the freeze tool.
•To thaw all frozen areas, click Thaw All in the Freeze Area section of the dialog box.
•To thaw all frozen areas and freeze the remaining areas, click Invert in the Freeze Area section of the dialog box. If you used an alpha channel to define the frozen area, the alpha channel name in the Channel menu changes to Custom.
To show or hide frozen areas:
Select or deselect Frozen Areas in the View Options section of the dialog box.
To change the color of frozen areas:
Choose a color from the Freeze Color pop-up menu in the View Options section of the dialog box.
Reconstructing distortions
After you distort the preview image, you can use a variety of controls and reconstruction modes to reverse changes or redo the changes in new ways. Reconstruction modes include reverting to the original state, extending distortions in frozen areas into unfrozen areas, and repeating distortions sampled from a starting point.
To restore a preview image to a previous state:
After distorting the preview image, do one of the following:
•To change one or more unfrozen areas back to their state when you opened the Liquify dialog box, choose Revert from the Mode menu in the Reconstruction section of the
dialog box. Then select the reconstruct tool  , and hold down the mouse button or drag over the areas. The restoration occurs more quickly at the brush center.
•To change all unfrozen areas back to their state when you opened the Liquify dialog box, choose Revert from the Mode menu in the Reconstruction section of the dialog box, and click Reconstruct.
Using Help | Contents | Index |
Back |
197 |
Adobe Photoshop Help |
Transforming and Retouching |
|
|
|
|
Using Help | Contents | Index |
Back |
198 |
•To restore the entire preview image to its state when you opened the dialog box, click Revert in the Reconstruction section of the dialog box.
To extend distortions in frozen areas into unfrozen areas:
1Freeze part of the areas you have changed. (For reconstruction, the image borders are also treated as if they are frozen.)
2Choose one of these reconstruction modes from the Mode menu in the Reconstruction section of the dialog box:
•Rigid to maintain right angles in the pixel grid (as shown by the mesh) at the edges between frozen and unfrozen areas, sometimes producing near-discontinuities at the edges.This restores the unfrozen areas to something close to their original appearance. (To restore their original appearance, use Revert reconstruction mode.)
•Stiff acts like a weak magnetic field. At the edges between frozen and unfrozen areas, the unfrozen areas continue the distortions in the frozen areas. As the distance from frozen areas increases, the distortions lessen.
•Smooth to propagate the distortions in frozen areas throughout unfrozen areas, with smoothly continuous distortions.
•Loose to produce effects similar to Smooth, with even greater continuity between distortions in frozen and unfrozen areas.
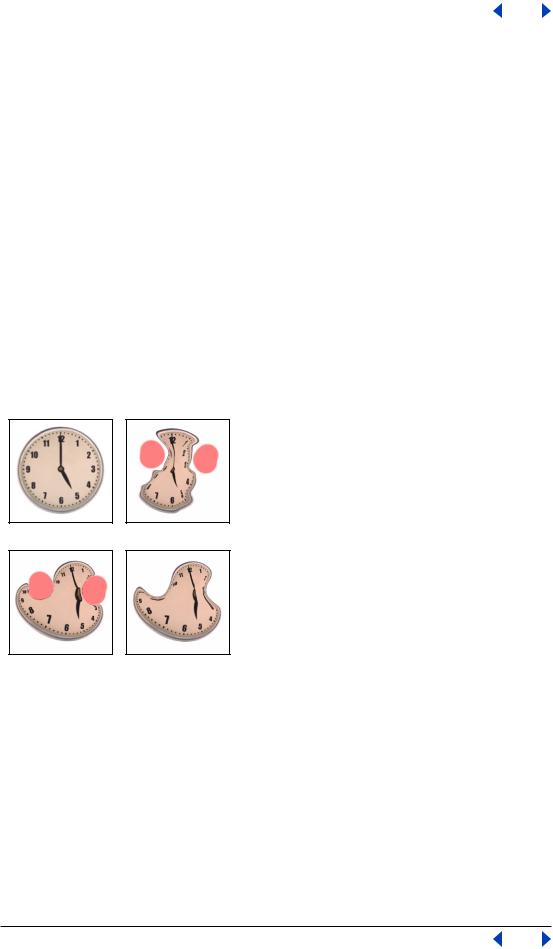
A B
C D
Reconstruction based on distortions in frozen areas:
A. Original image B. Distorted with frozen areas C. Reconstructed in Rigid mode (using button) D. Thawed, edges reconstructed in Smooth mode (using tool)
3 Do one of the following:
•To reconstruct one or more unfrozen areas, select the reconstruct tool  , and hold down the mouse button or drag over the area. Pixels move more quickly at the brush center. Shift-click to reconstruct in a straight line between the current point and the previous point that you clicked or Shift-clicked.
•To reconstruct all unfrozen areas, click Reconstruct. The image changes until reconstruction in the current mode is complete. To partially reconstruct the unfrozen areas, press Esc or press Command+period (Mac OS) during reconstruction.
Using Help | Contents | Index |
Back |
198 |