

Adobe Photoshop Help |
|
Painting |
|
|
|
Using Help | Contents | Index |
Back |
236 |
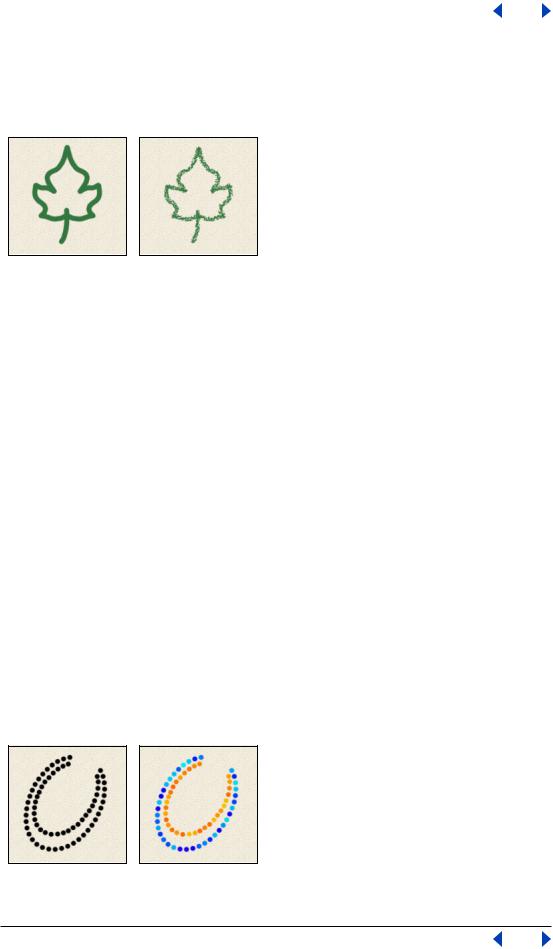
Creating dual brushes (Photoshop)
A dual brush uses two tips to create brush marks.You set options for the primary tip in the Brush Tip Shape section of the Brushes palette.You set options for the secondary tip in the Dual Brush section of the Brushes palette.
Brush strokes created with a single tip and with dual tips
To edit dual tip options for a brush:
1In the Brushes palette, select Dual Brush on the left side of the palette. Be sure to click the name, rather than the check box, to select the item.
2Select a blending mode to use when combining brush marks from the primary tip and the dual tip. (See “Selecting a blending mode” on page 241.)
3Select a tip for the dual brush from the list below the Mode pop-up menu.
4Set one or more of the following options:
Diameter Controls the size of the dual tip. Enter a value in pixels, drag the slider, or click Use Sample Size to use the original diameter of the brush tip. (The Use Sample Size option is only available if the brush tip shape was created by sampling pixels in an image.)
Spacing Controls the distance between the dual tip brush marks in a stroke. To change the spacing, type a number, or use the slider to enter a value that is a percentage of the tip diameter.
Scatter Specifies how dual tip brush marks are distributed in a stroke. When Both Axis is selected, dual tip brush marks are distributed in a radial direction. When Both Axis is deselected, dual tip brush marks are distributed perpendicular to the stroke path. To specify the maximum percentage of scattering, type a number or use the slider to enter a value.
Count Specifies the number of dual tip brush marks applied at each spacing interval. Type a number, or use the slider to enter a value.
Specifying color dynamics (Photoshop)
Color dynamics determine how the color of paint changes over the course of a stroke.
Brush strokes without color dynamics and with color dynamics
Using Help | Contents | Index |
Back |
236 |
Adobe Photoshop Help |
|
Painting |
|
|
|
Using Help | Contents | Index |
Back |
237 |
To edit color dynamics for a brush:
1In the Brushes palette, select Color Dynamics on the left side of the palette. Be sure to click the name, rather than the check box, to select the item.
2Set one or more of the following options:
Foreground/Background Jitter and Control Specifies how paint varies between the foreground color and background color. For more information, see “About brush dynamics (Photoshop)” on page 231.
To specify a percentage by which the color of the paint can vary, type a number or use the slider to enter a value. To specify how you want to control the color variance of brush marks, choose an option from the Control pop-up menu:
•Off to not control the color variance of brush marks.
•Fade to vary the color of paint between the foreground color and the background color in the specified number of steps.
•Pen Pressure, Pen Tilt, or Stylus Wheel to vary the color of paint between the foreground color and the background color based on the pen pressure, pen tilt, or position of the pen thumbwheel.
Hue Jitter Specifies a percentage by which the hue of the paint can vary in a stroke. Type a number, or use the slider to enter a value. A lower value changes the hue while maintaining a close proximity to the hue of the foreground color. A higher value increases the difference between hues.
Saturation Jitter Specifies a percentage by which the saturation of the paint can vary in a stroke. Type a number, or use the slider to enter a value. A lower value changes the saturation while maintaining a close proximity to the saturation of the foreground color. A higher value increases the difference between saturation levels.
Brightness Jitter Specifies a percentage by which the brightness of the paint can vary in a stroke. Type a number, or use the slider to enter a value. A lower value changes the brightness while maintaining a close proximity to the brightness of the foreground color. A higher value increases the difference between brightness levels.
Purity Increases or decreases the saturation of the color. Type a number, or use the slider to enter a percentage between –100 and 100. At –100, the color is fully desaturated; at 100, the color is fully saturated.
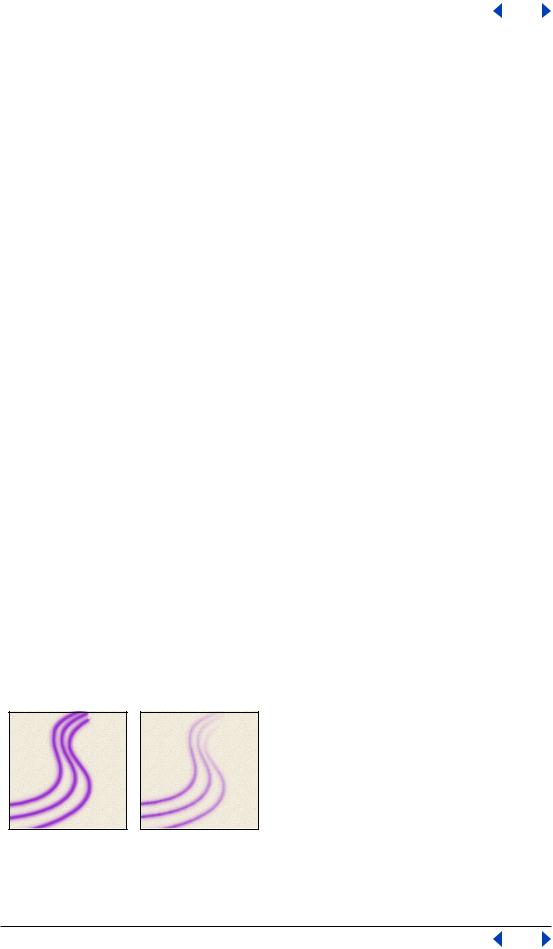
Specifying paint dynamics (Photoshop)
Paint dynamics determine how paint changes over the course of a stroke.
Brush strokes without paint dynamics and with paint dynamics
Using Help | Contents | Index |
Back |
237 |

Adobe Photoshop Help |
|
Painting |
|
|
|
Using Help | Contents | Index |
Back |
238 |
To edit paint dynamics for a brush:
1In the Brushes palette, select Other Dynamics on the left side of the palette. Be sure to click the name, rather than the check box, to select the item.
2Set one or more of the following options:
Opacity Jitter and Control Specifies how the opacity of paint varies in a brush stroke, up to (but not exceeding) the opacity value specified in the options bar. For more information, see “About brush dynamics (Photoshop)” on page 231.
To specify a percentage by which the opacity of the paint can vary, type a number or use the slider to enter a value. To specify how you want to control the opacity variance of brush marks, choose an option from the Control pop-up menu:
•Off to not control the opacity variance of brush marks.
•Fade to fade the opacity of paint from the opacity value in the options bar to 0 in the specified number of steps.
•Pen Pressure, Pen Tilt, or Stylus Wheel to vary the opacity of paint based on the pen pressure, pen tilt, or the position of the pen thumbwheel.
Flow Jitter and Control Specifies how the flow of paint varies in a brush stroke, up to (but not exceeding) the flow value specified in the options bar. For more information, see “About brush dynamics (Photoshop)” on page 231.
To specify a percentage by which the flow of the paint can vary, type a number or use the slider to enter a value. To specify how you want to control the flow variance of brush marks, choose an option from the Control pop-up menu:
•Off to not control the flow variance of brush marks.
•Fade to fade the flow of paint from the flow value in the options bar to 0 in the specified number of steps.
•Pen Pressure, Pen Tilt, or Stylus Wheel to vary the flow of paint based on the pen pressure, pen tilt, or the position of the pen thumbwheel.
Adding noise to brush strokes (Photoshop)
The Noise option adds additional randomness to individual brush tips. This option is most effective when applied to soft brush tips (brush tips that contain gray values).
To enable or disable noise in brush strokes:
In the Brushes palette, select Noise on the left side of the palette. A check mark indicates that the option is enabled.
Using wet brush edges (Photoshop)
The Wet Edges option causes paint to build up along the edges of the brush stroke, creating a watercolor effect.
To enable or disable wet brush edges:
In the Brushes palette, select Wet Edges on the left side of the palette. A check mark indicates that the option is enabled.
Using Help | Contents | Index |
Back |
238 |

Adobe Photoshop Help |
|
Painting |
|
|
|
Using Help | Contents | Index |
Back |
239 |
Creating airbrush effects (Photoshop)
The Airbrush option in the Brushes palette lets you apply gradual tones to an image, simulating traditional airbrush techniques.
Note: The Airbrush option in the Brushes palette corresponds to the Airbrush option in the options bar.
To enable or disable the Airbrush option:
In the Brushes palette, select Airbrush on the left side of the palette. A check mark indicates that the option is enabled.
Note: The Airbrush option in the Brushes palette corresponds to the Airbrush option in the options bar.
Smoothing brush strokes (Photoshop)
The Smoothing option produces smoother curves in brush strokes. This option is most effective when you are painting quickly with a stylus; however, it may produce a slight lag time in stroke rendering.
To enable or disable smoothing in brush strokes:
In the Brushes palette, select Smoothing on the left side of the palette. A check mark indicates that the option is enabled.
Protecting texture in brush strokes (Photoshop)
The Protect Texture option applies the same pattern and scale to all brush presets that have a texture. Select this option to simulate a consistent canvas texture when painting with multiple, textured brush tips.
To enable or disable the Protect Texture option:
In the Brushes palette, select Protect Texture on the left side of the palette. A check mark indicates that the option is enabled.
Copying textures between tools (Photoshop)
When you specify a texture for the current tool, you can copy the texture’s pattern and scale to all tools that support textures. For example, you can copy the current texture pattern and scale for the brush tool to the pencil, clone stamp, pattern stamp, history brush, art history brush, eraser, dodge, burn, and sponge tools.
To copy a texture pattern and scale to other painting and editing tools:
Choose Copy Texture to Other Tools from the Brushes palette menu.
Clearing brush options (Photoshop)
You can easily clear all brush options for a tool using the Clear Brush Controls command.
To clear brush options:
Choose Clear Brush Controls from the Brushes palette menu.
Using Help | Contents | Index |
Back |
239 |