

Adobe Photoshop Help |
Making Color and Tonal Adjustments |
|
|
|
|
Using Help | Contents | Index |
Back |
139 |
Using Levels to adjust color (Photoshop)
In addition to setting the tonal range, you can use Levels to adjust the color balance of an image.
To use Levels to adjust color balance:
1Place a color sampler on an area of neutral gray in the image.
2Open the Levels dialog box. (See “Making color adjustments” on page 132.)
3Do one of the following:
•Double-click the eyedropper tool  in the Levels dialog box to display the Color Picker. Enter the values you want to assign to the neutral gray, and click OK. Then click the color sampler in the image.
•Click Options in the Levels dialog box. Click the Midtones color swatch to display the Color Picker. Enter the values you want to assign to the neutral gray, and click OK.
In general, assign equal color component values to a neutral gray. For example, assign equal red, green, and blue values to produce a neutral gray in an RGB image.
Using the Curves dialog box (Photoshop)
Like the Levels dialog box, the Curves dialog box lets you adjust the entire tonal range of an image. But instead of making adjustments using only three variables (highlights, shadows, midtones), with Curves you can adjust any point along a 0–255 scale while keeping up to 15 other values constant. You can also use Curves to make precise adjustments to individual color channels in an image.
To adjust tonal range and color balance using Curves:
1 Open the Curves dialog box. (See “Making color adjustments” on page 132.)
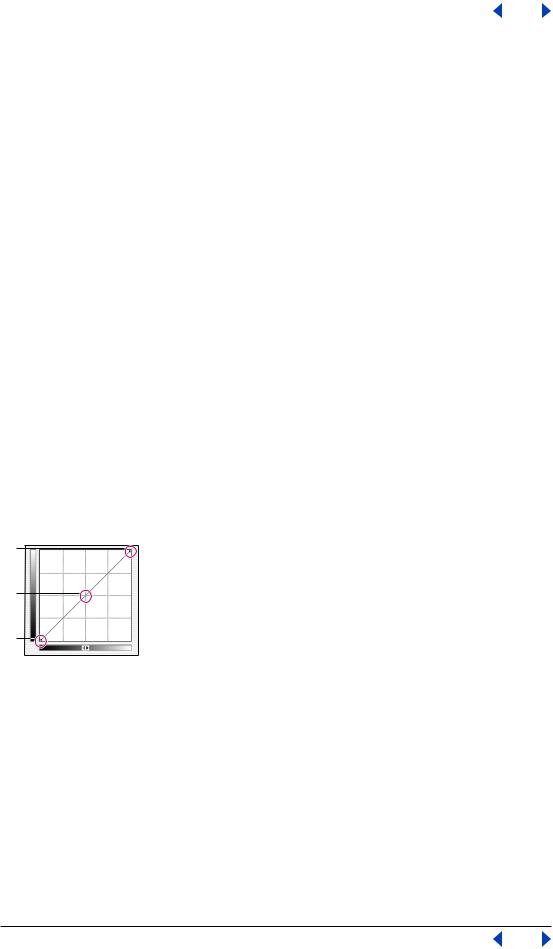
A
B
C
Points along a curve:
A. Highlights B. Midtones C. Shadows
The horizontal axis of the graph represents the original intensity values of the pixels (Input levels); the vertical axis represents the new color values (Output levels). In the default diagonal line, all pixels have identical Input and Output values.
Note: For RGB images, Curves displays intensity values from 0 to 255, with shadows (0) on the left. For CMYK images, Curves displays percentages from 0 to 100, with highlights (0) on the left. To reverse the display of shadows and highlights at any time, click the double arrow below the curve.
Using Help | Contents | Index |
Back |
139 |
Adobe Photoshop Help |
Making Color and Tonal Adjustments |
|
|
|
|
Using Help | Contents | Index |
Back |
140 |
2 To adjust the color balance of the image, choose the channel (or channels) you want to adjust from the Channel menu.
To edit a combination of color channels at the same time, Shift-select the channels in the Channels palette before choosing Curves. The Channel menu then displays the abbreviations for the target channels—for example, CM for cyan and magenta. The menu also contains the individual channels for the selected combination.
3To make the Curves grid finer, hold down Alt (Windows) or Option (Mac OS), and click the grid. Alt/Option-click again to make the grid larger.
4Click any points on the curve that you want to remain fixed. For example, if you want to adjust the midtones while minimizing the effect on the highlights and shadows, click the quarter and three-quarter points on the curve.
You can add up to 14 control points to the curve, locking those values.To remove a control point, drag it off the graph, select it and press Delete, or Ctrl-click (Windows) or Command-click (Mac OS) it. You cannot delete the endpoints of the curve.
To determine the lightest and darkest areas in the image, drag over the image. The intensity values of the area under the pointer, along with the corresponding location
on the curve, are displayed in the Curves dialog box.
5 Do any of the following to adjust the curve:
•Drag the curve until the image looks the way you want it.
•Click a point on the curve, and enter Input and Output values for the point.
•Select the pencil at the bottom of the dialog box, and drag to draw a new curve. You can hold down Shift to constrain the curve to a straight line, and click to define endpoints. When you’re finished, click Smooth if you want to smooth the curve.
•Click Auto to adjust the image using the settings specified in the Auto Correction Options dialog box. For more information, see “Setting auto correction options (Photoshop)” on page 144.
The following shortcuts work with the Curves dialog box:
•Ctrl-click (Windows) or Command-click (Mac OS) in the image to set a point on the curve in the current channel specified in the Curves dialog box.
•Shift+Ctrl-click (Windows) or Shift+Command-click (Mac OS) in the image to set a point on the curve for the selected color in each color component channel (but not in the composite channel).
•Shift-click points on the curve to select multiple points. Selected points appear filled with black.
•Click in the grid, or press Ctrl-D (Windows) or Command-D (Mac OS) to deselect all points on the curve.
•Press arrow keys to move selected points on the curve.
•Press Ctrl+Tab (Windows) or Control+Tab (Mac OS) to move forward through control points on the curve.
•Press Shift+Ctrl+Tab (Windows) or Shift+Control+Tab (Mac OS) to move backward through control points on the curve.
Using Help | Contents | Index |
Back |
140 |
Adobe Photoshop Help |
Making Color and Tonal Adjustments |
|
|
|
|
Using Help | Contents | Index |
Back |
141 |
Using target values to set highlights and shadows (Photoshop)
Professional color technicians typically set the highlights and shadows in an image by assigning their lightest and darkest CMYK ink values to the lightest and darkest areas of detail in the image.
When identifying the lightest and darkest areas of an image, it’s important to identify representative highlights and shadows. Otherwise the tonal range may be expanded unnecessarily to include extreme pixel values that don’t give the image detail. A highlight area must be a printable highlight, not specular white. Specular white has no detail, and so no ink is printed on the paper. For example, a spot of glare is specular white, not a printable highlight.
Note: You can do the following procedure in ImageReady in the Levels dialog box.
To use target values to set highlights and shadows:
1Select the eyedropper tool, and choose 3 by 3 Average from the Sample Size menu in the eyedropper tool options. This ensures a representative sample of an area rather than the value of a single screen pixel.
2Open the Levels or Curves dialog box. (See “Making color adjustments” on page 132.)
When you open Levels or Curves, the eyedropper tool  is still active outside the dialog box. You still have access to the scroll controls and to the hand and zoom tools by using keyboard shortcuts.
3 Do one of the following to identify areas of representative highlights and shadows in the image:
•Move the pointer around the image, and look at the Info palette to find the lightest and darkest areas. (See “Seeing the color values of pixels (Photoshop)” on page 133.)
•Drag the pointer in the image, and look at the Curves dialog box to find the lightest and darkest points in the range of values. This method does not work if the Curves dialog box is set to the CMYK composite channel.
You can also use the Threshold command to identify representative highlights and shadows before opening Levels or Curves. (See “Using the Threshold command
(Photoshop)” on page 154.)
4 Do one of the following to assign color values to the lightest area of the image:
•Double-click the Set White Point eyedropper tool  in the Levels or Curves dialog box to display the Color Picker. Enter the values you want to assign to the lightest area in the image, and click OK. Then click the highlight you identified in step 3.
If you accidentally click the wrong highlight, hold down Alt (Windows) or Option (Mac OS), and click Reset in the Levels or Curves dialog box.
•Click Options in the Levels or Curves dialog box. Click the Highlights color swatch to display the Color Picker. Enter the values you want to assign to the lightest area in the image, and click OK.
Using Help | Contents | Index |
Back |
141 |
Adobe Photoshop Help |
Making Color and Tonal Adjustments |
|
|
|
|
Using Help | Contents | Index |
Back |
142 |
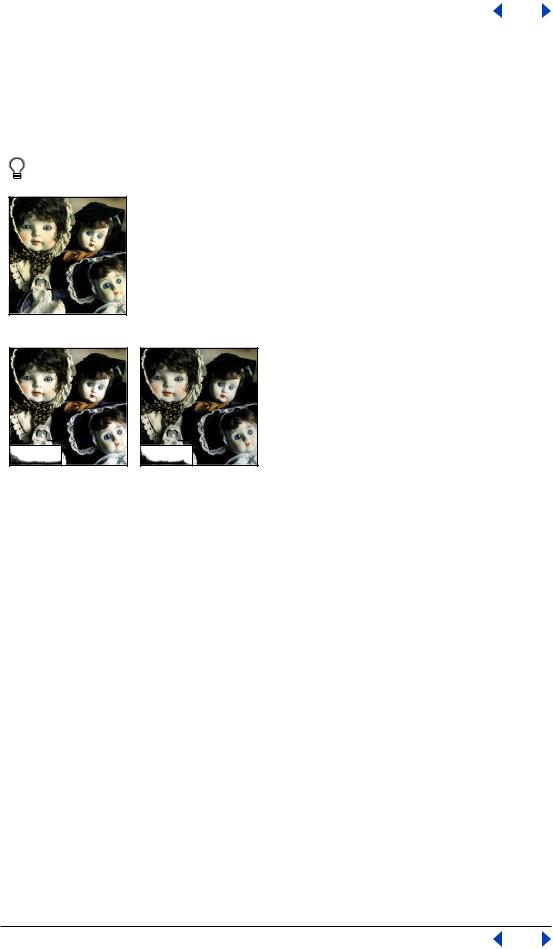
In most situations when you are printing on white paper, you can achieve a good highlight in an average-key image using CMYK values of 5, 3, 3, and 0, respectively. An approximate RGB equivalent is 244, 244, 244, and an approximate grayscale equivalent is a 4% dot. You can approximate these target values quickly by entering 96 in the Brightness (B) text box under the HSB section of the Color Picker.
With a low-key image, you might want to set the highlight to a lower value to avoid too much contrast. Experiment with Brightness values between 96 and 80.
Original
Highlight set using average-key target brightness values (B: 96); and highlight set using lower target brightness values (B: 80)
The pixel values throughout the image are adjusted proportionately to the new highlight values. Any pixels lighter than the area you clicked become specular white. The Info palette shows the values both before and after the color adjustment.
5 Do one of the following to assign color values to the darkest area of the image:
•Double-click the Set Black Point eyedropper tool  in the Levels or Curves dialog box to display the Color Picker. Enter the values you want to assign to the darkest area in the image, and click OK. Then click the shadow you identified in step 3.
•Click Options in the Levels or Curves dialog box. Click the Shadows color swatch to display the Color Picker. Enter the values you want to assign to the darkest area in the image, and click OK.
In most situations when you’re printing on white paper, you can achieve a good shadow in an average-key image using CMYK values of 65, 53, 51, and 95. An approximate RGB equivalent is 10, 10, 10, and an approximate grayscale equivalent is a 96% dot.You can approximate these same values quickly by entering 4 in the Brightness (B) text box under the HSB section of the Color Picker.
Using Help | Contents | Index |
Back |
142 |
Adobe Photoshop Help |
Making Color and Tonal Adjustments |
|
|
|
|
Using Help | Contents | Index |
Back |
143 |
With a high-key image, you might want to set the shadow to a higher value to maintain detail in the highlights. Experiment with Brightness values between 4
and 20.
Original
Shadow set using average-key target brightness values (B: 4); and shadow set using higher target brightness values (B: 20)
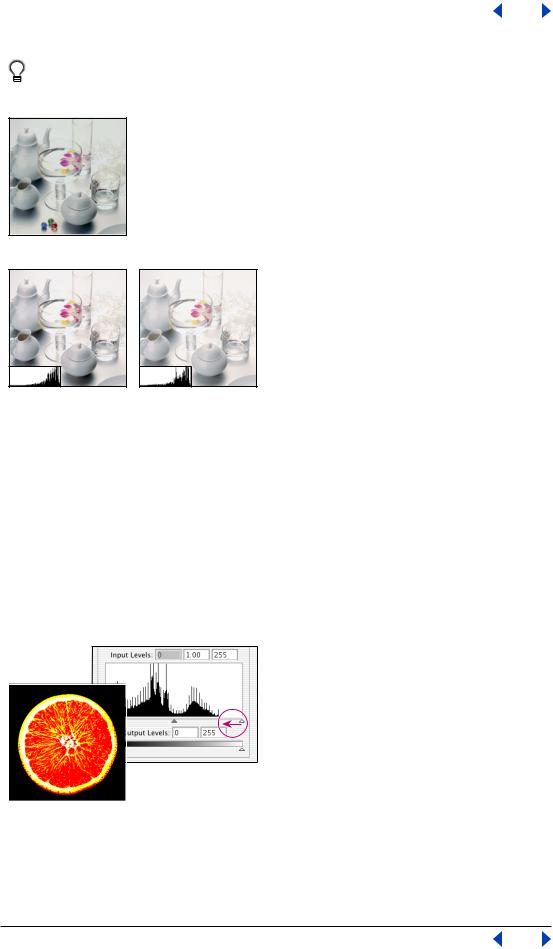
To use Threshold mode to identify the lightest and darkest areas in an image:
1 Open the Levels dialog box, and select Preview.
Note: The Threshold mode in Levels is not available for CMYK images.
2 Hold down Alt (Windows) or Option (Mac OS), and drag the white or black Input Levels triangle.
The image changes to Threshold mode, and a high-contrast preview image appears. The visible areas of the image indicate the lightest parts of the image if you are dragging the white slider, and the darkest parts if you are dragging the black slider. If a color channel is selected in the Levels dialog box, the black area indicates where none of the given color component exists.
Image preview in Threshold mode
3 Slowly drag the slider to the center of the histogram to identify the light or dark areas in the image. Use these pixels for targeting the black point and white point in your image.
Using Help | Contents | Index |
Back |
143 |