

Adobe Photoshop Help |
Using Layers |
|
|
|
|
Using Help | Contents | Index |
Back |
301 |
Using layer effects and styles
Layer styles let you quickly apply effects to a layer’s content. You can scan through a variety of predefined layer styles and apply a style with just a click of the mouse, or you can create a custom style by applying multiple effects to a layer.
About layer effects and styles
Photoshop and ImageReady provide a variety of effects—such as shadows, glows, bevels, overlays, and strokes—that let you quickly change the appearance of a layer’s contents. Layer effects are linked to the layer contents. When you move or edit the contents of the layer, the effects are modified correspondingly. For example, if you apply a drop shadow effect to a text layer, the shadow will change automatically when you edit the text.
The effects that you apply to a layer become part of the layer’s custom style. When a layer has a style, an “f” icon  appears to the right of the layer’s name in the Layers palette. You can expand the style in the Layers palette to view all the effects that comprise the style and edit the effects to change the style.
When you save a custom style, it becomes a preset style. Preset styles appear in the Styles palette and can be applied with just a click of the mouse. Photoshop and ImageReady provide a variety of preset styles to fill a wide range of uses.
Illustration of a layer without a style
Illustration of a layer with a style
Note: You cannot apply layer effects and styles to a background, a locked layer, or to a layer set.
Using Help | Contents | Index |
Back |
301 |
Adobe Photoshop Help |
Using Layers |
|
|
|
|
Using Help | Contents | Index |
Back |
302 |
Applying preset styles
The Styles palette, Layer Styles dialog box (Photoshop), and Layer Styles pop-up palette in the options bar for the pen and shape tool let you view and select preset layer styles. By default, applying a preset style replaces the current layer style. However, you can add the attributes of a second style to those of the current style using a keyboard modifier.
The layer styles that come with Photoshop and ImageReady are grouped into libraries by function. For example, one library contains styles for creating Web buttons; another library contains styles adding effects to text.
To display the Styles palette:
Choose Window > Styles.
To apply a preset style to a layer:
Do one of the following:
•Click a style in the Styles palette to apply it to the currently selected layer.
•Drag a style from the Styles palette onto a layer in the Layers palette.
•Drag a style from the Styles palette to the document window, and release the mouse button when the pointer is over the layer content to which you want to apply the style.
Note: Hold down Shift while clicking or dragging to add the style to (instead of replace) any existing effects on the destination layer.
•(Photoshop) Double-click a layer thumbnail in the Layers palette, and click on the word Styles in the Layer Styles dialog box (top item in the list on the left side of the dialog box). Click the style you want to apply, and click OK.
•When using a shape or pen tool, select a style from the pop-up palette in the options bar before drawing the shape.
To load a library of preset styles:
1Click the triangle  in the Styles palette, Layer Style dialog box (Photoshop), or Layer Style pop-up palette in the options bar (Photoshop).
2Do one of the following:
•Choose Load Styles (Photoshop) or Append Styles (ImageReady) to add a library to the current list. Then select the library file you want to use, and click Load.
•Choose Replace Styles to replace the current list with a different library. Then select the library file you want to use, and click Load.
•Choose a library file (displayed at the bottom of the palette menu). Then click OK to replace the current list, or click Append to append the current list.
Note: You can also use the Preset Manager to load and reset style libraries. For more information, see “Managing libraries with the Preset Manager (Photoshop)” on page 54.
To return to the default library of preset styles:
1Click the triangle  in the Styles palette, Layer Styles dialog box (Photoshop), or Layer Styles pop-up palette in the options bar (Photoshop).
2Choose Reset Styles.You can either replace the current list or append the default library to the current list.
Using Help | Contents | Index |
Back |
302 |

Adobe Photoshop Help |
Using Layers |
|
|
|
|
Using Help | Contents | Index |
Back |
303 |
To change how preset styles are displayed:
1Click the triangle  in the Styles palette, Layer Styles dialog box (Photoshop), or Layer Styles pop-up palette in the options bar (Photoshop).
2Choose a display option from the palette menu:
•(Photoshop) Select Text Only to view the layer styles as a list.
•Select Small or Large Thumbnail to view the layer styles as thumbnails.
•Select Small or (Photoshop) Large List to view the layer styles as a list, with a thumbnail of the selected layer style displayed.
Creating custom styles
You can create custom style using one or more of the following effects:
Drop Shadow Adds a shadow that falls behind the contents on the layer.
Inner Shadow Adds a shadow that falls just inside the edges of the layer’s content, giving the layer a recessed appearance.
Outer Glow and Inner Glow Add glows that emanate from the outside or inside edges of the layer’s content.
Bevel and Emboss Adds various combinations of highlights and shadows to a layer.
Satin Applies shading to the interior of a layer that reacts to the shape of the layer, typically creating a satiny finish.
Color, Gradient, and Pattern Overlay Fills the layer’s content with a color, gradient, or pattern.
Stroke Outlines the object on the current layer using color, a gradient, or a pattern. It is particularly useful on hard-edged shapes such as type.
To apply a custom style to a layer:
1 Do one of the following:
•Click the Layer Styles button  in the Layers palette and choose an effect from the list.
•Choose an effect from the Layer > Layer Style submenu.
•(Photoshop) Double-click a layer thumbnail in the Layers palette, and select an effect on the left side of the dialog box.
2Set effect options in the Layer Style dialog box (Photoshop) or the context-sensitive Layer Options/Style palette (ImageReady). (See “Editing styles” on page 304.)
3To add additional effects to the style, do one of the following:
•Repeat steps 1 and 2.
•(Photoshop) Select additional effects in the Layer Style dialog box. Click the check box to the left of the effect name to add the effect without selecting it.
Using Help | Contents | Index |
Back |
303 |
Adobe Photoshop Help |
Using Layers |
|
|
|
|
Using Help | Contents | Index |
Back |
304 |
Displaying layer styles
When a layer has a style, an “f” icon  appears to the right of the layer’s name in the Layers palette. You can show or hide the style’s effects in the image and in the Layers palette.
To hide or show all layer styles in an image:
Choose Layer > Layer Style > Hide All Layer Effects or Show All Layer Effects.
To expand or collapse layer styles in the Layers palette:
Do one of the following:
•Click the triangle  next to the layer styles icon
  to expand the list of layer effects applied to that layer.
•Click the inverted triangle  to collapse the layer effects.
•To expand or collapse all of the layer styles applied within a layer set, hold Alt (Windows) or Option (Mac OS) and click the triangle or inverted triangle for the set.The layer styles applied to all layers within the layer set expand or collapse correspondingly.
Editing styles
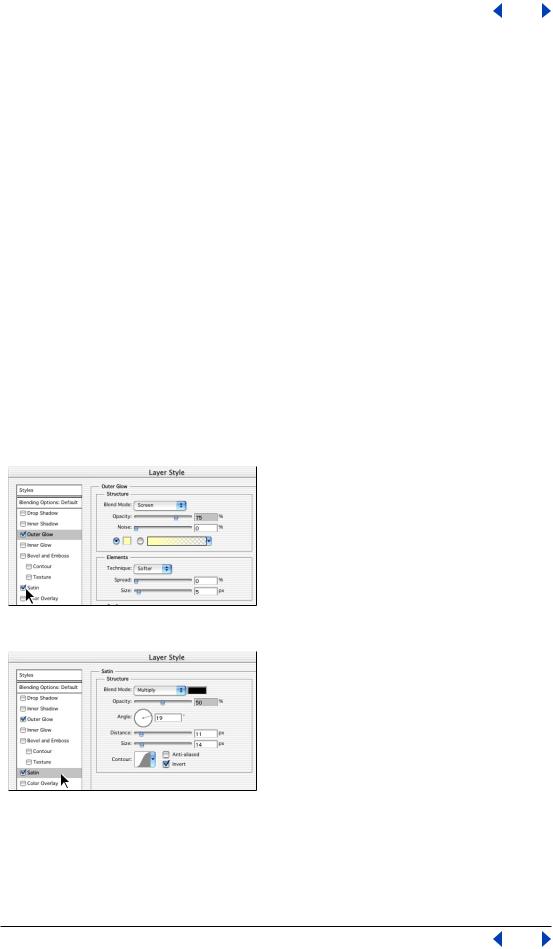
You edit a layer’s style by adjusting its effect settings. In Photoshop, effect settings appear in the Layer Style dialog box. In ImageReady, effect settings appear in the contextsensitive Layer Options/Style palette—the name of the palette changes depending on the effect you select.
Note: ImageReady provides a subset of the effect settings provided by Photoshop.
Photoshop Layer Style dialog box. Click a check box to apply the default settings without displaying the effect’s options.
Click an effect name to display the effect’s options.
Using Help | Contents | Index |
Back |
304 |
Adobe Photoshop Help |
Using Layers |
|
|
|
|
Using Help | Contents | Index |
Back |
305 |
To edit a layer style:
1 Do one of the following:
•In the Layers palette, double-click an effect displayed below the layer name. (Click the inverted triangle  next to the “f” icon
  to display the effects contained in the style.)
•(Photoshop) Double-click a layer thumbnail, and select the effect you want to edit on the left side of the dialog box.
2 Set one or more of the following options in the Layer Style dialog box (Photoshop) or the context-sensitive Layer Options/Style palette (ImageReady). The available options depend on the selected effect:
In Photoshop, you can edit multiple effects without closing the Layer Style dialog box. Select an effect on the left side of the dialog box to display an effect’s options.
Angle Determines the lighting angle at which the effect is applied to the layer. In Photoshop, you can drag in the document window to adjust the angle of a Drop Shadow, Inner Shadow, or Satin effect.
Anti-alias Blends the edge pixels of a contour or gloss contour. Most useful on shadows with a small size and complicated contour.
Blend Mode Determines how the layer style blends with the underlying layers, which may or may not include the active layer. For example, an inner shadow blends with the active layer because the effect is drawn on top of that layer, but a drop shadow blends only with the layers beneath the active layer. In most cases, the default mode for each effect produces the best results. (See “Choosing a blending mode” on page 296.)
Choke Shrinks the boundaries of the matte of an Inner Shadow or Inner Glow prior to blurring.
Color Specifies the color of a shadow, glow, or highlight. You can click the color box and choose a color. (See “Using the Adobe Color Picker” on page 261.)
Contour With solid color glows, contour allows you to create rings of transparency. With gradient filled glows, contour allows you to create variations in the repetition of the gradient color and opacity. With bevel and emboss, contour allows you to sculpt the ridges, valleys, and bumps that are shaded in the embossing process. With shadows, allows you to specify the fade. For more information, see “Modifying layer effects with contours (Photoshop)” on page 307.
Distance Specifies the offset distance for a shadow or satin effect. In Photoshop, you can drag in the document window to adjust the offset distance.
Depth Specifies the depth of a bevel and is a ratio of size. It also specifies the depth of a pattern.
Global Angle Turns on global lighting for the effect. Global lighting applies the same angle to all effects with the Global Angle option selected, giving the appearance of a consistent light source shining on the image. (See “Applying global lighting” on page 308.) Deselect Global Angle to assign a local angle to Drop Shadow, Inner Shadow, and Bevel effects.
Gloss Contour Creates a glossy, metal-like appearance and is applied after shading a bevel or emboss.
Using Help | Contents | Index |
Back |
305 |

Adobe Photoshop Help |
Using Layers |
|
|
|
|
Using Help | Contents | Index |
Back |
306 |
Gradient Specifies the gradient of a layer effect. In Photoshop, click the gradient to display the Gradient Editor or click the inverted arrow  and choose a gradient from the pop-up palette. In Photoshop, you can edit a gradient or create a new gradient using the Gradient Editor. (See “Creating smooth gradient fills” on page 245.) In ImageReady, click the inverted arrow
  next to the gradient sample and select a gradient from the list, or choose a gradient type from the pop-up list. You can edit the color or opacity in the Gradient Overlay panel the same way you do in the Gradient Editor. For some effects, you can specify additional gradient options. Reverse flips the orientation of the gradient, Align With Layer uses the bounding box of the layer to calculate the gradient fill. Scale scales the application of the gradient.You can also use the mouse to move the center of the gradient by clicking and dragging in the image window. Style specifies the shape of the gradient.
Highlight or Shadow Mode Specifies the blending mode of a bevel or emboss highlight or shadow.
Jitter Varies the application of a gradient’s color and opacity.
Layer Knocks Out Drop Shadow Controls the drop shadow’s visibility in a semitransparent layer.
Noise Specifies the amount of random elements in the opacity of a glow or shadow as you enter a value or drag the slider.
Opacity Sets the opacity of the layer effect as you enter a value or drag the slider.
Pattern Specifies the pattern of a layer effect. In ImageReady, click the inverted arrow  next to the pattern sample and choose a pattern from the list. In Photoshop, click the pop-up palette and choose a pattern. Click the New preset button
  to create a new preset pattern based on the current settings. Click Snap to Origin to position the origin of the pattern with that of the document if Link With Layer is selected, or to position the origin with the top left corner of the layer if it is deselected. Select Link With Layer to specify that the pattern moves with the layer as it is relocated, and drag the Scale slider or enter a value to specify the size of the pattern. You can drag a pattern in the layer to position it while in this panel. The position can be reset with the Snap to Origin button. There must be at least one pattern loaded for the pattern option to be available. You can also load patterns using the Preset Manager.
Position Specifies the position of a stroke effect as Outside, Inside, or Center.
Range Controls which portion or range of the glow is targeted for the contour.
Size Specifies the amount of blur or the size of the shadow.
Soften Blurs the results of shading before compositing to reduce unwanted artifacts.
Source Specifies the glow source for an inner glow. Choose Center to apply a glow that emanates from the center of the layer’s content, or Edge to apply a glow that emanates from the inside edges of the layer’s content.
Spread Expands the boundaries of the matte prior to blurring.
Style Specifies the style of a bevel: Inner Bevel to create a bevel on the inside edges of the layer contents, Outer Bevel to create a bevel on the outside edges of the layer contents, Emboss to create the effect of embossing the layer contents against the underlying layers, Pillow Emboss to create the effect of stamping the edges of the layer contents into the underlying layers, or Stroke Emboss to confine the emboss to the boundaries of a stroke effect applied to the layer. (Note that the Stroke Emboss effect will not be visible if no stroke is applied to the layer.)
Using Help | Contents | Index |
Back |
306 |