


state (average summary on the sales field) and calculate the number of products sold in the state (distinct count of the product name field).
See How to summarize grouped data, Page 289, and How to subtotal grouped data, Page 291.
Beyond basic reports
Once you are comfortable with the basics of reporting, you will be ready to investigate powerful reporting features including:
●graphs (see Graphing, Page 405),
●OLE objects (see OLE, Page 415),
●form letters (see How to create a form letter using a text object, Page 218),
●subreports (see Subreports, Page 429),
●cross-tabs (see Cross-Tab Objects, Page 445),
●multi-section reports (see Multiple Section Reports, Page 213),
●and much, much more.
HANDS-ON (Report Creation and Design)
How to select data and begin creating a report
You can use Experts to help you create reports as quickly as possible. When you click the NEW REPORT button on the standard toolbar, the Report Gallery appears. In the Report Gallery you will find a series of buttons representing the different types of Experts that are at your disposal.
Reporting 101 |
113 |
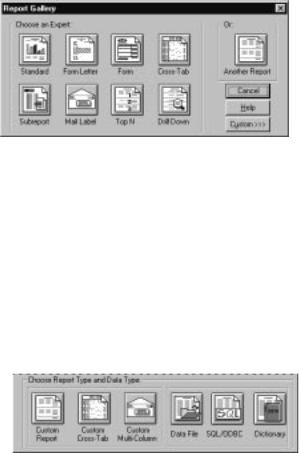
●Click the icon for the type of report you want to create and follow the steps outlined on the tabs in the Expert that appears.
●If you want to build a new report based upon one that already exists, click the Another Report button. You can select a report file to serve as a template for your new report. The program will make a duplicate of that original report, which you can modify however you please.
●If you want to build a report from scratch, click the Custom button. Several Report Type and Data Type icons will appear at the bottom of the Report Gallery. Click the buttons appropriate to your needs.
The program will open a dialog box that enables you to select the data you need. Since building reports from scratch is the easiest way to learn about all the powerful features of the program, this is the method discussed throughout the documentation. For information on creating reports from another report, see
ANOTHER REPORT, Page 106, and search for Report Templates in Seagate Crystal Reports online Help and Sample Reports in Sample Reports online Help.
114 |
Seagate Crystal Reports User’s Guide |

If you choose Data File |
1 Using the File Name and Directories |
as your data source... |
list boxes, select the desired file. |
2 Click OK to add the file to your report.
If you choose SQL/ODBC
as your data source...
1 First, choose the Server Type.
2 Then, using the SQL Tables and SQL Databases list boxes, select the desired table and click OK.
3 Click done once you have added all you want.
Reporting 101 |
115 |
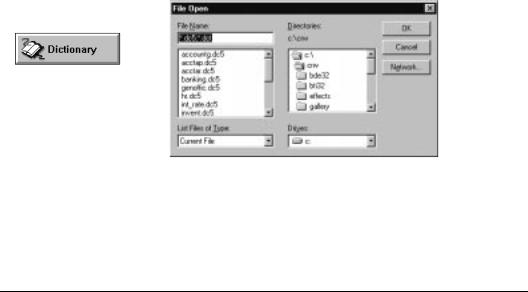
If you choose Dictionary as your data source...
1 Using the File Name and Directories list boxes, select the desired file.
2 Click OK to open the file and add it to your report.
Related Topics
Data Sources, Page 583
How to select a dictionary for a report, Page 510
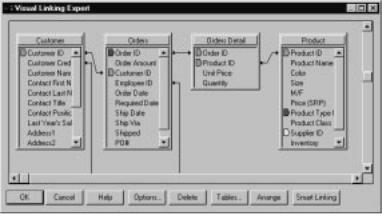
How to add and link multiple tables
After you have selected a database table to begin working on your report, you may need to select a second table and then link the tables so the records in each table match up. For example, if you are using a Customers table and an Orders table for your report, you will need to link the tables so the records in the Orders table are matched up with the records of the customers who placed the orders.
Choose the ADD DATABASE TO REPORT command from the Database menu. The Choose Database File dialog box appears.
Using the Directories, Drives, and File Name boxes, select the new database that you want to use in the report and click OK when finished. The Visual Linking Expert appears and displays the databases currently available for linking. Search for Visual Linking Expert in Seagate Crystal Reports online Help.
NOTE: If the Auto-Smart Linking option is toggled on in the
Database Tab of the File Options dialog box, you will not have to
116 |
Seagate Crystal Reports User’s Guide |
manually create links between the tables. See Linking tables, Page 520, and search for File Options dialog box in Seagate Crystal Reports online Help.
NOTE: If your primary database is either Access or Btreive, all tables contained in those databases will appear in the Visual Linking Expert. You do not have to manually add each table to your report.
To create links manually, drag a field from one table to a field in another table. If successful, a link line is created. If unsuccessful, a message is issued.
|
|
|
|
|
|
Click OK when |
To specify the tables, |
|
To link databases automatically, |
||
|
|||||
finished. |
click the Tables button. |
click the Smart Linking button. |
|||
NOTE: When manually creating links, the field you are linking “to” field must be an indexed field. For more information on indexed fields and tables, see Indexed tables, Page 518.
The Visual Linking Expert closes, and you are returned to your report. The linked databases are now available to use. If you are not satisfied with the link, you can modify it using the Visual Linking Expert. Search for Visual Linking Topics Index in Seagate Crystal Reports online Help.
Related Topics
Working With Databases, Page 513
SQL join types (ODBC data sources), Page 537
Reporting 101 |
117 |