

HANDS-ON (Sections and Areas)
How to add, delete, move, and merge sections
The Design Tab opens originally with a standard set of report sections, each in a standard size (see Design Tab Areas, Page 67). You can not delete any of these original sections but you can add to them. Once you have added sections, you can delete them, move them in relation to other similar sections, or merge related sections together.
While there are different ways to do this, an easy way is using the
SECTION EXPERT button.
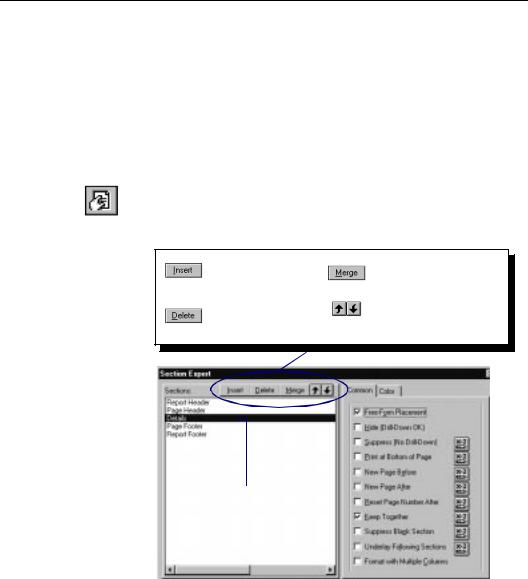
Click the SECTION EXPERT button on the standard toolbar. The Section Expert appears with a list of all the sections in the report. When there are more than one of any kind of section, the sections are lettered A, B, C, and so on.
Click Insert to insert a new section.
Click Delete to delete an existing section.
Click Merge to merge two sections.
Click the arrow buttons to move a section up or down in an area.
2 Highlight the section you want to work with from this list.
Getting to Know Seagate Crystal Reports |
89 |
Inserting a section
Deleting a section
Moving a section
Click the Insert button. The program adds a new section immediately below the highlighted section.
NOTE: You can also insert a section by right-clicking the shaded area to the left of any section in the Design or Preview Tabs and choosing the INSERT SECTION BELOW command from the shortcut
menu that appears.
Click the Delete button. The program removes the highlighted section from your report.
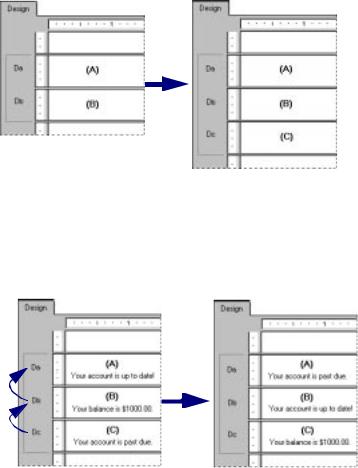
Highlight the section you want to move.
Click the Up or Down arrow to move the section.
3 With Section (C) highlighted, click the up arrow twice.
The data originally in Section
(C) is moved to Section (A). The data in the other sections is moved down.
90 |
Seagate Crystal Reports User’s Guide |
Merging two related sections
NOTE: You can only move a section up or down within an area.
NOTE: The letters that identify the sections describe their relative (as opposed to original) position. Thus, if you move a “C” section up, it becomes a “B” section. It loses its original “C” designation.
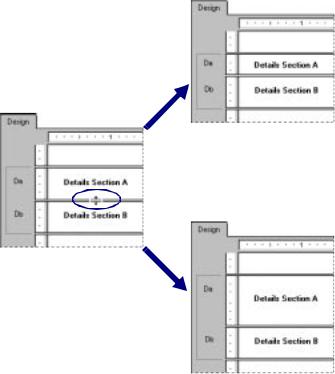
There may be times when you have placed objects in two sections (where they print sequentially) and you want to put them all in a single section (where they print simultaneously). You can merge the two sections and then rearrange the objects as needed in the new section.
Move the sections so the two sections you want to merge follow each other in the list.
Highlight the top section.
!Click the Merge button. The program combines both sections into a single section.
" Rearrange the objects as needed.
5 With Section (B) highlighted, click the Merge button and Section (C) will be merged with Section (B) to form one section.
Getting to Know Seagate Crystal Reports |
91 |
How to split and resize sections
Splitting a section
Resizing a section
You can split a section into two or more sections or resize sections easily in the Design Tab.
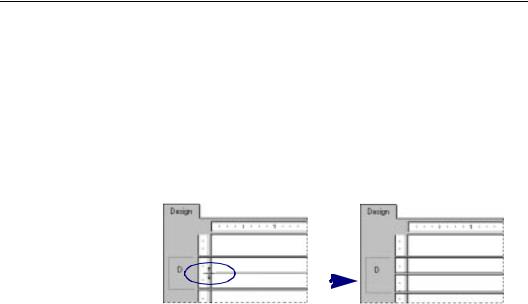
Move the pointer over the left boundary of the section you want to split.
When the pointer becomes the section splitting cursor, click the boundary. See Cursors, Page 64.
!When a horizontal line appears, drag it up or down to split the section the way you want it.
|
|
|
|
4 When the section splitting cursor |
|
The section will split at the line. |
|
appears, drag the horizontal line to |
|
|
|
the desired position. |
|
|
|
Move the pointer over the bottom boundary of the section you want to resize and, when the pointer becomes a resizing cursor, drag the boundary to make the section bigger or smaller as you wish.
If you have one or more objects in a section and you want to resize the section to remove unnecessary white space, right-click in the shaded area to the left of the section in the Design and Preview Tabs and choose the FIT SECTION command from the shortcut menu that appears. The program automatically resizes the section, moving the bottom boundary of the section to the baseline of the bottom object in the section.
92 |
Seagate Crystal Reports User’s Guide |
Drag the resizing cursor up to make the section above smaller.
Drag the resizing cursor down to make the section above bigger.
A section will automatically expand vertically in two instances:
●when you place an object and the object is bigger (vertically) than the section you put it in, and
●when you expand an object (vertically) so it becomes bigger than the section it resides in.
NOTE: You can not resize a section smaller than an object in the section.
Getting to Know Seagate Crystal Reports |
93 |
94 |
Seagate Crystal Reports User’s Guide |

5 |
Reporting 101 |
What you will find in this chapter...
Basic report design, Page 96
How to design a prototype, Page 104
Concepts in reporting, Page 105
Beyond basic reports, Page 113
HANDS-ON (Report Creation and Design), Page 113
HANDS-ON (Finishing Your Report), Page 130
Reporting 101 |
95 |