


Redo an action.
Insert database, formula, parameter, and group name fields.
Insert a text object.
Insert a summary.
Activate the Report Expert.
Format any section of your report.
Set record/group selection criteria.
Set record sort order.
Insert a graph/chart.
Search for a specific record.
Sets the magnification factor for viewing your report.
Context-sensitive Help.
Supplementary toolbar
The supplementary toolbar gives you quick access to many advanced report-enhancing experts and features. Activate the supplementary toolbar by clicking the SUPPLEMENTARY TOOLBAR button found on the far-right of the format bar.
Getting to Know Seagate Crystal Reports |
57 |

Insert a line.
Insert a box.
Insert a picture.
Arrange report elements automatically to best fit page.
Activate Style Expert to apply a professionallydesigned style to your report.
Insert a group.
Insert a subreport.
Insert a cross-tab object.
Find Top/Bottom N records or sort on summary information.
Activate the Format Editor to modify object properties.
Compile your report.
Activate the Report Distribution Expert.
Define links between tables.
58 |
Seagate Crystal Reports User’s Guide |
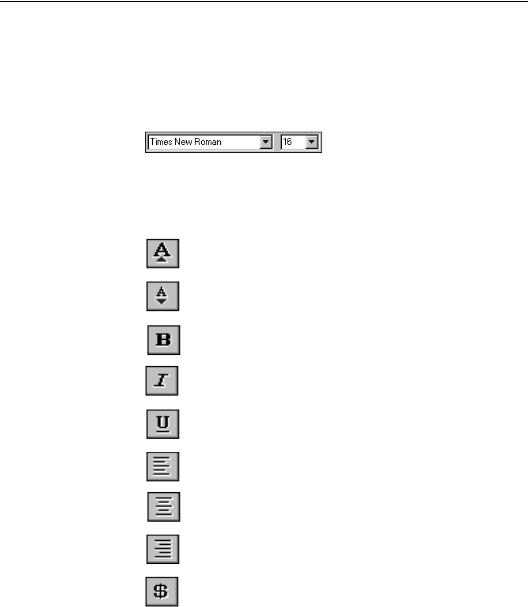
Format bar
The format bar enables you to access many popular formatting options with the click of a button or a selection from a drop-down box. You simply select the data you want to format, then click the appropriate button or list option to format the data.
Two drop-down boxes appear at the left side of the format bar.
Use these drop-down boxes for selecting new fonts and font sizes if you want to use something other than the default.
The buttons on the format bar perform the following functions:
Increase the font size of the selected data one point each time you click the button.
Decrease the font size of the selected data one point each time you click the button.
Change the selected data to boldface.
Change the selected data to italic face.
Change the selected data to be underlined.
Align the selected data flush left.
Center the selected data.
Align the selected data flush right.
When a number field is selected, places a currency symbol with the number.1
Getting to Know Seagate Crystal Reports |
59 |

When a number field is selected, places a thousands separator in the number.1
When a number field is selected, places a percentage sign with the number.1
When a number field is selected, adds one decimal place to the number.1
When a number field is selected, subtracts one decimal place from the number.1
Toggles the Group Tree’s Smart Navigation on/off in the Preview Tab. See Group Tree view, Page 74.
Toggles the supplementary toolbar on/off. See
Supplementary toolbar, Page 57.
1The program refers to your setting in the International section of the Control Panel (Windows 3.x, and Windows NT 3.51) or the Regional Settings section of the Control Panel (Windows 95 and Win NT 4.0).
Status bar
The status bar at the bottom of the application window displays valuable information to help users work with the program more efficiently.
TOOLBARS/FORMAT BAR FUNCTIONS
When the cursor is over a toolbar or format bar button, the status bar displays a short description of the button’s function.
MENU COMMAND DESCRIPTIONS
When you highlight a menu command, the status bar displays a short description of the command.
CURRENT SELECTIONS
When you highlight or place an object, the status bar displays the name of the object (or its object type) plus its location and sizing information.
60 |
Seagate Crystal Reports User’s Guide |
To identify objects, the status bar displays:
●the words OLE Object for a picture or other OLE object,
●the alias and field name for a field,
●the words Line for a line, Box for a box, and Text for a text object,
●the field type for special fields (Print Date, Record Number, and so forth),
●the summary name for a summary or subtotal,
●the formula name for a formula, and
●the parameter field name for a parameter field.
The status bar also displays:
●how far the object is from the left and top boundaries of a section, and
●how big the object is.
Using this information, you can easily move and resize objects with precision.
DATA RETRIEVAL INFORMATION
When you preview your report for the first time or refresh the data in the Preview Tab, the status bar displays four figures that describe the data retrieval processing.
1.The first number defines the number of records selected out of the number of records read.
2.The second number defines the number of records read.
●If your report has a selection formula, the records selected figure will typically be smaller than the records read figure.
Getting to Know Seagate Crystal Reports |
61 |