


5-14 FUEL SYSTEM AND THROTTLE BODY
AIR CLEANER BOX REMOVAL AND INSTALLATION
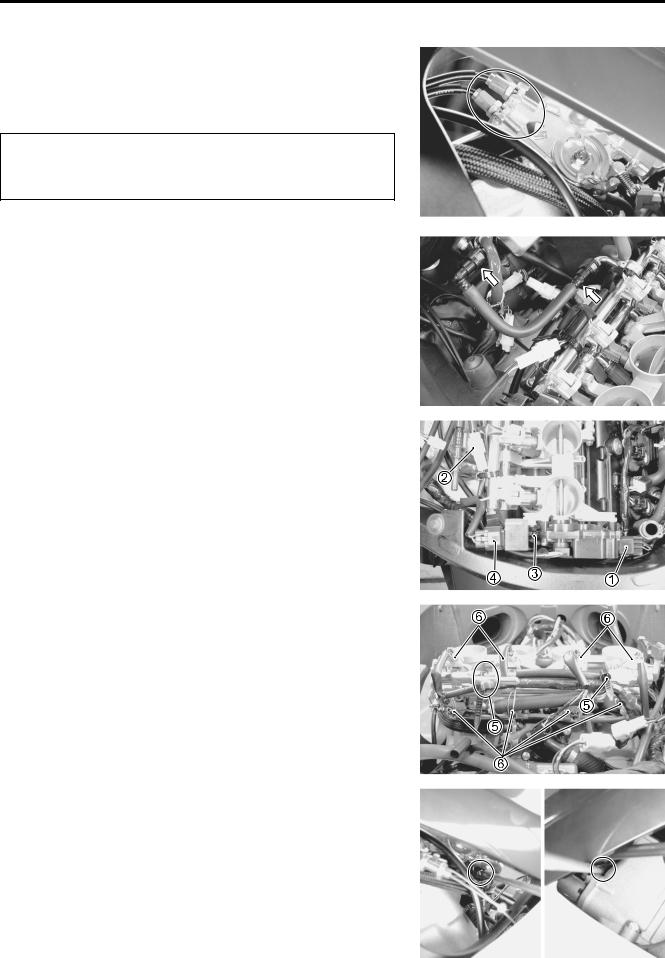
REMOVAL
• Lift and support the fuel tank. ( 5-3)
• Disconnect the fuel pump relay 1, cooling fan relay 2 and IAT sensor lead wire coupler 3.
• Disconnect the PCV hose 4.
• Remove the air cleaner mounting bolt 5.
• Disconnect the PAIR hose 6.
|
|
E |
• Remove the rubber caps 7 |
(LH & RH). |
L |
• Loosen the throttle body clamp screws (LH & RH). |
P |
|
• Remove the air cleaner box. |
|
|
|
M |
|
|
A |
|
S |
|
|
INSTALLATION
• Installation is in the reverse order of removal.


FUEL SYSTEM AND THROTTLE BODY 5-17
• Remove the TP sensor and STP sensor with the special tool.
09930-11950: Torx wrench
NOTE:
Prior to disassembly, mark the each sensor’s original position with a paint or scribe for accurate reinstallation.
Never remove the STVA 7 from the throttle body.
|
|
E |
|
L |
|
|
||
|
P |
|
Never remove the secondary throttle valve 8 and |
||
throttle valve 9. |
|
|
|
M |
|
|
A |
|
|
S |
|
The fast idle screw 0 is factory-adjusted at the time of delivery and therefore avoid removing or turning it unless otherwise necessary.

5-18 FUEL SYSTEM AND THROTTLE BODY
THROTTLE BODY CLEANING
Some carburetor cleaning chemicals, especially dip-type soaking solutions, are very corrosive and must be handled carefully. Always follow the chemical manufacturer’s instructions on proper use, handling and storage.
•Clean all passageways with a spray-type carburetor cleaner and blow dry with compressed air.
|
|
|
|
|
Do not use wire to clean passageways. Wire can dam- |
|
|||
age passageways. If the components cannot be |
|
|||
cleaned with a spray cleaner it may be necessary to |
|
|||
use a dip-type cleaning solution and allow them to |
E |
|||
soak. Always follow the chemical manufacturer’s |
||||
instructions for proper use and cleaning of the throttle |
||||
L |
||||
body components. Do not apply carburetor cleaning |
||||
|
||||
chemicals to the rubber and plastic materials. |
|
|
||
|
|
|
|
|
INSPECTION |
A |
P |
||
|
|
|||
|
|
|
||
Check following items for any damage or clogging.M |
|
|||
* O-ring |
S |
|
|
|
|
|
|
||
* Throttle valve
* Secondary throttle valve * Vacuum hose

FUEL SYSTEM AND THROTTLE BODY 5-19
THROTTLE BODY REASSEMBLY
Reassemble the throttle body in the reverse order of disassembly. Pay attention to the following points:
• With the STV fully open, install the STP sensor 1 and tighten the STP sensor mounting screw to the specified torque.
NOTE:
* Apply thin coat of the engine oil to the O-ring.
* Align the secondary throttle shaft end A with the groove B of STP sensor.
*Apply SUZUKI SUPER GREASE “A” to the secondary throttle shaft end A if necessary.
99000-25010: SUZUKI SUPER GREASE “A”
(or equivalent grease)
09930-11950: Torx wrench
STP sensor mounting screw: 3.5 N·m (0.35 kgf-m, 2.5 lb-ft)
NOTE:
* Make sure the STP valve open or close smoothly. |
E |
||
|
|||
* If the STP sensor adjustment is necessary, refer to page 5-22 |
|
||
for STP sensor setting procedure. |
sensorL2 |
||
• With the throttle valve fully closed, install the |
|||
and tighten the TP sensor mounting screw to the specified |
|
||
torque. |
M |
|
|
A |
TP |
|
|
NOTE: |
|
|
|
|
|
|
|
* Apply thin coat of the engine oil to the O-ring. |
|
|
|
|
S |
|
|
* Align the throttle shaft end C with the groove D of TP sensor. |
|
||
* Apply SUZUKI SUPER GREA E “A” to the throttle shaft end C if necessary.
99000-25010: SUZUKI SUPER GREASE “A”
(or equivalent grease)
09930-11950: Torx wrench
TP sensor mounting screw: 3.5 N·m (0.35 kgf-m, 2.5 lb-ft)
NOTE:
*Make sure the throttle valve open or close smoothly.
*TP sensor setting procedure. ( 4-20)
•Apply thin coat of the engine oil to the new O-ring 3 and cushion seal 4.
Replace the cushion seal and O-ring with the new ones.

5-20 FUEL SYSTEM AND THROTTLE BODY
•Install the fuel injector 5 by pushing it straight to the delivery pipe 6.
NOTE:
Align the boss E of the injector with the groove F of the delivery pipe.
Never turn the injector while pushing it.
|
|
|
E |
|
• Install the fuel delivery pipe assembly 7 to the throttle body |
L |
|||
|
||||
assembly. |
P |
|||
|
||||
|
|
|
||
|
|
|
||
Never turn the fuel injectors while installing them. |
|
|
||
|
|
|
|
|
|
A |
|
||
Tighten the fuel delivery pipe mounting screwsMto the specified |
|
|||
torque. |
S |
|
||
Fuel delivery pipe mounting screw:
5.0 N·m (0.5 kgf-m, 3.7 lb-ft)
*Replace the O-rings with the new ones.
*Never turn the fuel delivery pipes while pushing them.

FUEL SYSTEM AND THROTTLE BODY 5-21
THROTTLE BODY INSTALLATION
Installation is in the reverse order of removal. Pay attention to the following points:
• Connect the fuel injector couplers to the fuel injectors. Make sure that each coupler is installed in the correct position. The color on each lead wire refers to the appropriate fuel injector.
|
1 Primary injector |
2 Secondary injector |
|
|
|
#1 |
Y/R and Gr/W |
Y/R and Lg |
|
|
|
#2 |
Y/R and Gr/B |
Y/R and Lg/W |
|
|
|
#3 |
Y/R and Gr/Y |
Y/R and Lg/G |
|
|
|
#4 |
Y/R and Gr/R |
Y/R and Lg/Bl |
|
|
|
• Connect the throttle pulling cable 3 and throttle returning cable 4 to the throttle cable drum.
|
|
E |
|
|
|
|
L |
|
|
|
|
P |
|
|
|
|
|
|
|
• Loosen each throttle cable lock-nut. |
M |
|
|
|
• Turn in each throttle cable adjuster fully and locate each outer |
|
0 mm (0 in) |
||
cable so that the clearance is 0 mm (0 in). |
|
|
||
|
|
|
||
• Tighten each lock-nut. |
|
|
|
|
S |
|
|
|
|
• Adjust the throttle cable play.A |
|
|
|
|
Refer to page 2-15 for details. |
|
|
|
|
|
|
|
0 mm (0 in) |
|
|
|
|
|
|

5-22 FUEL SYSTEM AND THROTTLE BODY
STP SENSOR ADJUSTMENT |
|
|
|
|
|
|
|
|
|
|
|
If the STP sensor adjustment is necessary, measure the sensor |
|
|
|
|
|
|
|
|
|||
output voltage and adjust the STP sensor position as follows: |
|
|
|
|
|
|
|
|
|||
• Remove the air cleaner box . ( 5-14) |
|
|
|
|
|
|
|
|
|
|
|
• Loosen the throttle body clamp screws at the intake pipe side. |
|
|
|
|
|
|
|
|
|||
• Lift up the throttle body assembly from the intake pipe. |
|
|
|
|
|
|
|
|
|||
• Disconnect the throttle cables from their drum. |
|
|
|
|
|
|
|
|
|
||
• Disconnect the STVA lead wire coupler. |
|
|
|
|
|
|
|
|
|
|
|
• Insert the needle pointed probes to the STP sensor coupler. |
|
|
|
|
|
|
|
|
|||
• Turn the ignition switch ON. |
|
|
|
|
|
|
|
|
|
|
|
• Close the secondary throttle valve by finger, and measure the |
|
|
|
|
|
|
|
|
|||
STP sensor output voltage. |
|
|
|
|
|
|
|
|
|
|
|
|
|
|
|
|
|
|
|
V |
|
||
|
|
|
|
|
|
|
|
|
|
||
STP sensor output voltage |
|
|
|
|
|
|
|
|
|
|
|
|
|
|
|
|
|
|
|
|
|
||
ST valve is fully closed: 0.57 – 0.67 V |
|
|
|
|
|
|
|
|
|
||
|
(+ Yellow – - Black) |
|
|
|
|
|
|
|
|
||
09900-25008: Multi-circuit tester set |
|
|
|
E |
|
|
|
|
|
|
|
09900-25009: Needle pointed probe set |
|
|
|
|
|
|
|
|
|||
Tester knob indication: Voltage ( ) |
|
|
|
|
|
|
|
|
|
||
|
|
L |
|
|
|
|
|
|
|||
• Loosen the STP sensor mounting screw. |
|
|
|
|
|
|
|
|
|||
|
P |
|
|
|
|
|
|
||||
|
|
|
|
|
|
|
|
|
|||
• Adjust the STP sensor 1 until the output voltage comes |
|
|
|
|
|
|
|
|
|||
within the specified value and tighten the STP sensor mount- |
|
|
|
|
|
|
|
|
|||
ing screw. |
|
M |
|
|
|
|
|
|
|
|
|
09930-11950: Torx wrench |
A |
|
|
|
|
|
|
|
|
|
|
|
|
|
|
|
|
|
|
|
|
|
|
STP sensor mounting screw: 3.5 N·m (0.35 kgf-m, 2.5 lb-ft) |
|
|
|
|
|
|
|
|
|||
S |
|
|
|
|
|
|
|
|
|
|
|
FUEL SYSTEM AND THROTTLE BODY 5-23
FUEL INJECTOR REMOVAL
•Remove the air cleaner box. ( 5-14)
•With battery negative cable disconnected, disconnect the injector couplers.
•Remove the fuel delivery pipe assemblies. ( 5-16)
•Remove the primary and secondary fuel injectors #1, #2, #3 and #4. ( 5-16)
FUEL INJECTOR INSPECTION
Check fuel injector filter for evidence of dirt and contamination. If present, clean and check for presence of dirt in the fuel lines and fuel tank.
The fuel injector can be checked without removing it from the throttle body.
Refer to page 4-77 to -82 for details.
FUEL INJECTOR INSTALLATION |
|
E |
|
• Apply thin coat of the engine oil to new injector cushion seal |
|
||
and O-rings. |
|
L |
|
|
|
|
|
• Install the injector by pushing it straight to the throttle body. |
|
||
|
P |
|
|
Never turn the injector while pushing it. ( 5-20) |
|
|
|
|
M |
|
|
|
A |
|
|
|
S |
|
|

5-24 FUEL SYSTEM AND THROTTLE BODY
FAST IDLE
The fast idle system is automatic type.
When the fast idle cam is turned by the secondary throttle valve actuator, the cam pushes the lever on the throttle valve shaft causing the throttle valve to open and raise the engine speed. When the engine has warmed up, depending on the water temperature, ambient temperature and lapsed time, the fast idle is cancelled allowing the engine to resume idle speed.
Ambient Temp. |
Fast idle rpm |
Fast idle cancel- |
|
ling time |
|||
|
|
||
|
|
|
|
–5 °C (23 °F) |
1 500 – 2 000 r/min |
Approx. 45 sec. |
|
|
|
|
|
15 °C (59 °F) |
1 500 – 2 000 r/min |
Approx. 20 sec. |
|
|
|
|
|
25 °C (77 °F) |
1 500 – 2 000 r/min |
Approx. 14 sec. |
FAST IDLE ADJUSTMENT
• Lift and support the fuel tank. ( 5-3) |
|
|
|
|
E |
|||||
• Start up the engine and run it in idling condition for warming |
|
|
|
|||||||
L |
||||||||||
up at the water temperature of 80 – 90 °C (176 – 194 °F). |
||||||||||
|
|
|
|
|
|
|
||||
• Set the idle rpm to 1 300 r/min by the throttle stop screw 1. |
|
|
|
|
|
|
|
|||
• Check and adjust the TP sensor. ( 4-20) |
P |
|||||||||
|
|
|
|
|
|
|
|
|||
|
M |
|
|
|
|
|
|
|
||
• Turn the ignition switch OFF. |
|
|
|
|
|
|
|
|
||
|
S |
|
|
|
|
|
|
|
|
|
• Disconnect the TP sensor couplerAand install the test harness. |
|
|
|
|
|
|
|
|||
|
|
|
|
V |
|
|||||
• Start up the engine. |
|
|
|
|
|
|
|
|||
|
|
|
|
|
|
|
|
|
||
• Measure the TP sensor output voltage at the wire terminals |
|
|
|
|
|
|
|
|||
|
|
|
|
|
|
|
||||
(between + terminal Red and - terminal Black). |
|
|
|
|
|
|
|
|
||
|
|
|
|
|
|
|
|
|||
TP sensor output voltage at idle position: Approx. 1.125 V
09900-28630: TPS test wire harness
09900-25008: Multi-circuit tester set
Tester knob indication: Voltage ( )
•Turn the ignition switch OFF.
•Remove the air cleaner box ( 5-14) and disconnect the STVA coupler. ( 5-15)
•Turn the ignition switch ON.
•Open the secondary throttle valve fully by turning it with your finger.
•With the secondary throttle valve held at this position, measure the output voltage of the TP sensor as shown.

FUEL SYSTEM AND THROTTLE BODY 5-25
• Calculate the voltage difference between TP sensor output voltage at idle and TP sensor output voltage with the STV full opened.
Example: TP sensor output voltage with the STV fully open Minus TP sensor output voltage at idle is 0.025 V
STV fully open |
1.150 |
V |
Idle |
- 1.125 |
V |
0.025 V
TP sensor output voltage variation: 0.020 – 0.030 V
•If the voltage variation is out of specification, turn in or out the fast idle adjust screw 3 to adjust the voltage to specification.
The fast idle screw is factory-adjusted at the time of delivery and therefore avoid removing or turning it unless otherwise necessary.
• Cool down the engine to ambient air temperature and start the |
E |
|
|
||
engine to check the fast idle rpm comes with in the specified |
|
|
rpm. |
P |
|
Standard |
|
|
L |
||
Fast idle rpm: 1 500 – 2 000 r/min (Cold engine) |
|
|
Idle rpm |
M |
|
: 1 300 ± 100 r/min (Warmed engine) |
|
|
• If it is not at the specified rpm, the cause may possibly be |
|
|
short-circuit in water temperature sensor or wiring harness or |
|
|
|
S |
|
STVA. |
A |
|

5-26 FUEL SYSTEM AND THROTTLE BODY
THROTTLE VALVE SYNCHRONIZATION
Check and adjust the throttle valve synchronization among four cylinders.
Step 1
• Lift and support the fuel tank. ( 5-3)
• Start up the engine and run it in idling condition for warming up.
•Stop the warmed-up engine.
•Disconnect the IAP sensor coupler 1 .
•Disconnect the vacuum hose 2 from each throttle body.
|
|
E |
• Connect the vacuum tester hose 3 to each vacuum nipple on |
L |
|
the throttle body. |
P |
|
|
|
|
|
M |
|
|
A |
|
|
S |
|
Step 2
•Connect a tachometer and start up the engine.
•Bring the engine r/min to 1 300 r/min by the throttle stop screw.
•Check the vacuum of the four cylinders and balance the four throttle valves with the balance screw 4.
Avoid dirt drawn into the throttle body while running the engine without air cleaner box cover. Dirt drawn into the engine will damage the internal engine parts.
NOTE:
*During balancing the throttle valves, always set the engine r/min at 1 300 r/min, using throttle stop screw.
*After balancing the four valves, set the idle r/min to 1 300 r/min by the throttle stop screw.
*If the above procedures cannot still synchronize the valves, proceed to the next step.

FUEL SYSTEM AND THROTTLE BODY 5-27
Step 3
• Turn in all the idle air screws to the complete close position.
• Check for difference of vacuum between #1 and #2.
•Equalize these two by gradually turning back the air screw on the higher vacuum side until the vacuum comes down to the
lower. Similarly perform the same procedures between #3 and #4.
• Check for the synchronization adjustment. If the adjustment is not yet correct, remove each idle air screw and clean them with a spray-type carburetor cleaner and blow dry with a compressed air.
• Also, clean the idle air screw passageways.
NOTE:
*Slowly turn the idle air screw in clockwise and count the number of turns until the screw is lightly seated.
*Make a note of how many turns were made so the screw can be reset correctly after cleaning.
Step 4 |
|
|
E |
|
|
|
|
Repeat the procedures of Step 2 and Step 3. |
P |
|
|
|
|
|
|
THROTTLE POSITION SENSOR (TPS) SETTINGL |
|||
After all adjustments are completed, check or adjust the T S |
|
||
setting condition. |
M |
|
|
|
A |
|
|
(Refer to page 4-20 for TPS setting procedure.) |
|
|
|
|
S |
|
|