


Managing Space |
475 |
You’ll note that the only work area that you can modify with OEM is the SORT_AREA_ SIZE, but you can also set the value for the maximum number of concurrent users; the product of the two determines the maximum total size of memory that will be used for the sort work area. Also, from the command-line interface you can show the *_AREA_SIZE parameters and modify them in the spfile as needed. Please note that HASH_AREA_SIZE and SORT_AREA_SIZE can be modified at the session level and that they are not dynamically modifiable for the instance.
SQL> show parameter area_size
NAME |
TYPE |
VALUE |
------------------------------------ |
----------- |
------- |
bitmap_merge_area_size |
integer |
1048576 |
create_bitmap_area_size |
integer |
8388608 |
hash_area_size |
integer |
131072 |
sort_area_size |
integer |
65536 |
You can very easily return to Automatic PGA Memory Management mode by clicking the Enable Automatic Mode button and then Apply.
Managing Space
In the following sections, we will explore resumable space allocation, transportable tablespaces, transportable databases, and shrinking segments. Resumable space allocation allows you to temporarily suspend operations that run out of space while you correct the space issue without aborting the operation. With the transportable tablespace feature, you can copy a set of tablespaces from a source database to a destination database. With the transportable database feature, you can copy an entire database from one platform to another. And finally, you’ll learn how to shrink segments dynamically.
Managing Resumable Space Allocation
If the Oracle database encounters a space problem during the execution of an operation, it can suspend the operation and then later resume the operation. This feature is called resumable space allocation, and it allows the DBA to fix a problem prior to the database returning an error message to the user process. Once you’ve fixed the problem, the database automatically resumes the suspended operation.
Enabling resumable space allocation is simple: you can set the initialization parameter RESUMABLE_TIMEOUT to a value greater than zero, or you can issue the ALTER SESSION ENABLE RESUMABLE statement.

476 Chapter 11 n Managing Database Resources
Understanding Resumable Space Allocation
A resumable statement suspends when an object runs out of space, it reaches the maximum number of extents, or a space quota is exceeded. An object running out of space or reaching maximum extents applies to tables, indexes, temporary segments, undo segments, large objects (LOBs), clusters, and table or index partitions. When a resumable statement is suspended, an error is reported in the alert log and the system issues the resumable session suspended alert, and if an AFTER SUSPEND trigger is in place, it will be executed. When the statement is suspended, the transaction will be suspended and all transaction resources held until rolled back or the suspend operation is resumed to completion. When the suspend condition is resolved, it will automatically resume and the associated resumable session suspended alert is cleared; of course, the original error message logged in the alert log remains.
In a distributed transaction, the remote RESUMABLE_TIMEOUT initialization parameter applies to the remote part of the transaction, and the remote session resumable setting applies. Also, local resumable settings do not apply to the remote part of the distributed transactions.
Resumable Space Operations
Specific Data Definition Language (DDL), Import/Export, Data Manipulation Language (DML), and query statements are candidates for resumable executions:
NN |
SELECT statements that run out of sort area temporary space |
NN |
INSERT, UPDATE, DELETE, and INSERT INTO…SELECT |
NN |
Export/import and SQL*Loader |
NNThe following DDL statements:
CREATE TABLE AS SELECT CREATE INDEX
ALTER TABLE MOVE PARTITION ALTER TABLE SPLIT PARTITION ALTER INDEX REBUILD
ALTER INDEX REBUILD PARTITION ALTER INDEX SPLIT PARTITION CREATE MATERIALIZED VIEW CREATE MATERIALIZED VIEW LOG
For parallel operations, each process is handled independently. If one suspends, an error is logged and the associated AFTER SUSPEND trigger is executed. Meanwhile, the other parallel processes continue. However, if one aborts, the parallel operation aborts. As with all resumable processing, when a suspend condition is repaired, it will continue and join up with the others.

Managing Space |
477 |
Enabling and Disabling Resumable Operations
You enable resumable operations and configure the suspend time-out for the instance and for a session. For the instance, configure the initialization parameter RESUMABLE_TIMEOUT. For the session, set the session parameter RESUMABLE_TIMEOUT to a numeric value greater than zero, or issue the ALTER SESSION command.
Enabling and Disabling Resumable Operations for an Instance
To enable resumable operations for the instance, alter the instance parameter RESUMABLE_ TIMEOUT to a numeric value greater than zero. The default value is 0, which in effect initially disables resumable operations for all sessions. This represents the number of seconds that
an operation may suspend while you take corrective action. After the time-out is reached, the operation will abort. In this example, we alter the system RESUMABLE_TIMEOUT from 1 minute to 10 minutes:
SQL> show parameter resumable
NAME |
TYPE |
VALUE |
------------------------------------ |
----------- |
------- |
resumable_timeout |
integer |
60 |
SQL> alter system set resumable_timeout=600 scope=both;
System altered.
Enabling and Disabling Resumable Operations for a Session
Before you can enable or disable resumable operations at the session level, the user must have been granted the RESUMABLE system privilege. Once that’s granted, resumable operations are enabled within a session when the following command is issued:
SQL> alter session enable resumable;
Session altered.
The default resumable time-out for a session is 7,200 seconds. To disable resumable operations within a session, issue the following command:
SQL> alter session disable resumable;
Session altered.
Additionally, the user session can control the suspend time-out in one of three ways: by altering the RESUMABLE_TIMEOUT parameter for the session, by executing the DBMS_RESUMABLE. SET_TIMEOUT procedure (covered later, in the section “The DBMS_RESUMABLE Supplied Package”) or by appending to the ALTER SESSION ENABLE RESUMABLE command as follows:
SQL> alter session set resumable_timeout=3600;

478 Chapter 11 n Managing Database Resources
Session altered. |
|
|
SQL> show parameter resumable; |
|
|
NAME |
TYPE |
VALUE |
------------------------------------ |
----------- |
----- |
resumable_timeout |
integer |
3600 |
SQL> |
|
|
SQL> alter session enable resumable timeout 7200; |
|
|
Session altered. |
|
|
SQL> show parameter resumable; |
|
|
NAME |
TYPE |
VALUE |
------------------------------------ |
----------- |
----- |
resumable_timeout |
integer |
3600 |
SQL> |
|
|
The alter session enable resumable timeout nnnn command does not alter the value of the session-initialization parameter RESUMABLE_TIMEOUT.
Procedurally, you can also enable resumable operations for a session with a logon trigger.
Identifying Resumable Sessions
By default, if a session is enabled for resumable space allocation, the session is identified in the NAME column of the DBA_ and USER_RESUMABLE views by the username, session ID, and instance number, as follows:
SQL> select name from user_resumable;
NAME
------------------------------------
User SYS(0), Session 108, Instance 1
SQL>
You can alter the session identifier by issuing the ALTER SESSION command and adding the NAME clause, as follows:
SQL> alter session enable resumable name ‘LEB test’;
Session altered.
SQL> select name from user_resumable;
NAME

Managing Space |
479 |
----------------------------------------------------
LEB test SQL>
This changed name remains in effect until it’s altered by the ENABLE RESUMABLE NAME command, until resumable is disabled by the session, or until the session ends.
Working with Resumable Operations
Once you’ve enabled resumable operations, you’ll need to monitor and take action on suspended resumable operations. You’ll monitor specific views to determine the status of resumable operations, and you’ll write AFTER SUSPEND triggers and utilize the DBMS_RESUMABLE supplied package to take action within a session when a suspend occurs.
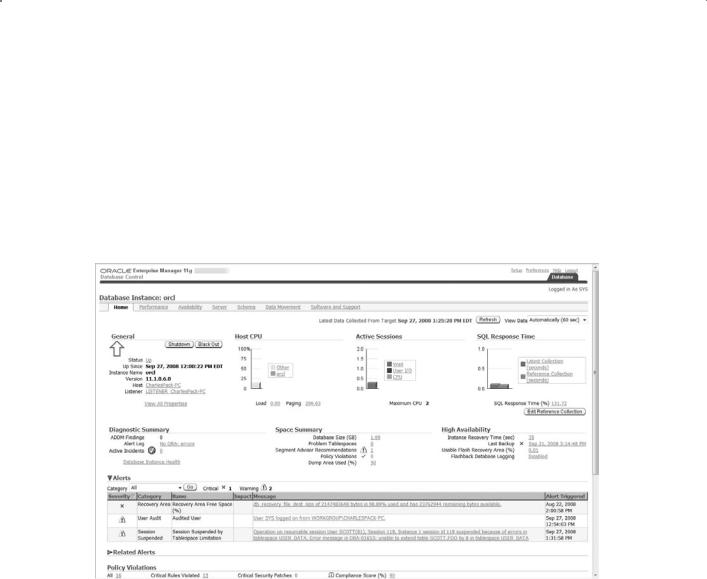
Additionally, Enterprise Manager reports resumable alerts and provides the mechanism for resolving resumable space issues.
Views for Monitoring Resumable Space Allocation
The DBA_RESUMABLE and USER_RESUMABLE views contain rows for suspended resumable statements as well as those that are executing as normal. The key information columns are described in Table 11.1. The USER_ID column is not included in the USER_RESUMABLE view, and as with all USER_ views, only the current session information is shown.
Ta b l e 11.1 DBA_RESUMABLE Columns
Column Name |
Description |
|
|
STATUS |
Status of the RESUMABLE statement: RUNNING, SUSPENDED, TIMEOUT, |
|
ERROR, ABORTED. |
TIMEOUT |
Time-out value of the resumable statement. |
START_TIME |
Start time of the resumable statement. |
SUSPEND_TIME |
The last time the resumable statement was suspended. |
RESUME_TIME |
The last time the statement resumed. |
SQL_TEXT |
The resumable statement. |
ERROR_NUMBER |
The error number of the last error logged or this resumable state- |
|
ment. If no errors, the value will be NULL. |
ERROR_PARAMETERn |
Error parameter columns 1 through 5. |
ERROR_MSG |
The error message associated with the ERROR_NUMBER. |
|
|
Managing Space |
481 |
F i g u r e 11. 22 Resumable space suspended session details
F i gu r e 11. 23 Database tablespaces

482 Chapter 11 n Managing Database Resources
F i g u r e 11. 2 4 Tablespaces datafile details
The DBMS_RESUMABLE Supplied Package
The DBMS_RESUMABLE package allows you to get and set time-out parameters for a session, abort a suspended resumable session, and query the error stack for specific resumable space errors. Table 11.2 describes the package functions and subprograms.
Ta b le 11. 2 DBMS_RESUMABLE Package Programs
Program Name |
Description |
|
|
ABORT |
Procedure that allows you to abort a suspended resumable |
|
operation |
GET_SESSION_TIMEOUT |
Function that when passed the session ID returns the current |
|
resumable time-out |
GET_TIMEOUT |
Function that returns resumable time-out for the current session |
SET_SESSION_TIMEOUT |
Procedure that when passed the session ID and time-out value |
|
sets the time-out for a session |
SET_TIMEOUT |
Procedure that sets the time-out for the current session |
SPACE_ERROR_INFO |
Function that allows you to search the error stack on error_ |
|
type, object_type, object_owner, object_name, sub_object_ |
|
name, and table_space_name |
|
|

Managing Space |
483 |
In the following code, you see an example that enables resumable for the session, gets the session time-out value; changes the value; queries the value; disables resumable; and then queries, modifies, and enables it. You’ll note that the resumable time-out value is retained by the session even though resumable was disabled. Also note that the default time-out is 7,200 seconds.
SQL> alter session enable resumable;
Session altered.
SQL> select dbms_resumable.get_timeout from dual;
GET_TIMEOUT
-----------
7200
SQL> exec dbms_resumable.set_timeout (9600);
PL/SQL procedure successfully completed.
SQL> select dbms_resumable.get_timeout from dual;
GET_TIMEOUT
-----------
9600
SQL> alter session disable resumable;
Session altered.
SQL> select dbms_resumable.get_timeout from dual;
GET_TIMEOUT
-----------
9600
SQL> alter session enable resumable timeout 7200;
Session altered.
SQL> select dbms_resumable.get_timeout from dual;

484 Chapter 11 n Managing Database Resources
GET_TIMEOUT
-----------
7200
SQL>
Triggered Events to Respond to Suspends
Oracle has created the AFTER SUSPEND trigger to help you resolve suspend conditions programmatically. By registering an AFTER SUSPEND trigger on the database as user SYS using the ON DATABASE clause, you can take action regardless of who owns the resumable operation.
Managing Transportable Tablespaces
The transportable tablespace feature allows you to copy or move a tablespace from one database to another. Using transportable tablespaces is faster than copying rows or using export/ import or unload/load. With Oracle 10g or higher, it is possible to transport tablespaces across some but not all platforms. Transportable tablespaces are useful for, but not limited to, the following:
NN |
Database migrations |
|
|
NN |
Sharing tablespaces with other database users (for example, remote customers) |
NN |
Tablespace point-in-time recovery (TSPITR) |
NN |
Archiving data from one database to another |
NN |
Exporting and importing partitions |
Transporting a tablespace is straightforward, but there are caveats and limitations. You can use Enterprise Manager, or you can use SQL*Plus and the OS command line. We will take you through the basic process and list the major considerations.
The first step is to determine what will be transported. If your intent is to transport objects that exist only in one tablespace and have no dependencies in other tablespaces, then the process is simplified. If, however, you intend to transport a set of objects that are spread across multiple tablespaces or have dependencies on objects in other tablespaces, then the task becomes slightly more complex.
Transportable Tablespace Sets
A transportable tablespace set is a self-contained group of tablespaces that encapsulate the objects that you wish to transport from one database to another. For example, if you wish to transport several tables that reside in different tablespaces, then you would include each of the tablespaces in the tablespace set. If you wish to transport a partitioned table and the different partitions are in different tablespaces, then you would need to include each of the tablespaces in the tablespace set.
We’ll discuss tablespace sets in detail and show examples a bit later.
Managing Space |
485 |
Requirements of Transportable Tablespaces
Transportable tablespaces must meet the following requirements:
NN |
The tablespaces can be locally managed or dictionary managed. |
NNIn Oracle9i or higher, the transported tablespace does not have to be the same block size as the target database’s standard block size. However, the target database must have a DB_nK_CACHE_SIZE initialization parameter set, where n is the block size of the transportable tablespace.
NN |
The tablespace must be placed in read-only mode during the transport process. |
NNStarting with Oracle 11g, data pump is used instead of export/import to move the metadata from the source to the target.
NNYou can’t import a transported tablespace that has the same name as an existing tablespace in the target database. You can rename the transported tablespace as part of the import process.
NNIn order for an object to be transportable, all of the partitions that contain its dependent objects such as indexes, materialized views, and partitioned tables must be included in the tablespace set.
NNTablespaces that do not use block encryption but have tables that have encrypted columns are not transportable.
NN |
You can’t transport the SYSTEM tablespace or objects owned by the SYS user. |
NNTablespaces with 8.0-compatible advanced queues with multiple recipients are not transportable.
NNIf you’re transporting across platforms, RAW, BFILE, and AnyTypes are not converted from one endian type to another as part of the transport process.
Manually Transporting a Tablespace
In this section, we will demonstrate how to manually transport a tablespace using a combination of SQL*Plus, the OS command line, and data pump.
The basic steps are as follows:
1.Check compatibility and endian format.
2.Choose the transportable tablespace set.
3.Generate the transportable tablespace set.
4.Transport the tablespace set.
5.Import the tablespace set.

486 Chapter 11 n Managing Database Resources
Database Requirements for Transportable Tablespaces
To utilize the transportable tablespace feature, you must make sure the database meets the following criteria:
NNTo create a transportable tablespace set, the source database must be Oracle 8i or later, and it must be Enterprise Edition.
NNTo import a tablespace set from the same platform, the target database can be any edition of Oracle8i or higher.
NNTo create a transportable tablespace set for import into a database on a different platform, the source database must have compatibility set to 10.0 or higher.
NNTo import a transportable tablespace set from a different platform, both the source and target databases must have compatibility set to 10.0 or higher.
NNThe source and target database must have the same character set and national character set.
Step 1: Check Compatibility and Endian Format
If the source and target are different versions of the database, you’ll need to verify the minimum compatibility for transportable tablespaces. When you create a transportable tablespace set, Oracle determines the minimum compatibility level for the target. Oracle throws an error if the target database’s compatibility level is lower than the minimum compatibility. If you’re transporting a tablespace to the same platform, the minimum compatibility must be 8.0 for both the source and target. Both source and target must have a minimum compatibility of 9.0 if the transportable tablespace’s block size is different than the target’s standard block size. For different platforms, the minimum compatibility must be 10.0 for both source and target.
If your source and target are different platforms, it will be necessary to check for endian compatibility. If the source and target are not directly compatible—for example, the source is big endian and the target is little endian—then you will need to use RMAN to convert the copy of each tablespace datafile on either the source or target platform. To determine which platforms you can transport to, run this query:
SQL> select |
* from v$transportable_platform; |
|
PLATFORM_ID |
PLATFORM_NAME |
ENDIAN_FORMAT |
----------- |
-------------------------------- |
-------------- |
1 |
Solaris[tm] OE (32-bit) |
Big |
2 |
Solaris[tm] OE (64-bit) |
Big |
7 |
Microsoft Windows IA (32-bit) |
Little |
10 |
Linux IA (32-bit) |
Little |

Managing Space |
487 |
6 |
AIX-Based Systems |
(64-bit) |
Big |
3 |
HP-UX (64-bit) |
|
Big |
5 |
HP Tru64 UNIX |
|
Little |
4 |
HP-UX IA (64-bit) |
|
Big |
11 |
Linux IA (64-bit) |
|
Little |
15 |
HP Open VMS |
|
Little |
8 |
Microsoft Windows |
IA (64-bit) |
Little |
9 |
IBM zSeries Based |
Linux |
Big |
13 |
Linux 64-bit for AMD |
Little |
|
16 |
Apple Mac OS |
|
Big |
12 |
Microsoft Windows |
64-bit for AMD |
Little |
17 |
Solaris Operating |
System (x86) |
Little |
18 |
IBM Power Based Linux |
Big |
|
19 |
HP IA Open VMS |
|
Little |
20 |
Solaris Operating |
System (AMD64) |
Little |
19 rows selected. SQL>
If you only want to see target platforms that are endian-compatible with the source platform, run this query at your source database:
SQL> COL “Source” FORM A32
SQL> COL “Compatible Targets” FORM A32
SQL> BREAK ON “Source”
SQL> select d.platform_name “Source”, t.platform_name
“Compatible Targets”, endian_format |
|
|
from v$transportable_platform t, v$database d |
|
|
where t.endian_format = (select |
endian_format |
|
from v$transportable_platform t, |
|
|
v$database d |
|
|
where |
d.platform_name = |
|
t.platform_name) |
|
|
SQL> / |
|
|
Source |
Compatible Targets |
|
ENDIAN_FORMAT |
|
|
-------------------------------- |
------------------------- |
|
------ -------------- |
|
|
Microsoft Windows IA (32-bit) |
Microsoft Windows IA (32-bit) |
Little |

488 |
Chapter 11 n Managing Database Resources |
|
|
Linux IA (32-bit) |
Little |
|
HP Tru64 UNIX |
Little |
|
Linux IA (64-bit) |
Little |
|
HP Open VMS |
Little |
|
Microsoft Windows IA (64-bit) |
Little |
|
Linux 64-bit for AMD |
Little |
|
Microsoft Windows 64-bit for AMD |
Little |
|
Solaris Operating System (x86) |
Little |
|
HP IA Open VMS |
Little |
|
Solaris Operating System (AMD64) Little |
|
11 rows selected.
SQL>
If the source and target have the same endian format, no RMAN conversion is necessary. If they are different, you will need to use RMAN to convert the tablespace datafiles in the transportable set to the correct endian format.
Step 2: Choose the Transportable Tablespace Set
In order for a tablespace set to be transportable, it must be self-contained; that is, objects in the tablespace set must have no dependencies in tablespaces outside the tablespace set. Here are some basic rules:
NNThe tablespace set must contain all of the partitions of a partitioned table if any of the table’s partitions are included in the tablespace set.
NNIf an index is included in a tablespace set, its corresponding table must also be included in the tablespace set.
NNIf you choose to include referential integrity constraints in the tablespace set, then all tablespaces required to support the constraints must be included in the set.
NNIf you have tables with LOB columns in the set, the tablespace that contains the LOBs must be included.
The easy way to determine if the set of tablespaces is self-contained is to execute the DBMS_TTS.TRANSPORT_SET_CHECK procedure, supplying the list of tablespaces in the tablespace set, as in this example:
SQL> create table scott.foo_1 (x number, y varchar2(20)) tablespace users; Table created.
SQL> create index scott.foo_1_indx on scott.foo_1 (x) tablespace user_data; Index created.
SQL> SET SERVEROUTPUT ON
SQL> exec dbms_tts.transport_set_check (‘USER_DATA’);

Managing Space |
489 |
PL/SQL procedure successfully completed. SQL> SELECT * FROM TRANSPORT_SET_VIOLATIONS; VIOLATIONS
ORA-39907: Index SCOTT.FOO_1_INDX in tablespace USER_DATA points to table SCOTT.FOO_1 in tablespace USERS.
SQL>
This simple verification showed that the index foo_1_indx was built in the USER_DATA tablespace but the corresponding foo_1 table is in the USERS tablespace, which is not included in the transportable tablespace set. You must remedy this situation before you can transport tablespace USER_DATA.
It is important at this time to discuss the concept of referential integrity constraints relative to transportable tablespace sets. By default, referential integrity constraints are not required to be included in the transportable set; however, you can test for constraint containment with the DBMS_TTS.TRANSPORT_SET_CHECK procedure. For the following example, we have created the table FOO in the USER_DATA tablespace and checked the transportability. We then add an index on FOO in the USERS tablespace and create a primary key constraint on the indexed column. We check the transportability of the USER_DATA tablespace as follows:
SQL> exec dbms_tts.transport_set_check (‘USER_DATA’,TRUE);
PL/SQL procedure successfully completed.
SQL> SELECT * FROM TRANSPORT_SET_VIOLATIONS; no rows selected
SQL>
SQL> CREATE INDEX SCOTT.FOO_INDX 2 ON SCOTT.FOO (X)
3 TABLESPACE USERS; Index created.
SQL> ALTER TABLE SCOTT.FOO ADD (PRIMARY KEY (x)); Table altered.
SQL> exec dbms_tts.transport_set_check (‘USER_DATA’,TRUE); PL/SQL procedure successfully completed.
SQL> SELECT * FROM TRANSPORT_SET_VIOLATIONS;
VIOLATIONS
----------------------------------------------------------
ORA-39908: Index SCOTT.FOO_INDX in tablespace USERS enforces primary constraints
of table SCOTT.FOO in tablespace USER_DATA. SQL>

490 Chapter 11 n Managing Database Resources
Before we can transport the USER_DATA tablespace, we need to resolve this constraint issue by including the USERS tablespace, by rebuilding the index into the USER_DATA tablespace, by dropping the primary key constraint, or by deciding not to include constraints in the transportable set.
The SYSAUX tablespace is not transportable. Also, if the SYSTEM tablespace is locally managed, you can plug in a dictionary-managed tablespace, but it will be read-only and cannot be made writable.
Step 3: Generate the Transportable Tablespace Set
As introduced earlier, a transportable tablespace set is a self-contained group of tablespaces that encapsulate the objects that you wish to transport from one database to another. The transportable set must include all datafiles for each of the tablespaces to transport. The remaining component of the transportable set is a data pump export file that contains metadata about the transportable set. Here are the basic steps required to generate the transportable set:
1.Make all of the tablespaces in the transportable set read-only.
2.Use data pump on the source system to specify which tablespaces are included in the transportable set.
3.If converting to a different endian format, use the RMAN convert command to convert the files in a temporary location on the source system.
With these basic steps, we can show you a straightforward example. Remember, the tablespaces are placed in read-only mode and remain read-only until the files have been copied to the target or to their temporary location for endian conversion.
You must have the EXP_FULL_DATABASE role to export a transportable tablespace. You must use a valid DIRECTORY in your data pump export command.
First, place the tablespaces in the transportable set in read-only mode:
SQL>alter tablespace user_data read only;
Tablespace altered.
Now exit or “host” to the command line and execute the data pump export command:
SQL>host
C:\>expdp dumpfile=expdat.dmp DIRECTORY=exp_dir
TRANSPORT_TABLESPACES= user_data
Export: Release 11.1.0.6.0 - Production on Sunday, 28 September, 2008 14:40:19
Managing Space |
491 |
Copyright (c) 2003, 2007, Oracle. All rights reserved.
Username: sys as sysdba
Password:
Connected to: Oracle Database 11g Enterprise Edition Release 11.1.0.6.0 - Production
With the Partitioning, OLAP, Data Mining and Real Application Testing options Starting “SYS”.”SYS_EXPORT_TRANSPORTABLE_01”:
sys/******** AS SYSDBA dumpfile=e
xpdat.dmp DIRECTORY=EXP_DIR TRANSPORT_TABLESPACES= user_data Processing object type TRANSPORTABLE_EXPORT/PLUGTS_BLK Processing object type TRANSPORTABLE_EXPORT/TABLE Processing object type TRANSPORTABLE_EXPORT/INDEX
Processing object type TRANSPORTABLE_EXPORT/CONSTRAINT/CONSTRAINT Processing object type TRANSPORTABLE_EXPORT/INDEX_STATISTICS Processing object type TRANSPORTABLE_EXPORT/TABLE_STATISTICS Processing object type TRANSPORTABLE_EXPORT/POST_INSTANCE/PLUGTS_BLK
Master table “SYS”.”SYS_EXPORT_TRANSPORTABLE_01” successfully loaded/unloaded
******************************************************************************
Dump file set for SYS.SYS_EXPORT_TRANSPORTABLE_01 is: C:\TEMP\EXPDAT.DMP
******************************************************************************
Datafiles required for transportable tablespace USER_DATA: C:\ORACLE\ORADATA\ORCL\USER_DATA01.DBF
Job “SYS”.”SYS_EXPORT_TRANSPORTABLE_01” successfully completed at 14:41:47
Once the export is complete, if no endian conversion is required you can move on to the step of transporting the tablespace set. If endian conversion is required and you want to run the conversion on the target system, move on to that step. Otherwise, endian conversion is required locally and you’ll need to invoke RMAN on the source system as follows:
C:\>RMAN TARGET /
RMAN> convert tablespace user_data
2> to platform ‘Solaris[tm] OE (32-bit)‘ 3> format ‘c:\temp\%U’;
Starting conversion at source at 28-SEP-08 using channel ORA_DISK_1
channel ORA_DISK_1: starting datafile conversion
input datafile file number=00006 name=C:\ORACLE\ORADATA\ORCL\USER_DATA01.DBF converted datafile=C:\TEMP\DATA_D-ORCL_I-1190467526_TS-


Managing Space |
493 |
In the previous target-side endian conversion example, we copied the tablespace datafile and converted it into the /oracle/oradata/LNEB directory. Make sure that you have a DIRECTORY created for the target database and that you have copied the export metadata file referenced by DUMPFILE into that location. Now we’ll import the datafiles:
IMPDP DUMPFILE=expdat.dmp DIRECTORY=imp_dir
TRANSPORT_DATAFILES=/oracle/oradata/LNEB/user_data01.dbf
If the schema owner on the source does not exist on the target, you must either create the schema owner on the target or use the REMAP_SCHEMA import clause to specify a new schema owner. You must use a valid Directory object in your data pump import command.
Once you have verified that the import completed successfully, it would be a good time to verify that the source tablespaces are in read-write mode.
In Exercise 11.1, you will see how to export a transportable tablespace set.
E x e r c i s e 11 .1
Exporting a Transportable Tablespace Set
To export a transportable tablespace set, do the following:
1.Check source and destination compatibility.
2.Select the tablespaces for the transportable tablespace set and verify that the set is self-contained.
3.Generate the transportable tablespace set.
Using Enterprise Manager to Transport a Tablespace
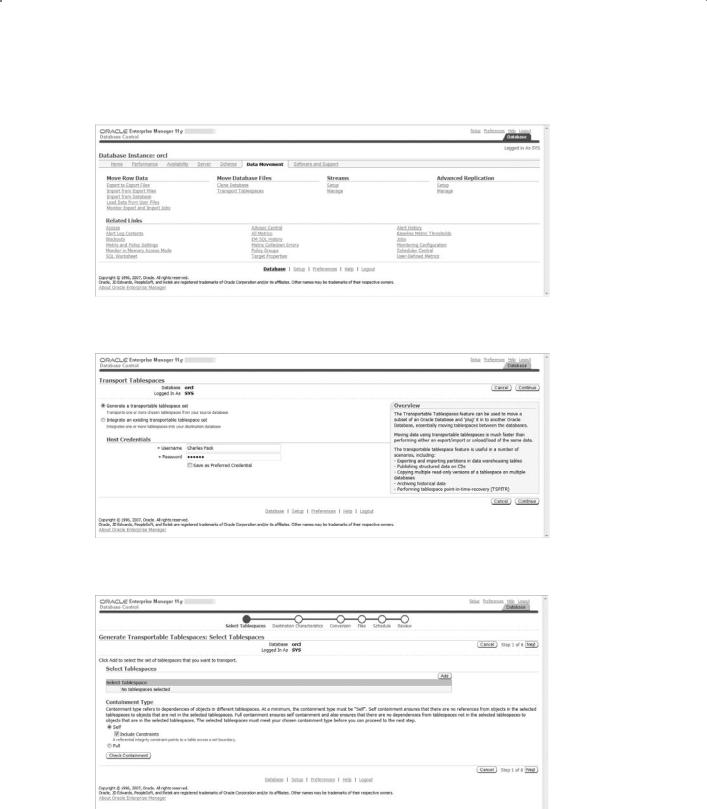
In this section we will show you how to transport a tablespace using Enterprise Manager. From the Enterprise Manager database home page, click the Data Movement tab, then click the Transport Tablespaces link under Move Database Files, shown in Figure 11.25.
From the Transport Tablespaces page, select the Generate a Transportable Tablespace Set option, provide the host credentials, then click the Continue button, all shown in Figure 11.26.
Now, in the screen shown in Figure 11.27, add the tablespaces required in the transportable tablespace set, and choose Self or Full under Containment Type. For selfcontained, determine if you need to include constraints. You can also check containment at this time.
Once you have checked containment, you will be given the opportunity to select the destination database platform and character set, shown in Figure 11.28.
494 Chapter 11 n Managing Database Resources
F i g u r e 11. 25 The Transport Tablespace link in Enterprise Manager
F i gu r e 11. 26 Transport tablespaces using Enterprise Manager.
F i gu r e 11. 27 Generate Transportable Tablespaces: Select Tablespaces

Managing Space |
495 |
F i g u r e 11. 28 Generate Transportable Tablespaces: Destination Characteristics
The next step is to choose the conversion process, either convert at destination or convert at source, as shown in Figure 11.29. For this exercise, we’ll choose to convert at the source.
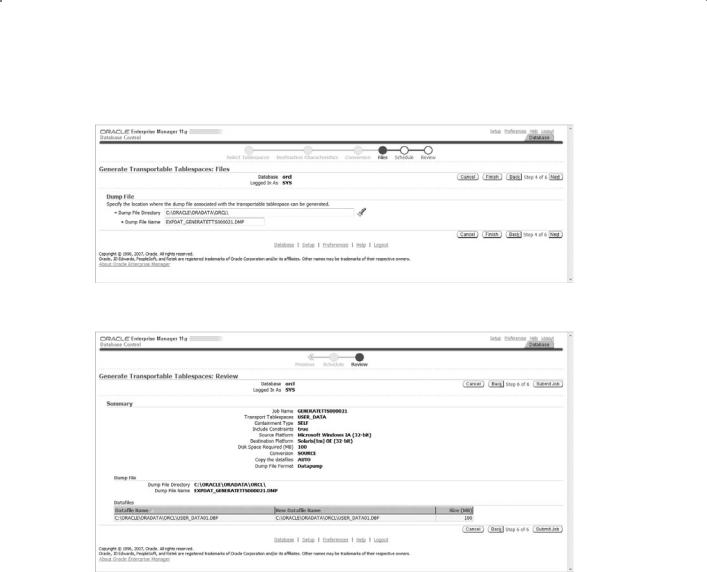
Now we choose the dump-file directory and dump-file name, as shown in Figure 11.30. Now you can schedule the export and conversion, and then review as shown in
Figure 11.31.
Submit the job. You will be returned to the Data Movement home page, and you can view the job details if you choose. At this point, you have a transportable tablespace set that you can import into a target database using Enterprise Manager or the command line.
F i gu r e 11. 29 Generate Transportable Tablespaces: Conversion
496 Chapter 11 n Managing Database Resources
F i g u r e 11. 3 0 Generate Transportable Tablespaces: Files
F i gu r e 11. 31 Generate Transportable Tablespaces: Review
Managing Transportable Databases
Transportable Database (TDB) allows you to migrate an entire database from one platform to another as long as the source and destination platforms have the same endian format. You must use a tool other than TDB for database migration if the source and destination are not of the same endian format.
TDB utilizes RMAN to convert all datafiles from the source to the destination platform. You can use TDB to create a copy of the database on the source system in the format of the destination system and then copy to the files to the destination, or you can copy the source files to the destination system into a staging area and then use RMAN to convert the datafiles and copy them to their intended final destination.
The basic steps for TDB to migrate a database to a new platform are as follows:
1.Verify the prerequisites.

Managing Space |
497 |
2.Identify all external files and directories.
3.Start the source database in read-only mode.
4.Verify that the source database is ready for migration.
5.Run RMAN CONVERT DATABASE.
6.Move files to the destination system.
7.Complete the migration.
A large amount of the time required to complete the migration will be spent writing files, with RMAN converting files and transferring files from the source to the destination. If you have a time constraint, consider manually copying files across a LAN instead; utilize your storage area network (SAN)–attached storage, network attached storage (NAS), or network file system (NFS)–mounted file systems to speed the process. Allowing source and destination to share the staging area will reduce your transfer time. Also consider running the RMAN CONVERT process on the system that has the better throughput.
Checking Prerequisites
Before you begin TDB, you’ll need to verify that your source and destination database platforms are supported. From your source database, query the V$DB_TRANSPORTABLE_PLATFORM view. If you don’t see the destination platform, you’ll need to skip TDB and choose another migration method.
SQL> select platform_name from v$db_transportable_platform;
PLATFORM_NAME
-------------------------------
Microsoft Windows |
IA (32-bit) |
Linux IA (32-bit) |
|
HP Tru64 UNIX |
|
Linux IA (64-bit) |
|
HP Open VMS |
|
Microsoft Windows |
IA (64-bit) |
Linux 64-bit for AMD |
|
Microsoft Windows |
64-bit for AMD |
Solaris Operating |
System (x86) |
HP IA Open VMS |
|
Solaris Operating |
System (AMD64) |
11 rows selected. SQL>


500 Chapter 11 n Managing Database Resources
Database Conversion on the Source System
To create the converted copy of the source database on the source system, connect to RMAN on the source system and execute the CONVERT DATABASE command. In this example, we converted the small orcl sample database on a Windows 32-bit system to Linux 64-bit. The database files are converted and placed into the c:\temp\stage directory on the source system, and the transport script and the init.ora file are placed in the c:\temp directory.
RMAN> convert database
2> transport script ‘c:\temp\transport_db_orclnx.sql’ 3> new database ‘orclnx’
4> to platform ‘Linux IA (64-bit)‘ 5> parallelism 4
6> format ‘c:\temp\%d%f’
7> db_file_name_convert ‘c:\oracle\oradata\orcl\‘,’c:\temp\stage\‘;
Starting conversion at source at 31-AUG-08 using channel ORA_DISK_1
using channel ORA_DISK_2 using channel ORA_DISK_3 using channel ORA_DISK_4
External table SYS.WRR$_REPLAY_CONN_DATA_EXT found in the database External table SYS.WRR$_REPLAY_SEQ_DATA_EXT found in the database External table SYS.WRR$_REPLAY_SCN_ORDER_EXT found in the database External table SH.SALES_TRANSACTIONS_EXT found in the database
Directory SYS.IDR_DIR found in the database
Directory SYS.CAPTURE_DIR found in the database
Directory SYS.SUBDIR found in the database
Directory SYS.XMLDIR found in the database
Directory SYS.MEDIA_DIR found in the database
Directory SYS.LOG_FILE_DIR found in the database
Directory SYS.DATA_FILE_DIR found in the database
Directory SYS.AUDIT_DIR found in the database
Directory SYS.DATA_PUMP_DIR found in the database
Directory SYS.ORACLE_OCM_CONFIG_DIR found in the database
BFILE PM.PRINT_MEDIA found in the database
User SYS with SYSDBA and SYSOPER privilege found in password file channel ORA_DISK_1: starting datafile conversion

502 Chapter 11 n Managing Database Resources
command. The command produces the convert script necessary to convert the database files on the destination system, the pfile, and a transport script.
rman connect target /
RMAN> convert database on destination platform 2>convert script ‘/tmp/convert_orclnx.rman’ 3>transport script ‘/tmp/transport_orclnx.sql’ 4>new database ‘orclnx’
5>format ‘/tmp/orclnx%U’
6>db_file_name_convert ‘/ora100/oradata/orclnx/datafile’,’/tmp/stage/‘;
Moving Files to the Destination System
If you converted the datafiles at the source, you should now copy them to the destination system. If you used your SAN, NAS, or NFS storage, now’s the time for the destination system to take ownership of the database files. Copy the transport SQL script, pfile, external table files, and BFILES to the destination.
If you chose to convert the files at the destination, you will now need to copy the convert script to the destination and move the unconverted datafiles to the staging area. Again, SAN, NAS, and/or NFS storage should be made read/write for the destination at this time.
Completing the Migration
If you converted the datafiles at the destination, you’ll need to run the RMAN convert script on the destination system.
Whether you converted at the source or at the destination, review and modify the pfile as required. Now review the transport script created by the RMAN CONVERT DATABASE command. Verify that the directory locations are correct for the pfile, datafiles, log files, and tempfile.
After you make corrections and verify, execute the transport script and check for any error messages.
Using Shrinking Segments
As with the files on the hard drive in your personal computer, the data within Oracle database segments can become fragmented with use. Data Manipulation Language (DML) operations—namely delete, update, and insert—can cause fragmentation of data and free space. Fragmentation of free space leads to wasted free space as well as performance issues such as the following:
Cache utilization Sparsely populated (fragmented) data blocks in memory require more reads to get the same amount of data as densely populated (defragmented) data blocks.
Table and index scans A full segment scan of fragmented data blocks requires more physical reads than a scan of defragmented blocks, so full table scans must read more fragmented blocks than defragmented blocks to get the same results.

Managing Space |
503 |
There are two methods to defragment a segment online; use either Table Redefinition, also referred to as reorganization, or Segment Shrink. Table Redefinition copies a table to a new location and consolidates the data. This operation requires space for the new copy of the table and its dependent objects. Also worth mentioning is the method to deallocate unused space above the high-water mark by issuing the DEALLOCATE UNUSED command. See Table 11.3 for a comparison of these methods.
Ta b l e 11. 3 Comparing Space-Reclamation Methods
Method |
Reclamation Method |
|
|
Segment Shrink |
Reclaims space above and below the high-water mark without |
|
using additional space |
Reorganization |
Moves rows to a new physical location, resetting the high-water |
|
mark but using additional space during the operation |
Deallocate Unused |
Deallocates space above the high-water mark that is currently not |
|
in use |
|
|
For segments in dictionary-managed tablespaces or for locally managed tablespaces with manual segment space management, segment reorganization is the only permitted operation for reclaiming fragmented free space.
Online Segment Shrink compacts the segment in place and does not require additional space to perform the operation. Segment Shrink can be performed on the dependent objects like indexes and partitions. Segment Shrink works on the following objects:
NN |
Heap tables |
|
|
NN |
Index-organized tables and their overflow segments |
NN |
LOBs and LOB segments |
NN |
Materialized views and materialized view logs |
|
|
NN |
Indexes |
NN |
Partitions and subpartitions |
To be eligible for segment shrink, the segment must have row movement enabled and reside in a tablespace that is locally managed and utilizes Automatic Segment Space Management (ASSM). The following objects in an ASSM tablespace are not eligible for Segment Shrink:
NN |
SecureFile LOBs |
|
|
NN |
Index-organized table mapping tables |
NN |
Tables that have ROWID-based materialized views |
|
|
NN |
Tables with function-based indexes |

504 Chapter 11 n Managing Database Resources
To enable row movement for a table, issue the ALTER TABLE … ENABLE ROW MOVEMENT command.
Performing an Online Segment Shrink Operation
Because Segment Shrink moves rows and changes the ROWIDs, before you perform the online Segment Shrink operation, you will need to do the following:
NN |
Enable row movement. |
NN |
Disable any ROWID-based triggers defined on the object. |
|
|
NN |
Determine if the application uses any ROWID-based DML or queries. |
By default, online Segment Shrink performs the following:
NN |
Compacts the segment |
|
|
NN |
Resets the high-water mark |
NN |
Releases the reclaimed free space |
Since Segment Shrink is an online operation, DML and queries can continue as normal. There is a brief block of concurrent DML operations on the segment when the space is released at the end of the shrink operation. Indexes remain usable throughout the operation.
Here’s an example of shrinking a table:
SQL> ALTER TABLE HR.EMPLOYEES SHRINK SPACE; ALTER TABLE HR.EMPLOYEES SHRINK SPACE
*
ERROR at line 1:
ORA-10636: ROW MOVEMENT is not enabled
SQL> ALTER TABLE HR.EMPLOYEES ENABLE ROW MOVEMENT; Table altered.
SQL> ALTER TABLE HR.EMPLOYEES SHRINK SPACE; Table altered.
There are two optional clauses with the SHRINK SPACE command: COMPACT and CASCADE. The COMPACT clause defragments and compacts but does not reset the high-water mark or return the free space. Execute the SHRINK SPACE command without the COMPACT clause at a later time to complete the task.
The CASCADE clause performs the Shrink Space operation on all dependent objects, as reported by the DBMS_SPACE.OBJECT_DEPENDENT_SEGMENT procedure.
Partitions in a partitioned table are automatically shrunk with the SHRINK SPACE command, so you don’t need to specify the CASCADE clause.

Managing Space |
505 |
Here’s an example of a small sample table called HR.EMPLOYEES_HIST, built as a copy of the Oracle-provided HR.EMPLOYEE table. We’ve inserted rows until we’ve allocated 40 blocks, then deleted about 70 percent of the rows. The shrink operation should reduce the number of blocks to 16. We’ll perform the two-step COMPACT process and CASCADE so that you can see how they work:
SQL> SELECT COUNT(1) from hr.employees_hist;
COUNT(1)
----------
2943
SQL> SELECT SEGMENT_NAME, BLOCKS FROM DBA_SEGMENTS
WHERE OWNER = ‘HR’ and SEGMENT_NAME LIKE ‘EMPL%‘;
SEGMENT_NAME |
BLOCKS |
------------------------- ---------- |
|
EMPLOYEES |
8 |
EMPLOYEES_HIST |
40 |
EMPLOYEES_HIST_IX |
16 |
SQL> ALTER TABLE HR.EMPLOYEES_HIST SHRINK SPACE COMPACT; |
|
Table altered. |
|
SQL> SELECT SEGMENT_NAME, BLOCKS FROM DBA_SEGMENTS |
|
WHERE OWNER = ‘HR’ and SEGMENT_NAME LIKE ‘EMPL%‘; |
|
SEGMENT_NAME |
BLOCKS |
------------------------- ---------- |
|
EMPLOYEES |
8 |
EMPLOYEES_HIST |
40 |
EMPLOYEES_HIST_IX |
16 |
SQL> ALTER TABLE HR.EMPLOYEES_HIST SHRINK SPACE; |
|
Table altered. |
|
SQL> SELECT SEGMENT_NAME, BLOCKS FROM DBA_SEGMENTS |
|
WHERE OWNER = ‘HR’ and SEGMENT_NAME LIKE ‘EMPL%‘; |
|
SEGMENT_NAME |
BLOCKS |
------------------------- ---------- |
|
EMPLOYEES |
8 |
EMPLOYEES_HIST |
16 |
506 Chapter 11 n Managing Database Resources
EMPLOYEES_HIST_IX |
16 |
SQL> ALTER TABLE HR.EMPLOYEES_HIST SHRINK SPACE CASCADE;
Table altered.
SQL> SELECT SEGMENT_NAME, BLOCKS FROM DBA_SEGMENTS
WHERE OWNER = ‘HR’ and SEGMENT_NAME LIKE ‘EMPL%‘;
SEGMENT_NAME |
BLOCKS |
------------------------- ---------- |
|
EMPLOYEES |
8 |
EMPLOYEES_HIST |
16 |
EMPLOYEES_HIST_IX |
8 |
SQL> SELECT COUNT(1) from hr.employees_hist;
COUNT(1)
----------
910
SQL>
Using Enterprise Manager Segment Space Advisor to Perform an Online Segment Shrink Operation
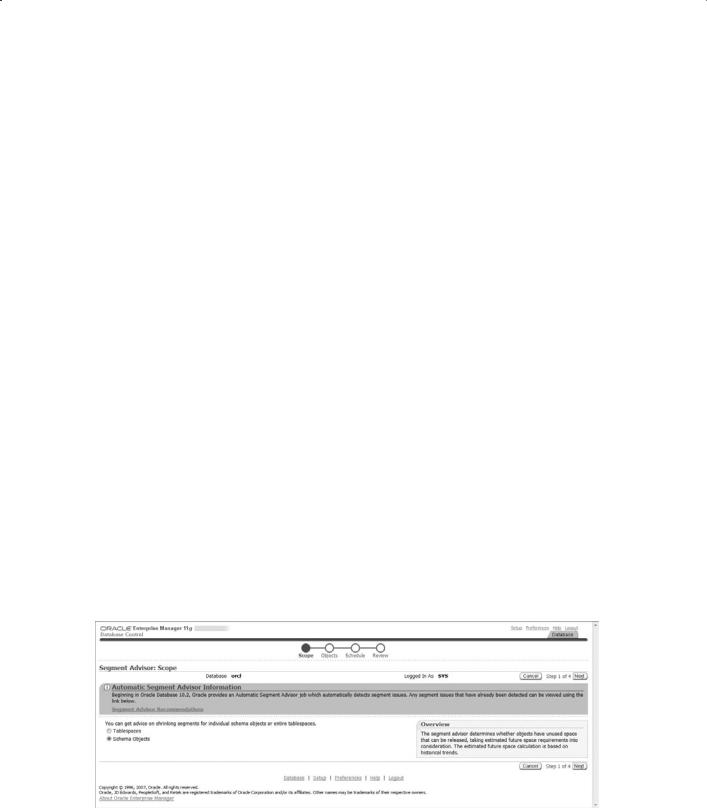
After repopulating and deleting from our test table HR.EMPLOYEES_HIST, we want to use EM to shrink the segment. From the Enterprise Manager database home page, in the Related Links section, find the Advisor Central. From the Advisor Central, choose the Segment Advisor. From the Segment Advisor Scope page, shown in Figure 11.32, choose Schema Objects and then click Next.
F i g u r e 11. 3 2 The Automatic Segment Advisor: Scope page

Managing Space |
507 |
Next choose the objects to add to the advisor by clicking the check box in the Select column next to the object name on the Schema Objects page, shown in Figure 11.33. You can also set the time limit for analysis under the advanced options, shown in Figure 11.34.
F i g u r e 11. 3 3 The Automatic Segment Advisor: Schema Objects page
F i gu r e 11. 3 4 The Automatic Segment Advisor: Schema Objects page
508 Chapter 11 n Managing Database Resources
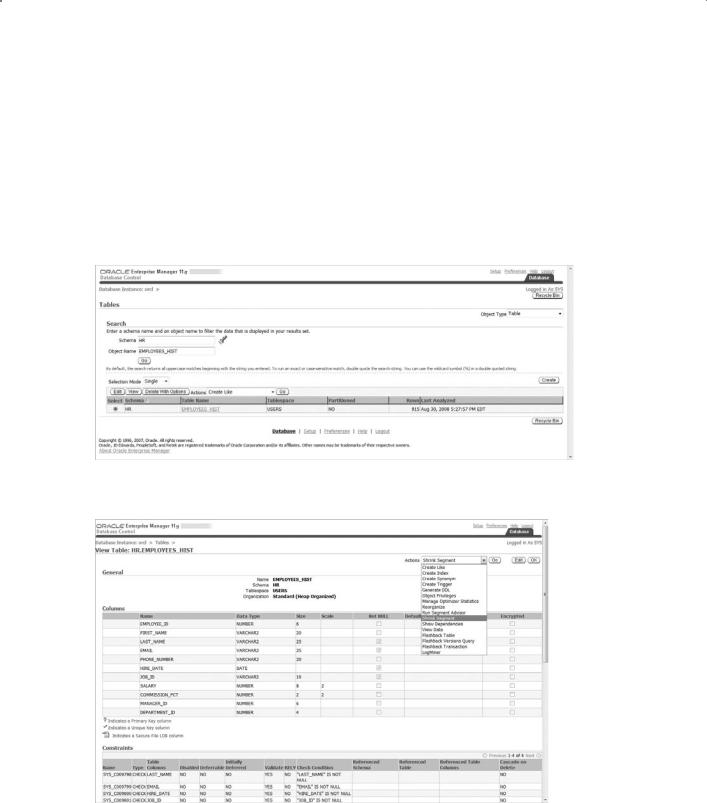
Once you set the schedule and review it, return to the Advisor Central page to monitor the Auto Space Advisor task results. For the example, the Segment Space Advisor chose not to shrink our HR.EMPLOYEES_HIST table. Since we’re really persistent about shrinking this table, from the EM database home page we will go to the Schema page, click Tables, enter the schema and object information for HR.EMPLOYEES_HIST, and then click the Go button. The basic information for the object will be displayed as in Figure 11.35.
Figure 11.36 shows that we chose the Shrink Segment operation from the Actions dropdown menu.
F i g u r e 11. 3 5 Selecting a table
F i gu r e 11. 3 6 Selecting the shrink operation
Managing Space |
509 |
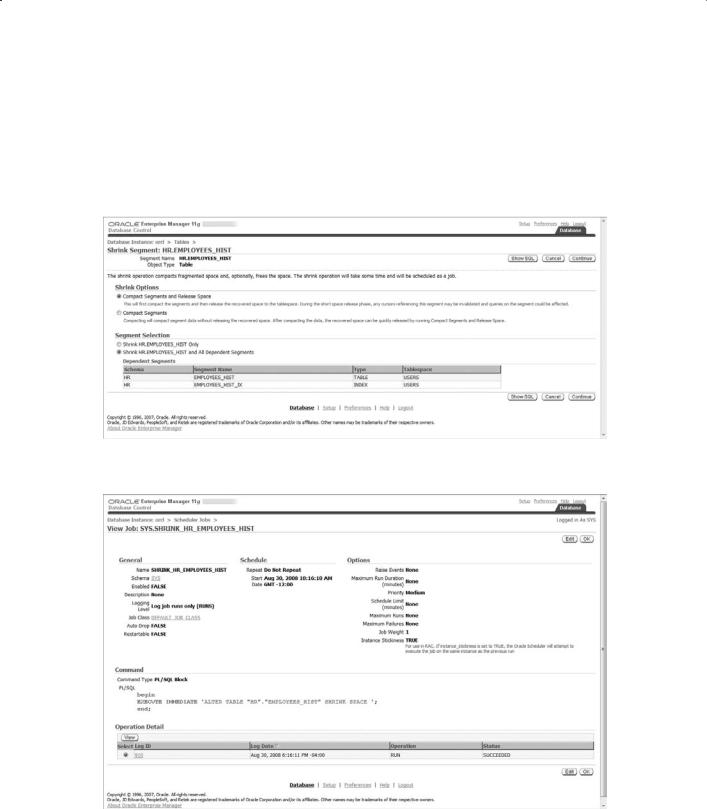
Under Shrink Options (shown in Figure 11.37), choose to compact only or to compact and release freed space, and also choose an option under Segment Selection, synonymous with the CASCADE clause we used at the command line. Schedule a job to shrink the table by clicking the Continue button; then submit the job. You can see in Figure 11.38 that the job completed successfully, and you can view the SQL statement executed to shrink the segment.
F i g u r e 11. 37 Selecting the shrink options
F i gu r e 11. 3 8 Viewing the shrink job