


Answers to Review Questions |
397 |
Answers to Review Questions
1.A, C, E. Flashback Drop utilizes the Recycle Bin, which does not use the undo tablespace; therefore options B and F are incorrect. Flashback Database is a physical recovery method and does not use undo; therefore option D is incorrect.
2.B, D. The Recycle Bin is a logical container of Flashback dropped objects. The objects in the Recycle Bin are stored in the tablespace they were created in.
3.C. Flashback Transaction Query could provide the data requested in a single query. Option A is an invalid choice because the table wasn’t dropped. Option B is incorrect because Flashback Query returns data at only a specific point in time, not for a range of times. Option D is incorrect because, although it could produce the data needed for the report, Flashback Versions Query would have to be run for each table individually. Option E is incorrect because the user does not want to recover the table at all.
4.A. The user needs to have the SELECT ANY TRANSACTION privilege granted to him. All of the other choices are incorrect.
5.C. AUM will ignore the UNDO_RETENTION parameter if the undo tablespace is not set to autoextend. Option A is incorrect because guaranteeing retention could result in failed transactions, which you are specifically wanting to avoid. Option B is not the best answer because the size of the undo tablespace is not the cause of the issue, but increasing the size of the undo tablespace could increase the amount of undo retained. Option D is wrong because this question is not dealing with the Recycle Bin and because it has no guaranteed retention setting.
6.C, D. Version 10.0 compatibility must be set, so option A is incorrect. Option B is incorrect because there is no such thing as Flashback Logging. Option E is incorrect because ARCHIVELOG mode has no effect on Flashback Transaction Query functionality.
7.A, E. The likely causes are that the RETENTION GUARANTEE option has been set on the undo tablespace and there are no expired transactions to remove to make room for new transactions, or that the user has exceeded the undo quota that has been set by the database resource manager. FLASHBACK GUARANTEE is not a valid option, so option B is incorrect. Flashback queries would not interfere with transactions entering the system, so options C and D are incorrect.
8.D. Flashback Versions Query does not change data at all, so option A is incorrect. B could be correct, but only if one of the specified points in time was the current timestamp. Therefore, B is not the best description. Option C is incorrect because Flashback Versions Query does not provide the SQL to undo the changes.
9.C. The VERSIONS_XID column contains the unique transaction identifier for the row. None of the other choices are valid column names.
10.A, C. Lists of values are not valid, so both B and E are incorrect. Also, sequence values are not valid, so D is also incorrect.

398 Chapter 9 n Understanding Flashback Technology
11.E. A Flashback Drop operation restores dropped objects from the Recycle Bin. It does not use SCN or timestamp ranges, so options A, B, and D are incorrect. Also, Flashback Drop operations don’t create objects in the Recycle Bin (they move them out of the Recycle Bin), so C is incorrect. The likely cause is that multiple versions of the table existed in the Recycle Bin and the wrong one was restored.
12.C. The VERSIONS BETWEEN clause of the Flashback Versions Query cannot query past table modifications or DDL changes to a table.
13.D. Like the other Flashback options, Flashback Table must be able to find the necessary undo records in order to recover. The use of SCNs is valid in Flashback Table; therefore option A is incorrect. Row Movement must be enabled in all cases, not just when a significant number of changes have been made. Therefore option B is incorrect. One of the main features of Flashback Table is that the tablespace can remain online, so option C is incorrect.
14.A. The default action for the FLASHBACK TABLE command is to disable all triggers regardless of their previous state. If the ENABLE TRIGGER clause is added to the FLASHBACK TABLE command, then triggers that were previously enabled will be reenabled after the operation completes.
15.B, C. FLASHBACK_TRANSACTION_QUERY is the correct view to query, and it can be done using either timestamps or SCN ranges. DBA_TRANSACTION_QUERY is not a valid view; therefore options A and D are incorrect.
16.B. Flashback Database relies on flashback logs in the flash recovery area. The Flashback Data Archive and Undo tablespace are not required. The RMAN command line is not required to recover to a flashback point; the DBA can execute the Flashback Database command from within SQL Plus.
17.C. The Flashback Database architecture consists of the recovery writer RVWR background process and Flashback Database logs. When the Flashback Database is enabled, the RVWR process is started. The RVWR writes the Flashback Database logs in the flash recovery area. FBDA is the Flashback Data Archive background process; the remaining options are fictitious.
18.A, B, C. The DBA can use Flashback Database to recover to an SCN, a point in time, or a named recovery point that is within the recovery window. Transaction ID and Session ID will not help you recover using the Flashback Database feature.
19.A, C. When creating a Flashback Data Archive, you need to specify the tablespace name and a retention period. The storage quota is optional. You add tables to an archive after the archive is created, not as a prerequisite. You don’t need to name a default Flashback Data Archive.
20.C. Do nothing. Once the retention period has passed, rows will be automatically removed from the Flashback Data Archive. TRUNCATE on a table that is archived is not allowed. Dropping the archive will definitely clear the old records, but it will also eliminate the ones you wanted to keep.


Diagnosing the Database |
401 |
health monitor reports, network tracing, and all other error diagnostic data. In Oracle 11g, ADR is the diagnostic data repository for Automatic Storage Management (ASM), the database, and all other Oracle products.
The ADR stores information in files outside the database so the information is available whether or not the database is up. The files are stored in a directory structure that includes a home directory for each instance of each product.
ADR Initialization Parameters
Since the Oracle 11g ADR provides a single repository location for the alert log and all dump files and trace files, there is no longer a need for the BACKGROUND_DUMP_DEST, CORE_DUMP_DEST, and USER_DUMP_DEST initialization parameters. They are deprecated and ignored. Now you use the initialization parameter DIAGNOSTIC_DEST to designate the location of the ADR.
SQL> show parameter diag |
|
|
NAME |
TYPE |
VALUE |
------------------------------------ |
----------- |
--------- |
diagnostic_dest |
string |
C:\ORACLE |
The default value for DIAGNOSTIC_DEST is $ORACLE_BASE. If the ORACLE_BASE environment variable is not set, then $ORACLE_HOME is used for DIAGNOSTIC_DEST.
Directory Structure of the Automatic Diagnostic Repository
Within the DIAGNOSTIC_DEST directory, Oracle builds the hierarchy of directories to support the ADR. The ADR home directory is located in this directory structure:
<diagnostic_dest>/diag/rdbms/<dbname>/<instname>
For the examples used in this chapter, the following represents the correct ADR home:
C:\oracle\diag\rdbms\orcl\orcl
|
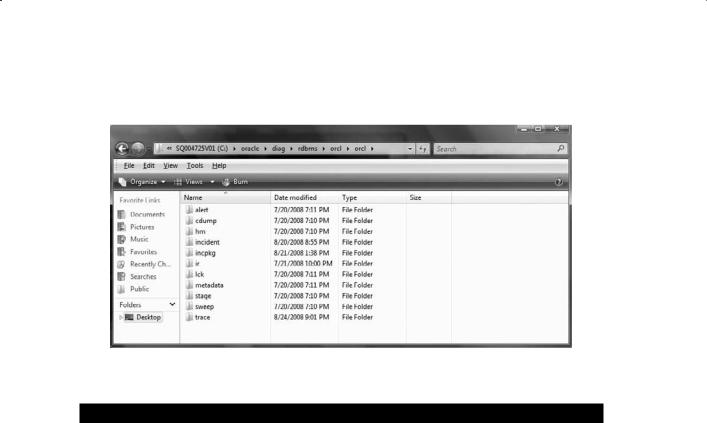
These are some important directories that you need to know about: |
NN |
Incident: Each incident gets its own subdirectory within the incident directory. |
NN |
Alert: The alert log is written to the alert directory. |
NN |
Cdump: Core dumps are written to this directory. |
NN |
Trace: Trace files are written to the trace directory. |
See Figure 10.1 for an example directory structure.
The DBA can set the value of DIAGNOSTIC_DEST on each instance in Real Application Clusters. The recommendation from Oracle is for each instance in a cluster to have the same value for DIAGNOSTIC_DEST.
402 Chapter 10 n Diagnosing the Database and Managing Performance
F i g u r e 10 .1 Folders within the ADR home directory
In Exercise 10.1, you’ll set the diagnostic destination.
E x e r c i s e 10 .1
Setting the Diagnostic Destination
To set the value for the diagnostic destination, do the following:
1.Verify the current setting for DIAGNOSTIC_DEST.
2.Determine the new destination.
3.Set the value for DIAGNOSTIC_DEST.
4.Verify that the directory structure has been created.
5.Verify the current setting for DIAGNOSTIC_DEST.
SQL> show parameter diag
NAME |
TYPE |
VALUE |
------------------------------------ |
----------- |
--------- |
diagnostic_dest |
string |
C:\ORACLE |
6.Determine the new destination. Check the new destination for security, access, and sufficient space. In this example, we’re moving the diagnostic destination from c:\ oracle to c:\temp.
7.Set the value for DIAGNOSTIC_DEST.
8.Use the ALTER SYSTEM command to change the value of DIAGNOSTIC_DEST:
SQL> alter system set diagnostic_dest=”c:\temp”;

Diagnosing the Database |
403 |
E x e r c i s e 10 .1 ( c o n t i n u e d )
9.Verify that the directory structure has been created.
10.Oracle creates the diag directory under the diagnostic_dest directory and creates the directory tree under the diag directory:
SQL> host
c:\temp>cd diag
c:\temp\diag>tree
Folder PATH listing for volume SQ004725V01 Volume serial number is 000DF7CC 8E02:02B8 C:.
rdbms orcl
orcl
alert cdump hm incident incpkg ir
lck metadata stage sweep trace
c:\temp\diag>
Using the Support Workbench
New to Oracle 11g, the Enterprise Manager Support Workbench (Support Workbench) is a central location for the DBA to see reported problems, investigate the problems, report the problem to Oracle support, and follow up through problem resolution. This is a vast improvement over previous versions, where there was no central location and no defined process for reporting, tracking, and resolving problem incidents.
To access the Support Workbench, start from the Enterprise Manager Database home page, click the Software and Support tab, and then in the Support section, click Support Workbench.
404 Chapter 10 n Diagnosing the Database and Managing Performance
Fundamental Tasks of the Support Workbench
The Support Workbench provides a framework for problem resolution: investigate, report, and resolve a problem. The following are the basic tasks within the Support Workbench:
NN |
View critical error alerts. |
NN |
View problem details. |
NN |
Gather additional diagnostic information. |
NN |
Create a service request. |
NN |
Package and upload diagnostic data to Oracle Support. |
NN |
Track the service request and implement any repairs. |
NN |
Close the incident. |
Task 1: View Critical Error Alerts
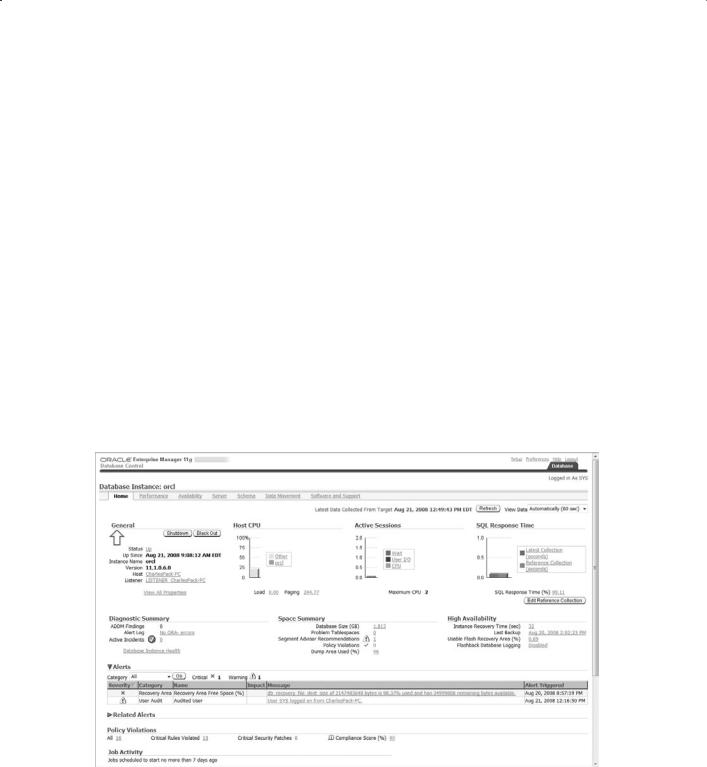
In most cases, you’ll discover a critical alert on the Enterprise Manager home page and then work your way to the Support Workbench page. On the EM Database Instance home page, critical-error alerts and warnings will be displayed in the Alerts section. A red X in the Severity column and an incident in the Category column indicate a critical-error alert. See Figure 10.2 for an example.
F i g u r e 10 . 2 Alerts on the Enterprise Manager home page
Diagnosing the Database |
405 |
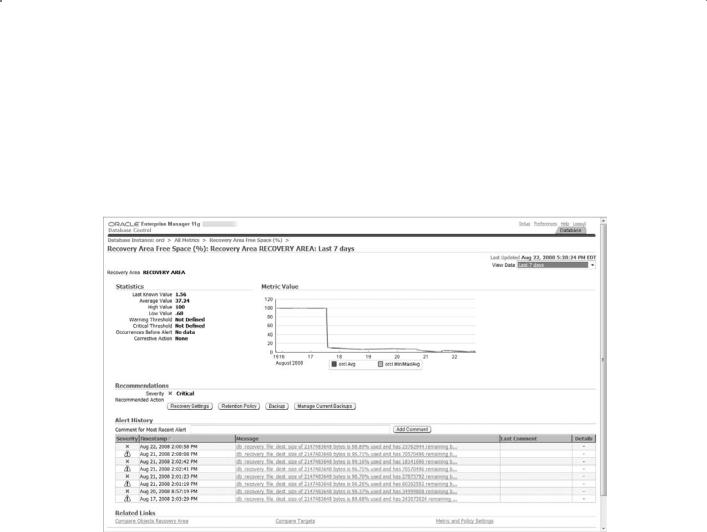
When you select the Message link, EM will direct you to the details for the critical alert, indicating by default any incidents in the last 24 hours. As you can see in Figure 10.3, changing the View Data option to Last 7 Days shows a lingering problem that needs to be addressed. You can add a comment to the most recent alert, or you can click one of the alert messages and add a comment to that specific alert.
F i g u r e 10 . 3 Critical alert
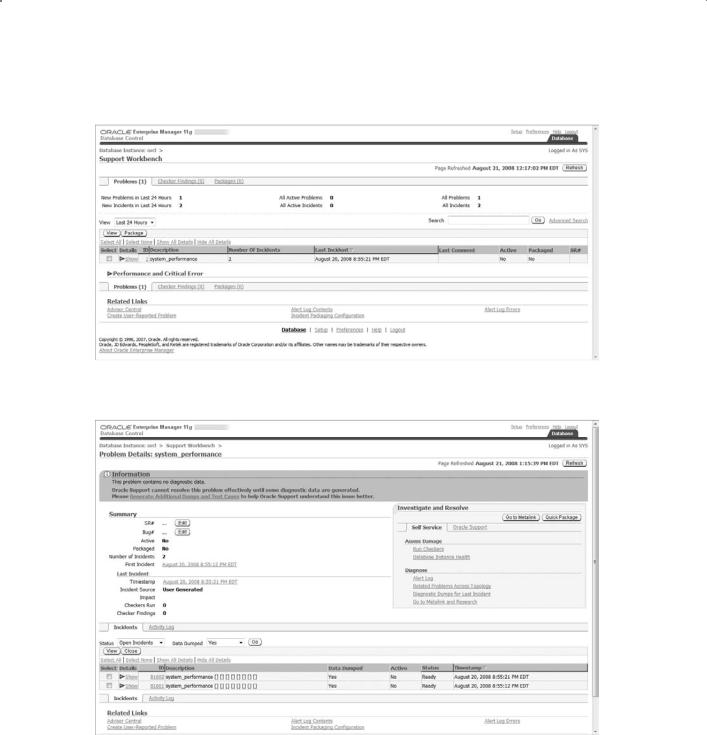
Return to the Database home page and go to the Support Workbench home page as described previously. Figure 10.4 shows one problem and two incidents. In Oracle 11g, a problem is a critical error in the database. An incident is a single occurrence of a problem. By default, incidents of a problem that have occurred within the last 24 hours are displayed on the page. To change the date range displayed, click the View drop-down menu and select your preference. To view all of the incidents for a problem, click the Details column’s Show icon or the Show All Details link.
Task 2: View Problem Details
Click the Select check box for the problem, and click the View button to see the problem details and, by default, all open incidents of the problem. To view all open, all closed, or all incidents associated with the problem, select the appropriate values from the Status drop-down menu options. There is also a Data Dumped drop-down menu; the options are yes and no. For the example shown in Figure 10.5, we want to see open incidents with data dumped.
Diagnosing the Database |
407 |
Task 3: Gather Additional Diagnostic Information
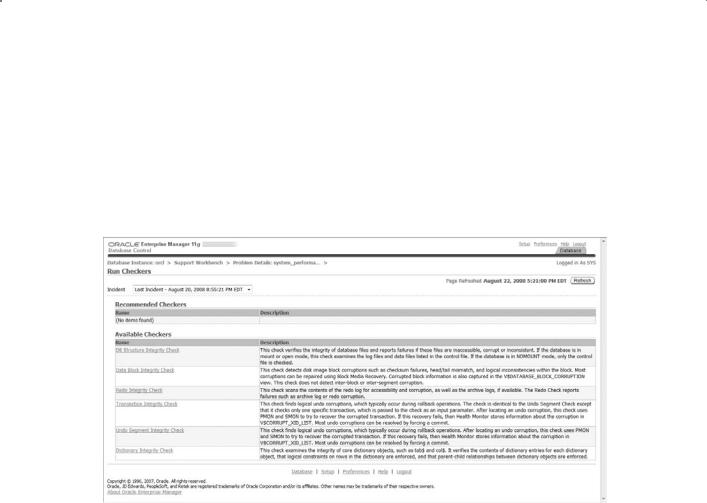
With this problem, the DBA needs to generate additional dumps and test cases before engaging Oracle Support, as noted at the top of the Problem Details subpage. Now would be a good time to perform self-service. In the Investigate and Resolve Section on the Self Service tab, select Run Checkers. For the example shown in Figure 10.6, there are no recommended checkers to run.
F i g u r e 10 .6 Run Checkers
Task 4: Create a Service Request
If you would like to open a service request with Oracle Support, click the Go to Metalink button in the Investigate and Resolve section; your browser will take you to Oracle’s Metalink home page. From there, you can open a service request and then return to EM.
Task 5: Package and Upload Diagnostic Data to Oracle Support
The Support Workbench has solved one very annoying problem for the active DBA: packaging all of the related data for an incident and getting it to Oracle. In the past, we searched for relevant files, compressed them, batched them, and either FTPed them to Oracle Support or attached the files to the Technical Assistance Request (TAR). Oracle 11g Incident Packaging Service (IPS) makes it easy. It identifies all files associated with a critical error and adds them to a zip file so you can easily send it to Oracle Support.
IPS is built into the Support Workbench, meant to make the DBA more productive and help Oracle Support to receive a complete set of data before advising on action steps.
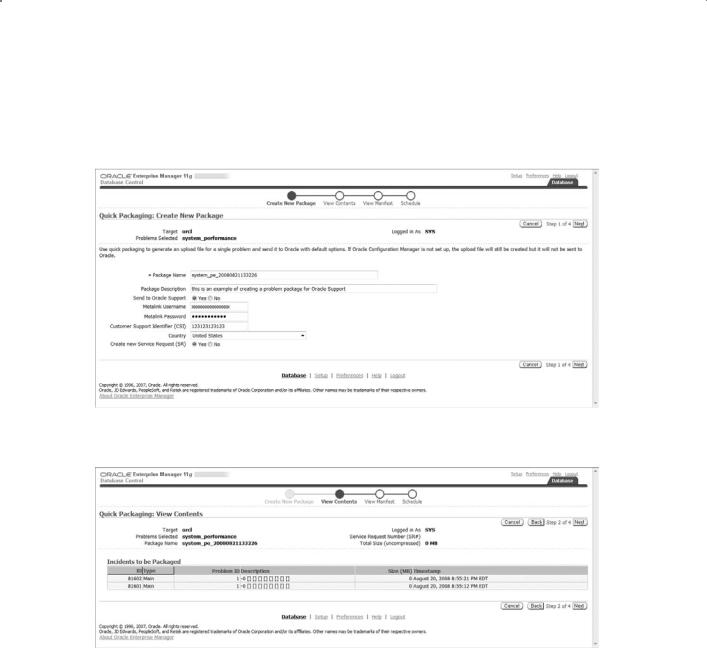
From the Investigate and Report section on the Problem Details page, click Quick Package. This will allow you to zip files related to the problem and send them to Oracle Support. We start the process in Figure 10.7.
408 Chapter 10 n Diagnosing the Database and Managing Performance
Enter your package description, Metalink credentials, and customer-support identifier. Click Next to view the package contents, shown in Figure 10.8.
F i g u r e 10 .7 Quick Packaging: Create New Package
F i gu r e 10 . 8 Viewing the package contents
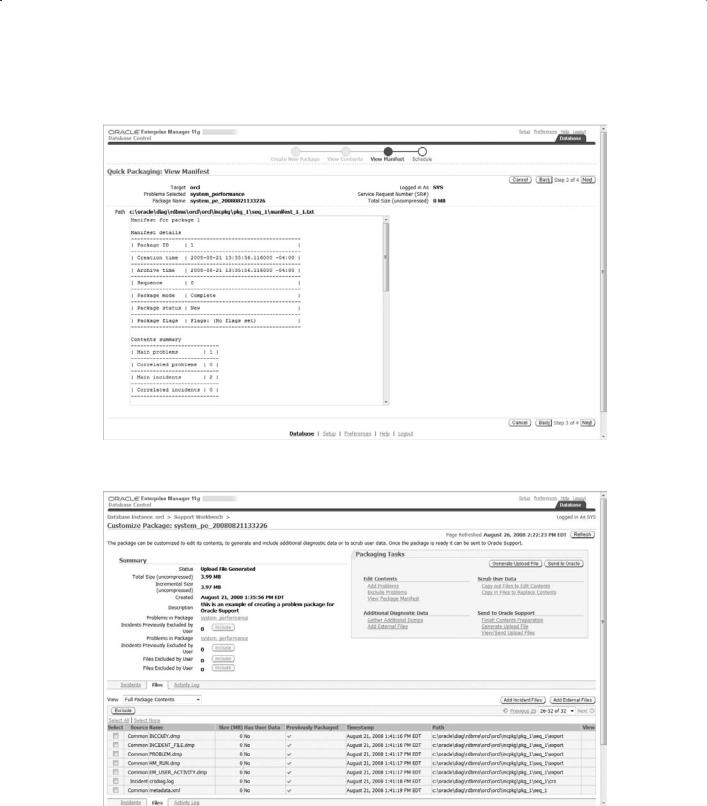
The View Manifest screen, shown in Figure 10.9, displays the package information that will be sent to Oracle Support.
After you verify that the information is correct, click Next to schedule the job that will submit the information to Oracle Support. Once you verify the job send time, click the final Submit button. Then click the OK button to return to the Problem Details page.
To view the details of a package in the Support Workbench, choose packages from the Support Workbench home page, and then choose a package by clicking on the package name. You can view the list of files included in the package, as shown in Figure 10.10, by clicking the Files tab from the Incident Package Details screen.
Diagnosing the Database |
409 |
F i g u r e 10 . 9 The View Manifest screen
F i gu r e 10 .10 The Customize Package screen

Diagnosing the Database |
411 |
These advantages are related to recovery performance and returning the customer to normal operating mode.
Detecting Block-level Corruption
Data-block corruption can occur because of memory corruption that is written to disk or because of I/O errors. Corruption is detected by dbv, SQL that accesses corrupt blocks, RMAN, ANALYZE operations, and any other operation that attempts to read data from a corrupt block, including DBMS_REPAIR.CHECK_OBJECT. Once a corrupt block is detected, the database will not allow access to that block until it is repaired.
The aid the DBA in diagnosis of datafile corruption, Oracle provides the dbv “DB Verify” OS utility program. The dbv program takes, for example, a database file name as a command-line parameter, and performs an analysis of the structure and contents of the file and determines if there is any block corruption. At the command line, execute dbv to see the following help screen:
C:\>dbv
DBVERIFY: Release 11.1.0.6.0 - Production on Sun Nov 23 18:30:28 2008
Copyright (c) 1982, 2007, Oracle. All rights reserved.
Keyword |
Description |
(Default) |
---------------------------------------------------- |
||
FILE |
File to Verify |
(NONE) |
START |
Start Block |
(First Block of |
File) |
|
|
END |
End Block |
(Last Block of File) |
BLOCKSIZE |
Logical Block Size |
(8192) |
LOGFILE |
Output Log |
(NONE) |
FEEDBACK |
Display Progress |
(0) |
PARFILE |
Parameter File |
(NONE) |
USERID |
Username/Password |
(NONE) |
SEGMENT_ID |
Segment ID (tsn.relfile.block) |
(NONE) |
HIGH_SCN |
Highest Block SCN To Verify |
(NONE) |
|
(scn_wrap.scn_base OR scn) |
|
