

- •STANDARD SERVICE PROCEDURES
- •MOPAR SILICONE RUBBER ADHESIVE SEALANT
- •MOPAR GASKET MAKER
- •GASKET DISASSEMBLY
- •SURFACE PREPARATION
- •CRANKSHAFT SPROCKET BOLT ACCESS PLUG
- •ENGINE PERFORMANCE
- •HONING CYLINDER BORES
- •MEASURING MAIN BEARING CLEARANCE AND CONNECTING ROD BEARING CLEARANCE
- •PLASTIGAGE METHOD
- •CONNECTING ROD BEARING CLEARANCE
- •LASH ADJUSTER (TAPPET) NOISE DIAGNOSIS
- •REPAIR OF DAMAGED OR WORN THREADS
- •HYDROSTATIC LOCKED ENGINE
- •GENERAL INFORMATION
- •ENGINE IDENTIFICATION NUMBER OR CODE
- •ENGINE MOUNTS
- •FRONT MOUNT
- •LEFT SIDE MOUNT
- •ENGINE MOUNT RUBBER INSULATORS
- •ENGINE ASSEMBLY
- •REMOVAL
- •INSTALLATION
- •SOLID MOUNT COMPRESSOR BRACKET SERVICE
- •ACCESSORIES REMOVAL
- •TIMING SYSTEM AND SEALS SERVICE
- •TIMING BELT SERVICE
- •CYLINDER HEAD AND VALVE ASSEMBLY SERVICE
- •CYLINDER HEAD COVER AND CURTAIN
- •REMOVAL
- •CLEANING
- •CURTAIN INSTALLATION
- •COVER SEALING AND INSTALLATION
- •CAMSHAFT SERVICE
- •REMOVAL
- •INSPECTION
- •CAMSHAFT END PLAY
- •INSTALLATION
- •LASH ADJUSTER (TAPPET) NOISE
- •INSTALLATION
- •INSTALLATION
- •CYLINDER HEAD
- •REMOVAL
- •INSPECT HEAD AND CAMSHAFT BEARING JOURNALS
- •VALVES AND VALVE SPRINGS
- •VALVE INSPECTION
- •VALVE GUIDES
- •REFACING VALVES AND VALVE SEATS
- •CLEANING
- •CYLINDER HEAD COVER SEALING
- •CYLINDER HEAD
- •TIMING BELT
- •CAMSHAFT AND CRANKSHAFT TIMING PROCEDURE
- •INSTALLATION
- •SERVICING OIL SEALS
- •CAMSHAFTS SERVICE
- •REMOVAL
- •INSPECTION
- •INSTALLATION
- •CAMSHAFT END PLAY
- •LASH ADJUSTER (TAPPET) NOISE
- •ROCKER ARM AND HYDRAULIC LASH ADJUSTER
- •VALVE SPRINGS AND VALVE STEM SEALS
- •VALVE SERVICE
- •VALVE AND VALVE SPRINGS
- •VALVE INSPECTION
- •VALVE GUIDES
- •TESTING VALVE SPRINGS
- •REFACING VALVES AND VALVE SEATS
- •VALVE GEAR REASSEMBLY AFTER VALVE SERVICE
- •CRANKSHAFT OIL SEALS SERVICE
- •REAR CRANKSHAFT SEAL RETAINER AND OIL SEAL
- •FRONT CRANKSHAFT SEAL RETAINER
- •CRANKSHAFT SERVICE
- •CRANKSHAFT MAIN BEARINGS
- •CRANKSHAFT MAIN JOURNALS
- •CHECKING CRANKSHAFT END PLAY
- •OPTIONAL CRANKSHAFT END PLAY CHECK
- •CRANKSHAFT BEARING CLEARANCE
- •BALANCE SHAFTS
- •REMOVAL
- •BALANCE SHAFTS CARRIER ASSEMBLY
- •CHAIN TENSIONING
- •INTERMEDIATE SHAFT SERVICE
- •REMOVAL
- •INSTALLATION
- •INTERMEDIATE SHAFT BUSHING SERVICE
- •CYLINDER BORE INSPECTION
- •SIZING PISTONS
- •PISTON PINS
- •PISTON PINS
- •FITTING RINGS
- •PISTON AND CONNECTING ROD ASSEMBLY INSTALLATION
- •CONNECTING RODS
- •ENGINE CORE PLUGS
- •REMOVAL
- •INSTALLATION
- •ENGINE LUBRICATION SYSTEM
- •PRESSURE LUBRICATION
- •ACCESSORY SHAFT
- •BALANCE SHAFTS
- •TURBOCHARGER (WHERE EQUIPPED)
- •SPLASH LUBRICATION
- •REMOVAL
- •OIL PAN RAIL TO BLOCK SEALING
- •INSTALLATION
- •OIL PUMP SERVICE
- •OIL PICKUP
- •INSTALLATION
- •INSPECTION
- •CHECKING ENGINE OIL PRESSURE
- •OIL FILTER
- •FILTER
- •SPECIFICATIONS
- •ENGINE SPECIFICATIONS (CONT.)
- •ENGINE SPECIFICATIONS (CONT.)
- •SPECIFICATIONS
- •3.0L ENGINE
- •GENERAL INFORMATION
- •ENGINE IDENTIFICATION NUMBER OR CODE
- •3.0L ENGINE
- •SPECIFICATIONS
- •ENGINE MOUNTS
- •FRONT MOUNT
- •LEFT SIDE MOUNT
- •ENGINE MOUNT RUBBER INSULATORS
- •ENGINE MOUNT INSULATOR ADJUSTMENT
- •ENGINE ASSEMBLY
- •REMOVAL
- •INSTALLATION
- •ACCESSORY DRIVE BELT SERVICE
- •REMOVAL
- •TIMING BELT SERVICE
- •REMOVAL
- •INSTALLATION
- •TIMING BELT TENSIONER
- •CYLINDER HEAD AND CAMSHAFT SERVICE
- •INSTALL
- •AUTO LASH ADJUSTER
- •FUNCTION CHECK
- •CAMSHAFT SERVICE
- •CAMSHAFT INSPECTION
- •CAMSHAFT INSTALL
- •ROCKER ARMS
- •ROCKER ARM SHAFTS
- •REASSEMBLE
- •ASSEMBLE ROCKER ASSEMBLY
- •INSTALL ROCKER ARM SHAFT ASSEMBLY
- •CYLINDER HEAD
- •REMOVAL
- •INSPECTION
- •INSTALLATION
- •VALVE SPRINGS
- •VALVE AND VALVE SPRINGS
- •VALVES
- •VALVE SEAT INSPECTION
- •CYLINDER BORE INSPECTION
- •FITTING PISTONS
- •FITTING PISTON RINGS
- •CONNECTING ROD CLEARANCE
- •CONNECTING ROD SIDE CLEARANCE
- •CRANKSHAFT SERVICE
- •INSPECTION
- •PLASTIGAGE MEASUREMENT
- •CHECKING CRANKSHAFT END PLAY
- •FRONT CRANKSHAFT OIL PUMP AND OIL SEAL
- •BORING CYLINDER
- •CYLINDER BLOCK
- •ENGINE LUBRICATION SYSTEM
- •OIL PAN SEALING AND INSTALLATION
- •OIL PUMP SERVICE
- •REMOVAL
- •INSPECTION OIL PUMP
- •OIL RELIEF PLUNGER
- •INSTALLATION
- •CHECKING ENGINE OIL PRESSURE
- •OIL FILTER AND BRACKET
- •OIL FILTER
- •ENGINE SPECIFICATIONS
- •ENGINE SPECIFICATIONS (CONT.)
- •TORQUE
- •GENERAL INFORMATION
- •ENGINE INDENTIFICATION NUMBER OR CODE
- •SPECIFICATIONS
- •ENGINE MOUNTS
- •FRONT MOUNT
- •LEFT SIDE MOUNT
- •ENGINE MOUNT RUBBER INSULATORS
- •ENGINE MOUNT INSULATOR ADJUSTMENT
- •ENGINE ASSEMBLY
- •REMOVAL
- •INSTALLATION
- •ROCKER ARMS AND SHAFT ASSEMBLY
- •REMOVAL
- •INSTALLATION
- •CYLINDER HEADS
- •REMOVAL
- •INSPECTION
- •INSTALLATION
- •INTAKE MANIFOLD SEALING
- •VALVE SERVICE
- •VALVES AND VALVE SPRINGS
- •REMOVAL
- •VALVE INSPECTION
- •VALVE GUIDES
- •REFACING VALVES AND VALVE SEATS
- •VALVES
- •VALVE SEATS
- •TESTING VALVE SPRINGS
- •VALVE INSTALLATION
- •REPLACE VALVE STEM SEALS OR VALVE SPRINGS, CYLINDER HEAD NOT REMOVED
- •HYDRAULIC TAPPETS
- •PRELIMINARY STEP TO CHECKING THE HYDRAULIC TAPPETS
- •OIL LEVEL TOO HIGH
- •OIL LEVEL TOO LOW
- •VALVE TRAIN NOISE DIAGNOSIS
- •TAPPET REMOVAL
- •DISASSEMBLY (FIG. 27)
- •CLEANING AND ASSEMBLY
- •INSTALLATION
- •VALVE TIMING
- •TIMING CHAIN COVER, OIL SEAL AND CHAIN
- •COVER
- •MEASURING TIMING CHAIN FOR STRETCH
- •TIMING CHAIN COVER EXTERNAL OIL SEAL
- •CAMSHAFT
- •INSTALLATION
- •REMOVAL
- •INSTALLATION
- •ENGINE CORE OIL AND CAM PLUGS
- •REMOVAL
- •INSTALLATION
- •CLEANING AND INSPECTION
- •CYLINDER BORE INSPECTION
- •FINISHED PISTONS
- •FITTING PISTONS
- •PISTON PINS
- •FITTING RINGS
- •INSTALLING PISTON AND CONNECTING ROD ASSEMBLY
- •CONNECTING RODS
- •INSTALLATION OF CONNECTING ROD BEARINGS
- •CRANKSHAFT SERVICE
- •CRANKSHAFT MAIN BEARINGS
- •CRANKSHAFT MAIN JOURNALS
- •CHECKING CRANKSHAFT END PLAY
- •CRANKSHAFT OIL CLEARANCE
- •CRANKSHAFT OIL SEALS SERVICE
- •REMOVAL
- •INSTALLATION
- •REAR CRANKSHAFT SEAL RETAINER
- •ENGINE LUBRICATING SYSTEM
- •OIL PAN SERVICE
- •REMOVAL
- •CLEANING AND INSPECTION
- •INSTALLATION
- •OIL PUMP SERVICE
- •DISASSEMBLY
- •INSPECTION AND REPAIR
- •OIL PUMP ASSEMBLY AND INSTALLATION
- •CHECKING ENGINE OIL PRESSURE
- •OIL FILTER
- •ENGINE SPECIFICATIONS
- •ENGINE SPECIFICATIONS (CONT.)
- •ENGINE SPECIFICATIONS (CONT.)
- •ENGINE SPECIFICATIONS (CONT.)
- •TORQUE
Ä |
|
3.0L ENGINE 9 - 79 |
|
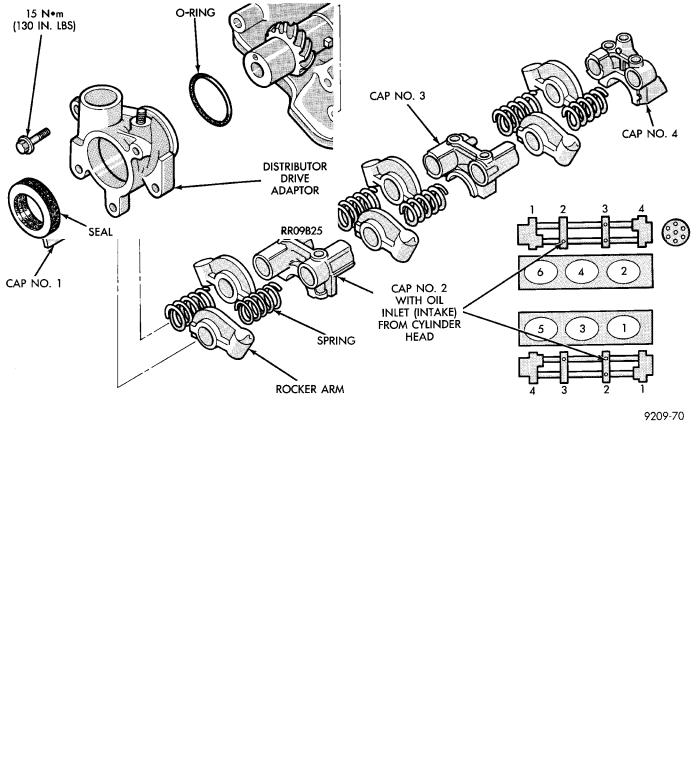
Fig. 10 Assemble Rocker Arm and Shafts
Fig. 11 Distributor Drive
install the new cam plug to a depth of 0.5mm (0.020 inch) below the surface of the cylinder head.
(6) Replace air cleaner assembly.
CAMSHAFT END SEAL (PLUG) SERVICEÐOUT OF VEHICLE SERVICE
Install end seal plug with Special Tool MD998306. (Fig. 13).
Fig. 12 Install Camshaft Oil Seal
CYLINDER HEAD
REMOVAL
(1) See Timing System this group for disassembly and remove camshaft sprockets.

9 - 80 3.0L ENGINE |
|
Ä |
|
Fig. 13 Install Camshaft End SealÐPlug
(2)See Camshaft Rocker Arms Removal.
(3)Remove upper intake manifold assembly. Refer to Intake and Exhaust Manifolds, Group 11.
(4)Remove distributor.
(5)Remove exhaust manifolds and cross over Refer to Intake and Exhaust Manifolds, Group 11.
Fig. 14 Cylinder Head Bolt Removal Sequence
(6) Remove cylinder head bolts in sequence shown in (Fig. 14) and remove cylinder head.
Fig. 15 Check Cylinder Head
INSPECTION
(1)Before cleaning, check for leaks, damage and cracks.
(2)Clean cylinder head and oil passages.
(3)Check cylinder head for flatness (Fig. 15).
(4)Cylinder head must be flat within;
²Standard dimension = less than 0.05mm (.002 inch)
²Service Limit = 0.2mm (.008 inch)
²Grinding Limit = Maximum of 0.2 mm (.008 inch) is permitted.
CAUTION: This is a combined total dimension of stock removal from cylinder head if any and block top surface.
Fig. 16 Cylinder Head Bolt Tightening Sequence
INSTALLATION
(1) Clean surfaces of head and block, install head gasket over locating dowels.