

Ä |
|
3.0L ENGINE 9 - 71 |
|
Fig. 4 Accessories Mounting Brackets
(a)Mark RIGHT insulator on right yoke and engine plate supports. Remove insulator to rails screws.
(b)Remove FRONT engine mount through bolt and nut.
(c)Remove LEFT insulator through bolt from inside wheelhouse or insulator bracket to transmission screws.
(11)Remove engine.
INSTALLATION
(1)Attach hoist and lower engine into engine compartment.
(2)Align engine mounts and install but do not tighten until all mounting bolts have been installed. Tighten bolts to torque specified in (Fig. 2).
(3)Install transmission case to cylinder block, tighten bolts to 102 Nzm (75 ft. lbs.) torque.
(4)Remove engine hoist and transmission holding fixture.
(5)Remove C clamp from torque converter housing. Align flex plate to torque converter and install mounting screws. Tighten to 75 Nzm (55 ft. lbs.)
(6)Install transmission inspection cover.
(7)Connect exhaust system at manifold.
(8)Install starter.
(9)Install power steering pump and air conditioning compressor. For belt installation Refer to Accessory Belt Drive in Cooling System Group 7.
(10)Lower vehicle and connect all vacuum lines.
(11)Connect all electrical connections including ground strap.
(12)Connect fuel lines and accelerator cable.
(13)Install radiator and fan assembly. Connect fan motor electrical lead. Install radiator hoses. Fill cooling system. Refer to Cooling System Group 7 for filling procedure.
(14)Fill engine crankcase with proper oil to correct
level.
(15)Install hood.
(16)Connect battery.
(17)Start engine and run until operating temperature is reached.
(18)Adjust transmission or linkage if necessary.
ACCESSORY DRIVE BELT SERVICE
REMOVAL
(1)Loosen Adjusting Lock Nut (Fig. 6).
(2)Turn adjusting jack screw counterclockwise to reduce belt tension. Remove belt.
(3)Inspect drive belt for wear and damage (Fig. 5).
(4)Installation: Adjust belt tension to 5/16 deflection between pulleys (Fig. 6).
9 - 72 3.0L ENGINE |
|
Ä |
|
(5)Install breaker bar into 1/2 square opening in tensioner.
(6)Rotate tensioner clockwise to remove and install belt. (Fig. 7).
(2)Remove screws attaching air conditioning compressor mounting bracket and adjustable drive belt tensioner from block and engine mounting bracket. Remove both assemblies.
(3)Remove steering pump/alternator belt tensioner mounting bolt and remove automatic belt tensioner.
Fig. 5 Drive Belt Inspection
Fig. 6 Air Conditioning Belt
Fig. 7 Alternator/Power Steering Belt
ENGINE MOUNT BRACKET
REMOVAL
(1) Remove air conditioning compressor to mounting bracket screws and lay compressor aside (Fig. 4).
Fig. 8 Right Inner Splash ShieldÐTypical
Fig. 9 Crankshaft Drive Pulleys
(4)Remove two steering pump to engine mounting brackets screws and one rear support lock nut.
(5)Lay power steering pump aside.
(6)Raise vehicle and remove right inner splash shield (Fig. 8).
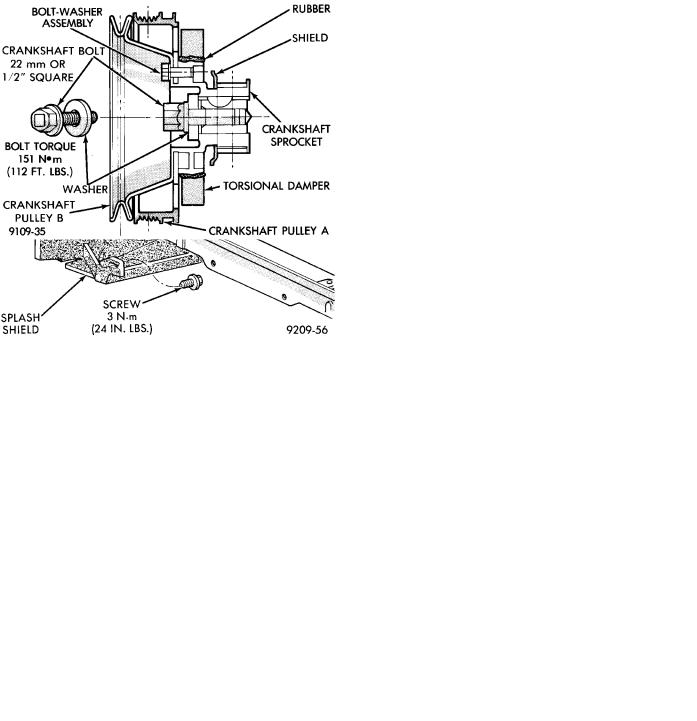
(7)Remove crankshaft drive pulleys and torsional damper (Fig. 9).
(8)Lower vehicle and place a jack under engine.