

MusculoSkeletal Exam
.pdfChapter 4 The Cervical Spine and Thoracic Spine
Sternocleidomastoid muscle
Scaleni
Figure 4.32 Palpation of the sternocleidomastoid muscle and |
Figure 4.33 Palpation of the lymph node chain. |
|
the scaleni muscles. |
||
|
and you will feel the occipital artery (Moore and Dalley, 1999). The sternocleidomastoid is the anterior border of the anterior triangle of the neck; the upper trapezius is the posterior border, and the clavicle the inferior border. It is a useful landmark for palpating enlarged lymph nodes (Figure 4.32).
Scaleni Muscles
The scalenus anterior attaches proximally to the anterior tubercles of the transverse processes of all the cervical vertebrae. The scalenus medius attaches proximally to the posterior tubercles of the transverse processes of all the cervical vertebrae. They both have their distal attachment to the first rib. The scalenus anterior is clinically significant because of its relationship to the subclavian artery and the brachial plexus. Compression of these structures may lead to thoracic outlet syndrome. Both the scalenus anterior and medius can assist in elevating the first rib. The scalenus posterior attaches from the posterior tubercles of the transverse processes from C4–C6 into the second rib. The scalenus anterior muscles can work bilaterally to flex the neck. Unilaterally the group can laterally flex the neck. These muscles work together as stabilizers of the neck in the sagittal plane. They can be injured in acceleration-type accidents. This occurs when the individual is sitting
at a standstill and hit from behind. Place your fingers over the lateral aspect of the neck in the anterior triangle and ask the patient to laterally flex away from you. This places the muscles on stretch and facilitates palpation (see Figure 4.32). Inhalation will also make the muscles more distinct.
Lymph Node Chain
Multiple lymph nodes are located in the head and neck. There is a long lymph node chain with the majority of the nodes located deep to the sternocleidomastoid muscle. These are not normally accessible to palpation. If they are enlarged secondary to an infection or a malignancy, they can be palpated by surrounding the sternocleidomastoid with your thumb and finger (Figure 4.33).
Carotid Pulse
The carotid pulse may be visible by inspection. Locate the sternocleidomastoid muscle in the area of the carotid tubercle (see description, p. 51). Place your index and middle fingers medial to the midsection of the muscle belly and press toward the transverse processes of the cervical spine. Ask the patient to rotate the head toward the side you are palpating. This relaxes the muscle and makes the pulse more accessible
55

The Cervical Spine and Thoracic Spine Chapter 4
Palpate well below the upper border of the thyroid cartilage
Sternocleidomastoid
muscle
Carotid sinus
(Figure 4.34). Remember not to press too hard or the pulse will be obliterated.
Parotid Gland
The parotid gland is the largest of the three salivary glands. It is not normally palpable. If it is enlarged, it can be found in the space between the sternocleidomastoid, the anterior mastoid process, and the ramus of the mandible (Figure 4.35). It is enlarged when the patient has the mumps or a ductal stone. The contour of the mandibular angle will appear more rounded.
Carotid artery
Figure 4.34 Palpation of the carotid pulse.
Parotid
gland
Figure 4.35 Palpation of the parotid gland.
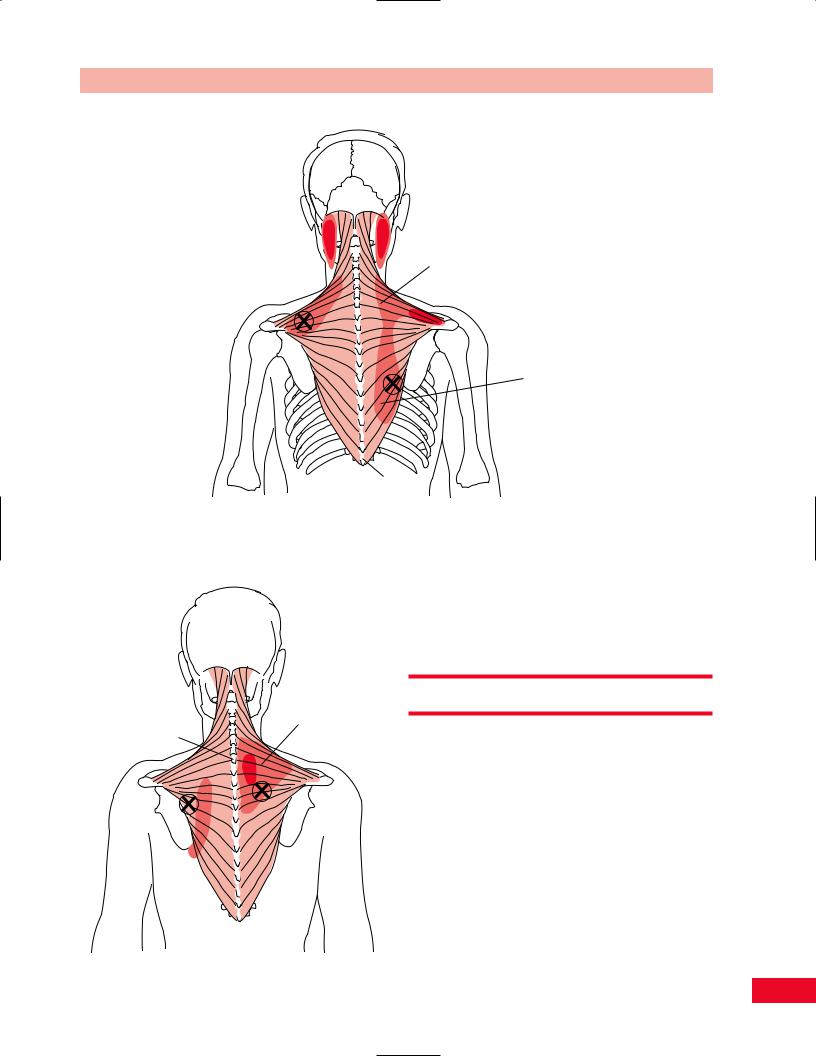
Trigger Points of the Cervical Spine
The trapezius muscle contains numerous trigger points. Five common trigger points are illustrated in Figures 4.36, 4.37, and 4.38. The sternocleidomastoid muscle contains trigger points that frequently cause symptoms such as nasal congestion, watery eyes, and headaches (Figure 4.39). The scalene muscles may refer pain down
Upper trapezius
Figure 4.36 A trigger point in the upper trapezius muscle may cause headaches. Adapted with permission from Travell J, Rinzler SI. The myofascial genesis of pain. Postgrad Med 1952; 31: 425–431.
56
Chapter 4 The Cervical Spine and Thoracic Spine
Middle trapezius
Lower trapezius
T12
Figure 4.37 Trigger points in the middle and lower trapezius may cause pain in the occipital region and along the paraspinal region. Adapted with permission from Travell J, Rinzler SI. The myofascial genesis of pain. Postgrad Med 1952; 31: 425–431.
as far as the hand (Figure 4.40). Trigger points of the splenius capitis and suboccipital muscles also commonly cause headaches (Figures 4.41 and 4.42).
|
Active Movement Testing |
|
Trapezius |
C7 |
Have the patient sit on a stool in a well-lit area of the |
|
examination room. Shadows from poor lighting will |
|
affect your perception of the movement. The patient |
|
should be appropriately disrobed so that you can |
|
observe the neck and upper thoracic spine. You should |
|
watch the patient’s movements from the anterior, |
|
posterior, and both lateral aspects. While observing |
|
the patient move, pay particular attention to his or her |
Figure 4.38 (left) Additional trigger points in the left lower and right middle trapezius are shown with their referred pain patterns. Adapted with permission from Travell J, Rinzler SI. The myofascial genesis of pain. Postgrad Med 1952; 31:
425–431.
57

The Cervical Spine and Thoracic Spine Chapter 4
Sternocleidomastoid
Figure 4.39 Trigger points in the sternocleidomastoid muscle may cause referred pain in the face and head and also symptoms of watery eyes and runny nose. Adapted with permission from Travell J, Rinzler SI. The myofascial genesis of pain. Postgrad Med 1952; 31: 425–431.
Scalene
X
X
Figure 4.40 Trigger points within the scaleni muscles may refer pain all the way to the hand. Adapted with permission from Travell J, Rinzler SI. The myofascial genesis of pain. Postgrad Med 1952; 31: 425–431.
58

Suboccipital
Figure 4.41 Trigger points in the suboccipital muscles radiate pain in the region of the greater occipital nerve. Adapted with permission from Travell J, Rinzler SI. The myofascial genesis of pain. Postgrad Med 1952; 31: 425–431.
Splenius capitis muscle
Chapter 4 The Cervical Spine and Thoracic Spine
willingness to move, the quality of the motion, and the available range. Lines in the floor may serve as visual guides to the patient and alter the movement patterns. It may be helpful to ask the patient to repeat movements with the eyes closed.
Before your examination of the cervical spine, you should have the patient perform a quick test to clear the joints of the upper extremities. Ask the patient to fully elevate the upper extremities; stress a combination of shoulder internal rotation, adduction, and extension at the end of the range; and passively stress the elbow and wrist. This will check the range of motion of the entire upper extremity. If the movements are painless, then these joints are not implicated and you should proceed with the examination of the cervical spine.
You should then have the patient perform the following movements: bending the head forward and backward, lateral (side) bending to the right and left, and rotation to the right and left. You should observe the alignment and symmetry of the spinal curves. You may note a flattening in a particular area as the patient bends to the side or a deviation to one side during forward bending. These deviations should alert you to more carefully examine the involved area. If the
Figure 4.42 A trigger point in the splenius capitis muscle may cause referred pain on the top of the head. Adapted with permission from Travell J, Rinzler SI. The myofascial genesis of pain. Postgrad Med 1952; 31: 425–431.
59

The Cervical Spine and Thoracic Spine Chapter 4
motion is pain free at the end of the range, you can add an additional overpressure to “clear” the joint (Cyriax, 1979). You can also ask the patient to sustain the position for 15 seconds to determine whether the symptoms can be reproduced. Sustained movements can also be combined to increase the degree of nerve root compression symptoms. If the patient experiences pain in any of these movements, you should note the position that increases or alleviates the symptoms.
Forward Bending
Instruct the patient to sit on a stool with the feet firmly on the ground approximately 6 in. apart. Stand behind the patient to observe them from the back during the movement. Note the patient’s normal resting posture, as changes in the normal thoracic and lumbar curves can influence the resting position and mobility of the cervical spine. It is also helpful to observe the patient from the side to obtain a better view of the cervical lordosis. Instruct the patient to sit in an erect posture before you begin your examination. Ask the patient to drop the head forward with the chin toward the chest (Figure 4.43A). Observe the degree of range of motion and any deviation to the right or left. Note the smoothness with which each intervertebral level opens as the cervical lordosis reverses. Note whether the range is limited by pain or the patient’s anticipation of pain. The patient achieves full flexion when the chin, with mouth closed, touches the chest. It is accepted as normal if there is a two finger space between the chin and chest. The normal range of motion of flexion is 80–90 degrees (Magee, 1997).
The amount of movement can be recorded on a movement diagram. Deviations to the side and the onset of symptoms can also be recorded. A more objective method of measuring the range can be accomplished in one of a few ways. One method is to use a ruler to measure the distance from the patient’s chin to the sternal notch. Another is by using a standard goniometer or a gravity-assisted bubble goniometer specifically designed for the cervical spine to give you the actual degrees of movement.
Backward Bending
Instruct the patient to sit on a stool with the feet firmly on the ground approximately 6 in. apart. Stand behind the patient to observe the movement. Instruct the patient to sit in an erect posture before you begin your examination. Ask the patient to raise the chin and look toward the ceiling (Figure 4.43B). Normal range
is achieved when the patient’s forehead and nose are on a horizontal plane. Note the smoothness with which each intervertebral level closes. Note whether the range is limited by pain or the patient’s anticipation of pain.
Range of motion is most easily recorded on a movement diagram. Another method of recording is to use a ruler to measure the distance from the patient’s chin to the sternal notch as the neck is extended. A standard goniometer or one specifically designed for the cervical spine can be used to give you the actual degrees of movement. Normal range of motion is 70 degrees (Magee, 1997).
Lateral (Side) Bending
Instruct the patient to sit on a stool with the feet firmly on the ground approximately 6 in. apart. Stand behind the patient to observe the movement. Instruct the patient to sit in an erect posture before you begin your examination. Ask the patient to allow their ear to approach the shoulder on the side to which he or she is moving (Figure 4.43C). Do not allow the patient to substitute by raising the shoulder to meet the ear. Lateral bending should be repeated on the right and left sides. Compare the degree and quality of movement from side to side. Note any breaks in the continuity of the curve. An angulation of the curve may indicate an area of hypermobility or hypomobility. Note the smoothness with which each intervertebral level opens. Note whether pain or the patient’s anticipation of pain limits the range.
Range of motion is most easily recorded on a movement diagram. You can also use a ruler to measure the distance from the mastoid process to the tip of the acromion process and compare one side to the other. A standard goniometer or one specifically designed for the cervical spine can be used to give you the actual degrees of movement. Normal range of motion is 20– 45 degrees (Magee, 1997).
Rotation
Instruct the patient to sit on a stool with the feet firmly on the ground approximately 6 in. apart. Stand behind the patient to observe the movement. Instruct the patient to sit in an erect posture before you begin your examination. Ask the patient to turn the head in the horizontal plane so that the chin moves toward the shoulder (Figure 4.43D). The patient may try to substitute by rotating the trunk. Rotation should be repeated on the right and left sides. Compare the degree and quality of movement from side to side. Note any
60

Chapter 4 The Cervical Spine and Thoracic Spine
A B
C D
Figure 4.43 Active movement testing. (A) Cervical forward bending. (B) Cervical backward bending. (C) Cervical side bending.
(D) Cervical rotation.
discontinuity of the curve. Note the smoothness in which each intervertebral level opens. Note whether the range is limited by pain or the patient’s anticipation of pain.
Range of motion is most easily recorded on a movement diagram. You can use a ruler to measure the distance from the chin to the acromion process and compare one side to the other. A standard goniometer or one specifically designed for the cervical
spine can be used to give you the actual degrees of movement. Normal range of motion is 70–90 degrees (Magee, 1997).
Upper Cervical Spine
Tucking the chin in will produce flexion of the upper cervical spine and extension of the lower cervical
61

The Cervical Spine and Thoracic Spine Chapter 4
spine. Jutting the chin produces extension of the upper cervical spine and flexion of the lower cervical spine.
Thoracic Motion
Active motion of the upper thoracic spine can be evaluated as an extension of the cervical spine. After the patient takes up all the motion in each direction of the cervical spine, instruct him or her to continue the flexion, extension, lateral bending, and rotation movements to a greater degree until you can sense movement in the middle thoracic vertebrae. The lower thoracic spine can be evaluated as an extension of the lumbar spine. Recognize that the thoracic spine is the most restricted area of the spine because of the costal attachments.
Passive Movement Testing
Passive movement testing can be divided into two categories: physiological movements (cardinal plane), which are the same as the active movements, and mobility testing of the accessory (joint play, component) movements. Using these tests helps to differentiate the contractile from the noncontractile (inert) elements. These elements (ligaments, joint capsule, fascia, bursa, dura mater, and nerve root) (Cyriax, 1979) are stretched or stressed when the joint is taken to the end of the available range. At the end of each passive physiological movement you should sense the end feel and determine whether it is normal or pathological. Assess the limitation of movement and see if it fits into a capsular pattern. The capsular pattern of the cervical spine is equally limited lateral bending and rotation, followed by extension that is less limited (Magee, 1997). This pattern is only clearly noticeable when multiple segments are involved. Paris described a capsular pattern for the cervical spine secondary to a facet lesion. With the facet lesion on the right, lateral bending is limited to the left, rotation is limited to the left, and forward bending deviates to the right (Paris, 1991).
Since the structures of the cervical and thoracic spine can be easily injured, it is imperative that you take a history and are aware of the radiological findings before you initiate the passive movement portion of the examination. Patients may have fractures, subluxations, or dislocations that are not easily diagnosed on the initial clinical evaluation. If these injuries exist, the patient’s well being may be jeopardized during the examination process.
Passive Physiological Movements
Passive testing of the physiological movements is easiest if they are performed with the patient in the sitting position. You should place one hand over the top of the patient’s head and rest your fingers on the anterior aspect of the skull and your palm over the patient’s forehead. Your other hand should grasp the patient’s occiput. This hold will allow you to support the patient’s head and allow him or her to relax while you perform the passive movements.
Mobility Testing of Accessory Movements
Mobility testing of accessory movements will give you information about the degree of laxity present in the joint and the end feel. The patient must be totally relaxed and comfortable to allow you to move the joint and obtain the most accurate information. Before beginning the mobility testing portion of the examination, you must be sure that the vertebral artery is not compromised and that the cervical spine is stable.
Intervertebral Mobility of the Cervical Spine
Flexion Intervertebral Mobility Testing
Place the patient in the sitting position either on a stool or on a low table, with the head and neck in neutral alignment. Stand beside the patient to observe the movement occurring posteriorly. Support the patient’s head by placing your hand over his or her forehead onto the skull. Place the middle finger of your other hand in the interspace between the spinous processes of C2 and C3. Flex the patient’s head and neck until you feel movement at the segment you are palpating. Note the opening of the intervertebral space. You can slightly extend the neck to get a better sense of opening and closing. Slightly increase the degree of flexion to palpate the next intervertebral segment and continue in a caudal direction (Figure 4.44). You can also palpate over the facet joints during passive flexion. The test should be repeated bilaterally to evaluate all of the joints.
Extension Intervertebral Mobility Testing
Cervical extension is evaluated in the same manner as described above for flexion except that you should be feeling a closing between the spinous processes as you extend the neck.
Lateral Bending Intervertebral Mobility Testing
Place the patient in the sitting position either on a stool or on a low table, with the head and neck in neutral
62

Figure 4.44 Mobility testing of cervical spine flexion.
alignment. Stand beside the patient to observe the movement occurring posteriorly. Support the patient’s head by placing your hand over the top of the skull. Place the middle finger of your other hand over the facet joint on the side that you are testing. Start by placing your middle finger over the facet joint between C2 and C3. Bend the patient’s head and neck toward the side you are evaluating until you feel movement at the segment being palpated. Note the closing of the facet joint. You can laterally bend the head and neck slightly in the opposite direction to get a better sense of opening and closing. Slightly increase the degree of side bending to palpate the next intervertebral segment and continue in a caudal direction (Figure 4.45). This movement can also be palpated over the facet joints on the opposite side of the movement. In that case, you will palpate an opening of the facet joint. The test should be repeated on both sides to evaluate all of the joints.
Rotation Intervertebral Mobility Testing
Place the patient in the sitting position either on a stool or on a low table, with the head and neck in neutral alignment. Stand beside the patient to observe the movement occurring posteriorly. Support the patient’s head by placing your hand over the forehead onto the skull. Place the middle finger of your other hand on the
Chapter 4 The Cervical Spine and Thoracic Spine
Figure 4.45 Mobility testing of cervical spine lateral (side) bending.
lateral aspect of the spinous process of C2. Rotate the patient’s head and neck away from the side on which you have placed your finger, until you feel the spinous process pressing into your finger at the segment you are palpating. Slightly increase the degree of rotation to palpate the next intervertebral segment and continue in a caudal direction (Figure 4.46). You can also palpate by rotating the head toward your palpating finger. You will then feel the spinous process moving away from you. The test should be repeated on both sides to evaluate all of the joints.
Thoracic Spine Movements
Passive motion of the upper thoracic spine can be evaluated as a continuation of the cervical spine. After you evaluate all the motions in each direction, continue the flexion, extension, lateral bending, and rotation movements to a greater degree until you can sense movement down to the middle thoracic vertebrae. The middle thoracic spine can be evaluated with the patient in the sitting position. Hold the patient by placing your arm around the patient’s crossed upper extremities and grasping the opposite shoulder. Your
63

The Cervical Spine and Thoracic Spine Chapter 4
Figure 4.46 Mobility testing of cervical spine rotation.
hand placements and the method of palpation are the same as described above for the cervical spine. The lower thoracic spine can be evaluated as a continuation of the lumbar spine. When evaluating the lumbar spine, you should move the pelvis and lower extremities with a greater amount of range in a cranial direction until you can sense mobility in the lower thoracic vertebrae.
Cervical Traction
Place the patient in the supine position. Stand behind the patient’s head. Place your hands so that your fingertips grasp under the occiput. Use your body weight and lean back, away from the patient, to create the traction force (Figure 4.47).
Accessory Movements of the Cervical Spine
Posteroanterior Central Pressure (Ventral Glide) on the Spinous Process
Place the patient in the prone position with the neck in neutral rotation midway between flexion and extension. Stand on the side of the patient so that your dominant eye is centered over the spine, with your body turned so that you are facing the patient’s head. Place your
Figure 4.47 Mobility testing of cervical traction.
Spinous process
Figure 4.48 Mobility testing of central posteroanterior pressure on the spinous processes.
overlapping thumbs onto the spinous process. Press directly over the process in an anterior direction until all the slack has been taken up (Figure 4.48).
Posteroanterior Unilateral Pressure on the Transverse Process
Place the patient in the prone position with the neck in neutral rotation midway between flexion and extension. Stand on the side of the patient so that your dominant eye is centered over the spine, with your body turned so that you are facing the patient’s head. Place your overlapping thumbs onto the transverse process on the side closest to you. Press directly over the process in an anterior direction until all the slack has been taken up. This will cause a rotation of the
64