

MusculoSkeletal Exam
.pdfAxillary lymph nodes
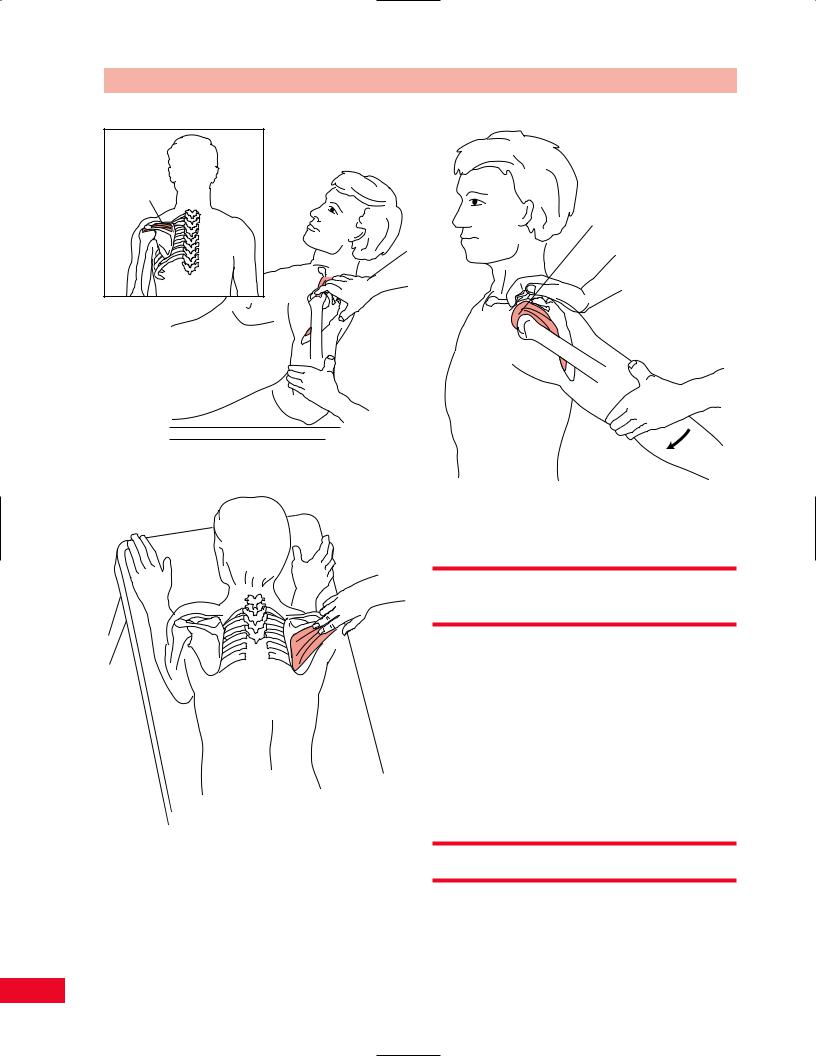
Serratus anterior
Figure 8.25 Palpation of the serratus anterior muscle.
Chapter 8 The Shoulder
to 90 degrees and place his or her forearm behind the back. Then ask the patient to lean back onto the elbow in a half-lying position. This fixes the arm in adduction and medial rotation. You can localize the tendon by palpating the coracoid process and moving laterally to the greater tubercle, under the edge of the acromion (Figure 8.27).
To locate the infraspinatus tendon, have the patient prop himself or herself up on the elbows. Ask the patient to hold onto the edge of the treatment table to maintain lateral rotation. Instruct the patient to shift his or her weight over the arm being examined. The weight of the trunk will help to uncover the greater tubercle. The combination of flexion, adduction, and lateral rotation brings the greater tubercle out laterally. Palpate along the spine of the scapula laterally and palpate the infraspinatus tendon on the head of the humerus (Figure 8.28).
Subacromial (Subdeltoid) Bursa
The subacromial bursa is located between the deltoid and the capsule. It is elongated under the acromion and coracoacromial ligament. This bursa does not communicate with the joint. The subacromial bursa can be easily inflamed and become impinged under the
Subaromial
bursa
Rotator 
cuff
Figure 8.26 Palpation of the rotator cuff muscles.
155
The Shoulder Chapter 8
Supraspinatus 
Figure 8.27 Palpation of the supraspinatus tendon.
Figure 8.28 Palpation of the infraspinatus tendon.
acromion by virtue of its position. It will be very tender to palpation if it is inflamed and a thickening may be noted. It can be more easily palpated if it is brought forward from under the acromion by extending and internally rotating the shoulder (Figure 8.29).
Subacromial bursa
Figure 8.29 Palpation of the subacromial bursa.
Trigger Points of the Shoulder
Region
Myofascial pain of the shoulder girdle is extremely common, especially because of the occupational overuse that occurs in many patients. Trigger points around the shoulder can mimic the symptoms of cervical radiculopathy or angina.
The common locations and referred pain zones for trigger points for the levator scapulae, supraspinatus, infraspinatus, deltoid, subscapularis, rhomboideus major and minor, and pectoralis major are illustrated in Figures 8.30 through 8.36.
Active Movement Testing
Active movement testing can be performed either by having the patient perform individual specific movements or by functionally combining the movements. The patient can perform the following movements: flexion
156
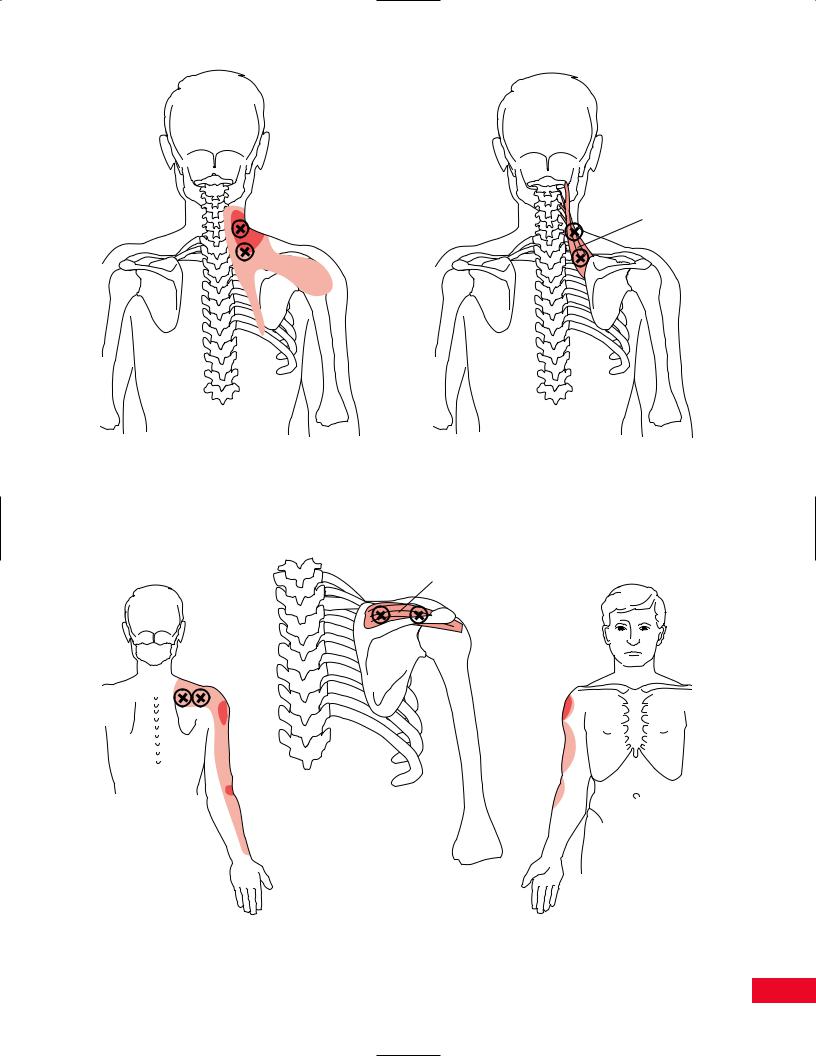
Levator scapulae
Figure 8.30 Trigger points in the levator scapulae, shown with common areas of referred pain. Adapted with permission from Travell J, Rinzler SI. The myofascial genesis of pain. Postgrad Med 1952; 31: 425–431.
Supraspinatus
Figure 8.31 Trigger points of the supraspinatus muscle, shown with common areas of referred pain. Adapted with permission from Travell J, Rinzler SI. The myofascial genesis of pain. Postgrad Med 1952; 31: 425–431.
157
The Shoulder Chapter 8
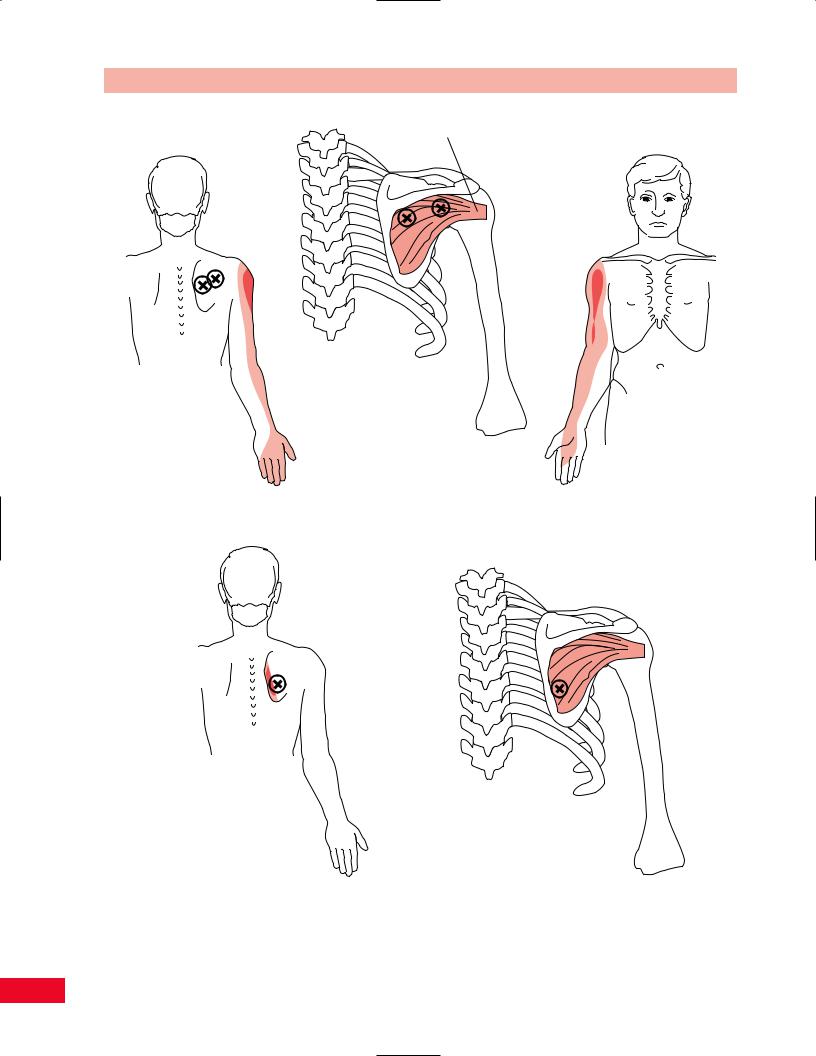
Infraspinatus
A
B
Figure 8.32 Trigger points of the infraspinatus muscle, shown with common areas of referred pain. Adapted with permission from Travell J, Rinzler SI. The myofascial genesis of pain. Postgrad Med 1952; 31: 425–431.
158

Deltoid
A
C
B
Figure 8.33 Trigger points of the deltoid muscle, shown with common areas of referred pain. Adapted with permission from Travell J, Rinzler SI. The myofascial genesis of pain. Postgrad Med 1952; 31: 425–431.
159
Subscapularis
Figure 8.34 Trigger points of the subcapularis muscle, shown with common areas of referred pain. Adapted with permission from Travell J, Rinzler SI. The myofascial genesis of pain. Postgrad Med 1952; 31: 425–431.
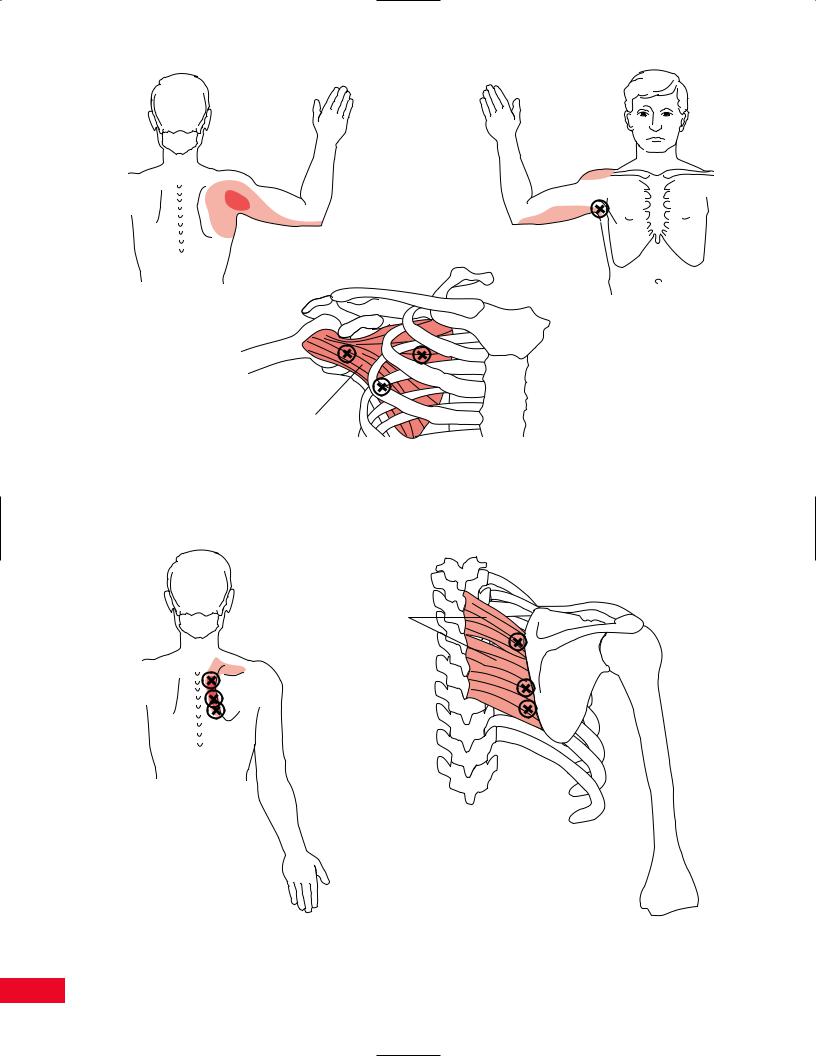
Rhomboids
Figure 8.35 Trigger points of the rhomboid muscles, shown with common areas of referred pain. Adapted with permission from Travell J, Rinzler SI. The myofascial genesis of pain. Postgrad Med 1952; 31: 425–431.
160

Pectoralis minor
A |
Pectoralis |
major |
Pectoralis minor
Pectoralis major
B
C
Figure 8.36 Trigger points of the pectoralis major muscle, shown with common areas of referred pain. Adapted with permission from Travell J, Rinzler SI. The myofascial genesis of pain. Postgrad Med 1952; 31: 425–431.
161
The Shoulder Chapter 8
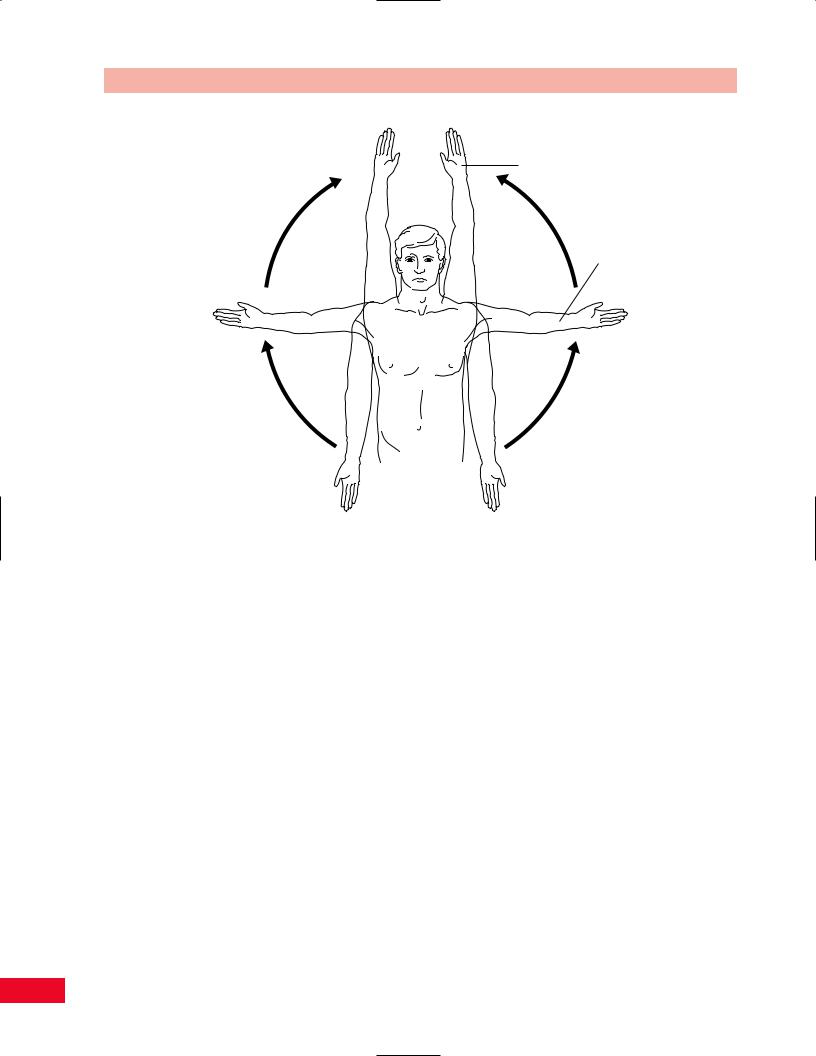
Flexion
Abduction
Figure 8.37 Active movement testing of shoulder abduction and flexion.
and extension on the transverse axis, abduction and adduction on the sagittal axis, and medial and lateral rotation on the longitudinal axis. These should be quick, functional tests designed to clear the joint. If the motion is pain free at the end of the range, you can add an additional overpressure to “clear” the joint. Be aware, however, that overpressure in external rotation can cause anterior dislocation of an unstable shoulder. If the patient experiences pain in any of these movements, you should continue to explore whether the etiology of the pain is secondary to contractile or noncontractile structures by using passive and resistive tests.
Place the patient in either the sitting or standing position. Have the patient repeat the movement so that you can observe from both the anterior and posterior aspect. Have the patient place the arms next to the body. Ask the patient to abduct both arms out to 90 degrees with the palms facing the floor. Direct the patient to externally rotate the arms and bring the palms together overhead (Figure 8.37), which achieves the end of range for forward flexion and abduction. Observe the patient for symmetry of movement and the actual available range. Does the patient present with a painful arc (Cyriax, 1979) (pain-free movement is present before
and after the pain occurs) secondary to bursitis or tendinitis? Note that the dominant arm may be more limited even in normal activity. Is the patient willing to move or is the patient apprehensive because of instability? From the posterior view, notice how the scapulae move. Is winging present? Mark the inferior angle of the scapula with your thumbs and observe them rotate upward. Note the scapulohumeral rhythm. If a reverse scapulohumeral rhythm is noted, the patient may have a major shoulder dysfunction such as an adhesive capsulitis or rotator cuff tear. From the anterior view, note the symmetry and movement of the sternoclavicular and acromioclavicular joints. From the lateral view, note whether the patient is attempting to extend the spine so that it appears that the range is greater than it actually is.
Some clinicians prefer to have patients perform abduction in the neutral plane or plane of the scapula. This is located with the arm in approximately 30– 45 degrees of horizontal adduction from the midcoronal plane. This plane is less painful for the patient and represents a more functional movement. There is less stress on the capsule, making the movement easier to perform (Figure 8.38).
162

Chapter 8 The Shoulder
0°
30°
Figure 8.38 Active movement testing of shoulder flexion in the plane of the scapula.
Have the patient abduct the shoulder to 90 degrees with the elbow flexed to 90 degrees. Instruct the patient to reach across and touch the opposite acromion. This movement will test for horizontal adduction (cross flexion). Then instruct the patient to bring the arm into extension while maintaining the 90 degrees of abduction. This will test for horizontal abduction (cross extension) (Figure 8.39).
Combined functional movements may save you time in the examination process. Be aware, however, that
since you are testing several movements simultaneously, determining the source of the limitation is more difficult. Using the Apley “scratch” test (Magee, 1997) will give you the most information most efficiently. Ask the patient to bring one hand behind the head and reach for the superior border of the scapula on the opposite side. This movement combines abduction and external rotation. Then ask the patient to bring the opposite hand behind the back and reach up to touch the contralateral inferior angle of the scapula. This movement combines adduction and internal rotation. Then have the patient reverse the movements to observe the combination bilaterally (Figure 8.40).
Figure 8.39 Active movement testing of shoulder in horizontal |
Figure 8.40 Active movement testing using the Apley |
adduction and abduction. |
“scratch” test. |
163
The Shoulder Chapter 8
Passive Movement Testing
Passive movement testing can be divided into two areas: physiological movements (cardinal plane), which are the same as the active movements, and mobility testing of the accessory (joint play, component) movements. You can determine whether the noncontractile (inert) elements are causative of the patient’s problem by using these tests. These structures (ligaments, joint capsule, fascia, bursa, dura mater, and nerve root) (Cyriax, 1984) are stretched or stressed when the joint is taken to the end of the available range. At the end of each passive physiological movement, you should sense the end feel and determine whether it is normal or pathological. Assess the limitation of movement and see if it fits into a capsular pattern. The capsular pattern of the shoulder is lateral rotation, abduction, and medial rotation (Kaltenborn, 1999).
Physiological Movements
You will be assessing the amount of motion available in all directions. Each motion is measured from the anatomical starting position, which is 0 degrees of flexion–extension, with the upper arm lying parallel to the trunk, the elbow in extension, and the thumb pointing anteriorly (Kaltenborn, 1999). The patient should be relaxed to enable you to perform the tests with greater ease. Testing can be performed with the patient in the sitting position, but the supine position
and the prone position offer more stability by supporting the patient’s trunk.
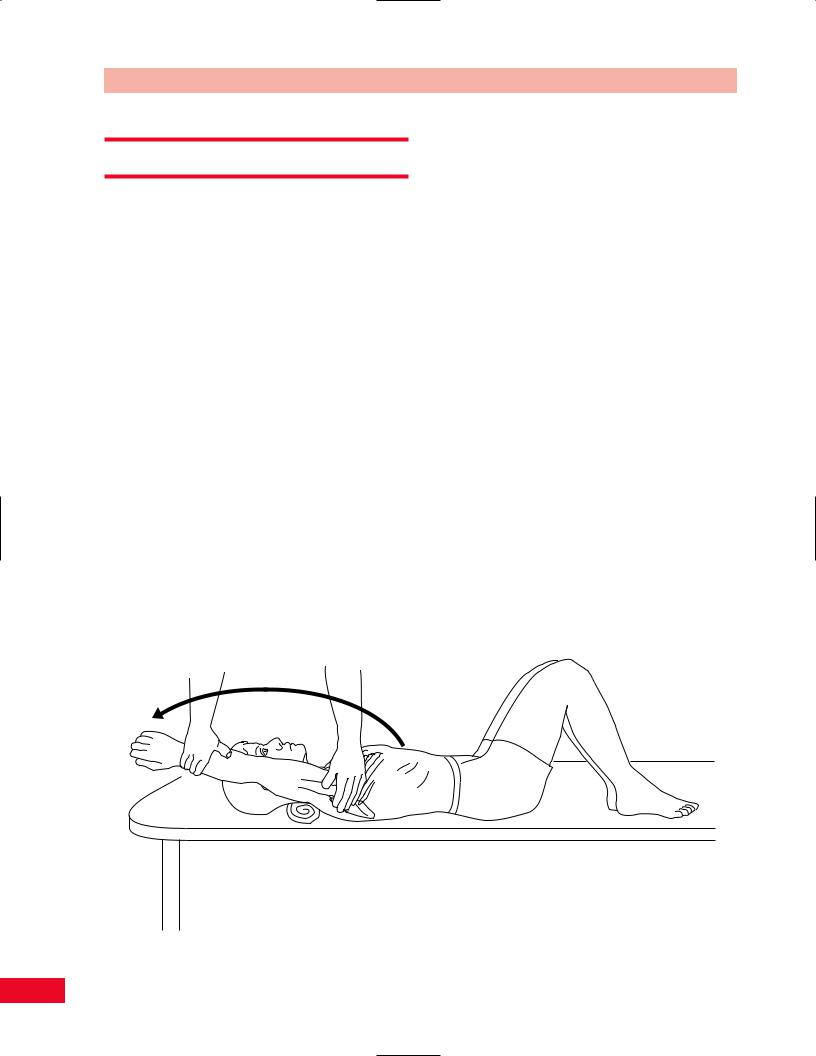
Flexion
The patient is placed in the supine position with the hip and knees flexed to 90 degrees to flatten the lumbar lordosis. The shoulder is placed in the anatomical starting position. Place your hand over the lateral border of the scapula to stabilize it and thereby accurately assess glenohumeral movement. Place your hand over the lateral part of the rib cage to stabilize the thorax and prevent spinal extension when you assess shoulder complex movement. Face the patient’s side and stabilize either the scapula or the thorax with your left hand. Hold the distal part of the patient’s forearm, just proximal to the wrist joint, and move the upper extremity in an upward direction. When you sense movement in the scapula you will know that you have reached the end of the available glenohumeral movement. Continue to move the upper extremity until the end feel is noted for the entire range of motion of the shoulder complex. The normal end feel of glenohumeral flexion is abrupt and firm (ligamentous) (Kaltenborn, 1999; Magee, 1997) because of the tension in the posterior capsule, muscles, and ligaments. The normal end feel of the shoulder complex is also abrupt and firm (ligamentous) due to tension in the latissimus dorsi. The normal range of motion for flexion of the shoulder complex is 0–180 degrees (Figure 8.41) (American Academy of Orthopedic Surgeons, 1965).
Figure 8.41 Passive movement testing of shoulder flexion.
164