

MusculoSkeletal Exam
.pdfChapter 8 The Shoulder
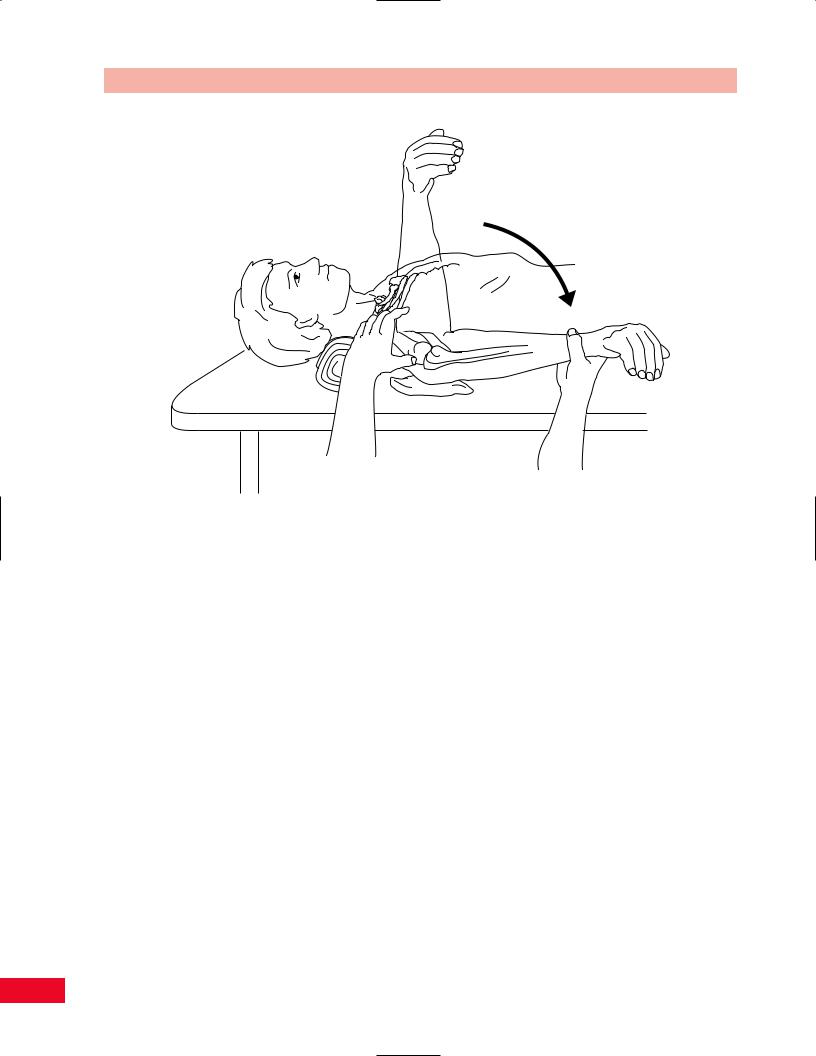
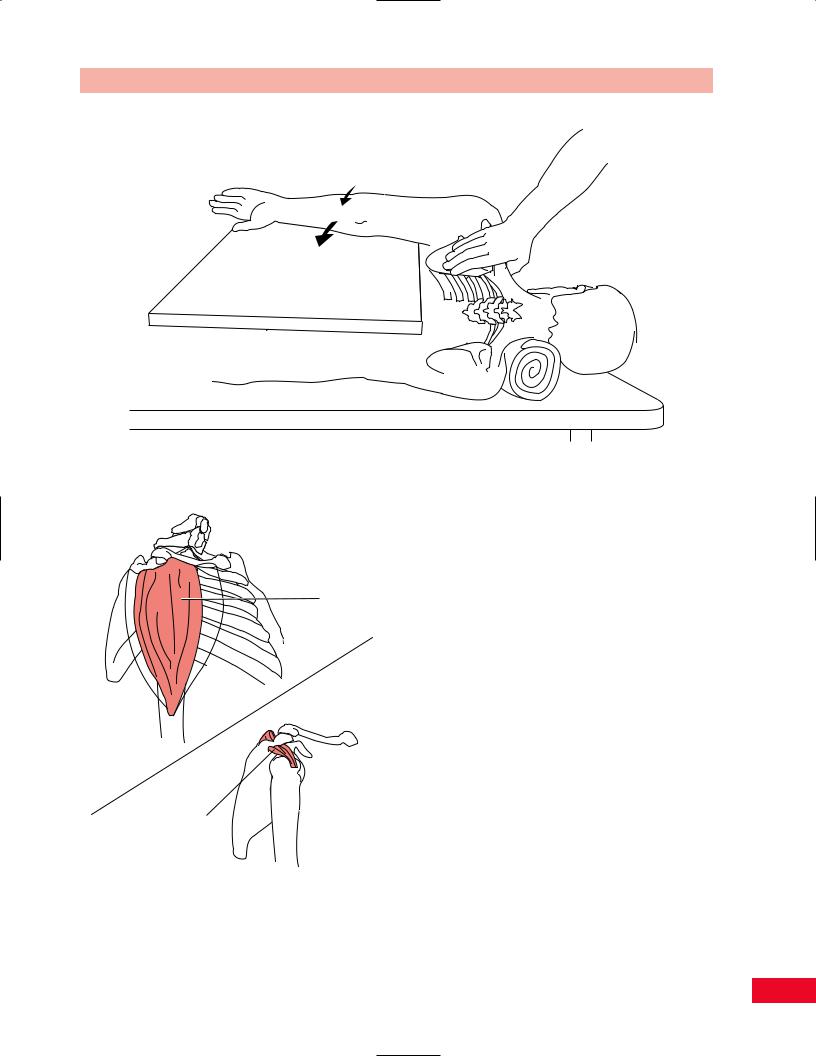
Figure 8.42 Passive movement testing of shoulder extension.
Extension
The patient is placed in the prone position with the shoulder in the anatomical position. Do not place a pillow under the patient’s head. The elbow should be slightly flexed so that the long head of the biceps brachii is slack and does not decrease the available range. Place your hand over the superior and posterior aspect of the scapula to stabilize it, and thereby accurately assess glenohumeral movement. Place your hand over the lateral part of the rib cage to stabilize the thorax and prevent spinal flexion while you assess shoulder complex movement. Face the patient’s side and stabilize either the scapula or the thorax with your right hand. Place your hand under the distal anterior aspect of the humerus and lift the upper extremity toward the ceiling. The normal end feel is abrupt and firm (ligamentous) due to tension from the anterior capsule and ligaments. The normal end feel of the shoulder complex is also abrupt and firm (ligamentous) due to tension in the pectoralis major and serratus anterior. Normal range of motion is 0–60 degrees (Figure 8.42) (American Academy of Orthopedic Surgeons, 1965).
Abduction
The patient is placed in the supine position with the shoulder in the anatomical starting position. The elbow
Figure 8.43 Passive movement testing of shoulder abduction.
should be in extension to prevent limitation of motion from tension in the long head of the triceps. Place your hand over the lateral border of the scapula, stabilizing it for accurate assessment of glenohumeral movement. Place your hand over the lateral part of the rib cage to stabilize the thorax and prevent spinal lateral flexion while you assess shoulder complex movement. Face the patient’s side and stabilize either the scapula or the thorax with your left hand. Hold the distal aspect of the patient’s arm, just proximal to the elbow joint, and move the upper extremity in an outward direction. You must rotate the humerus laterally before you reach 90 degrees to allow for the greater tubercle of the humerus to pass more easily under the acromion and prevent impingement. When you sense movement in the scapula, you will know that you have reached the end of the available glenohumeral movement. Continue to move the upper extremity until the end feel is noted for the entire range of motion of the shoulder complex. The normal end feel of glenohumeral abduction is abrupt and firm (ligamentous) (Kaltenborn, 1999; Magee, 1997) because of the tension in the inferior capsule and anterior and posterior muscles and ligaments. The normal end feel of the shoulder complex is also abrupt and firm (ligamentous) due to tension in the posterior muscles. The normal range of motion for abduction of the shoulder complex is 0–180 degrees (Figure 8.43) (American Academy of Orthopedic Surgeons, 1965).
Medial (Internal) Rotation
The patient is placed in the supine position with the hip and knees flexed to 90 degrees to flatten the lumbar
165
The Shoulder Chapter 8
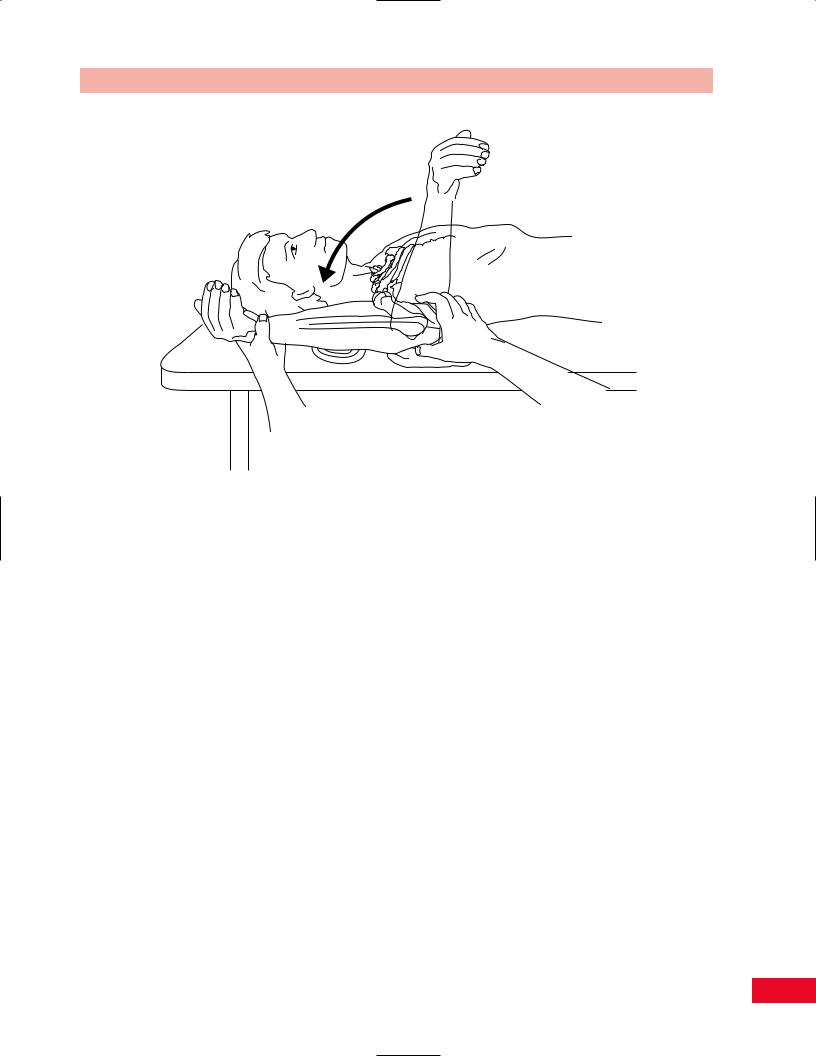
Figure 8.44 Passive movement testing of shoulder medial rotation.
lordosis. The shoulder is placed at 90 degrees of abduction, with neutral position between supination and pronation of the forearm, with the forearm at a right angle to the treatment table, and the patient’s hand facing inferiorly. Support the elbow with a small folded towel so that the shoulder is not extended. Stabilize the elbow to maintain 90 degrees of abduction during the beginning of the movement. Toward the end of the movement you should stabilize the scapula by placing your hand over the acromion to prevent anterior tilting. Place your hand over the anterior part of the rib cage, just medial to the shoulder, to stabilize the thorax and prevent spinal flexion while you assess shoulder complex movement. Face the patient’s side and stabilize either the scapula or the thorax with your right hand. Hold the distal aspect of the patient’s forearm, just proximal to the wrist joint, and move the upper extremity so that the palm moves toward the table. When you sense movement in the scapula, you will know that you have reached the end of the available glenohumeral movement. Continue to move the upper extremity until the end feel is noted for the entire range of motion of the shoulder complex. The normal end feel of glenohumeral medial rotation is abrupt and firm (ligamentous) (Kaltenborn, 1999; Magee, 1997)
because of the tension in the posterior capsule, muscles, and ligaments. The normal end feel of the shoulder complex is also abrupt and firm (ligamentous) due to tension in the posterior muscles. The normal range of motion for medial rotation of the shoulder complex is 0–70 degrees (Figure 8.44) (American Academy of Orthopedic Surgeons, 1965).
Lateral (External) Rotation
Lateral rotation is performed with the body in the same starting position as for medial rotation. Hold the distal aspect of the patient’s forearm, just proximal to the wrist joint, and move the upper extremity so that the dorsum of the hand moves toward the table. When you sense movement in the scapula, you will know that you have reached the end of the available glenohumeral movement. Continue to move the upper extremity until the end feel is noted for the entire range of motion of the shoulder complex. The normal end feel of glenohumeral medial rotation is abrupt and firm (ligamentous) (Kaltenborn, 1999; Magee, 1997) because of the tension in the anterior capsule, muscles, and ligaments. The normal end feel of the shoulder complex is also abrupt and firm (ligamentous) due to
166
Chapter 8 The Shoulder
Figure 8.45 Passive movement testing of shoulder lateral rotation.
tension in the anterior muscles. The normal range of motion for lateral rotation of the shoulder complex is 0–90 degrees (Figure 8.45) (American Academy of Orthopedic Surgeons, 1965).
Mobility Testing of Accessory
Movements
Mobility testing of accessory movements will give you information about the degree of laxity in the joint. The patient must be totally relaxed and comfortable to allow you to move the joint and obtain the most accurate information. The joint should be placed in the maximal loose packed (resting) position to allow for the greatest degree of joint movement. The resting position of the shoulder is abduction to approximately 55 degrees and horizontal adduction to 30 degrees (Kaltenborn, 1999).
Traction (Lateral Distraction)
Place the patient in the supine position with the shoulder in the resting position and the elbow in flexion. Stand on the side of the table so that your body is turned toward the patient. Place your hand over the acromion and the superior posterior aspect of the scapula for
stabilization. Place your hand on the medial superior aspect of the humerus and support the patient’s arm with your forearm. Pull the humerus away from the patient until all the slack is taken up. This creates a lateral traction force and a separation of the humerus from the glenoid fossa (Figure 8.46).
Caudal Glide (Longitudinal Distraction)
Place the patient in the supine position with the shoulder in the resting position. Stand on the side of the table so that your body is turned toward the patient. Cup your hand over the lateral border of the scapula with your thumb located up to the coracoid process for stabilization. Place your other hand around the distal aspect of the humerus, proximal to the elbow joint. Pull the humerus in a caudal direction until all the slack is taken up. This creates a caudal glide or longitudinal traction force and a separation of the humerus from the glenoid fossa (Figure 8.47).
Ventral Glide of the Humeral Head
Place the patient in the prone position so that the humerus is just off the table. Place a small folded towel under the coracoid process to stabilize the scapula. The
167

The Shoulder Chapter 8
Figure 8.46 Mobility testing of shoulder lateral distraction.
Figure 8.48 Mobility testing of ventral glide of the humeral head.
Figure 8.47 Mobility testing of shoulder caudal glide.
shoulder is placed in the resting position. Stand at the side of the table so that you are between the patient’s arm and trunk and your body is turned toward the patient’s shoulder. Hold the patient’s humerus with
one hand placed over the distal aspect. Place the other hand over the proximal aspect of the humerus, just distal to the glenohumeral joint. Move the humerus as a unit in an anterior direction until you take up all the slack. This creates an anterior glide of the humeral head (Figure 8.48).
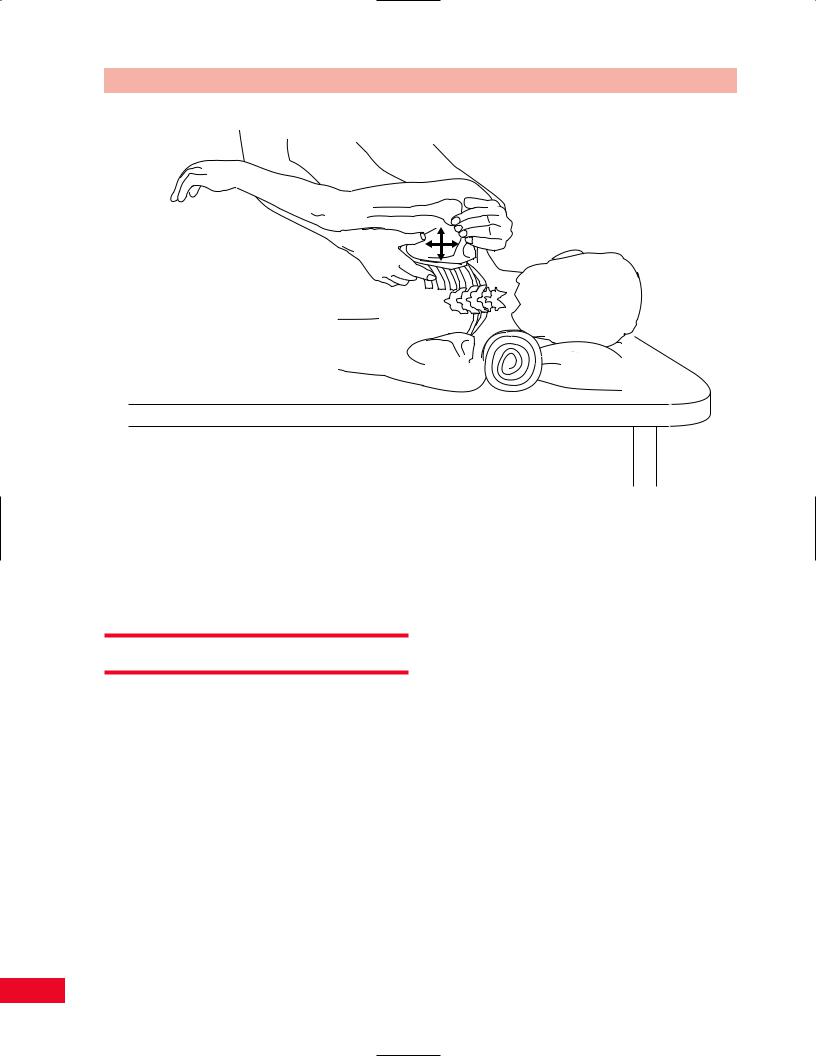
Dorsal Glide of the Humeral Head
Place the patient in the supine position so that the humerus is just off the table. Place a small folded towel under the scapula to stabilize it. The shoulder is placed in the resting position. Stand at the side of the table so that you are between the patient’s arm and trunk and your body is turned toward the patient’s shoulder. Hold the patient’s humerus with one hand over the distal aspect and support the patient’s forearm by holding it between your arm and trunk. Place your other hand at the proximal end of the humerus just distal to the glenohumeral joint. Move the humerus as a unit in a posterior direction until you take up all the slack. This creates a posterior glide of the humeral head (Figure 8.49).
Sternoclavicular Joint Mobility
Place the patient in the supine position. Stand at the side of the table so that you are facing the patient’s head.
168

Chapter 8 The Shoulder
Figure 8.49 Mobility testing of dorsal glide of the humeral head.
Palpate the joint space of the sternoclavicular joint with the index finger of one hand. Place your index finger and thumb of the other hand around the medial aspect of the clavicle. Move the clavicle in the cranial, caudal, anterior, and posterior directions. Take up the slack in each direction. This creates a glide of the clavicle in the direction of your force (Figure 8.50).
Acromioclavicular Joint Mobility
Place the patient in the supine position. Stand at the side of the table so that you are facing the patient’s head. Palpate the joint space of the acromioclavicular joint with the index finger of one hand. Place your index finger and thumb on the anterior and posterior surfaces of the acromion to stabilize it. Place your index finger and thumb around the lateral aspect of the clavicle.
Move the clavicle in an anterior and posterior direction. Take up the slack in each direction. This creates a glide of the clavicle in the direction of your force (Figure 8.51).
Scapular Mobilization
Place the patient in the side-lying position. Stand so that you are facing the patient. Place one hand between the patient’s upper extremity and trunk. Hold the inferior angle of the scapula by placing your hand so that your fingers grasp the medial border and your palm rests on
Figure 8.50 Mobility testing of the sternoclavicular joint.
Figure 8.51 Mobility testing of the acromioclavicular joint.
the lateral border of the scapula. Place your other hand so that your thenar eminence is over the acromion and your fingers surround the superior posterior aspect of the scapula. Move the scapula in cranial, caudal,
169
The Shoulder Chapter 8
Figure 8.52 Mobility testing of the scapula.
medial, and lateral directions. Take up the slack in each direction. This creates a glide of the scapula on the thorax in the direction of your force (Figure 8.52).
Resistive Testing
The muscles of the shoulder joint, in addition to being responsible for the movement of the arm, are necessary to maintain coaptation of the humeral head to the glenoid fossa of the scapula. For example, during heavy lifting with the extremity, the long muscles that include the triceps, coracobrachialis, and long and short heads of the biceps contract in an effort to raise the humeral head up to the scapula and prevent its inferior dislocation.
As with most joints, weakness of a particular movement may be compensated for by other muscles. This is accomplished by substitution and is generally noticeable on examination as irregular or abnormal movement of the body part. For example, weakness or restricted abduction of the glenohumeral joint may be compensated for by greater lateral rotation, elevation, and abduction of the scapulothoracic joint (i.e., shrugging of the shoulder).
To test the strength of the shoulder, you will have to examine flexion, extension, abduction, adduction, internal (medial) rotation, and external (lateral) rotation.
The following movements of the scapula should also be tested: elevation, retraction, protraction, and adduction with depression.
Shoulder Flexion
The primary flexors of the shoulder are the anterior part of the deltoid and the coracobrachialis (Figure 8.53). Secondary flexors include the clavicular head of the pectoralis major, the middle fibers of the deltoid, the biceps brachii, the serratus anterior, and the trapezius.
•Position of patient: Sitting with the arm at the side and the elbow slightly flexed. The patient should then attempt to flex the shoulder to about 90 degrees without rotation or horizontal displacement.
•Resisted test: Stand beside the patient and place one hand on the upper thorax to stabilize the body, and place your other hand just proximal to the elbow joint so that you can apply a downward force on the lower arm. Ask the patient to attempt to elevate the arm directly upward against your resistance (Figure 8.54).
170
Deltoid muscle (anterior fibers)
Coracobrachialis
Figure 8.53 The primary flexors of the shoulder are the anterior fibers of the deltoid and the coracobrachialis muscles.
Testing shoulder flexion with gravity eliminated can be performed with the patient lying on the side with the tested arm upward. The arm is placed on a powdered board and the patient is asked to flex through the range of motion in the coronal plane (Figure 8.55).
Chapter 8 The Shoulder
Figure 8.54 Testing shoulder flexion.
Figure 8.55 Testing shoulder flexion with gravity eliminated.
171

The Shoulder Chapter 8
Posterior deltoid
Teres major
Latissimus dorsi
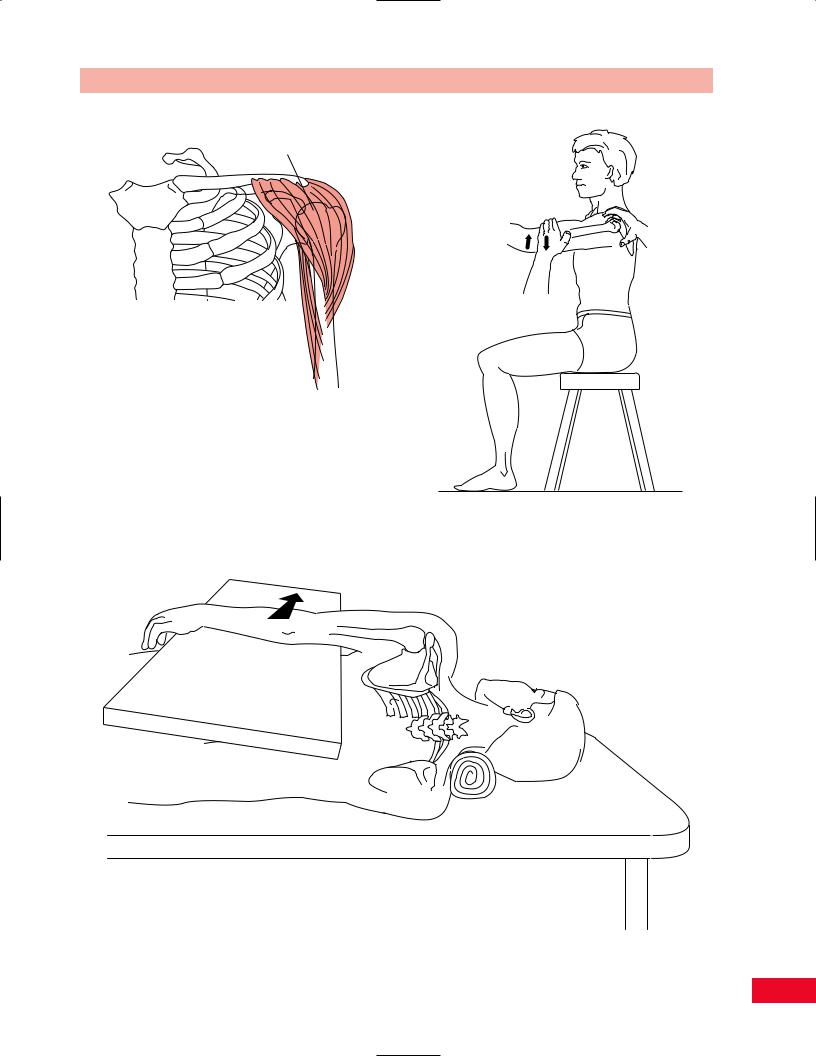
Figure 8.56 The primary extensors of the shoulder are the latissimus dorsi and teres major muscles.
Painful resisted shoulder flexion may be due to tendinitis of the contracting muscles.
Weakness of shoulder flexion results in an inability to perform many activities of daily living and self-care.
Shoulder Extension
The primary extensors of the shoulder are the latissimus dorsi, teres major, and the posterior fibers of the deltoid (Figure 8.56). Secondary extensors include the teres minor and long head of the triceps.
•Position of patient: In the prone position with the shoulder internally rotated and adducted so that the palm is facing upward.
•Resisted test: Stabilize the thorax in its upper portion with one hand and hold the patient’s arm proximal to the elbow with your other hand while applying downward resistance as the patient attempts to elevate the arm from the examining table straight upward (Figure 8.57).
Testing shoulder extension with gravity eliminated
can be performed with the patient lying on the side with the tested arm upward. The arm is placed on a powdered board and the patient attempts to extend the shoulder through the range of motion (Figure 8.58).
Painful shoulder extension may be due to tendinitis of the contracting muscles.
Weakness of shoulder extension will limit the patient’s ability to use their arms for climbing, walk with crutches, swim, or row a boat.
Shoulder Abduction
The abductors of the shoulder are primarily the middle portion of the deltoid and supraspinatus muscles
Figure 8.57 Testing shoulder extension.
172
Chapter 8 The Shoulder
Figure 8.58 Testing shoulder extension with gravity eliminated.
Deltoid (middle fibers)
Supraspinatus
Figure 8.59 The primary abductors of the shoulder are the middle fibers of the deltoid and the supraspinatus muscle.
(Figure 8.59). Assisting those muscles are the anterior and posterior fibers of the deltoid and the serratus anterior by its direct action on the scapula to rotate it outward and upward.
•Position of patient: Sitting with the arm abducted to 90 degrees and the elbow flexed slightly.
•Resisted test: Stand behind the patient and put one hand over the upper trapezius next to the neck to stabilize the thorax. Take your other hand and place it over the arm just proximal to the elbow joint and apply downward resistance as the patient attempts to abduct the arm upward (Figure 8.60).
Testing shoulder abduction with gravity eliminated
is performed with the patient in the supine position with the arm at the side and the elbow flexed slightly. The patient attempts to abduct the arm with the weight of the arm supported by the examining table through the range of motion (Figure 8.61).
Painful resisted shoulder abduction may be due to tendinitis of the contracting muscles.
Weakness of shoulder abduction causes a significant restriction in the patient’s ability to perform activities of daily living and self-care.
Shoulder Adduction
The primary adductor of the shoulder is the pectoralis major muscle (Figure 8.62). Accessory muscles include
173

The Shoulder Chapter 8
the latissimus dorsi, the anterior portion of the deltoid, and the teres major.
• Position of patient: Supine with the shoulder abducted to about 90 degrees. The patient
horizontally adducts the shoulder, bringing the
arm across the chest.
• Resisted test: Place one hand behind the patient’s shoulder to stabilize the thorax. Take your other hand and hold the patient’s arm with your thumb posteriorly so that you can apply a resisting force away from the midline of the patient as the patient attempts to adduct the arm against your resistance
(Figure 8.63).
Testing shoulder adduction with gravity eliminated is performed with the patient sitting, with the upper extremity on an examining table and the elbow extended. The patient attempts to swing the arm forward across the body while the weight of the arm is
supported by the examining table (Figure 8.64).
Figure 8.60 Testing shoulder abduction.
Figure 8.61 Testing shoulder abduction with gravity eliminated.
174