

MusculoSkeletal Exam
.pdfChapter 4 The Cervical Spine and Thoracic Spine
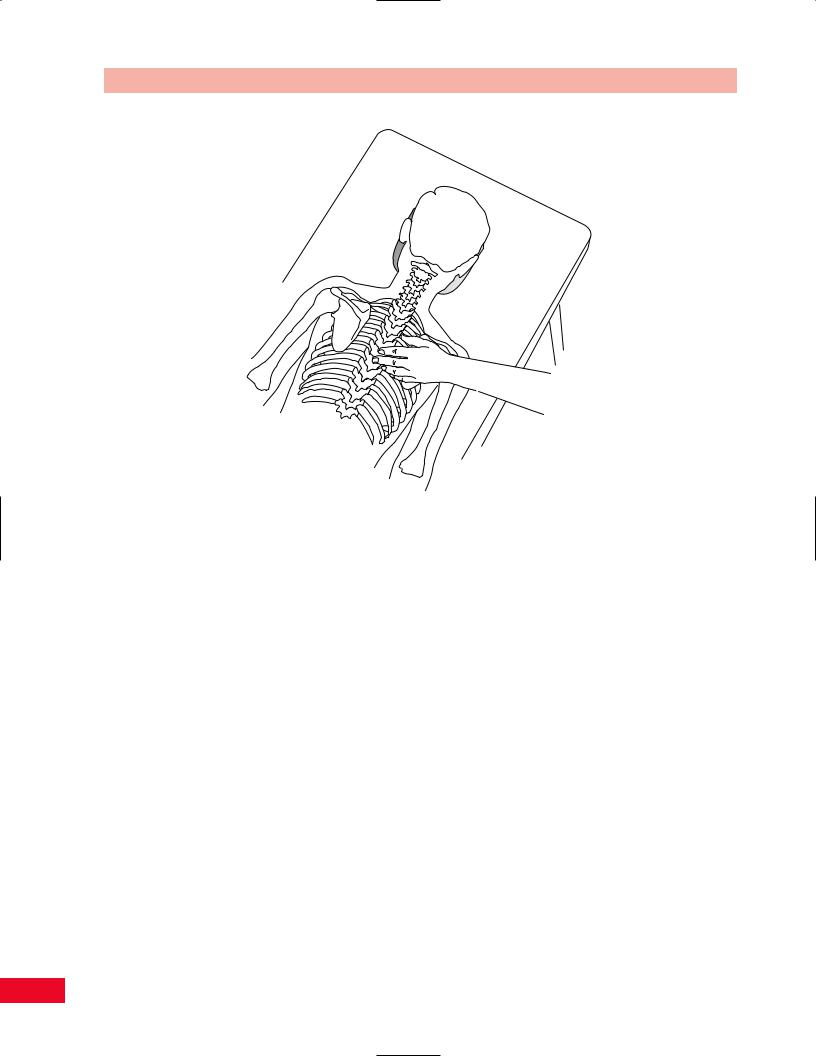
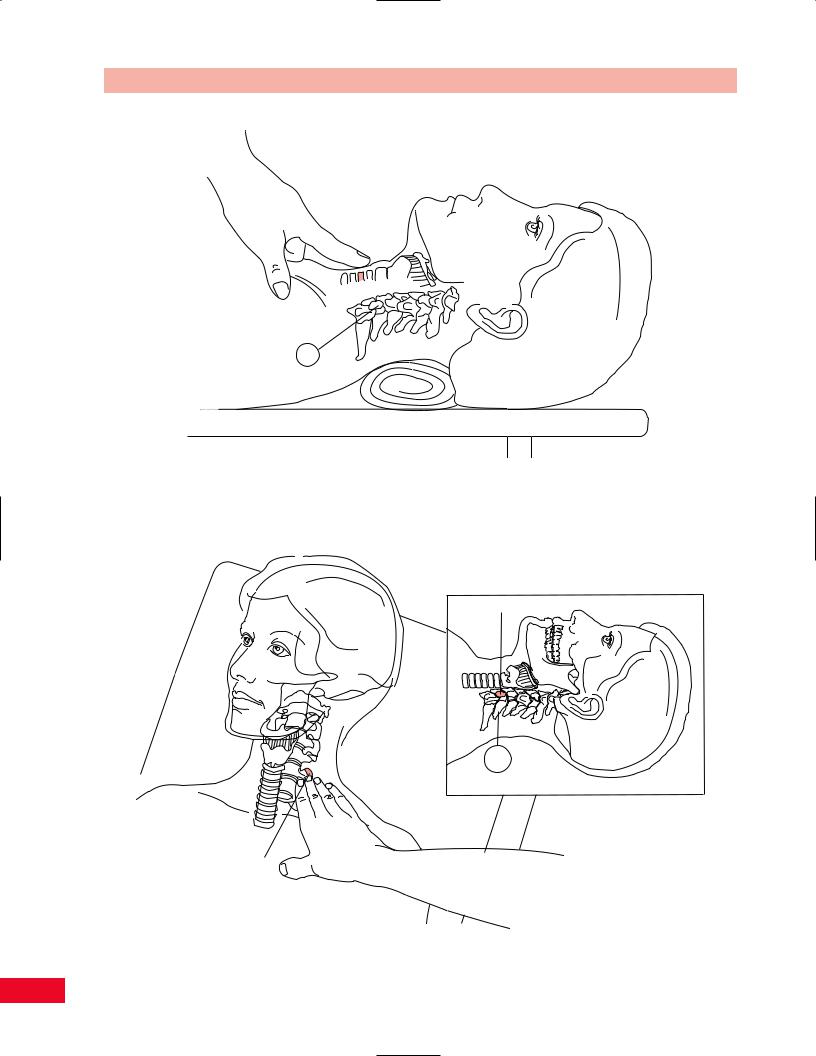
Articular
Pillar
Figure 4.13 Palpation of the articular pillar.
feel like a stick of bamboo (Figure 4.13). If the joints deteriorate secondary to osteoarthritis, they become enlarged and are not as clearly delineated. Note that the facet joints can be tender to palpation even in a normal individual. Facet joints can become locked or dislocated. They will alter the patient’s ability to move and limit the available range of motion in a distinctive pattern.
Transverse Processes of the Cervical Spine
Move your fingers to the most lateral aspect of the neck and you will feel a series of blunt prominences. These are the transverse processes (Figure 4.14). The second cervical transverse process can be palpated through the sternocleidomastoid muscle approximately 1 cm inferior to the mastoid process. These processes are normally tender to palpation.
The following palpations are more easily accomplished with the patient in either the prone or the seated position.
Spinous Processes of the Thoracic Spine
The spinous processes of the thoracic spine are longer and more slender than those of the cervical spine. Since the direction of the spinous processes changes
Transverse processes
Figure 4.14 Palpation of the transverse processes of the cervical spine.
45
The Cervical Spine and Thoracic Spine Chapter 4
Figure 4.15 Palpation of the spinous processes of the thoracic spine.
throughout the thoracic spine, a method for relating the location of the spinous process to the transverse process was developed. This is referred to as the “rule of 3’s.” T1–T3 vertebrae have spinous processes that are posteriorly directed as in the cervical spine. Therefore, the spinous process is at the same level as its own transverse process. T4–T6 vertebrae have spinous processes that are angled in a slightly downward direction. Therefore, the tip of the spinous process is located at a point halfway between the transverse process at the same level and the vertebra below. T7–T9 vertebrae have spinous processes that are angled moderately downward. Therefore, the spinous process is located at the same level as the transverse process of the vertebra below. T10–T12 vertebrae have spinous processes that slowly resume the horizontal direction as in the lumbar spine, where the spinous process is at the same level as the transverse process (Bourdillon et al., 1992) (Figure 4.15).
Transverse Processes of the Thoracic Spine
In T1–T3 vertebrae the transverse processes are at the same level as the spinous processes. The transverse processes of T4–T6 vertebrae are halfway between each vertebra’s own spinous process and the one above. The transverse processes of T7–T9 vertebrae are at the
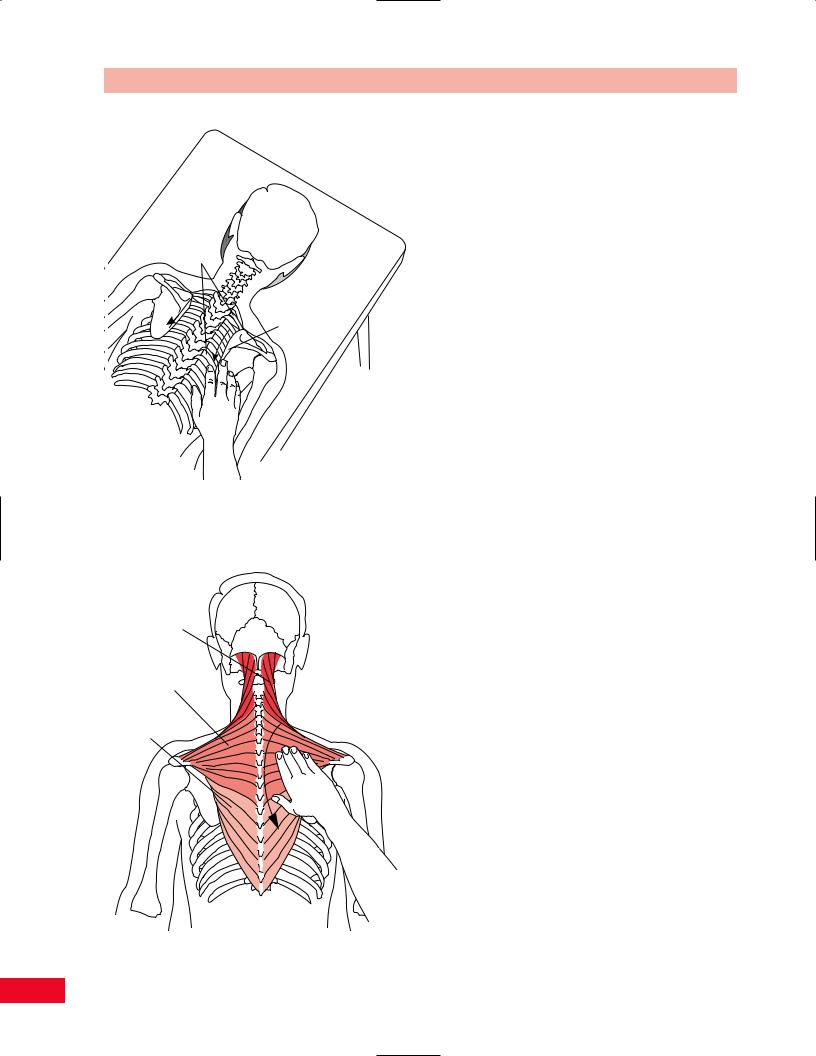
level of the spinous process of the vertebra above. The transverse processes of T10–T12 vertebrae are the reverse of those in the previous three groups (T10 process resembles T7–T9 processes, T11 resembles T4–T6, and T12 resembles T1–T3) as the spinous processes become more horizontal (Figure 4.16).
Spine of the Scapula
Palpate the posterior aspect of the acromion and follow medially along the ridge of the spine of the scapula as it tapers and ends at the level of the spinous process of the third thoracic vertebra (Figure 4.17).
Medial (Vertebral) Border of the Scapula
Move superiorly from the medial aspect of the spine of the scapula until you palpate the superior angle, which is located at the level of the second thoracic vertebra. This area serves as the attachment of the levator scapulae and is often tender to palpation. It is frequently an area of referred pain from the cervical spine. Continue inferiorly along the medial border and note if it lies flat along the rib cage. If the border wings away from the rib cage, it may be indicative of a long thoracic nerve injury. Notice the attachment of the rhomboid major along the length of the medial border from the spine to the inferior angle. The inferior
46
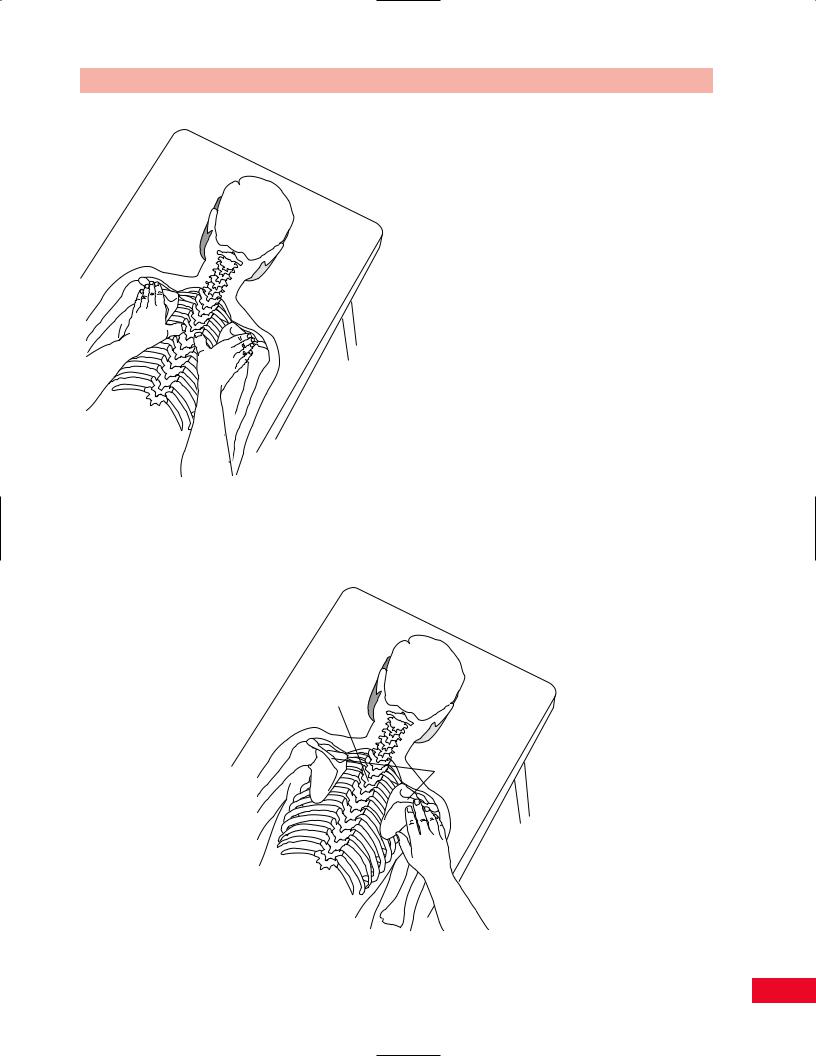
Figure 4.16 Palpation of the transverse processes of the thoracic spine.
Spinous process of 3rd thoracic vertebrae
Chapter 4 The Cervical Spine and Thoracic Spine
angle is located at the level of the seventh thoracic vertebra (Figure 4.18).
Soft-Tissue Structures
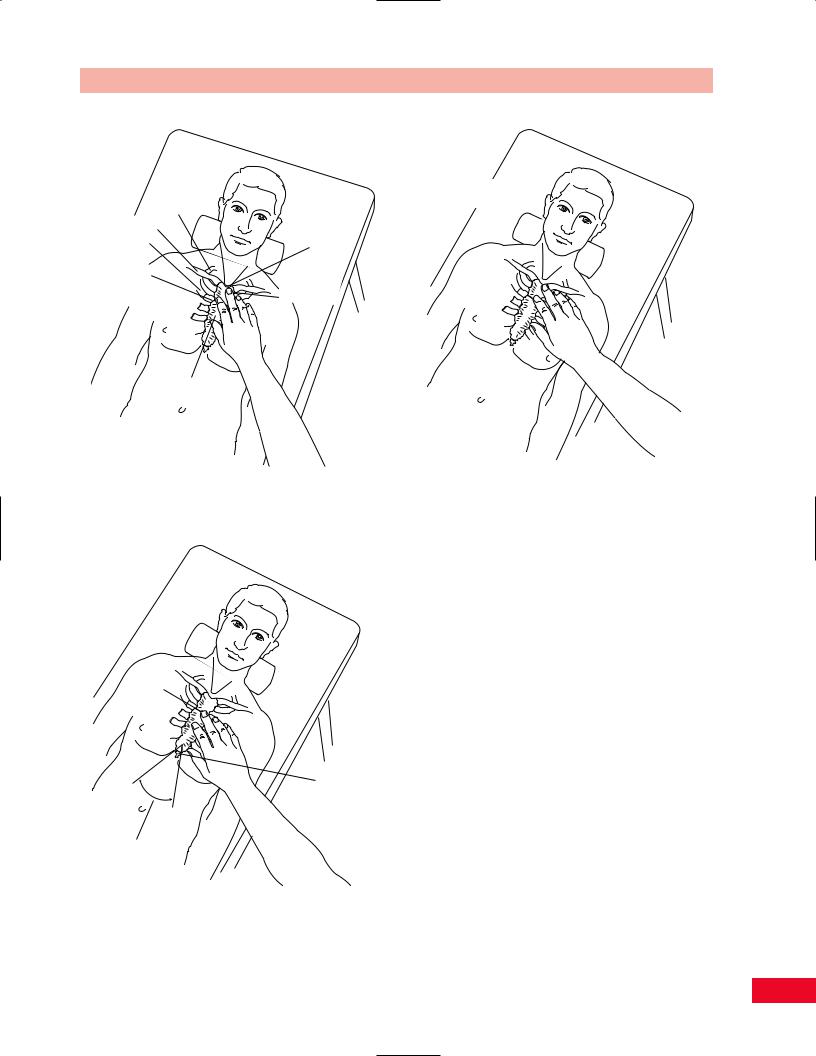
Trapezius Muscle
Stand behind the seated patient or observe the patient in the prone position. Differences in contour and expanse can be easily noted as you observe the patient prior to palpation. To enable you to palpate the fibers of the upper trapezius, allow your fingers to travel laterally and inferiorly from the external occipital protuberance to the lateral third of the clavicle. The muscle is a flat sheet but feels like a cordlike structure because of the rotation of the fibers. It is frequently tender to palpation and often very tight secondary to tension or trauma. You can palpate the muscle using your thumb on the posterior aspect and your index and middle fingers anteriorly. The fibers of the lower trapezius can be traced as they attach from the medial aspect of the spine of the scapula, running medially and inferiorly to the spinous processes of the lower thoracic vertebrae. The fibers become more prominent by asking the patient to depress the scapula. The fibers of the middle trapezius can be palpated from the acromion to the spinous processes of the seventh cervical and upper thoracic vertebrae. The muscle becomes more prominent by asking the patient to adduct the scapulae (Figure 4.19).
Spine of scapula
Figure 4.17 Palpation of the spine of the scapula.
47
The Cervical Spine and Thoracic Spine Chapter 4
T2—T7
Medial border of scapula
Figure 4.18 Palpation of the medial border of the scapula.
Upper trapezius
Middle trapezius
Lower trapezius
Figure 4.19 Palpation of the trapezius muscle.
Suboccipital Muscles
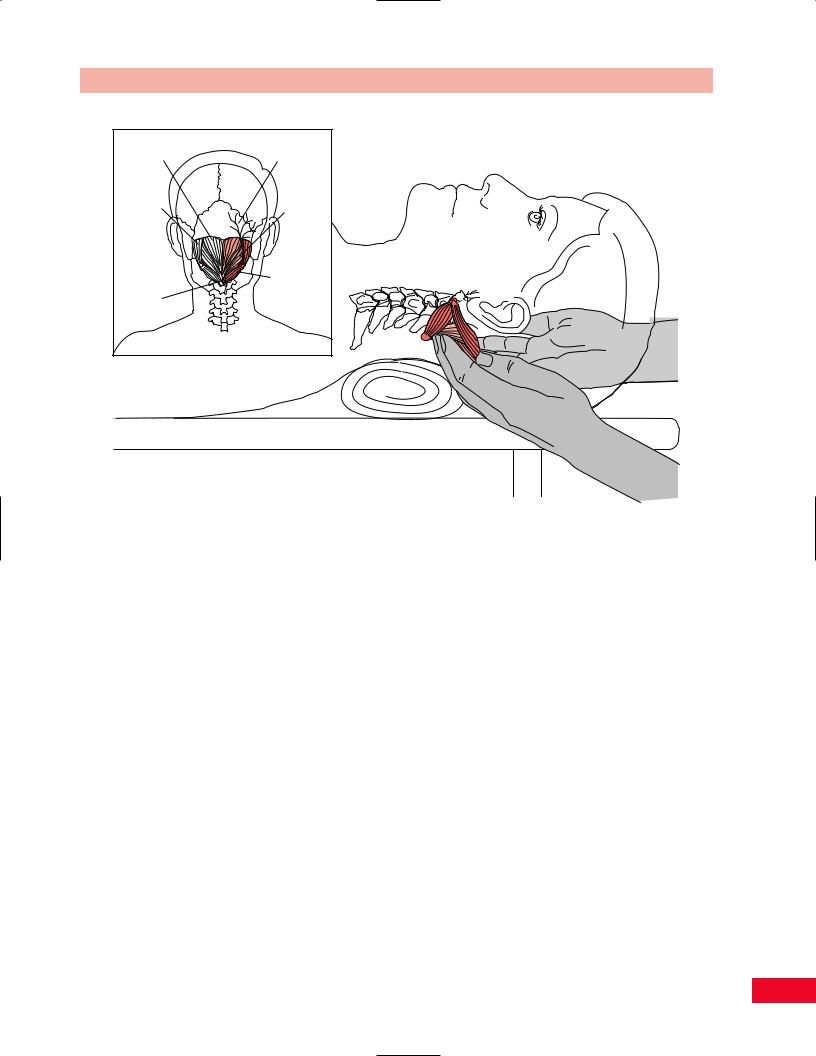
The suboccipital muscles consist of the rectus capitis posterior major and minor and the obliquus capitis superior and inferior. The rectus minor and the obliquus superior attach from the atlas to the occiput. The rectus major and the obliquus inferior have their distal attachment on the axis. The rectus then travels to the occiput while the obliquus attaches to the transverse processes of atlas (Figure 4.20). This group of muscles is designed to allow for independent function of the suboccipital unit. They can be palpated by placing your fingertips at the base of the occiput while the patient is in the supine position. It is important to recognize that they are very deep structures and that you are actually palpating the fascia and superficial muscles simultaneously (Porterfield and DeRosa, 1995).
These muscles are often in spasm and become tender to palpation.
Semispinalis Cervicis and Capitis
The semispinalis cervicis has its attachments to the transverse processes of the upper thoracic spine and the spinous process of C2. It functions as a stabilizer of the second cervical vertebra.
The semispinalis capitis has its attachments to the transverse processes of the upper thoracic and lower cervical vertebrae and to the occiput between the superior and inferior nuchal line.
The semispinalis capitis is superficial to the semispinalis cervicis. The two muscles form a cordlike structure. Place your finger over the spinous processes from C2–C7 and move laterally until you feel the rounded cordlike structure (see Figure 4.53).
Greater Occipital Nerves
The greater occipital nerves pierce the upper trapezius near its attachment to the occiput. Locate the proximal attachment of the trapezius and palpate the base of the skull on either side of the external occipital protuberance (see Figure 4.20). The nerves are only palpable if they are inflamed. The nerves pierce the semispinalis muscle. An entrapment syndrome with pain, numbness, or burning in the scalp may occur when the semispinalis capitis muscle is hyperirritable (Porterfield and DeRosa, 1995). They may also be the source of headaches in patients with acute cervical strain.
Ligamentum Nuchae
The superficial part of the ligamentum nuchae has its attachment on the external occipital protuberance and
48
Chapter 4 The Cervical Spine and Thoracic Spine
Rectus capitis posterior |
Greater |
|
minor muscle |
occipital nerve |
|
Obliquus |
Rectus |
|
capitis |
||
capitis |
||
superior |
||
posterior |
||
muscle |
||
major |
||
|
||
|
muscle |
|
|
Obliquus |
|
Spinous |
capitis |
|
inferior |
||
process |
||
muscle |
||
of axis |
||
|
Figure 4.20 Palpation of the suboccipital muscles and the greater occipital nerves.
the seventh cervical vertebra (Figure 4.21). It is easily palpated on top of and between the cervical spinous processes. It becomes more apparent as the patient flexes the neck. This ligament continues caudally as the supraspinous and interspinous ligaments.
Levator Scapulae
The levator scapulae is attached to the transverse processes of C1–C4 and the superior medial aspect of the scapula. The muscle can function as a scapula elevator and also as a lateral flexor of the neck. However, it also functions as a dynamic check to the anterior pull of the cervical lordosis. It is therefore often obligated to maintain a state of constant contraction. Tenderness can be palpated over its distal attachment on the superior medial border of the scapula. You can palpate the muscle with the patient in either the prone or the seated position (see Figure 8.71). You can facilitate the palpation by asking the patient to rotate away from the side being examined. This will allow for greater tension in the levator scapulae by moving the transverse processes anteriorly while creating laxity in the trapezius by moving the spinous processes toward the side being tested (Porterfield and DeRosa, 1995).
Anterior Aspect
To facilitate palpation of the anterior aspect of the neck, the patient should be in the supine position. The head should be supported and the neck relaxed. Make sure that the neck is in neutral alignment.
Bony Structures
Hyoid Bone
The hyoid bone is located at the anterior aspect of the C3–C4 vertebral bodies. It is useful as a landmark for locating the spinous processes, as you can easily palpate the anterior surface and then wrap your fingers posteriorly at the same level. The hyoid is a horse- shoe-shaped bone. With your thumb and index finger, surround the most superior aspects of the structure and move it from side to side. It is not easy to palpate because it is tucked under the mandible and is suspended by many of the anterior neck muscles. When the patient swallows, movement of the hyoid becomes apparent (Figure 4.22). You may notice crepitus while moving the hyoid laterally, which indicates a roughened cartilage surface.
49

The Cervical Spine and Thoracic Spine Chapter 4
Ligamentum
nuchae
Ligamentum nuchae
Figure 4.21 Palpation of the ligamentum nuchae.
Hyoid bone
Hyoid bone
C3
C3
Figure 4.22 Palpation of the hyoid bone.
50

Chapter 4 The Cervical Spine and Thoracic Spine
C4-5
Figure 4.23 Palpation of the thyroid cartilage and gland.
Thyroid Cartilage
The thyroid cartilage (commonly referred to as Adam’s apple) is located at the anterior aspect of the C4–C5 vertebral bodies. Continuing inferiorly from the hyoid bone, you will feel the rounded dome of the thyroid cartilage (Figure 4.23). If the neck is fully extended, the upper part of the thyroid cartilage can be located at the midposition between the chin and the sternum. The thyroid cartilage is partially covered by the thyroid gland. If there is a swollen area noted over the anterior inferior aspect of the cartilage, it might be an enlargement of the thyroid gland known as goiter.
First Cricoid Ring
As you continue to palpate inferiorly along the anterior part of the neck, you reach a tissue that is softer than the thyroid cartilage at the level of the C6 vertebral body. This is the first cricoid ring (Figure 4.24). Palpation of this area creates a very unpleasant sensation for the patient. This is an area commonly used for tracheostomy incisions because of the easy and safe access into the trachea.
Carotid Tubercle
The carotid tubercle is located on the anterior aspect of the transverse process of C6 (Figure 4.25). The common carotid artery is located superficially next to the tubercle. The artery can be easily compressed when palpating the tubercle. Care must be taken not to palpate both carotid tubercles simultaneously because
of the possible consequences of decreased blood flow in the carotid arteries. The carotid tubercle is a useful landmark to orient you and confirm your location while examining the anterior cervical spine.
Suprasternal Notch
Stand facing the patient and use your middle or index finger to locate the triangular notch between the two clavicles. This is the suprasternal notch (Figure 4.26).
Sternal Angle (Angle of Louis)
You can locate the sternal angle by finding the suprasternal notch and moving inferiorly approximately 5 cm (Bates, 1983, p. 126), until you locate a transverse ridge where the manubrium joins the body of the sternum. If you move your hand laterally, you will find the attachment of the second rib (Figure 4.27).
Sternoclavicular Joint
Move your fingers slightly superiorly and laterally from the center of the suprasternal notch until you feel the joint line between the sternum and the clavicle. The joints should be examined simultaneously to allow for comparison of heights and location. You can get a better sense of the exact location of the sternoclavicular joint by having the patient shrug his or her shoulders while you palpate the movement of the joint and the upward motion of the clavicles. A superior and medial displacement of the clavicle may be indicative of dislocation of the sternoclavicular joint (Figure 4.28).
51
The Cervical Spine and Thoracic Spine Chapter 4
C6
Figure 4.24 Palpation of the first cricoid ring.
Carotid tubercle
C6
Carotid tubercle
Figure 4.25 Palpation of the carotid tubercle.
52
Chapter 4 The Cervical Spine and Thoracic Spine
Sternoclavicular
joint
1st rib Clavicle
2nd rib
Suprasternal
notch
Level of |
|
|
sternal angle |
Manubrium |
|
(angle of |
||
(of sternum) |
||
Louis) |
||
|
Gladiolus (of sternum)
Figure 4.28 Palpation of the sternoclavicular joint.
Figure 4.26 Palpation of the suprasternal notch.
Sternal
angle
Infrasternal
notch
Intercostal angle
Figure 4.27 Palpation of the sternal angle.
Clavicle and Surrounding Area
Continue to move laterally from the sternoclavicular joint along the superior and anterior curved bony surface of the clavicle. The bony surface should be smooth and continuous. Any area of increased prominence, pain, or sense of motion or crepitus in the bony shaft may be indicative of a fracture. The platysma muscle passes over the clavicle as it courses up the neck and can be palpated by having the patient strongly pull the corners of the mouth in a downward direction (Figure 4.29). The supraclavicular lymph nodes are found on the superior surface of the clavicle, lateral to the sternocleidomastoid in the supraclavicular fossa. If you notice any enlargement or tenderness, a malignancy or infection should be suspected. You can also palpate for the first rib in this space.
First Rib
The first rib is a little tricky to find since it is located behind the clavicle. If you elevate the clavicle and move your fingers posterior and inferior from the middle one-third of the clavicle you will locate the first rib just anterior to the trapezius muscle (Figure 4.30). This rib is often confused by examiners as being a muscle spasm of the trapezius. It is normally tender to palpation.
53

The Cervical Spine and Thoracic Spine Chapter 4
Clavicle
Sternum
T1
Figure 4.29 Palpation of the clavicle.
Figure 4.31
Second rib
Palpation of the ribs.
First rib
T1
Figure 4.30 Palpation of the first rib.
Ribs
The second rib is the most superior rib that is easily palpable on the anterior part of the chest. Locate the sternal angle (described previously) and move laterally
until you locate the second rib. You can then proceed inferiorly and count the ribs by placing your fingers in the intercostal spaces. The fifth rib is located at the xiphisternal joint. Note the symmetry of alignment and movement. Check the rib angles posteriorly along the insertion of the iliocostalis muscle approximately 1-in. lateral to the spinous processes. Observe for both the pump-handle elevation and the bucket-handle lateral expansion movements. The eleventh and twelfth ribs are found just above the iliac crests. They are most easily palpated on the lateral aspect along their free ends (Figure 4.31).
Soft-Tissue Structures
Sternocleidomastoid Muscle
To facilitate palpating the sternocleidomastoid muscle, have the patient bend the neck toward the side you are palpating and then simultaneously rotate away. This movement allows the muscle to become more prominent and therefore easier to locate. Palpate the distal attachments on the manubrium of the sternum and the medial aspect of the clavicle and follow the muscle superiorly and laterally until it attaches to the mastoid process. The upper trapezius and sternocleidomastoid meet at their attachment at the skull at the superior nuchal line. Move just medial to the attachment
54