

MusculoSkeletal Exam
.pdfChapter 2 Basic Concepts of Physical Examination
A 


 B
B
Figure 2.15 Genu varum (A) and valgum (B) deformities.
Observe the tibia. Note whether any bowing or tibial rotation is present. The patient may have tibial torsion. Note the relative heights of the fibular heads. Pay attention to the patellae. Do they squint (Figure 2.14) or are they bullfrog eyes (see p. 341 and Figure 12.10)? Are they of equal height? Observe the anterior aspect of the thigh and note whether the patient presents with quadriceps atrophy. Does the patient present with genu recurvatum, valgum, or varum (Figure 2.15)?
Observe the hip joint. Is there excessive medial or lateral rotation? There may be an excessive amount of anteversion or retroversion present. Is a hip flexion contracture present? Is the patient’s hip postured in an abnormal position? Note the heights of the greater trochanters. Place your hand over the iliac crest and check for leg length discrepancies. Place your fingers over the anterior iliac crests and note whether they are symmetrical. Changes in relative height may be secondary to pelvic rotation, sacroiliac dysfunction, or structural or functional leg length discrepancies.
Observe the patient’s trunk. If the patient has chest hair, you will more easily be able to determine if a scoliosis is present by observing changes in the growth
pattern. Observe the patient’s chest. Note symmetry of expansion during the breathing cycle. Is there symmetrical rib expansion both anteriorly/posteriorly and laterally? If a scoliosis is present, note the rib cage, the degree of rotation and the presence of any lateral humps. Is a lateral shift present? Is the patient able to stand in the erect position or is he or she forward or laterally flexed?
Observe the clavicles and sternum. Is one acromioclavicular or sternoclavicular joint higher than the other? Is a shoulder separation present? Does the patient demonstrate pectus excavatum, pectus carinatum, or barrel chest (Figure 2.16)? Check the sternoclavicular joints for symmetry. Note the acromioclavicular joints and observe for any separation. Note the upper extremities. Does the patient position both arms in the same manner? Is one arm held farther away from the trunk or held in more medial or lateral rotation? This can be secondary to muscle shortening and imbalances or fascial restrictions.
Does the patient present with a forward head posture? Is the head tilted to one side? Is torticollis present, with the head postured in side bending and rotation to opposite sides (Figure 2.17)?
25

Basic Concepts of Physical Examination Chapter 2
Figure 2.16 Barrel chest deformity.
sternocleidomastoid
Figure 2.17 Torticollis.
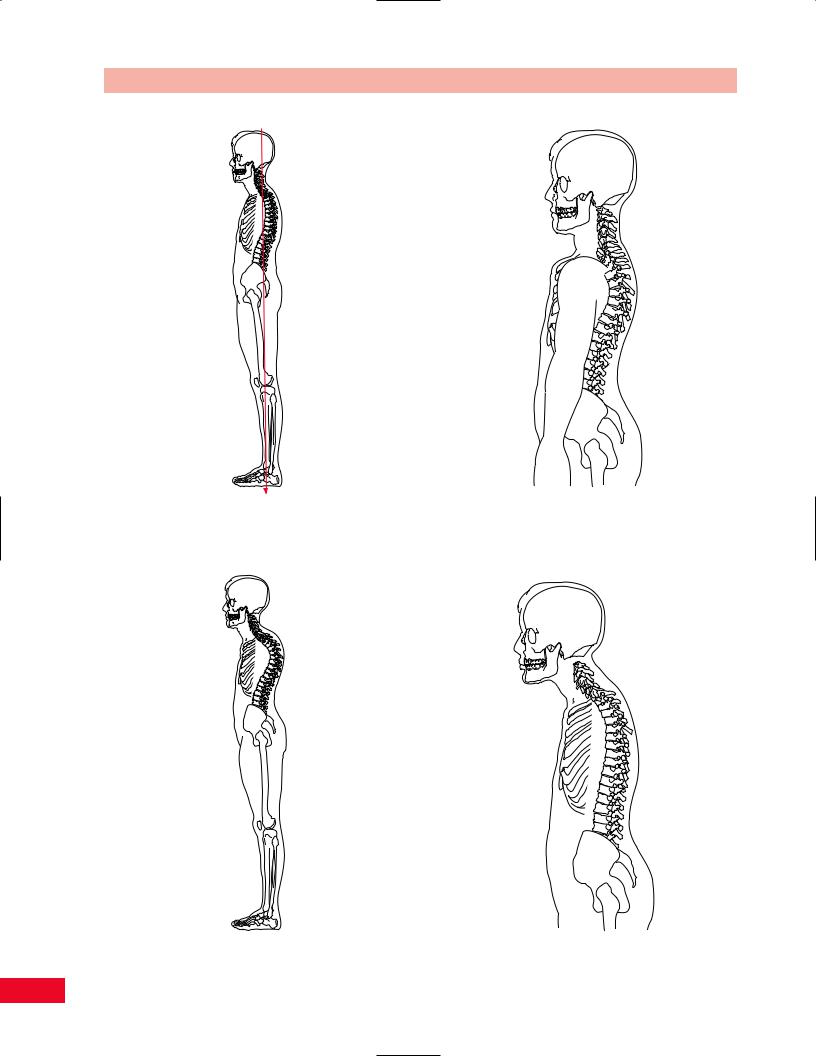
Lateral View
Normal
It is important to observe the patient from both the right and left lateral views and compare the findings (Figure 2.18). The feet should show a normal longitudinal arch. The navicular tuberosity should be located on Feiss’ line (from the medial malleolus to the first metatarsophalangeal joint). The knees should be from 0–5 degrees of flexion. The hips should be in 0 degrees of flexion. The pelvis should be aligned so that the anterior and posterior superior iliac spines are in the same plane horizontally, creating a normal lordosis. The pelvis should not be rotated. The anterior superior iliac spine and pubic symphysis should be in the same plane vertically. The normal posterior–anterior pelvic angle is 30 degrees from the posterior-superior iliac spine to the pubic ramus. The spine should demonstrate the normal anterior–posterior curves of lumbar lordosis, thoracic kyphosis, and cervical lordosis. The chest should have a smooth contour without any areas of depression or protrusion. The shoulders should be in proper alignment without being protracted or rounded. The head should be over the shoulders with the ear lobe


 2
2
Figure 2.18 Normal lateral view.
26

Chapter 2 Basic Concepts of Physical Examination
Feiss' Line
Figure 2.19 Normal medial longitudinal arch.
on a vertical line with the acromion process. Rocabado (unpublished data, 1982) notes that the apex of the thoracic kyphosis should not be more than 2 in. posterior to the deepest point of the cervical lordosis (Figure 2.18).
Possible Deviations from the Norm
Start by observing the patient’s feet. Note the medial longitudinal arch (Figure 2.19). You can observe Feiss’ line and determine if a pes planus (Figure 2.11) or cavus is present. Note the alignment of the knee. The lateral view gives you the easiest way to note a knee flexion contracture or genu recurvatum (Figure 2.20).
Note the relative position of the anterior and posterior superior iliac spines. If the anterior superior iliac spine is higher, it could indicate a posterior pelvic tilt or a posterior rotation of the innominate bone. A posterior pelvic tilt will cause a decrease in the lumbar lordosis or a flat back (Figure 2.21). Is a sway back present (Figure 2.22)? If the posterior superior iliac spine is relatively higher, this could indicate an anterior pelvic tilt or an anterior rotation of the innominate bone. An anterior pelvic tilt will cause an increase in the lumbar lordosis.
Figure 2.20 Genu recurvatum deformity.
Figure 2.21 Flat back deformity.
27
Basic Concepts of Physical Examination Chapter 2
Figure 2.24 Rounded shoulders.
Figure 2.22 Sway back deformity.
Figure 2.23 Dowager’s hump deformity. |
Figure 2.25 Forward head posture. |
28

Observe the trunk. The lateral view allows you to observe the anterior and posterior curves. Does the patient present with a rounded (Figure 2.6) or a flattened thoracic kyphosis? Is a Dowager’s hump present (Figure 2.23)?
Note the position of the shoulders. Does the patient present with anteriorly displaced rounded shoulders (Figure 2.24)? Where are the upper extremities in relation to the trunk? Observe the head and neck. Does the patient present with a forward head posture (Figure 2.25)?
Sitting Posture
Observe the patient in the sitting position while you are standing behind him or her. Note the differences in the alignment of the head, neck, trunk, and pelvis from the posterior view. These differences can be due to the removal of the influence of the lower extremities. Some patients may have considerably better posture in the sitting position by eliminating deviations in the lower extremities, which create functional leg length discrepancies or muscle imbalances.
Active Movement Testing
The examiner should proceed by directing the patient to move through all available ranges of motion. It is beneficial to have the patient move independently before the clinician begins the palpatory examination, as the degree of movement may be adversely affected if the patient’s pain level is increased. Active movement testing will provide the clinician with information regarding the status of both contractile (i.e., muscle, tendon) and noncontractile (ligaments, bones) structures of the joint (Cyriax, 1979). These tests can be used to assess the quantity and the quality of movement. The clinician should observe the degree of movement, the ease with which the patient moves, the willingness of the patient to move, and the rhythm, symmetry, and rate of movement (Cyriax, 1979). This will provide the clinician with information regarding the degree of the patient’s flexibility, mobility, and strength.
If on active movement the patient obtains full painfree active range of motion with an overpressure, the clinician can continue with the resisted testing portion of the examination. If the patient’s range of motion is limited, the clinician should utilize passive movement testing to gain a better understanding of the structures causing the restriction.
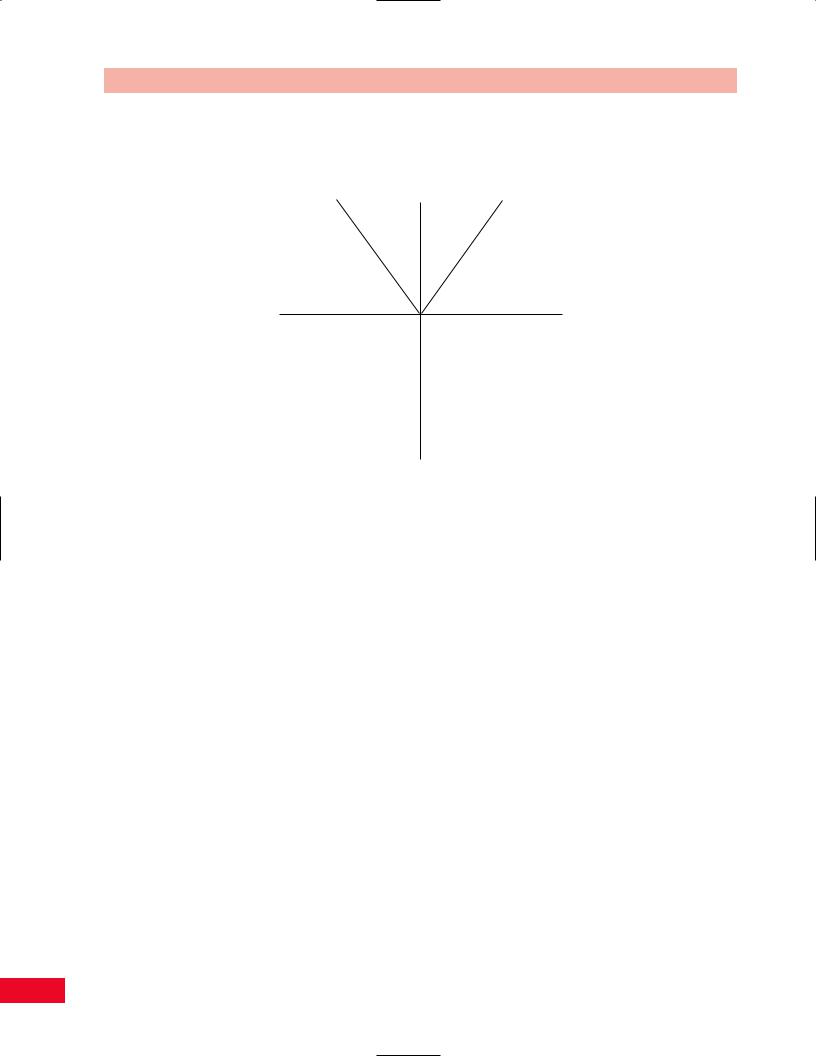
Objective measurement of movement in the spine can be recorded utilizing a movement diagram (Figure 2.26).
Chapter 2 Basic Concepts of Physical Examination
This very simple method allows the clinician to document the percentage of movement relative to the total normal anatomical range of motion in all directions. Deviations from the midline and the point of the onset of pain can also be noted. The diagram allows the clinician to quickly ascertain symmetry of movement.
Formal measurement of range of motion can also be documented with a standard goniometer using either the 180or 360-degree scale. The specifics of appropriately placing and utilizing the goniometer are more thoroughly addressed in a textbook on goniometry. In addition, bubble goniometers, flexible rulers, inclinometers, and tape measures have all been documented in the literature as appropriate measurement tools. More specific information concerning range-of-motion measurements is included in the individual chapters devoted to the joints.
Passive Movement Testing
Passive testing of the physiological movements (cardinal plane, gross joint movement) is used to provide information regarding the state of the noncontractile (inert) elements (Cyriax, 1979). Cyriax defined inert structures as those tissues that lack the inherent ability to contract. These structures (ligaments, joint capsule, fascia, bursa, dura mater, and nerve root) are stretched or stressed when the joint is taken to the end of the available range. It is important, however, to note that even though the muscles are not called on to contract during passive movement, they do exert an influence on the degree of motion. If the muscle is maintained in a shortened state, it will prevent the joint from achieving its full anatomical range.
When performing passive movement testing, it is necessary to have the patient relax and place him or her in a secure and comfortable position. This will allow movement without internal resistance. The movement should be carried out smoothly and gently to allow maximal movement with the least discomfort.
If the patient does not achieve full anatomical range, the end of the available motion is referred to as the pathological limit. The examiner should assess the feel of the limiting tissue at the end of this range. This sensation is referred to as the end feel (end point). The end feel can be hard (bony), abrupt and firm (ligamentous), soft (tissue approximation), or elastic (tendinous). This end feel will help the clinician understand which tissue may be responsible for the loss of motion. Pain can also be a limiting factor. In this case the clinician will experience the sense that the tissue is not restricting the motion, rather the patient is actively
29
Basic Concepts of Physical Examination Chapter 2
|
GROSS MOVEMENT |
|
Left side |
Forward |
Right side |
bending |
bending |
bending |
Left |
Right |
rotation |
rotation |
Backward
bending
Figure 2.26 Movement diagram.
preventing the rest of the movement from occurring. This is referred to as an empty end feel (Kaltenborn, 1999; Paris, 1991; Cyriax, 1979).
If pain is present before a sense of structural resistance is felt, the condition can be considered to be acute. Because of the pain the patient will prevent the movement well before the anatomical structures limit the range. If resistance is noted before the onset of pain, the condition can be considered to be chronic. The structures being stretched at the end of the range will cause the discomfort (Cyriax, 1979).
Resisted Movement Testing
Resisted movement testing involves an isometric contraction of the muscle that is performed in the neutral (mid) position. The joint must be held still so that the amount of stress placed on the inert (noncontractile) structures is minimized. The patient is instructed to produce a progressive maximal isometric contraction. This is accomplished by the clinician gradually increasing the degree of resistance until a maximal contraction is achieved. Resisted testing will help isolate the musculotendinous unit as the cause of the pain. The clinician should consider the results of the resisted movement tests. It is possible that a muscle that is tested as
weak has either a musculoskeletal component, such as a strain or inflammation, or a neurological component, such as a peripheral nerve compression. If the patient has a musculoskeletal dysfunction, the resisted movement will be painful since the damaged structure is stressed. If the test reveals a muscle that is weak and painless, then it is possible that the etiology is neurological (Cyriax, 1979).
The clinician must classify the response as strong, weak, painless, or painful. A muscle is considered strong if the patient can maintain a contraction against a moderate degree of resistance. If the muscle is unable to generate enough force to match the applied resistance, then it is considered to be weak (Cyriax, 1979).
If the patient’s pain level remains unchanged despite the examiner’s resistance, then the response is classified as painless. If the patient’s degree of pain increases or changes with the examiner’s resistance, then the response is classified as painful. This pain–strength relationship will give the clinician better insight into which structures are responsible for the problem. Interpretation using Cyriax’s method indicates the following:
1Strong and painful responses may be indicative of an injury to some part of the muscle or tendon.
2Weak and painless responses may be indicative of a full rupture of the muscle or may imply an
30

interruption of the nervous innervation of the muscle.
3Weak and painful responses may be an indication of a gross lesion such as a fracture or metastatic lesion.
4Strong and painless responses are indicative of normal structures.
Passive Mobility (Accessory) Movement Testing
Accessory movements (joint play) are movements that occur within the joint simultaneously with active or passive physiological movements. A combination of roll, spin, and glide allows the joint to move following the shape of the joint surface. The clinician can also assess the degree of laxity (slack) that is present when separating or gliding the joint surfaces. Laxity is the degree of looseness or “play” that is allowed by the capsule and ligaments in a normal joint while the muscles are relaxed. These movements are not under the volitional control of the patient and are totally independent from muscle contraction. To obtain full, pain-free physiological range of motion, the accessory movements must be present and full. The clinician should compare the findings from the symptomatic side with those obtained from the unaffected side.
Neurological Examination
The neurological examination helps the clinician determine whether the patient’s symptomatology stems from the musculoskeletal system, the nervous system, or a combination of both. For example, a patient with complaints of shoulder pain may have a C5 radiculopathy or a subdeltoid bursitis. The clinician cannot differentiate between the two diagnoses without completing a thorough examination of the cervical spine and shoulder. The specifics of these examinations are discussed later in this text.
Manual Muscle Testing
If the clinician prefers to obtain specific grades of strength for each individual muscle as opposed to classifying the strength as strong or weak, a formal manual muscle test can be performed. The patient is placed in the appropriate positions with resistance applied to elicit specific muscle contractions. The strength is then evaluated and graded using a system from 0–5 or zero to normal. Generally accepted definitions of the muscle grades are as follows (Kendall, 1993):
•Normal (5): The muscle can withstand a strong degree of resistance against gravity.
Chapter 2 Basic Concepts of Physical Examination
•Good (4): The muscle can withstand a moderate degree of resistance against gravity.
•Fair (3): The muscle is able to sustain the test position against gravity.
•Poor (2): The muscle is able to complete the range of motion in a plane that is parallel to gravity (gravity eliminated).
•Trace (1): The muscle can perform a palpable contraction but without any visible movement.
•Zero (0): No contraction is present.
Some clinicians may prefer to use plus and minus
grades with the above definitions or use a scale from 0–10. A discussion related to functional muscle testing is included in each of the chapters on individual joints. Selected manual muscle tests are included in the individual chapters later in this book. However, detailed information regarding the specifics of manual muscle testing is beyond the scope of this book. Some clinicians may want to continue their evaluation with more extensive equipment, such as that required for isokinetic testing.
Deep Tendon (Stretch) Reflexes
It is important to test the deep tendon (stretch) reflexes. Comparison of both sides is very important. A patient may present with symmetrically decreased reflexes and be perfectly normal. Normal variations must be taken into account. If the patient presents with hyperreflexia then a correlation can be made with upper motor neuron disease secondary to decreased inhibition by the motor cortex. If the patient presents with hyporeflexia, then lower motor neuron disease may be the causative factor secondary to an interruption in the reflex arc. Jendrassik’s method of reinforcement, where the patient pulls his or her clasped hands apart, may be needed to determine whether a reflex is present if the patient is very hyporeflexic. Asking the patient to lightly contract the muscle being tested can also enhance a difficult to elicit reflex.
Sensory Testing
The clinician should proceed with the pinprick test to assess the presence or absence of skin sensation. The clinician should correlate the findings with either a dermatomal or peripheral nerve distribution. If the patient appears to have significant neurological deficits, a more detailed sensory examination (including tests for temperature, position, and vibration sensations) would be appropriate. Light touch may also be used as a screening test for sensation.
31

Basic Concepts of Physical Examination Chapter 2
Nerve Stretch Testing
Nerve stretch tests can be used to determine whether there is compression of a nerve. The most common tests used are the straight-leg raise (Lasègue’s) test and the femoral nerve (prone knee bending) test. An increased dural stretch can be added to the straightleg raise (SLR) test by flexing the patient’s head and neck, adding dorsiflexion of the ankle. This creates additional stretch on the nerve root and increases the positive findings. Butler (1991) adds a slumping maneuver to the SLR and neck flexion in the sitting position, entitling it the “slump test.” Peripheral nerves can also be tested by stretching them to provoke or worsen symptoms.
Compression and Distraction
Compression and distraction of the spine can be used to evaluate whether the patient’s symptoms are either increased or decreased. Distraction can relieve pressure in an area that is compressed by separating the structures and allowing more space for the nerve root. Pain can also be increased because of increased stretch on the nerve root. Compression will increase an already existing pressure by decreasing the space in the nerve root foramen.
Pathological Reflex Testing
Pathological reflexes should also be tested. The clinician should check for the presence of the Babinski or Hoffmann reflex. If either of these are present, a correlation to upper motor neuron disease can be made.
Palpatory Examination
The clinician should start the examination by visually inspecting the skin and subcutaneous tissue over the affected area. Areas of localized swelling, excess fat, abrasion, discoloration, hematoma, and birthmarks should be noted. The clinician should then palpate the area and note areas of increased or decreased moisture
and temperature. If warmth, redness, and increased moisture are present, a correlation can be made to an acute lesion. A scratch test can be performed to evaluate the degree of histamine reaction. Skin rolling can determine whether there are any areas of adhesion. In a normal patient the skin should roll freely.
The clinician should palpate bony landmarks, noting their orientation and any areas of tenderness or deformity. When examining the spine, the clinician should pay attention to the alignment of the spinous and transverse processes and note if they are appropriately positioned. The inexperienced clinician may be misled into thinking that a faulty alignment exists when actually a congenital anomaly is present.
The muscles should be palpated and areas of spasm, guarding, knots, and tenderness should be noted. The clinician should be aware that it is easy to be fooled by listening to the patient’s complaint without completing the actual physical examination. Very often the area of complaint will not correlate to the area of palpable tenderness or dysfunction. When palpated, trigger points within muscles may radiate pain to a distant location. Ligaments and tendons should also be palpated. Swelling and a sense of bogginess may indicate an acute lesion whereas stringiness may be found in chronic injuries. Finally the clinician should palpate the arterial pulses in the area being examined to determine whether any vascular compromise is present.
Correlation
On completion of the examination, the clinician should correlate the information in a logical fashion, so that all the pieces of the puzzle fit together to formulate a diagnosis. If one piece of information does not fit, the clinician should re-examine the patient to guarantee that the finding is accurate. If the information does not fit together, the clinician should consider that the etiology of the problem is coming from another body system and refer the patient accordingly.
32
Chapter 3
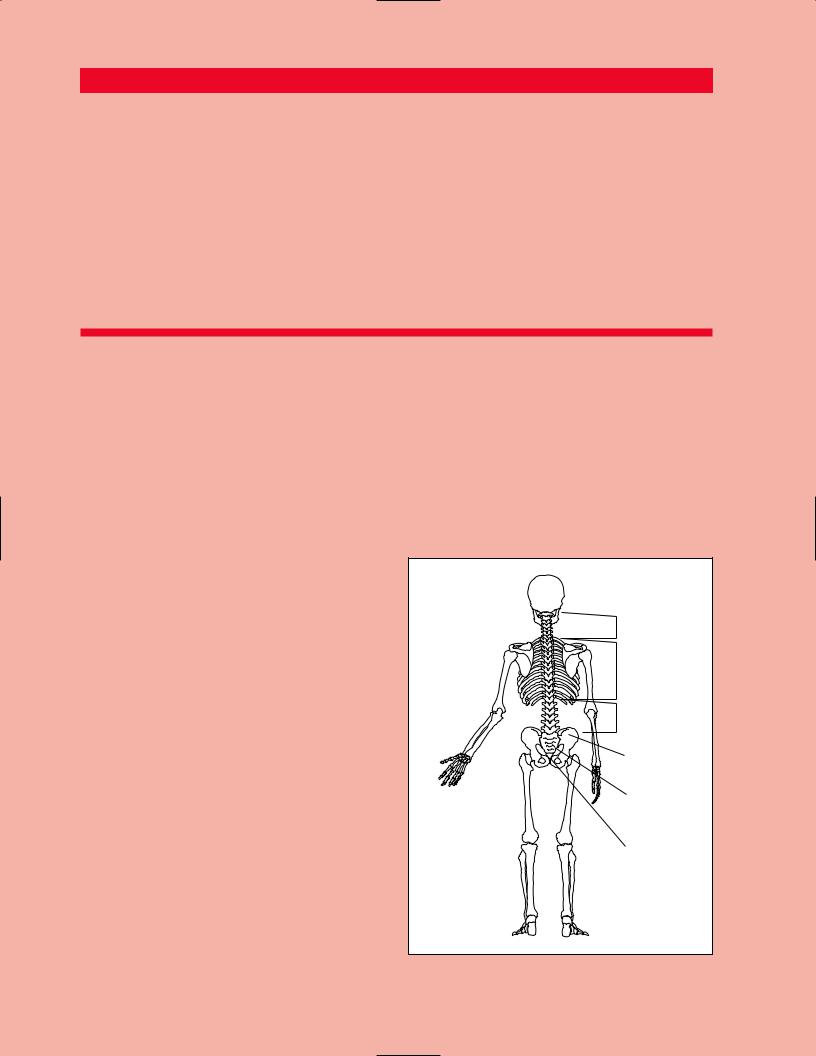
Overview of the
Spine and Pelvis
Cervical
Thoracic
Lumbar
Innominate
Sacrum
Coccyx
Overview of the Spine and Pelvis Chapter 3
The spine and pelvis represent the central support of the body. The pelvis can be thought of as a trapezoidal structure lying atop two columns (the lower extremities) upon which the spine sits.
The spine is composed of more than 30 segments called vertebrae. The vertebrae permit rotation, lateral bending, and flexion–extension movements. They vary in shape and size, but in general have similar structures (Figure 3.1). Most of the vertebrae have a large central body. Posteriorly they have a hollow ring through which the spinal cord passes. There are bony projections extending posteriorly from the lateral and posterior aspects of this ring. These bony projections are termed the transverse and spinous processes and serve as points of attachment for spinal ligaments and muscular tissues. Stability of the vertebrae is dependent upon soft tissues (intervertebral ligaments and paraspinal muscles) and posterior articulations called the facet joints. The vertebrae can be divided into five subgroups. Each subgroup has a different function; hence, vertebrae, although somewhat similar within a subgroup, vary significantly in their geometry from vertebrae of another subgroup. This change in shape and size reflects the different
functions of these subgroups. The different shapes have significant effects on vertebral mobility and stability.
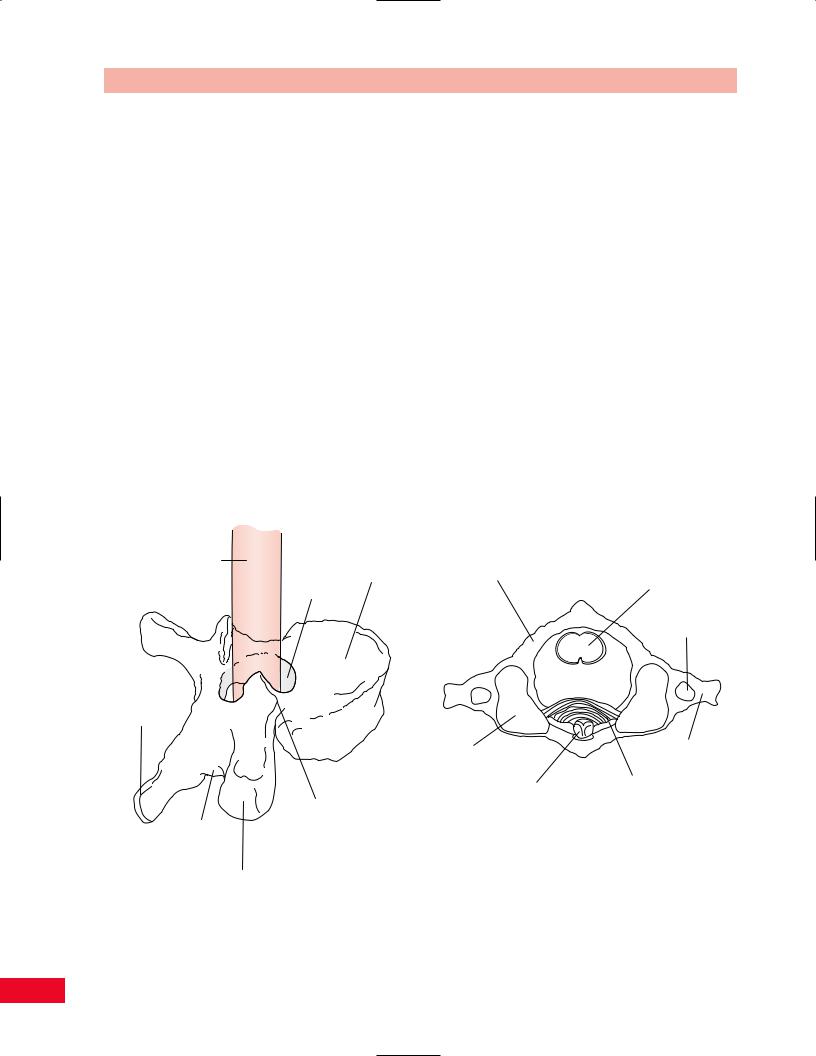
The most superior subgroup is termed the cervical spine. There are seven vertebrae within the cervical spine. At the apex is the atlas, or C1 vertebra. It is so named because it carries the “world” (the head) on its shoulders. Its articulation with the base of the skull permits a small amount of front-to-back movement (nodding) and sidebending. Beneath the atlas is the axis, or C2 vertebra. Its name comes from the fact that it presents a vertical structure (odontoid), much like that of a gatepost to the atlas, about which the atlas can rotate. This bony odontoid shares space with the spinal cord within the central hollow ring of the atlas (Figures 3.2 and 3.3). As such, any instability, whether traumatic or secondary to another etiology (rheumatoid inflammation), can cause anterior translation of the atlas on the axis. This can result in compression of the odontoid onto the spinal cord within the spinal canal, with life-threatening consequences. Beneath the axis, the remaining five cervical vertebrae are similar in shape and function. They accommodate flexion– extension, lateral (side) bending, and lateral rotation.
Spinal
cord
Spinal Body canal
Spinous process
Superior facet
Inferior facet
Transverse process
Figure 3.1 A generalized vertebral segment is composed of a large, solid cylindrical body anteriorly. Posteriorly, there is a bony ring through which the spinal cord and its coverings pass. Transverse and spinous processes project from the ring.
POSTERIOR
C 1 (Ring of Atlas)
Spinal cord
Foramen for vertebral artery
Lateral |
|
Transverse |
|
process |
|
mass |
|
|
|
|
|
|
Odontoid process |
Transverse ligament |
|
of odontoid |
|
|
of C 2 |
|
|
|
ANTERIOR
Figure 3.2 A transverse view through the ring of C1 (atlas) shows the spinal canal to be divided into thirds. The anterior third is occupied by the bony odontoid process of C2; the posterior third is filled by the spinal cord; the transverse ligament prevents migration of C1 on C2, not allowing the odontoid to invade the empty central third of the spinal canal.
34