
- •Navigating This Book
- •Table of Contents
- •Introduction
- •The History of Programmable Logic
- •Complex Programmable Logic Devices (CPLDs)
- •Why Use a CPLD?
- •Field Programmable Gate Arrays (FPGAs)
- •Design Integration
- •The Basic Design Process
- •HDL File Change Example
- •Before (16 x 16 multiplier):
- •After (32 x 32 multiplier):
- •Intellectual Property (IP) Cores
- •Design Verification
- •Xilinx Solutions
- •Introduction
- •Xilinx Devices
- •Platform FPGAs
- •Virtex FPGAs
- •Virtex-II Pro FPGAs
- •Virtex FPGAs
- •Spartan FPGAs
- •Spartan-3 FPGAs
- •Spartan-IIE FPGAs
- •Spartan-IIE Architectural Features
- •Xilinx CPLDs
- •XC9500 ISP CPLD Overview
- •XC9500XL 3.3V Family
- •XC9500XV 2.5V CPLD Family
- •CoolRunner Low-Power CPLDs
- •CoolRunner-II CPLDs
- •CoolRunner Reference Designs
- •Military and Aerospace
- •Automotive and Industrial
- •Design Tools
- •Design Entry
- •Synthesis
- •Implementation and Configuration
- •Board-Level Integration
- •Verification Technologies
- •Advanced Design Techniques
- •Embedded SW Design Tools Center
- •Xilinx IP Cores
- •Web-Based Information Guide
- •End Markets
- •Silicon Products and Solutions
- •Design Resources
- •System Resources
- •Xilinx Online (IRL)
- •Configuration Solutions
- •Processor Central
- •Tools and Partnerships
- •Memory Corner
- •Silicon
- •Design Tools and Boards
- •Technical Literature and Training
- •Connectivity Central
- •High-Speed Design Resources
- •Signal Integrity Tools
- •Partnerships
- •Signal Integrity
- •Services
- •Xilinx Design Services
- •Education Services
- •Live E-Learning Environment
- •Day Segment Courses
- •Computer-Based Training (CBT)
- •University Program
- •Design Consultants
- •Technical Support
- •Module Descriptions
- •WebPACK Design Suite
- •WebPACK Design Entry
- •WebPACK StateCAD
- •WebPACK MXE Simulator
- •WebPACK HDL Bencher Tool
- •WebPACK FPGA Implementation Tools
- •WebPACK CPLD Implementation Tools
- •WebPACK iMPACT Programmer
- •WebPACK ChipViewer
- •XPower
- •WebPACK CD-ROM Installation
- •Getting Started
- •Licenses
- •Projects
- •Summary
- •Introduction
- •Design Entry
- •The Language Template
- •Close the Language Templates
- •Edit the Counter Module
- •Save the Counter Module
- •Functional Simulation
- •State Machine Editor
- •Top-Level VHDL Designs
- •Top-Level Schematic Designs
- •ECS Hints
- •I/O Markers
- •Implementing CPLDs
- •Introduction
- •Synthesis
- •Constraints Editor
- •CPLD Reports
- •Timing Simulation
- •Configuration
- •Implementing FPGAs
- •Introduction
- •Synthesis
- •The Constraints File
- •FPGA Reports
- •Programming
- •Summary
- •Design Reference Bank
- •Introduction
- •Get the Most out of Microcontroller-Based Designs
- •Conventional Stepper Motor Control
- •Using a Microcontroller to Control a Stepper Motor
- •Stepper Motor Control Using a CPLD
- •PC-Based Motor Control
- •Design Partitioning
- •Conclusion
- •Documentation and Example Code
- •Website Reference
- •ACRONYMS
- •GLOSSARY OF TERMS

PROGRAMMABLE LOGIC DESIGN -- QUICK START HANDBOOK • CHAPTER 4
Design Entry
To start WebPACK ISE software, select Start > Programs > Xilinx ISE 6 > Project Navigator.
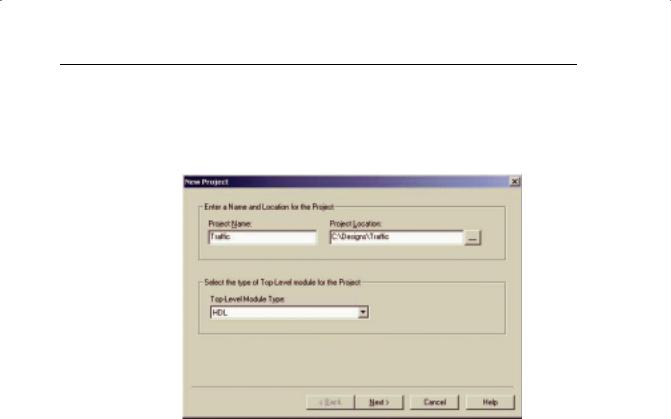
To create a new project, select File > New Project.
FIGURE 4-1: NEW PROJECT WINDOW – PROJECT NAME
Call the project “Traffic” and put it in your Designs directory. For this tutorial, we will be using an HDL top level.
Click the Next> button.
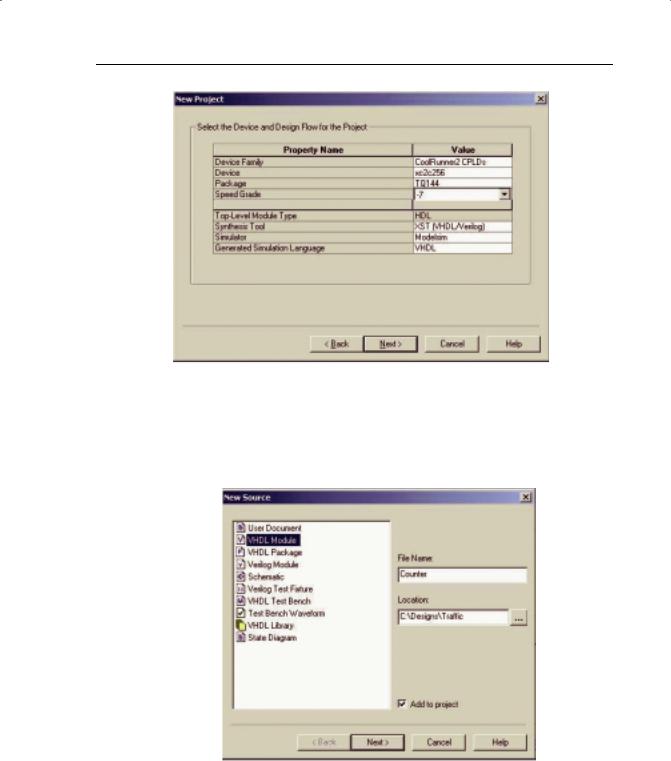
Enter the following into the New Project dialog box:
Device Family: |
CoolRunner-II |
Device: |
xc2c256 |
Package: |
TQ144 |
Speed Grade: |
-7 |
Synthesis Tool: |
XST (VHDL/Verilog) |
Simulator: |
ModelSim |
Generated Simulation Language: |
VHDL |
Xilinx • 100

WEBPACK ISE DESIGN ENTRY
FIGURE 4-2: NEW PROJECT WINDOW – DEVICE AND DESIGN FLOW
Click the Next> button.
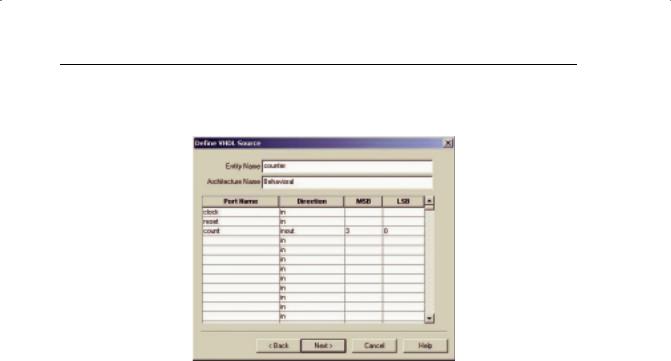
Add a new source to the project by clicking on the New Source button. Add a VHDL module and call it “Counter.”
FIGURE 4-3: NEW SOURCE WINDOW
Xilinx • 101

PROGRAMMABLE LOGIC DESIGN -- QUICK START HANDBOOK • CHAPTER 4
Click the Next> button.
Create a 4-Bit Counter Module
FIGURE 4-4: DEFINE VHDL SOURCE WINDOW
Declare three ports: “clock,” “reset,” and “count.” The clock and reset ports should both be of direction “in.”
Count should be direction “inout” and should be a 4-bit vector with MSB 3, LSB 0.
Click the Next> button.
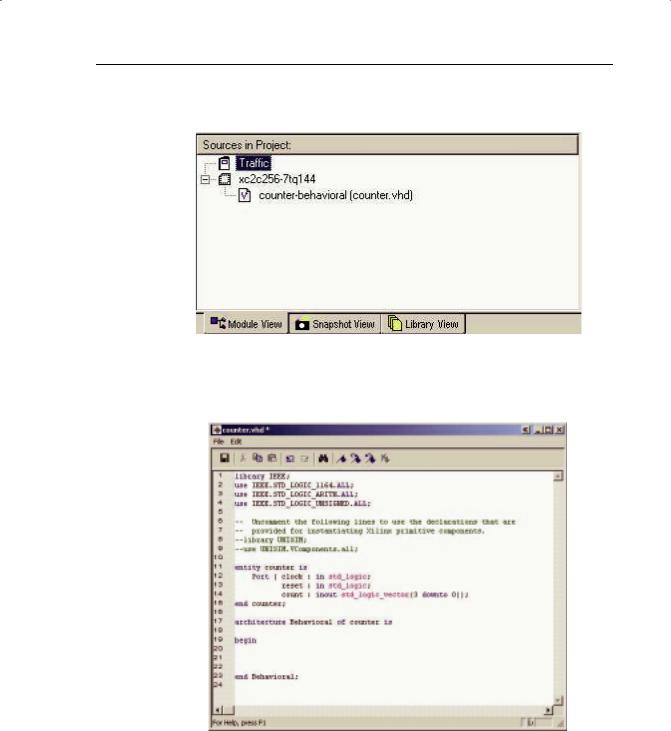
Review the contents of the final window and click the Finish button.
This has automatically generated the entity in the counter VHDL module.
Xilinx • 102

WEBPACK ISE DESIGN ENTRY
Notice that a file called “counter.vhd” has been added to the project in the Sources in Project window of the Project Navigator.
FIGURE 4-5: SOURCE IN PROJECT WINDOW
Double-click on this source to open it in the WebPACK ISE Editor window.
FIGURE 4-6: COUNTER WINDOW
Xilinx • 103