

Network Plus 2005 In Depth
.pdf202 |
Chapter 5 NETWORKING HARDWARE |
NET+ |
On-Board NICs |
1.6Not all peripheral devices are connected to a computer’s motherboard via an expansion slot or peripheral bus. Some are connected directly to the motherboard using on-board ports. For example, the electrical connection that controls a computer’s mouse operates through an onboard port, as does the connection for its keyboard and monitor. Many new computers also use on-board NICs, or NICs that are integrated into the motherboard. The advantage to using an on-board NIC is that it saves space and frees expansion slots for additional peripherals. When a computer contains an on-board network adapter, its RJ-45 port is usually located on the back or, with some laptops, on the side of the computer.
Wireless NICs
NICs are designed for use with either wire-bound or wireless networks. As you have learned, wireless NICs use an antenna (either internal or external) to exchange signals with a base station transceiver or another wireless NIC. Wireless NICs can be found for all of the bus types discussed in this chapter. One disadvantage to using wireless NICs is that currently they are somewhat more expensive than wire-bound NICs. (Other reasons for choosing wire-bound NICs over wireless, if the choices are equally convenient, are the bandwidth and security limitations of wireless transmission. These limitations are discussed elsewhere in the book.) Figure 5-9 depicts wireless PCI, CardBus, and USB NICs.
FIGURE 5-9 Wireless NICs

NICS (NETWORK INTERFACE CARDS) |
Chapter 5 203 |
NET+ Installing NICs
1.6To install a NIC, you must first install the hardware, and then install the software that shipped
3.2with it. In some cases, you may also have to perform a third step: configuring the firmware, a set of data or instructions that has been saved to a read-only memory (ROM) chip (which is on the NIC). The ROM’s data can be changed by a configuration utility program provided with the NIC. Because its data can be erased or changed by applying electrical charges to the chip (via the software program), this particular type of ROM is called EEPROM (electrically erasable programmable read-only memory). You’ll learn more about a NIC’s firmware later in the chapter. The following sections explain how to install and configure NICs.
Installing and Configuring NIC Hardware
It’s always advisable to start by reading the manufacturer’s documentation that accompanies the NIC hardware. The following steps generally apply to any kind of expansion card NIC installation in a desktop computer, but your experience may vary.
To install an expansion card NIC:
1.Make sure that your toolkit includes a Phillips-head screwdriver, a ground strap, and a ground mat to protect the internal components from electrostatic discharge. Also, make sure that you have ample space in which to work, whether it be on the floor, a desk, or table.
2.Turn off the computer’s power switch, and then unplug the computer. In addition to endangering you, opening a PC while it’s turned on can damage the PC’s internal circuitry. Also unplug attached peripherals and the network cable, if necessary.
3.Attach the ground strap to your wrist and make sure that it’s connected to the ground mat underneath the computer.
4.Open the computer’s case. Desktop computer cases are attached in several different ways. They might use four or six Phillips-head screws to attach the housing to the back panel, or they might not use any screws and slide off instead. Remove all necessary screws and then remove the computer’s case.
5.Select a slot on the computer’s motherboard where you will insert the NIC. Make sure that the slot matches the type of expansion card you have. Remove the metal slot cover for that slot from the back of the PC. Some slot covers are attached with a single Phillips-head screw; after removing the screw, you can lift out the slot cover. Other slot covers are merely metal parts with perforated edges that you can punch or twist out with your hands.
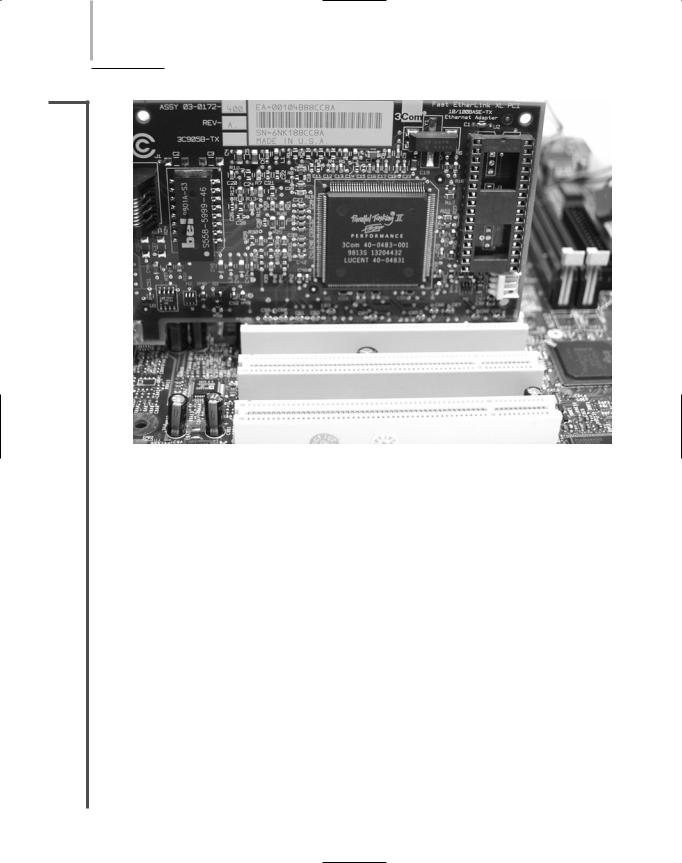
6.Insert the NIC by lining up its slot connector with the slot and pressing it firmly into the slot. Don’t be afraid to press down hard, but make sure the expansion card is properly aligned with the slot when you do so. If you have correctly inserted the NIC, it should not wiggle near its base. (Depending on the card’s size and thickness, it may have some inherent flexibility, however.) A loose NIC causes connectivity problems. Figure 5-10 shows a closeup of a NIC firmly seated in its slot.
204 Chapter 5 NETWORKING HARDWARE
NET+
1.6
3.2
FIGURE 5-10 A properly inserted NIC
7.The metal bracket at the end of the NIC should now be positioned where the metal slot cover was located before you removed the slot cover. Attach the bracket with a Phillips-head screw to the back of the computer cover to secure the NIC in place.
8.Make sure that you have not loosened any cables or cards inside the PC or left any screws or debris inside the computer.
9.Replace the cover on the computer and reinsert the screws that you removed in Step 4, if applicable. Also reinsert any cables you removed.
10.Plug in the computer and turn it on. Proceed to configure the NIC’s software, as discussed later in this chapter.
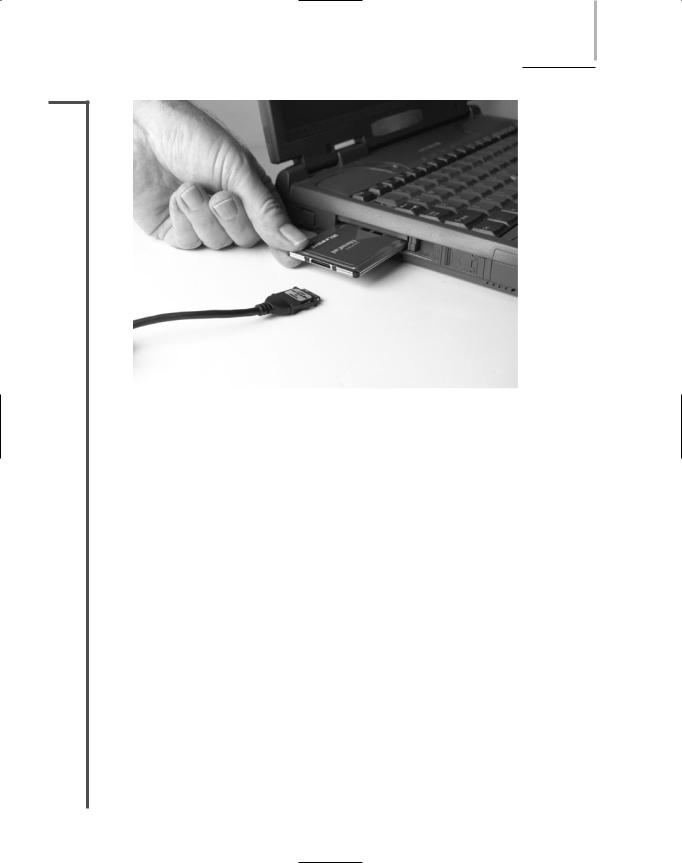
Physically installing a PCMCIA-standard NIC is much easier than installing an expansion card NIC. In general, you can simply turn off the machine, insert the card into the PCMCIA slot, as shown in Figure 5-11, then turn on the computer. Most modern operating systems (such as Windows XP) allow you to insert and remove the PCMCIA-standard adapter without restarting the machine. Make sure that the card is firmly inserted. If you can wiggle it, you need to realign it or push it in farther. Installing other types of external NICs, such as USB, ExpressCard, and CompactFlash adapters, is similar. All you need to do is insert the device into the computer’s port, making sure that it is securely attached.
NICS (NETWORK INTERFACE CARDS) |
Chapter 5 205 |
NET+
1.6
3.2
FIGURE 5-11 Installing a PCMCIA-standard NIC
On servers and other high-powered computers, you may need to install multiple NICs. For the hardware installation, you can simply repeat the installation process for the first NIC, choosing a different slot. The trick to using multiple NICs on one machine lies in correctly configuring the software for each NIC. Simple NIC configuration is covered in the following section. The precise steps involved in configuring NICs on servers will depend on the server’s networking operating system.
On older expansion board NICs, rather than using firmware utilities to modify settings, you may need to set a jumper or DIP switch. A jumper is a small, removable piece of plastic that contains a metal receptacle. This metal receptacle fits over a pair of pins on a circuit board to complete a circuit between those two pins. A DIP (dual inline package) switch is a small, plastic toggle switch that can represent an “on” or “off ” status that indicates a parameter setting. To set jumpers and DIP switches properly, refer to the documentation for the adapter (typically available at the manufacturer’s Web site), which shows how different jumper and DIP switch settings indicate particular NIC configurations.
Installing and Configuring NIC Software
Even if your computer runs an operating system with plug-and-play technology such as Windows XP or Red Hat Linux, you must ensure that the correct device driver is installed for the NIC and that it is configured properly. A device driver (sometimes called, simply, a driver) is software that enables an attached device to communicate with the computer’s operating system. When you purchase a computer that already contains an attached peripheral (such as a

206 |
|
|
Chapter 5 NETWORKING HARDWARE |
|
|
||||
|
|
|
|
|
|
|
sound card), the device drivers should already be installed. However, when you add hardware, |
||
NET+ |
|
|
||
1.6you must install the device drivers. Most operating systems come with a multitude of built-in
3.2device drivers. In that case, after you physically install new hardware and reboot, the operating system automatically recognizes the hardware and installs the device’s drivers. Each time a computer boots up, the device drivers for all its connected peripherals are loaded into RAM so that the computer can communicate with those devices at any time.
In other cases, the operating system might not contain appropriate device drivers for the hardware you’ve added. This section describes how to install and configure NIC software on a Windows XP operating system that does not already contain the correct device drivers. For other operating systems with plug-and-play capability, the process will be similar. Regardless of which operating system you use, you should first refer to the NIC’s documentation, because your situation may vary. Read the NIC documentation carefully before installing the relevant drivers, and make sure you are installing the appropriate drivers. Installing a device driver designed for Windows 95 on a Windows XP computer, for example, may cause problems.
To install NIC software from a Windows XP interface, you need access to the Windows XP software (via either a Windows XP CD or hard disk) and the device drivers specific to the NIC. These drivers are typically found on CD-ROMs, or in some cases, floppy disks.
If you do not have the CD-ROM or floppy disk that shipped with the NIC and the Windows XP software does not supply device drivers for your NIC, you can probably download the NIC software from the manufacturer’s Web site. If you choose this option, make sure that you get the appropriate drivers for your operating system and NIC type. Also, make sure that the drivers you download are the most current version (sometimes called “shipping drivers”) and not beta-level (unsupported) drivers.
To install and configure NIC software:
1.Physically install the NIC, and then restart the computer. Log on to the computer as a user with administrator privileges.
2.As long as you haven’t disabled the plug-and-play technology in the computer’s CMOS settings, Windows XP should automatically detect the new hardware. Upon detecting the NIC, it should also install the NIC’s driver. In many cases, you need not install any other software or adjust the configuration for the NIC to operate properly.
3.There are certain situations in which you might want to change or update the device driver that the operating system has chosen. To do this, click Start on the task bar, and then click Control Panel. The Control Panel window opens.
4.If necessary, switch to Category View. Then click Performance and Maintenance. The Performance and Maintenance window appears.
5.Click System. The System Properties dialog box opens.
6.Select the Hardware tab, and then click the Device Manager button. The Device Manager window opens, displaying a list of installed devices.
7.Double-click the Network adapters icon. A list of installed NICs appears.

|
NICS (NETWORK INTERFACE CARDS) |
Chapter 5 |
|
207 |
|
|
|||
|
|
|
|
|
|
8. Double-click the adapter for which you want to install new device drivers. The NIC’s |
|||
NET+ |
||||
1.6 |
Properties dialog box opens. |
|
|
|
3.29. Select the Driver tab. Details about your NIC’s current driver opens.
10.Click Update Driver. The Windows XP Hardware Update Wizard appears, to walk you through the device driver update process.
11.Select Install from a list or specific location (Advanced), and then click Next to continue. Make sure that the CD-ROM or floppy disk with the correct driver on it is inserted.
12.You are prompted to choose your search and installation options. Make sure Search for the best driver in these locations and Search removable media (floppy, CDROM...) are selected, as shown in Figure 5-12, and then click Next.
FIGURE 5-12 Windows XP Hardware Update Wizard
13.The Windows XP Hardware Update Wizard searches your floppy and CD-ROM drives for a driver that matches your network card. (If the disk sent with the NIC contains drivers for more than one type of NIC, you are asked to select the precise model you are using. After making your choice, click OK.)
14.The wizard should find the appropriate driver for your NIC and install it onto your hard disk. Later, it informs you that it has finished. To continue, click Finish. Close all open windows.
Procedures in this section work in most situations. Because every situation is different, however, you should always read the manufacturer’s documentation and follow the installation instructions. Some manufacturers supply setup programs that automatically install and register NIC software as soon as you run them, thereby eliminating the need to follow the steps outlined previously.
Installing NIC drivers on a UNIX or Linux workstation depends somewhat on the version you’re running. For example, a recent version of Linux from Red Hat, which supports plug- and-play technology, normally detects a connected NIC and automatically installs the correct

208 |
|
|
Chapter 5 NETWORKING HARDWARE |
|
|
||||
|
|
|
|
|
|
|
drivers. The first NIC the operating system detects is called, by default, eth0. If a second NIC |
||
NET+ |
|
|
||
1.6is present, it will be called eth1. Because they provide the network interface, eth0 and eth1 are
3.2called, in UNIX and Linux terminology, simply, interfaces.
As with other operating systems, however, a version of Linux may not always be able to install the proper drivers for your NIC automatically. In that case, you can follow these steps to install NIC software on a client running Fedora Core, a Linux operating system packaged and distributed by Red Hat, Inc. and the GNOME desktop (the default graphical user interface):
1.Log in as root (the default administrator ID) or a user ID with equivalent privileges.
2.Click the Main Menu icon in the lower-left corner of the screen (the icon is a red hat). This button reveals the desktop’s main menu, similar to the Start button in Windows XP.
3.Point to System Settings, and then click Network. The Network Configuration window opens, as shown in Figure 5-13. If a NIC is present and installed, it appears in the list of hardware devices in the Devices tab (and also on the Hardware tab).
FIGURE 5-13 Fedora Core Linux Network Configuration window
4.To begin adding drivers for a NIC, click New on the Network Configuration toolbar. The Add New Device Type window opens.
5.Under the list of device types, click Ethernet connection, and then click Forward.
6.In the list of Ethernet cards, click Other Ethernet Card to add drivers for a new NIC. You are prompted to provide information about the new adapter. Click
Forward.
7.Supply the adapter information, including adapter name (a drop-down list of common adapter types can help you specify the adapter), device name (for example, eth1), IRQ, memory address, I/O addresses, and DMA addresses. When you have finished, click Forward.

|
NICS (NETWORK INTERFACE CARDS) |
Chapter 5 |
|
209 |
|
|
|||
|
|
|
|
|
|
8. You are prompted to configure network settings. If your network relies on DHCP |
|||
NET+ |
||||
1.6 |
(which is most common), simply click Forward to continue. (Otherwise, click Stati- |
|||
3.2cally set IP addresses, and enter the NIC’s IP address information.) Click Forward to continue.
9.A summary of your selections appears under the Create Ethernet Device heading. Click Apply to install the drivers and configure network settings for the new NIC.
NET+ Interpreting LED Indicators
1.6After you have installed a NIC, you can test it by attempting to transmit data over the net-
4.3work. But even before such a test, you can learn about your NIC’s functionality simply by looking at it. Most modern NICs have LEDs that indicate whether they’re communicating with the network. The precise location, type, and meaning of LED indicators vary from one manufacturer to another. The following are some general guidelines, but the only way to know for certain what your NIC’s LEDs are trying to tell you is to read the documentation. Your NIC may have one or more of the following lights, and they may or may not be labeled:
ACT—If blinking, this LED indicates that the NIC is either transmitting or receiving data (in other words, experiencing activity) on the network. If steady, it indicates that the NIC is experiencing heavy traffic volume.
LNK—If lit, this LED indicates that the NIC is functional. Further, if the NIC drivers are properly installed, a lit LNK LED indicates that the NIC has a connection to the network (but is not necessarily transmitting or receiving data). In some models, if this LED is blinking, it means the NIC detects the network, but cannot communicate with it (for example, in the case of a 100BASE-TX NIC deployed on a 10BASE-T network).
TX—If blinking, this LED indicates that the NIC is functional and transmitting frames to the network.
RX—If blinking, this LED indicates that the NIC is functional and receiving frames from the network.
The next sections describe the variable settings you should understand when configuring NICs. Depending on your computer’s use of resources, NIC configuration may or may not be necessary after installation. For troubleshooting purposes, however, you need to understand how to view and adjust these variables. If you completed coursework for the A+ certification or have worked with PCs in the past, you should already be familiar with these variables.
NET+ IRQ (Interrupt Request)
1.6When a device attached to a computer’s bus, such as a keyboard or floppy disk drive, requires
3.2attention from the computer’s processor, it issues an interrupt request. An IRQ (interrupt request) is a message to the computer that instructs it to stop what it is doing and pay attention to something else. An interrupt is the circuit board wire over which a device issues voltage to signal this request. Each interrupt must have a unique IRQ number, a number that

210 |
|
|
Chapter 5 NETWORKING HARDWARE |
|
|
||||
|
|
|
|
|
|
|
uniquely identifies that component to the main bus. An IRQ number is the means by which |
||
NET+ |
|
|
||
1.6the bus understands which device to acknowledge. The term “IRQ” is frequently substituted
3.2for “IRQ number” in casual conversation, even though they are technically two different things.
IRQ numbers range from 0 to 15. Many computer devices reserve the same IRQ number by default no matter what type of system they are installed on. For example, on every type of computer, a floppy disk controller claims IRQ 6 and a keyboard controller takes IRQ 1. On the other hand, some IRQ numbers are not reserved by default, but are available to additional devices such as sound cards, graphics cards, modems, and NICs. Most often, NICs use IRQ 9, 10, or 11. To obtain Network+ certification, you should be familiar with the IRQ numbers reserved by common computer devices as well as those most apt to be used by NICs. Table 5- 1 lists all of the IRQ numbers and their default device assignments, if they have any.
Table 5-1 IRQ assignments
IRQ Number |
Default Device Assignment |
0 |
System timer (only) |
1 |
Keyboard controller (only) |
2 |
Access to IRQs 8–15 |
3 |
COM2 (second serial port) or COM4 (fourth serial port) |
4 |
COM1 (first serial port) or COM3 (third serial port) |
5 |
Sound card or LPT2 (second parallel port) |
6 |
Floppy disk drive controller |
7 |
LPT1 (parallel port 1) |
8 |
Real-time clock (only) |
9 |
No default assignment |
10 |
No default assignment |
11 |
No default assignment |
12 |
PS/2 mouse |
13 |
Math coprocessor (only) |
14 |
IDE channel (for example, an IDE hard disk drive) |
15 |
Secondary IDE channel |
|
|

NICS (NETWORK INTERFACE CARDS) |
Chapter 5 211 |
NET+ |
Normally the BIOS and the operating system manage IRQ assignment without problems. But |
1.6if two devices attempt to use the same interrupt, resource conflicts and performance problems
4.4result. Any of the following symptoms could indicate that two devices are attempting to use the same IRQ:
The computer may lock up or “hang” either upon starting or when the operating system is loading.
The computer may run much more slowly than usual.
Although the computer’s NIC may work properly, other devices—such as USB or parallel ports—may stop working.
Video or sound card problems may occur. For example, after the operating system loads, you may see an error message indicating that the video settings are incorrect, or your sound card may stop working.
The computer may fail to connect to the network (as evidenced by an error message after you attempt to log on to a server, for example).
The computer may experience intermittent data errors during transmission.
If IRQ conflicts do occur, you must reassign a device’s IRQ. NIC IRQs can be changed through the adapter’s EEPROM configuration utility or through the computer’s CMOS configuration utility. CMOS (complementary metal oxide semiconductor) is a type of microchip that requires very little energy to operate. In a PC, the CMOS stores settings pertaining to a computer’s devices, among other things. These settings are saved even after you turn off a PC because the CMOS is powered by a tiny battery in your computer. Information saved in CMOS is used by the computer’s BIOS (basic input/output system). The BIOS is a simple set of instructions that enables a computer to initially recognize its hardware. When you turn on a computer, the BIOS performs its start-up tasks. After a computer is up and running, the BIOS provides an interface between the computer’s software and hardware, allowing it to recognize which device is associated with each IRQ.
Although you can usually modify IRQ settings in the CMOS configuration utility, whether you can change them via the operating system software depends on the type of NIC involved. For example, on a PCI NIC, which requires a PCI bus controller, the PCI controller’s settings will dictate whether this type of modification is possible. The default setting prevents you from changing the NIC’s IRQ via the operating system; if you attempt to make this change on a Windows XP computer, for example, on the Resources tab in the PCI NIC’s Properties dialog box, the “Use Automatic Settings” option is checked and the “Change Settings” button is disabled.
NET+ Memory Range
1.6The memory range indicates, in hexadecimal notation, the area of memory that the NIC and
3.2CPU use for exchanging, or buffering, data. As with IRQs, some memory ranges are reserved for specific devices—most notably, the motherboard. Reserved address ranges should never be selected for new devices.