


C H A P T E R 14
Configuration of AAA on the Cisco PIX Firewall
This chapter addresses the commands necessary to configure authentication, authorization, and accounting (AAA) on the Cisco PIX Firewall. You might remember that the importance of remembering the PIX commands was mentioned in the Introduction. In the real world, it is possible to navigate your way around a PIX and figure out the correct syntax for a command. This is not possible in the testing environment. You will be asked to select a command that performs a certain function from a list of very similar commands. It is very important that you understand the correct syntax for each PIX command.
How to Best Use This Chapter
This chapter covers the communication between the Cisco PIX Firewall and the Cisco Secure Access Control Server (CSACS). You will learn to configure the PIX to work with a AAA server, and you will learn to configure the CSACS to work with the PIX. The configurations for authentication, authorization, and accounting are very similar and should be relatively simple to remember. Quite a few commands and options are available for configuring each AAA component, but each is used for nearly every component. The CSACS is a simple GUI-controlled package that includes online help. You need to become familiar with the tabs on the navigation bar and how the different configurations interact.
“Do I Know This Already?” Quiz
The purpose of this quiz is to help you determine your current understanding of the topics covered in this chapter. Write down your answers and compare them to the answers in Appendix A. If you have to look at any references to correctly answer the questions about PIX functionality, you should read that portion and double-check your thinking by reviewing the Foundation Summary. The concepts in this chapter are the foundation of much of what you need to understand to pass the CSPFA Certification Exam. Unless you do exceptionally well on the “Do I Know This Already?” pretest and are 100% confident in your knowledge of this area, you should read through the entire chapter.

274Chapter 14: Configuration of AAA on the Cisco PIX Firewall
1True or false: The show aaa command shows you everything that has to do with your AAA server in its configuration.
2Both your Cisco PIX Firewall and your CSACS are configured for TACACS+, but you cannot configure the downloadable PIX ACLs. What is the problem?
3What is the command to get authorization to work with access lists?
4What is the one type of database you do not want to implement for a large enterprise network with many users?
5What tab on the CSACS is used to configure the PIX, and what is the firewall considered?
6What three services are used to authenticate by default in the PIX?
7How do you put text messages into the logon prompt for a Telnet session?
8What three messages can you change with the auth-prompt command?
9If your timeout uauth is set to 0:58:00, when is the user prompted to reauthenticate after the session times out?
10What does the option inactivity in the timeout uauth command mean?
11What two formats can logs be written to using the CSACS?
12If you create a user on the CSACS and do not assign that user to a group, what group is he or she automatically assigned to?
13You have added a new RSA SecurID Token Server to the network. In which two places do you configure the CSACS to use it?
14What command is most commonly used to check your AAA configuration on the PIX?


276 Chapter 14: Configuration of AAA on the Cisco PIX Firewall
Figure 14-1 Cisco PIX Firewall and CSACS Topology for This Chapter
CSACS 172.16.1.8
 Web Server
192.168.1.18
FTP Server

 192.168.1.28 Client
10.10.10.10
Configuring AAA on the Cisco PIX Firewall
Four steps are required to configure AAA on the PIX Firewall. Each of these steps must be completed for the PIX to communicate with the AAA servers:
Step 1 Identify the AAA server
Step 2 Configure authentication
Step 3 Configure authorization
Step 4 Configure accounting
Step 1: Identifying the AAA Server and NAS
You must be sure to have the correct information about your AAA server before attempting to configure your PIX. The aaa-server command is used (from configuration mode on the PIX) to specify the AAA server. Remember that you are dealing with at least two devices: the PIX and the CSACS.
You must configure the PIX to recognize the CSACS as its AAA server for authentication. You must also configure the CSACS to communicate with the PIX with the necessary account information so that the CSACS can validate authentication requests from the PIX. To accomplish both tasks, you need to use the following commands:
aaa-server group_tag protocol auth_protocol
aaa-server group_tag (if_name) host server_ip key timeout seconds


278 Chapter 14: Configuration of AAA on the Cisco PIX Firewall
NOTE To remove the aaa-server from the configuration, enter no aaa-server.
You finish configuring the CSACS to connect to the PIX by selecting the PIX during the CSACS installation, as shown in Figure 14-2.
Figure 14-2 Selecting the Network Access Server
You also can create additional NASs or edit the current NAS settings in CSACS by selecting the Network Configuration tab on the CSACS main screen. Remember that the CSACS calls the NAS the “AAA client.” Figure 14-3 shows the settings for the PIX Firewall in the CSACS.

Configuring AAA on the Cisco PIX Firewall 279
Figure 14-3 Configuring NAS in CSACS
NOTE |
The TACACS+ or RADIUS key specified on CSACS must exactly match the key specified |
|
in the aaa-server command for communication between the CSACS server and the NAS |
|
to be established. |
|
|
Step 2: Configuring Authentication
Now that you have the AAA server and the NAS configured to communicate with each other, you need to configure both for user authentication. First you need to configure the authentication parameters on the Cisco PIX Firewall, and then you need to create the user accounts on the CSACS. Three types of authentication are supported on the PIX Cisco Firewall:
•TACACS+
•RADIUS
•LOCAL

280 Chapter 14: Configuration of AAA on the Cisco PIX Firewall
The aaa authentication command has three different types. The following list describes the options and variables you find collectively within all three:
•include—Creates a rule with a specified service.
•exclude—Creates an exception to a previously defined rule.
•authen_service—The service that is included or excluded. It is the application with which the user accesses the network. The PIX Firewall can authenticate only via FTP, HTTP, and Telnet. You can configure the authen_service as “any” to allow the PIX to authenticate any of the three, but this does not allow your users to authenticate using any protocol other than FTP, HTTP, or Telnet.
•inbound—Specifies that the PIX is to authenticate inbound traffic (originates on the inside interface and is directed to the outside interface).
•outbound—Specifies that the PIX is to authenticate outbound traffic (originates on the outside interface and is directed to the inside interface).
•if_name—The interface name from which the users should be authenticated. This is optional. By default, the user must authenticate before being allowed through the PIX Firewall. Therefore, outbound traffic authenticates at the inside interface, and inbound traffic authenticates at the outside interface.
•local_ip—The host address or network segment with the highest security level. As with the other address definitions on the PIX Firewall, 0 is used to define “any.”
•local_mask—The subnet mask that applies to the local_ip. 0 is used to define “any.”
•foreign_ip—Defines the address space with the lowest security level. The use of 0 defines “any.”
•foreign_mask—The subnet mask that applies to the foreign_ip. 0 is used to define “any.”
•group_tag—The name used for the AAA server group. The group_tag is also used in the aaa-server, aaa authorization, and aaa accounting commands.
The following sections describe the three different formats and functions of the aaa authentication command in greater detail.
Manually Designating AAA Authentication Parameters
The first command allows you to manually designate the authentication parameters using the items in the preceding list. The syntax for this command is as follows:
aaa authentication include/exclude authen_service inbound/outbound if_name local_ip local_mask foreign_ip foreign_mask group_tag
Configuring AAA on the Cisco PIX Firewall 281
Example 14-2 shows the syntax for requiring all inbound traffic to authenticate except for traffic connecting to host 192.168.1.28 based on the network shown in Figure 14-1.
Example 14-8 Configuring AAA Authentication on the PIX
tgpix (config)# aaa authentication include any inbound 0 0 0 0 TACACS+ tgpix (config)# aaa authentication exclude http inbound 192.168.1.28
255.255.255.255 0 0 TACACS+
Note that the local_ip listed is a public address. This is because inbound traffic cannot route to a private address. To configure this authentication, you must ensure that you have a static address translation or NAT configured for your local_ip and that you list the translated address as the local_ip.
Designating AAA Authentication Parameters Via Access Lists
It is also possible to configure your AAA authentication to reference access lists using the match command. This configuration removes the requirement of manually defining the local and foreign addresses. The syntax for AAA authentication using access lists is as follows:
aaa authentication match acl_name inbound | outbound if_name group_tag
Example 14-3 is an example of the aaa authentication command including the referenced access list.
Example 14-9 Configuring aaa authentication match
|
tgpix (config)# static (inside.outside) 192.168.200.1 10.10.10.10 netmask |
|
255.255.255.255 |
|
tgpix (config)# access-list PIXTEST permit tcp any host 192.168.200.2 eq 80 |
|
tgpix (config)# access-group PIXTEST in interface outside |
|
tgpix (config)# aaa authentication match PIXTEST inbound TACACS+ |
|
|
|
The static translation and access group are also included in this example because each is |
|
required in order to have the correct public address and to apply the access list. |
|
|
NOTE |
Chapter 7, “Configuring Access,” discusses access lists in greater detail. |
|
|
|
One additional command you should use when configuring authentication is sysopt uauth |
|
allow-http-cache. This command allows the HTTP cache for user authentication, which |
|
prevents the user from having to reauthenticate when navigating the Internet when HTTP |
|
authentication is required. |


Configuring AAA on the Cisco PIX Firewall 283
Authentication of Services
The Cisco PIX Firewall is designed to authenticate users via FTP, HTTP, and Telnet. Many other services passing through the PIX require authentication. To fulfill this requirement, the PIX supports virtual services. The Cisco PIX Firewall can perform functions for servers that do not exist and allow the PIX to authenticate users who want to connect to services other than FTP, HTTP, and Telnet. After the user has been authenticated, he can access whatever authorized services he is requesting.
Your company uses Microsoft NetMeeting to communicate between its many different branch offices. NetMeeting runs on the H.323 protocol, which uses a number of different ports. To allow this access, users must authenticate via FTP, HTTP, or Telnet. If you do not have a server available to accept the FTP, HTTP, or Telnet connections, you can configure the Cisco PIX Firewall to accept the connections via a virtual service.
Virtual Telnet
Vitrual Telnet allows the user to authenticate using Telnet and use a service that does not support authentication. The PIX accepts the user’s connection and challenges him for a username and password. The username and password are verified by the TACACS+ or RADIUS server. If the user successfully authenticates, the connection to his requested service is completed. An additional server is not required to accept the connection, because the Cisco PIX Firewall creates a virtual server to handle the authentication requests. Virtual Telnet sessions can be inbound or outbound on the PIX.
To configure virtual Telnet on the Cisco PIX Firewall, you must first create the virtual server on a segment that can be reached via the PIX. Normally this is an address on the firewall’s outside interface. In Figure 14-4, the virtual IP address is 192.168.1.4. This public IP address can be accessed from both inside networks and public networks (such as the Internet). The syntax of the virtual telnet command is as follows:
virtual telnet ip_address
Figure 14-4 Assigning the IP for Virtual Services
CSACS 172.16.1.8
|
|
NetMeeting |
|
|
Server |
|
Outside |
192.168.200.1 |
|
|
|
|
192.168.1.1 |
|
Client |
Virtual IP |
|
|
|
10.10.10.10192.168.1.4


286 Chapter 14: Configuration of AAA on the Cisco PIX Firewall
string should not include any special characters. It ends with either a question mark (?) or by pressing the enter key.
The auth-prompt command has three options:
•prompt—The text that is displayed when the user is prompted to authenticate: “Access to this location is restricted, please provide username and password”.
•accept—Configures the text displayed if the user successfully authenticates using a Telnet session: “User Authentication complete, please continue”. No text is displayed for authentication using FTP or HTTP.
•reject—Configures the text displayed if the user is unable to successfully authenticate using a Telnet session: “Authentication unsuccessful, if you feel that you have received this message in error please contact your systems administrator”. The text for FTP and HTTP authentication sessions cannot be configured on the PIX.
Authentication Timeout
After a user is successfully authenticated, his or her user information is saved in cache for a predetermined amount of time. You set this time by configuring the timeout uauth command. It is specified in hours, minutes, and seconds. If the user session idle time exceeds the timeout, the session is terminated, and the user is prompted to authenticate during the next connection. To disable caching of users, use the timeout uauth 0 command. Be sure not to use timeout uauth 0 when using virtual http. This setting prevents any connections to the real web server after successful authentication at the Cisco PIX Firewall.
NOTE If the firewall is performing NAT, the timeout uauth value must be less than the timeout xlate value to ensure that the user authentication times out before the address translation.
Two command options or settings are associated with the timeout uauth command:
•absolute—The default setting for the uauth timer. This setting sets the timer to prompt the user to reauthenticate after the timer elapses only when the user starts a new connection. If the user leaves the session open and the timer elapses, and he closes the browser without clicking another link, he is not prompted to reauthenticate. Setting the uauth timer to 0 disables caching of user authentication and therefore disables the absolute option.
•inactivity—The period of inactivity that must occur before the timer starts. This is how long the system waits before it considers a connection idle.
Example 14-7 depicts the timeout command with the absolute and inactivity settings. The first command sets the timer to 4 hours and tells the system not to prompt the user after the session times out unless he initiates another session. The second command defines a 30-minute period of inactivity as an idle session and tells the system to start the timer at that point.


288 Chapter 14: Configuration of AAA on the Cisco PIX Firewall
Example 14-8 shows the commands used to authorize outbound DNS requests and all inbound services except HTTP requests from 192.168.1.28 to any destination.
Example 14-14 Configuring Authorization on the PIX
tgpix (config)# aaa authorization include any inbound outside 0 0 0 0 TACACS+ tgpix (config)# aaa authorization exclude http inbound outside 192.168.1.28
255.255.255.255 0 0 TACACS+
tgpix (config)# aaa authorization include udp/53 outbound inside 0 0 0 0 TACACS+
NOTE To remove the aaa authorization from the configuration, enter no aaa authorization.
CSACS and Authorization
After the Cisco PIX Firewall is configured correctly, you must configure authorization on your CSACS. If your CSACS is already configured with the PIX as the NAS, a few steps remain to configure authorization:
Step 1 Configure user accounts within the CSACS.
Step 2 Assign users to a group.
Step 3 Apply authorization rules to the group.
Steps 1 and 2: Configuring User Accounts Within the CSACS and Assigning Users to a Group
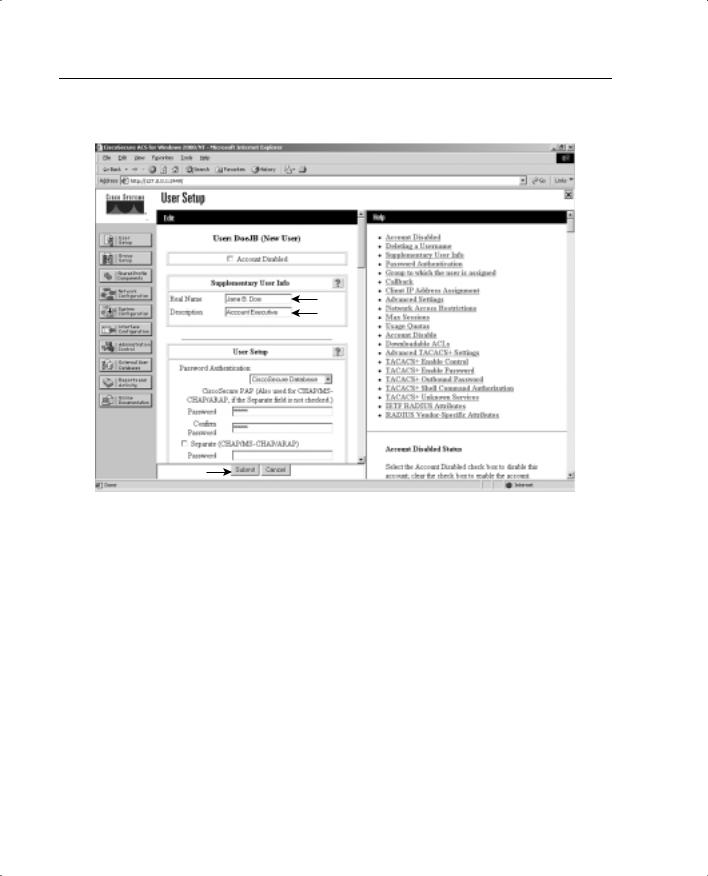
To configure new users in CSACS, select the User Setup tab on the left navigation bar. When the User Setup windows appears, enter the username in the User: box, and then click Add/Edit, as shown in Figure 14-5. You see the screen shown in Figure 14-6.
In the User Setup window, the administrator can configure many options pertaining to the user account:
•Account Disabled—Lets you create accounts for users who are not yet ready to begin using the system. For example, suppose you are told that the company has hired a new employee who is scheduled to begin working in three weeks. You can configure the user account and then turn it on when the new employee starts work.
•Supplementary User Info—An optional field for entering user information. It is a very good idea to complete these fields, because they help you keep track of your user accounts as your user base grows:
—Real Name—The user’s name, not the user account name.
—Description—A desription of the user. Normally this field describes the user’s position within the company.

Configuring AAA on the Cisco PIX Firewall 289
Figure 14-5 Creating User Accounts on the CSACS
•User Setup—Select the type of authentication database, and enter the user password:
—Password Authentication—Two types of password authentication are available on the CSACS by default. You can add a number of additional authentication types using the External User Databases tab on the left navigation bar. Select the authentication type from the drop-down menu:
CiscoSecure Database—Authenticates the user from a database installed locally on the CSACS.
Windows NT/2000—Authenticates the user against a Windows NT/ 2000 that is located on the same system that is running the CSACS.
External User Database—You can add multiple configurations for each of the following authentication services: Vasco Token Server, RSA SecurID Token Server, RADIUS Token Server, External ODBC Database, Windows NT/2000, Novell NDS, Leap Proxy RADIUS Server, Generis LDAP, SafeWord Token Server, CryptoCard Token Server, AXENT Token Server, and ActivCard Token Server.
290 Chapter 14: Configuration of AAA on the Cisco PIX Firewall
Figure 14-6 Configuring User Accounts on the CSACS
—Password and Confirm Password—Enter and confirm the user’s password.
—Separate (CHAP/MS-CHAP/ARAP) Password—This feature is not used on the PIX Firewall.
—Group to which the user is assigned—Select a user group from the dropdown box. All users are assigned to the Default Group unless they are specifically assigned to another group. Grouping the users and applying rules to groups allows you to efficiently administer the authentication services.
—Callback—This feature is not used on the PIX Firewall.
—Client IP Address Assignment—This feature is not used on the PIX Firewall.
•Network Access Restrictions—Defines per-user network access restrictions.
•Max Sessions—Contains three radio buttons that define the maximum number of concurrent sessions the user can have:
Configuring AAA on the Cisco PIX Firewall 291
—Unlimited—The user can maintain an unlimited number of concurrent sessions through the firewall.
—Fill in the box—Defines the maximum number of concurrent sessions.
—Use group settings—The default setting. The maximum number is defined at the group level.
•Account Disable—Configures the parameters for disabling a user account based on the date or a number of failed logon attempts. Do not confuse this option with the Account Disabled option at the top of the User Setup page.
—Never—The default setting. It allows the user unlimited attempts to log on.
—Disable account if:
Date exceeds—Select the date from the drop-down boxes. The default setting is 30 days after the account is created.
Failed attempts exceed—Add the number of allowed failed attempts to the box.
An indicator shows the number of failed attempts since the last successful logon.
There is a check box for you to reset the failed attempts count on submit.
Step 3: Applying Authorization Rules to the Group
Now that the user account is created and the user is assigned to a group, it is time to apply authorization rules to the group. Select the Group Setup tab on the navigation bar on the left.
Figure 14-7 shows the available selections in the initial Group Setup window.

292 Chapter 14: Configuration of AAA on the Cisco PIX Firewall
Figure 14-7 Configuring a Group Setup on the CSACS
You can select the group from the drop-down box and select any of three options for that group:
•Users in Group—Replaces the Help window on the right side of the screen with a list of the users assigned to the selected group, as shown in Figure 14-8. Each username is a link to that user’s configuration in the User Setup.
•Edit Settings—This option allows you to edit the specific settings for the selected group. This is where the authorization rules are applied to the group.
•Rename Group—Groups can be renamed to simplify administration. Users can be added to groups based on like positions or job functions (such as marketing, sales, infrastructure, and security).

Configuring AAA on the Cisco PIX Firewall 293
Figure 14-8 Users in Group
•You configure commands by editing the settings for a specific group. Select Group Setup from the navigation bar, click Edit Settings, and scroll down to the Shell Command Authorization Set. You see radio buttons and a Command box that is a subset, as shown in Figure 14-9.
To configure shell command authorization for AAA clients using TACACS+, set the options in this section as applicable:
•None—If you do not want to apply TACACS+ shell command authorization for users belonging to this group, select this option (This is the option selected in Figure 14-9).
•Assign a Shell Command Authorization Set for any network device—To apply a shell command authorization set to all TACACS+ AAA clients, select this option and then select the set you want from the corresponding list.

294 Chapter 14: Configuration of AAA on the Cisco PIX Firewall
Figure 14-9 Command Authorization Sets
•Assign a Shell Command Authorization Set on a per Network Device Group Basis—To apply a shell command authorization set to the TACACS+ AAA clients belonging to a particular Network Device Group (NDG), select this option, and then use the following options:
—Device Group—From the list, select the NDG to which you want to assign a shell command authorization set.
—Command Set—From the list, select the shell command authorization set you want to apply to the NDG.
—Add Association—Click to add the NDG and command set selected to the Device Group/Command Set list.
—Remove Associate—To remove an NDG/command set association, select from the Device Group/Privilege list the NDG/command set association you want to remove, and then click Remove Associate.

Configuring AAA on the Cisco PIX Firewall 295
NOTE Shell command authorization sets are created and configured in the Shared Profile Components window.
•Per Group Command Authorization—To set TACACS+ shell command authorization on a command-by-command basis, select this option, and then use the following options:
—Unmatched Cisco IOS commands—To determine how CSACS handles commands that you do not specify in this section, select either Permit or Deny as applicable.
—Command—Select this check box, and then enter the Cisco IOS command in the corresponding box.
—Arguments—For each argument of the Cisco IOS command, specify whether the argument is to be permitted or denied. These should be entered in the format permit argument or deny argument. This allows you to specify which commands are permitted or denied.
—Unlisted Arguments—To permit only the arguments listed, select Deny. To allow users to issue all arguments not specifically listed, select Permit. This setting allows you to permit or deny all commands and arguments not listed previously.
Step 4: Configuring Accounting
You have successfully configured both your Cisco PIX Firewall and CSACS for authentication and authorization. The final portion is to configure accounting. Accounting is used to track specific traffic passing through the firewall. It also ensures that users are performing functions in keeping with company policies. Log data is commonly stored and can be used to investigate employees who are using their Internet connections for activities not authorized by the employer. The general syntax for the command that accomplishes accounting is as follows:
aaa accounting include | exclude acctg_service inbound | outbound | if_name local_ip local_mask foreign_ip foreign_mask group_tag
The following items are defined within the aaa accounting command:
•include—Create a rule with a specified service.
•exclude—Create an exception to a previously defined rule.
•acctg_service—The service that is included or excluded. It is the service that the user is requesting access to the network. You can configure acctg_service as any, ftp, http, telnet, or protocol/port. When you configure protocol/port, the protocol is listed as a number:


Configuring AAA on the Cisco PIX Firewall 297
Viewing Accounting Information in Cisco Secure
Now that the Cisco PIX Firewall is configured to perform accounting, you need to ensure that the CSACS is properly configured to log the events. Select System Configuration, as shown in Figure 14-10, select the Logging tab on the navigation bar, and check off the log format and the items you want to log (see Figure 14-11). Logs can be saved in a .CSV (flat file) or ODBC (database) format.
Figure 14-10 CSACS System Configuration Options Screen

298 Chapter 14: Configuration of AAA on the Cisco PIX Firewall
Figure 14-11 CSACS Logging Targets and Options Screen
You can view several reports from the CSACS browser interface. Select Reports and Activity from the navigation bar (see Figure 14-12) and choose the report you want by clicking the applicable button in the left window. Reports are available for TACACS+ and/ or RADIUS only if a AAA client has been configured to use that protocol.

Configuring AAA on the Cisco PIX Firewall 299
Figure 14-12 CSACS Reports and Activity Options Screen
Some reports are available only if the applicable option is enabled in the Interface Configuration: Advanced Options panel (see Figure 14-13) and configured in System Configuration. After you select the type of report to view, a list of choices appears in the right window. Click the name of the report you want.

300 Chapter 14: Configuration of AAA on the Cisco PIX Firewall
Figure 14-13 Interface Configuration Options for CSACS Reports
Cisco Secure and Cut-Through Configuration
Cut-through proxy is a feature of the Cisco PIX Firewall that allows it to open connections after authenticating and authorizing a user with the AAA server. This feature was discussed in Chapters 1 and 2. The user initiates a connection to his or her destination and is prompted for a username and password by the PIX. The user-provided information is verified by the AAA server, and the connection is allowed by the firewall.
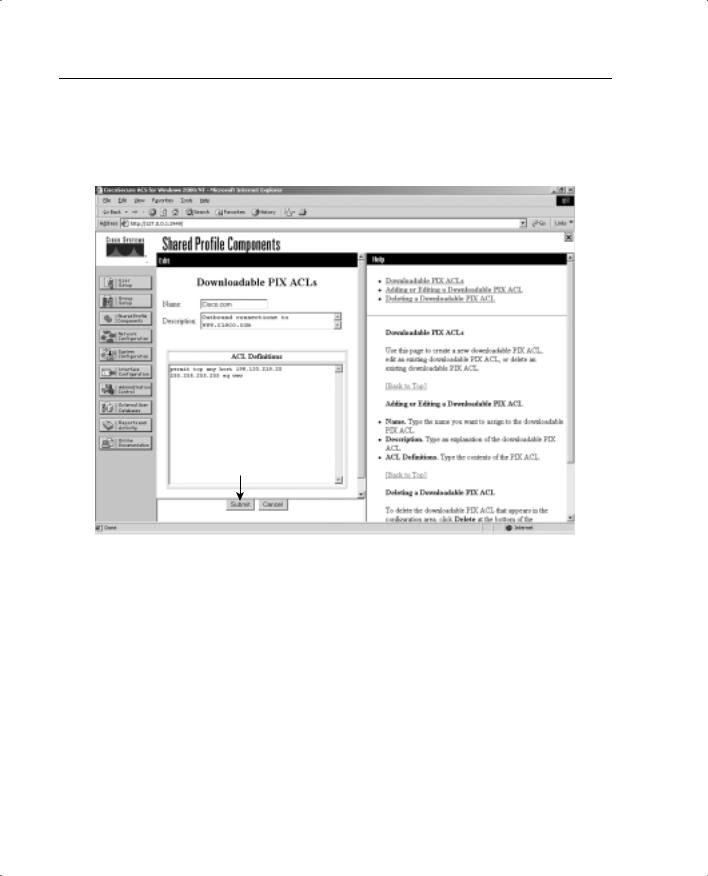
Configuring Downloadable PIX ACLs
Version 3.0 of CSACS allows you to create a “downloadable ACL” using the shared profile component. The downloadable ACL configuration is supported for RADIUS servers only. To verify that your configuration is for a RADIUS server, select Network Configuration from the navigation bar and click AAA Client. Verify that RADIUS (Cisco IOS/PIX) is selected, as shown in Figure 14-14.
Configuring Downloadable PIX ACLs 301
Figure 14-14 RADIUS (Cisco IOS/PIX) Configuration
|
Select Shared Profile Components from the navigation bar, click the link for Downloadable |
|
PIX ACL, and select Add. |
|
|
NOTE |
If you are not configured for a RADIUS server, the Downloadable PIX ACL link is |
|
unavailable. |
|
|
Add the following information in the Downloadable PIX ACLs configuration box, and click Submit:
•Name—The access list name.
•Description—A description of the access list.
•ACL Definitions—A test of the command. This should use the same format as the command used on the PIX Firewall, except for the access list name. It is also not necessary to add the access list to an access group. This is done automatically when the ACL is downloaded to the PIX Firewall.
302 Chapter 14: Configuration of AAA on the Cisco PIX Firewall
Figure 14-15 shows a downloadable ACL configured to allow outbound access to www.cisco.com.
Figure 14-15 Creating a Downloadable ACL
After you configure the downloadable ACL in Shared Profile Components, you can add it to either an individual user setup or a group setup. Figure 14-16 shows the Downloadable ACLs box in Group Setup. To add the downloadable ACL to the group, simply check the box and select the ACL name from the drop-down box.