


C H A P T E R 10
Virtual Private Networks
Virtual private networks (VPNs) have become a crucial portion of nearly all enterprise networks. The ability of VPN technologies to create a secure link interconnecting offices over the Internet saves companies the expense of dedicated connections. Additionally, VPN connections allow remote users to connect to their headquarters securely.
How to Best Use This Chapter
This chapter provides an overview of the different VPN technologies available and discusses where the Cisco PIX Firewall can be used as an endpoint for VPNs. You need to become very familiar with the methodology used to implement VPNs and how that methodology is applied to the PIX. As you read through this chapter, consider how encryption technology is applied in general, and then focus on the configuration steps required to configure the PIX. If you are at all familiar with configuring VPNs on any Cisco product, you will probably find this chapter very easy.
“Do I Know This Already?” Quiz
The purpose of this quiz is to help you determine your current understanding of the topics covered in this chapter. Write down your answers and compare them to the answers in Appendix A. If you have to look at any references to correctly answer the questions about PIX functionality, you should read that portion and double-check your thinking by reviewing the Foundation Summary. The concepts in this chapter are the foundation of much of what you need to understand to pass the CSPFA Certification Exam. Unless you do exceptionally well on the “Do I Know This Already?” pretest and are 100% confident in your knowledge of this area, you should read through the entire chapter.
1Which encryption is stronger, Group 2 Diffie-Hellman or 3DES?
2What is the command to apply an access list to a crypto map?
3What is the difference between ESP and AH?
4What service uses UDP 500?

160 Chapter 10: Virtual Private Networks
5What is the size of an MD5 hash?
6Why is manual-ipsec not recommended by Cisco?
7What is the most scalable VPN solution?
8What is the difference between an access VPN and an intranet VPN?
9Which hash algorithm is configured by default for phase 1?
10What are the two methods of identifying SA peers?
11What happens if you have different ISAKMP policies configured on your potential SA peers, and none of them match?
12What command should you use to watch your IKE negotiation?
13Where do you define your authentication method?
14What are the three types of VPNs?
Overview of VPN Technologies 161
Foundation Topics
Overview of VPN Technologies
Before the creation of VPN technologies, the only way for companies to secure network communications between different locations was to purchase costly dedicated connections. VPNs allow companies to create secure encrypted tunnels between locations over a shared network infrastructure such as the Internet. A VPN is a service that offers secure, reliable connectivity over a shared public network infrastructure. VPNs are broken into three types based on their usage:
•Access VPNs—An access VPN, shown in Figure 10-1, provides secure communications with remote users. Access VPNs are used by users who connect via dialup or other mobile connections. A user working from home would most likely use an access VPN to connect to work. Access VPNs usually require some type of client software running on the user’s computer. This type of VPN is commonly called a remote-access VPN.
Figure 10-1 Access VPN
•Intranet VPNs—An intranet VPN is used to securely interconnect a company’s different locations. This allows all locations to have access to the resources available on the enterprise network. Intranet VPNs link headquarters, offices, and branch offices over a shared infrastructure using connections that are always encrypted. This type of VPN is normally configured as a site-to-site VPN.
•Extranet VPNs—Extranet VPNs provide a secure tunnel between customers, suppliers, and partners over a shared infrastructure using connections that are always encrypted. This type of VPN is also normally configured as a site-to-site VPN. The difference between an intranet VPN and an extranet VPN is the network access that is granted at either end of the VPN. Figure 10-2 shows a site-to-site VPN, the configuration commonly used for both intranet and extranet VPNs.
Figure 10-2 Site-to-Site VPN
VPN Tunnel

162 Chapter 10: Virtual Private Networks
Internet Protocol Security (IPSec)
IPSec is not a protocol. It is a framework of open-standard protocol suites designed to provide data authentication, data integrity, and data confidentiality. IPSec runs at the IP layer and uses IKE to negotiate the security association (SA) between the peers. The following items must be negotiated as part of IKE SA negotiation:
•
•
•
•
Encryption algorithm
Hash algorithm
Authentication method
Diffie-Hellman group
As soon as the IKE SA negotiation is complete, the established SA is bidirectional.
IPSec’s function is to establish security associations between two IPSec peers. The security associations determine the keying, protocols, and algorithms to be used between the peers. IPSec SAs can be established only as unidirectional. Two primary security protocols are included as part of the IPSec standard supported by the PIX:
•Encapsulating Security Payload (ESP)—ESP provides data authentication, encryption, and antireplay services. ESP is protocol number 50 assigned by the Internet Assigned Numbers Authority (IANA). ESP is primarily responsible for getting the data from the source to the destination in a secure manner, verifying that the data has not been altered and ensuring that the session cannot be hijacked. ESP can also be used to authenticate the sender, either by itself or in conjunction with AH. ESP can be configured to encrypt the entire data packet or only the packet’s payload. Figure 10-3 shows how ESP encapsulates the IPv4 packet, which portions are encrypted, and which are authenticated.
Figure 10-3 ESP Encapsulation
IPV4 Packet without ESP Encapsulation
Original IP Header |
TCP |
Data |
|
|
|
IPV4 Packet with ESP Encapsulation
Original IP Header |
ESP |
TCP |
Data |
ESP |
ESP |
|
Header |
Trailer |
Authentication |
||||
|
|
|
||||
|
|
|
|
|
|
Encrypted
Authenticated

Overview of VPN Technologies 163
•Authentication Header (AH)—AH provides data authentication and antireplay services. AH is protocol number 51 assigned by the IANA. The primary function of AH is origin authentication. AH does not provide any data encryption. It provides only origin authentication or verifies that the data is from the sender. This functionality also prevents session hijacking. Figure 10-4 shows how AH is inserted into the IPv4 packet.
Figure 10-4 AH Insertion into the IPv4 Packet
IPV4 Packet without Authentication Header
Original IP Header |
TCP |
Data |
|
|
|
IPV4 Packet with Authentication Header
Original IP Header Authentication TCP Data
Header
It is important to note that ESP authenticates only the payload, and AH authenticates the IP header. You might want to use both ESP and AH if you use NAT for any of your IPSec traffic.
Both ESP and AH must be configured to use a specific encryption algorithm and hash algorithms. An encryption algorithm is the mathematical algorithm used to encrypt and decrypt the data. The hash algorithm is used to ensure data integrity.
NOTE The Cisco PIX Firewall requires an activation key (license) to implement the IPSec features.

164 Chapter 10: Virtual Private Networks
The encryption algorithms supported on the PIX are as follows:
•Data Encryption Standard (DES)—DES is a 56-bit symmetric encryption algorithm. Although it is still widely used, DES is somewhat outdated and should not be used if your data is highly sensitive. It is commonly used for VPN connections to locations outside the U.S. that cannot purchase higher levels of encryption due to U.S. technology export policies.
•Triple Data Encryption Standard (3DES)—3DES is a 168-bit symmetric encryption algorithm.
A hash algorithm takes a message as input and creates a fixed-length output called the message digest. The message digest is put into the digital signature algorithm, which generates or verifies the signature for the message. Signing the message digest rather than the actual message usually improves the message’s processing, because the message digest is smaller than the message. The same hash algorithm must be used by the message’s originator and verifier. The Cisco PIX Firewall supports the Keyed-Hash Message Authentication Code (HMAC) variant of the following hash algorithms:
•Secure Hash Algorithm 1 (SHA-1)—The output of SHA-1 is 160-bit. Because the output is larger than MD5, SHA-1 is considered more secure.
•Message Digest 5 (MD5)—The output of MD5 is 128-bit. MD5 is slightly faster to process because of its smaller message digest.
Internet Key Exchange (IKE)
IKE is the protocol that is responsible for negotiation. IKE is the short name for ISAKMP/ Oakley, which stands for Internet Security Association and Key Management Protocol (with Oakley distribution). The terms IKE and ISAKMP are used interchangeably throughout this chapter. IKE operates over UDP port 500 and negotiates the key exchange between peers to establish the SA. This process requires that the IPSec systems first authenticate themselves to each other and establish ISAKMP (IKE) shared keys. This negotiation is called phase 1 negotiation, and it is during this phase that the Diffie-Hellman key agreement is performed. During phase 1, IKE creates the IKE security association, which is a secure channel between the two IKE peers. IKE authenticates the peer and the IKE messages between the peers during IKE phase 1. Phase 1 consists of main mode or aggressive mode.
A main-mode negotiation consists of six message exchanges:
•The first two messages simply negotiate the exchange policy.
•The second two messages exchange Diffie-Hellman public-key values and an 8- to 256-bit nonce.
•The last two messages authenticate the key exchange.

Overview of VPN Technologies 165
In an aggressive-mode exchange:
•The first two messages negotiate policy, exchange public-key values, and authenticate the responder.
•The third message authenticates the initiator and is normally postponed until the negotiation is complete and is not sent as clear text.
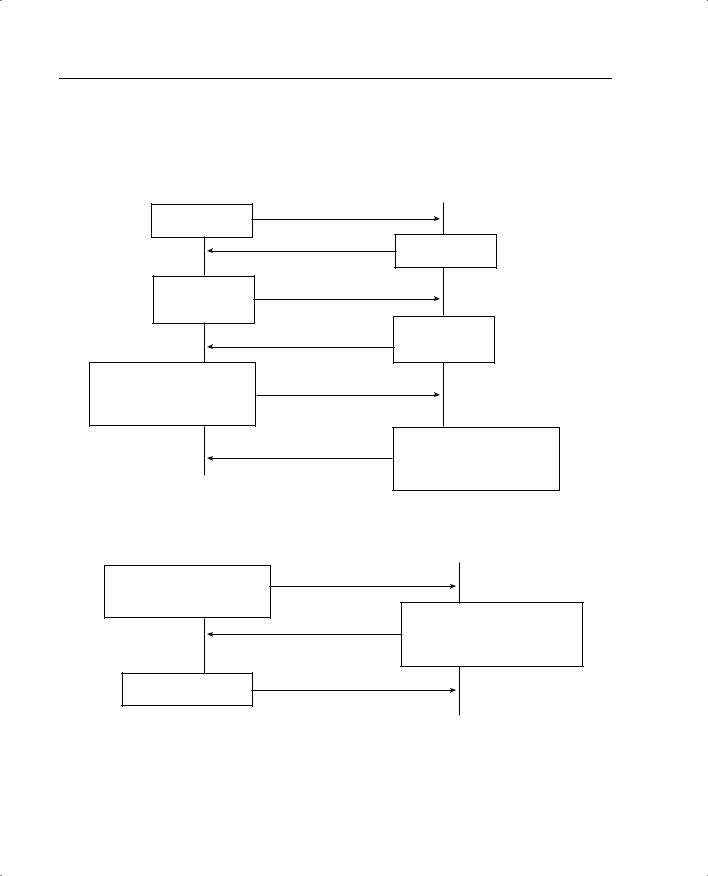
Figure 10-5 shows main-mode and aggressive-mode key exchanges.
NOTE |
Diffie-Hellman is a public-key cryptography protocol that is used between two IPSec peers |
|
to derive a shared secret over an unsecured channel without transmitting it to each other. |
|
Please change this sentance to read: There are two Diffie-Hellman groups supported by the |
|
PIX Firewall: Group 1 is 768-bit, and group 2 is 1024-bit. Diffie-Hellman is discussed in |
|
greater detail later in this chapter. |
|
|
Peers that want to participate in the IPSec session must authenticate themselves to each other before IKE can proceed. Peer authentication occurs during the main-mode/ aggressive-mode exchange during IKE phase 1. The IKE protocol is very flexible and supports multiple authentication methods as part of the phase 1 exchange. The two entities must agree on a common authentication protocol through a negotiation process. IKE phase 1 has three methods to authenticate IPSec peers in Cisco products:
•Preshared keys—A case-sensitive key value entered into each peer manually and used to authenticate the peer.
•RSA signatures—RSA is a public-key cryptographic system that uses a digital certificate authenticated by an RSA signature.
•RSA encrypted nonces—Uses RSA encryption to encrypt a nonce value (a random number generated by the peer) and other values.
166 Chapter 10: Virtual Private Networks
Figure 10-5 Key Exchanges
Main Mode Key Exchange
Initiator |
Responder |
ISAKMP Header with SA Payload
ISAKMP Header with SA Payload
ISAKMP Header
Key Exchange
Nonce (initiator)
ISAKMP Header
Key Exchange
Nonce (responder)
ISAKMP Header (with payload encryption)
Identification (ISAKMP initiator) HASH Payload (initiator)
ISAKMP Header (with payload encryption)
Identification (ISAKMP responder) HASH Payload (responder)
Aggressive Mode Key Exchange
ISAKMP Header with SA Payload Key Exchange Nonce (initiator) Identification (ISAKMP initiator)
ISAKMP Header
HASH Payload (initiator)
ISAKMP Header with SA Payload Key Exchange Nonce (responder) Identification (ISAKMP responder)
HASH Payload (responder)
Having completed the phase 1 negotiation, IKE provides a secure channel for the completion of phase 2. The phase 2 exchange occurs only after the IKE SA negotiation is

Overview of VPN Technologies 167
complete. It is used to derive keying material and negotiate policies for non-ISAKMP SA (such as the IPSec SA). IKE performs the following functions and provides the following benefits:
•It automatically negotiates the security parameters for SAs between peers, removing the requirement of manually configuring each peer.
•It provides the capability to configure an SA’s lifetime.
•It allows the encryption key to dynamically change while the IPSec session is open.
•It provides antireplay (hijacking) protection to IPSec services.
•It provides dynamic authentication of SA peers.
•It provides support for certification authorities.
•It allows for the scalable implementation of IPSec.
Certification Authorities (CAs)
IKE interoperates with X.509v3 certificates for authentication that requires public keys. Certification authorities (CAs) manage certificate requests, issue digital certificates, and publish certificate revocation lists (CRLs) to list certificates that are no longer valid. A digital certificate contains information about the user or device and includes a copy of its public key. This technology allows IPSec-protected networks to scale, because the peers simply exchange digital certificates that have been authenticated by a certificate authority, removing the requirement to manually configure each IPSec peer. The PIX interoperates with CA server products from the following vendors:
•
•
•
•
Baltimore Technologies
Entrust Corporation
Microsoft Corporation
VeriSign
After ensuring that you have correctly configured the firewall host name, domain name, and the system date/time, you can initiate enrollment with a CA server. It is important that your date and time are correctly configured so that you can verify the validity of the certificate when received. The process that a PIX uses to enroll with a CA server is as follows:
Step 1 The firewall generates an RSA key pair.
Step 2 The firewall contacts the CA server and obtains the CA server’s certificate, which contains the public key.
Step 3 The firewall requests a signed certificate from the CA server using the generated key and the public key from the CA.
Step 4 The CA administrator verifies the request and returns the signed certificate.

168 Chapter 10: Virtual Private Networks
Configuring the PIX Firewall as a VPN Gateway
Configuring the Cisco PIX Firewall as a VPN gateway or VPN termination point is a process that requires four specific tasks:
•
•
•
•
Selecting your configuration
Configuring IKE
Configuring IPSec
Testing and troubleshooting your connection
Selecting Your Configuration
Selecting a standardized configuration is perhaps the most important step in creating a VPN. You need to follow these steps when selecting your configuration:
Step 1 Determine which hosts will participate in this connection and what devices to use as VPN gateways. The Cisco PIX Firewall can create a VPN connection to another PIX, VPN appliances, routers, other thirdparty firewalls, and so on.
Step 2 Gather information about the peers and all hosts and networks that will participate in this VPN.
Step 3 Select which IKE policies (phase 1 and phase 2) to use based on the number and location of the peers.
Step 4 Verify the current configuration of your Cisco PIX Firewall to ensure that you do not select any policies (such as ACLs, ISAKMP policies, or crypto maps) that conflict with the current configuration:
—Ensure that you have connectivity with your peers. If you are unable to connect with a peer in the clear, you will be unable to create an encrypted connection.
—Ensure that perimeter devices such as routers are allowing the traffic required to create and maintain the VPN connection. Most notable are UDP port 500 (used for IKE negotiation), protocol 50 (ESP), and protocol 51 (AH).
It is extremely important to ensure that VPN peers have configurations with matching elements. If both peers are not configured to have compatible VPN components, they will be unable to create the encrypted connection.

Configuring the PIX Firewall as a VPN Gateway 169
Configuring IKE
Remember that IKE is the method used by the peers to negotiate and establish the SA. Determining which IKE configuration to use is not difficult. Most companies have a standard configuration that they employ when creating any VPN connection. If you do not have a pre-established policy, you should select a policy that allows your minimum amount of security to be not less than that required for the most sensitive data to travel across the connection. The following steps are required to configure IKE on a Cisco PIX Firewall:
Step 1 Enable IKE—This is a simple command on the PIX. You turn on IKE by enabling it on a specific interface. The syntax for the command is isakmp enable if_name. For example:
tgpix (config)# isakmp enable outside
Step 2 Create your IKE policies (phase I)—To create the IKE policies, you select certain options and configure them as policies. Again, it is extremely important that both peers are configured in the same manner. Any undefined policies use the current default values. You must make the following choices when creating the policy:
— Authentication method: preshared secret or RSA signature
NOTE You need to configure your SA peer’s preshared secret for each IP address.
—Message encryption algorithm: DES or 3DES
—Message integrity algorithm: SHA-1 or MD5
—Key exchange parameters: Diffie-Hellman group 1 or group 2
—IKE established SA lifetime: the default is 86,400 seconds
The isakmp policy command is a simple command with several options that all must be selected. Table 10-1 describes the isakmp policy command parameters.

170 Chapter 10: Virtual Private Networks
Table 10-1 isakmp policy Command Parameters
Parameter |
Description |
priority |
Allows you to prioritize your ISAKMP policies. Policy priorities |
|
range from 1 to 65,534, with 1 being the highest priority. |
|
|
authentication pre-share |
Specifies that the peer authentication method is the preshared key. |
|
This requires that the preshared key be manually configured on both |
|
peers. |
|
|
authentication rsa-sig |
Specifies that the peer authentication method is RSA signatures. This |
|
method allows peer authentication to be completed automatically and |
|
is a more scalable solution. This is the default setting. |
|
|
encryption des |
Specifies that the encryption algorithm is DES. This is the default |
|
setting. |
|
|
encryption 3des |
Specifies that the encryption algorithm is 3DES. |
|
|
group 1 |
Specifies that Diffie-Hellman group 1 (768-bit) is used. This is the |
|
default setting. |
|
|
group 2 |
Specifies that Diffie-Hellman group 2 (1024-bit) is used. |
|
|
hash md5 |
Specifies that the MD5 hash algorithm is used. |
|
|
hash sha |
Specifies that the SHA-1 hash algorithm is used. This is the default |
|
setting. |
|
|
lifetime |
Specifies the SA’s lifetime. The range is from 60 to 86,400 seconds. |
|
The default setting is 86,400. |
|
|
For example, to configure ISAKMP policies configured for VPN peers, you would have a configuration similar to this:
LOCAL PIX FIREWALL>>>>>>>>>>>
tgpix (config)# isakmp policy 10 authentication pre-share tgpix (config)# isakmp policy 10 encryption 3des
tgpix (config)# isakmp policy 10 group 2 tgpix (config)# isakmp policy 10 hash md5
tgpix (config)# isakmp policy 10 lifetime 86400 tgpix (config)# isakmp enable outside
REMOTE PIX FIREWALL>>>>>>>>>>
gonderpix (config)# isakmp policy 10 authentication pre-share gonderpix (config)# isakmp policy 10 encryption 3des gonderpix (config)# isakmp policy 10 group 2
gonderpix (config)# isakmp policy 10 hash md5 gonderpix (config)# isakmp policy 10 lifetime 86400 gonderpix (config)# isakmp enable outside
Configuring the PIX Firewall as a VPN Gateway 171
Note that the policies are the same on both peers.
Step 3 Configuring the preshared key—It is possible to configure the same preshared key for all your SAs. This method is not recommended, because it is more secure to specify a different key for each SA. To configure the preshared key, you need to determine how the peers identify themselves. SA peers can identify themselves by IP address or host name. It is recommended that you use the same method of identification for all SAs. If you choose to identify the peers by host name, the negotiations could fail if a DNS issue prevents the host name from resolving correctly. Here is the command for configuring identification:
isakmp identity (address | hostname)
Here is the command for configuring the preshared key:
isakmp key string address | hostname peer-address netmask peer netmask |
hostname
NOTE You can configure your preshared key with a wildcard IP address and netmask, but this is not recommended and could be considered a security risk.
To configure ISAKMP policies for both Cisco PIX Firewalls with the ISAKMP identities and isakmp key commands added, you would have a configuration similar to this:
LOCAL PIX FIREWALL>>>>>>>>>>>
tgpix (config)# isakmp policy 10 authentication pre-share tgpix (config)# isakmp policy 10 encryption 3des
tgpix (config)# isakmp policy 10 group 2 tgpix (config)# isakmp policy 10 hash md5
tgpix (config)# isakmp policy 10 lifetime 86400 tgpix (config)# isakmp enable outside
tgpix (config)# isakmp identity address
tgpix (config)# isakmp key abc123 192.168.1.2 netmask 255.255.255.255
REMOTE PIX FIREWALL>>>>>>>>>>
gonderpix (config)# isakmp policy 10 authentication pre-share gonderpix (config)# isakmp policy 10 encryption 3des gonderpix (config)# isakmp policy 10 group 2
gonderpix (config)# isakmp policy 10 hash md5 gonderpix (config)# isakmp policy 10 lifetime 86400 gonderpix (config)# isakmp enable outside gonderpix (config)# isakmp identity address
gonderpix (config)# isakmp key abc123 192.168.1.1 netmask 255.255.255.255

172 Chapter 10: Virtual Private Networks
Step 4 Verify your configuration—Because of the configurations’ complexity, it is a good idea to verify your configuration. Remember that both peers must have an exactly matched phase 1 policy for the key exchange to occur, which is the first step in establishing the VPN connection. As always, the show command is a very effective tool for checking your configuration. It is possible to get extended output with show isakmp policy, or you can see the commands that were input with show isakmp. You get slightly more detailed output with write terminal than with show isakmp. Here is some sample output from show isakmp:
tgpix# show isakmp
isakmp policy 10 authentication pre-share isakmp policy 10 encryption 3des
isakmp policy 10 group 2 isakmp policy 10 hash md5
isakmp policy 10 lifetime 86400 isakmp enable outside
You can see that policy 10 uses preshared secrets for authentication, 3DES encryption, the group 2 (1024-bit) Diffie-Hellman key exchange, MD5 HASH, and a connection lifetime of 86,400 seconds (24 hours), and it is enabled on the outside interface.
Here is some sample output from write terminal:
tgpix# write terminal
isakmp policy 10 authentication pre-share isakmp policy 10 encryption 3des
isakmp policy 10 group 2 isakmp policy 10 hash md5
isakmp policy 10 lifetime 86400 isakmp enable outside
isakmp key abc123 192.168.1.2 netmask 255.255.255.255
Here you see much the same information as with show isakmp, but you also see the shared secret (isakmp key) for peer 192.168.1.2.
Here is some sample output from show isakmp policy:
tgpix# show isakmp policy
Protection suite or priority 10
encryption algorithm: |
Three key triple DES |
|
hash algorithm: |
|
Message Digest 5 |
authentication |
method: |
Pre-Shared Key |
Diffie-Hellman |
group: |
#2 (1024 bit) |
lifetime: |
86400 seconds, no volume limit |
|
Default protection |
suite |
|
encryption algorithm: |
DES - Data Encryption Standard (56-bit keys) |
|

Configuring the PIX Firewall as a VPN Gateway 173
hash algorithm: |
|
Secure Hash |
Standard |
authentication method: |
Rivest-Shamir-Adleman Signature |
||
Diffie-Hellman group: |
#1 (768 bit) |
||
lifetime: |
86400 |
seconds, no |
volume limit |
In this output, you can see the two ISAKMP policies that are configured on the firewall (policy 10 and default). If you do not configure a specific ISAKMP policy, the default values are used.
Configuring IPSec
Now that you have successfully configured IKE on your firewall, you are ready to configure IPSec. Follow these steps:
Step 1 Create a crypto access list to define the traffic to protect.
Step 2 Configure a transform set that defines how the traffic is protected.
Step 3 Create a crypto map entry.
Step 4 Apply the crypto map set to an interface.
Step 5 Specify that IPSec traffic is permitted.
Creating a Crypto Access List
Crypto access lists are used to identify which IP traffic is to be protected by encryption and which traffic is not. After the access list is defined, the crypto maps reference it to identify the type of traffic that IPSec protects. The permit keyword in the access list causes IPSec to protect all IP traffic that matches the access list criteria. If the deny keyword is used in the access list, the traffic is not encrypted. It is good practice to have the same set of crypto access lists specified in the local peer defined at the remote peer. This ensures that traffic that has IPSec protection applied locally can be processed correctly at the remote peer. The crypto map entries themselves should also support common transforms and should refer to the other system as a peer.
It is not recommended that you use the permit any any command, because it causes all outbound traffic to be encrypted (and all encrypted traffic to be sent to the peer specified in the corresponding crypto map entry), and it requires encryption of all inbound traffic. With this type of access list, the firewall drops all inbound packets that are not encrypted.
The syntax for the access-list command is as follows:
access-list acl_name [permit | deny] protocol src_addr src_mask [operator port[port]] dest_addr dest_mask [operator port[port]]

174 Chapter 10: Virtual Private Networks
Table 10-2 lists and describes the command arguments and options for the access-list command.
Table 10-2 access-list Command Parameters
Parameter |
Description |
acl_name |
Specifies the access list’s name or number. |
|
|
permit |
Encrypts the packet. |
|
|
deny |
Does not encrypt the packet. |
|
|
protocol |
Specifies the protocol by name or IP protocol number. Protocols include |
|
icmp, tcp, udp, and ip. (ip is the keyword for any.) |
|
|
src_addr, |
Specifies the IP address of the network or host for the source and destination. |
dest_addr |
The term any is the wildcard for 0.0.0.0 0.0.0.0. It is also possible to use the |
|
word host to indicate a 32-bit mask. |
|
|
src_mask, |
Specifies the subnet masks of the source or destination network. |
dest_mask |
|
|
|
operator |
An optional field. It includes the following options: |
|
lt = less than |
|
gt = greater than |
|
eq = equal to |
|
neq = not equal to |
|
range = inclusive range |
|
|
port |
Specifies the TCP or UDP port used for the IP service. |
|
|
NOTE The configuration examples in this chapter build on each other (they include the previous portion). The specific items that are being addressed as part of the current configuration are highlighted.
Example 10-1 shows the current ISAKMP policy configuration with the access list added.
Example 10-1 Crypto Access List
tgpix (config)# isakmp policy 10 authentication pre-share tgpix (config)# isakmp policy 10 encryption 3des
tgpix (config)# isakmp policy 10 group 2 tgpix (config)# isakmp policy 10 hash md5
tgpix (config)# isakmp policy 10 lifetime 86400 tgpix (config)# isakmp enable outside
tgpix (config)# isakmp identity address
tgpix (config)# isakmp key abc123 192.168.1.2 netmask 255.255.255.255
tgpix (config)# access-list 90 permit ip 10.10.10.0 255.255.2550.0 10.10.20.0 255.255.255.0

Configuring the PIX Firewall as a VPN Gateway 175
Configuring a Transform Set
A transform set defines the combination of encryption algorithms and message integrity algorithms to be used for the IPSec tunnel. Both peers agree on the transform set during the IPSec negotiation. It is possible to define multiple transform sets, because both peers search for a common transform set during the IKE negotiation. If a common transform set is found, it is selected and applied to the protected traffic. Table 10-3 shows the transform sets supported on the Cisco PIX Firewall.
Table 10-3 PIX-Supported IPSec Transform Sets
Transform |
Description |
ah-md5-hmac |
AH-md5-hmac transform used for authentication. |
|
|
ah-sha-hmac |
AH-sha-hmac transform used for authentication. |
|
|
esp-des |
ESP transform using DES encryption (56-bit). |
|
|
esp-3des |
ESP transform using 3DES encryption (168-bit). |
|
|
esp-md5-hmac |
ESP transform with HMAC-MD5 authentication, used with either esp-des or |
|
esp-3des to provide additional integrity of ESP packets. |
|
|
esp-sha-hmac |
ESP transform with HMAC-SHA authentication, used with either esp-des or |
|
esp-3des to provide additional integrity of ESP packets. |
|
|
The syntax for the transform-set command is as follows:
crypto ipsec transform-set transform-set name transform1 [transform2 transform3]
Example 10-2 shows the current ISAKMP policy configuration with the access list and transform set defined.
Example 10-2 Crypto Transform Set
tgpix (config)# isakmp policy 10 authentication pre-share tgpix (config)# isakmp policy 10 encryption 3des
tgpix (config)# isakmp policy 10 group 2 tgpix (config)# isakmp policy 10 hash md5
tgpix (config)# isakmp policy 10 lifetime 86400 tgpix (config)# isakmp enable outside
tgpix (config)# isakmp identity address
tgpix (config)# isakmp key abc123 address 192.168.1.2 netmask 255.255.255.255 tgpix (config)# access-list 90 permit ip 10.10.10.0 255.255.2550.0 10.10.20.0
255.255.255.0
tgpix (config)# crypto ipsec transform-set strong esp-3des esp-md5-hmac
Configuring IPSec SA Lifetimes
To preclude any opportunity to gather sufficient network traffic using a single encryption key, it is important to limit the key lifetime. This forces a key exchange, changing the encryption scheme and greatly reducing the possibility of cracking the key. Technology continues to advance, producing computers that can break code at faster rates. However,

176 Chapter 10: Virtual Private Networks
these systems require a certain amount of traffic encrypted under a single key. The idea is to change encryption keys before any system can feasibly crack your encryption. The PIX allows you to configure your SA lifetimes, forcing a key exchange. It is possible to limit the SA lifetime either by the amount of traffic passing through the connection or by how long the encrypted connection remains open. The command for configuring SA lifetimes is as follows:
crypto ipsec security-association lifetime [kilobytes | seconds]
Example 10-3 shows the current configuration, including an SA lifetime of 15 minutes (900 seconds).
Example 10-3 Crypto IPSec SA Lifetime
tgpix (config)# isakmp policy 10 authentication pre-share tgpix (config)# isakmp policy 10 encryption 3des
tgpix (config)# isakmp policy 10 group 2 tgpix (config)# isakmp policy 10 hash md5
tgpix (config)# isakmp policy 10 lifetime 86400 tgpix (config)# isakmp enable outside
tgpix (config)# isakmp identity address
tgpix (config)# isakmp key abc123 address 192.168.1.2 netmask 255.255.255.255 tgpix (config)# access-list 90 permit ip 10.10.10.0 255.255.2550.0 10.10.20.0
255.255.255.0
tgpix (config)# crypto ipsec transform-set strong esp-3des esp-md5-hmac tgpix (config)# crypto ipsec security-association lifetime seconds 900
Configuring Crypto Maps
Just as the isakmp-policy configures the parameters for the IKE negotiations, cryptomaps tell the PIX how to negotiate the IPSec SA. The crypto-map is the final piece of the puzzle that is used on both peers to establish the SA. Again, it is extremely important that the settings are compatible on both ends. If both peers do not have a compatible configuration, they cannot establish the VPN connection. This does not mean that the configuration must be an exact match (like the isakmp configurations), but the peers must have matching elements within the crypto-map. Many different components are covered by the cryptomap command. The following parameters are set using this command:
•What traffic is to be encrypted and what traffic is not?—Earlier in this chapter, the access-list command was said to designate what traffic the PIX should encrypt. This is correct; however, the access list is applied by the crypto-map.
•What type of IPSec to apply to the connection?—The crypto-map tells the firewall which transform set to use.
•How the SA is to be initially established?—This tells the firewall if the SA is manually established or established using IKE.

Configuring the PIX Firewall as a VPN Gateway 177
•Who is the peer for this SA?—This can be one or more peers. You can configure a primary peer and backup peers. In the event that the firewall cannot establish the connection with the primary peer, it attempts to connect to the secondary, and so on. These additional peers are called backup gateways.
•What is the SA’s local address?—The crypto map is applied to a specific interface on the PIX.
•Any additional options that should be configured for this SA?—This can include setting a specific timeout in kilobytes or adding a AAA server.
Three steps are required for configuring crypto maps:
Step 1 Creating a crypto map entry
Step 2 Applying the crypto map set to an interface
Step 3 Specifying that IPSec traffic be permitted
It is important that you ensure that all three steps are completed. Although each line of the crypto map is considered “creating the crypto map,” specific lines apply the crypto map and specify the IPSec traffic. These lines are discussed next.
Normally you have at least five crypto-map entries with the same name. These entries combine to list your IPSec SA configuration. Each line of the configuration has its own purpose. The following text shows and explains the syntax of each line.
crypto-map map-name seq-num ipsec-isakmp
This line establishes the crypto map by name and sequence number and specifies that IKE negotiates the SA.
crypto-map map-name seq-num match address acl_name
This line binds the access list to the crypto map. It establishes what traffic is encrypted and what is not. This line specifies which IPSec traffic is permitted. It defines the traffic as “interesting.”
crypto-map map-name seq-num set transform-set transform-set name
This line identifies which transform set is to be used. The transform-set name is assigned to the transform set in the crypto ipsec transform-set command.
crypto-map map-name seq-num set peer ip-address
This line identifies the SA peer by IP address.
crypto-map map-name seq-num interface if_name
This line applies the crypto map to a specific interface. In much the same way that the access-group command is used to bind the access lists to an interface for standard ACLs, this command binds the entire crypto map process (including the crypto access list) to the interface. This line applies the crypto map set to a specific interface on the firewall.
Additional crypto-map entries can include pfs, set security-association lifetime, and aaaauthentication settings.

178 Chapter 10: Virtual Private Networks
Example 10-4 shows the current configuration, including the crypto map entries. Note that the access list is numbered 90 and the match address command references 90. The ipsec transform-set is named strong, and the set transform-set references the name strong.
Example 10-4 Crypto Map Entries
tgpix (config)# isakmp policy 10 authentication pre-share tgpix (config)# isakmp policy 10 encryption 3des
tgpix (config)# isakmp policy 10 group 2 tgpix (config)# isakmp policy 10 hash md5
tgpix (config)# isakmp policy 10 lifetime 86400 tgpix (config)# isakmp enable outside
tgpix (config)# isakmp identity address
tgpix (config)# isakmp key abc123 address 192.168.1.2 netmask 255.255.255.255 tgpix (config)# access-list 90 permit ip 10.10.10.0 255.255.2550.0 10.10.20.0
255.255.255.0
tgpix (config)# crypto ipsec transform-set strong esp-3des esp-md5-hmac tgpix (config)# crypto map gonder 10 ipsec-isakmp
tgpix (config)# crypto map gonder 10 match address 90
tgpix (config)# crypto map gonder 10 set transform-set strong tgpix (config)# crypto map gonder 10 set peer 192.168.1.2 tgpix (config)# crypto map gonder interface outside
Table 10-4 describes the different crypto-map command arguments and options that are available when you’re configuring crypto maps.
Table 10-4 crypto-map Arguments and Options
Argument/Option |
Description |
map-name |
You can apply multiple crypto-maps on a single PIX Firewall. It is a |
|
good idea to assign a name that allows you to keep track of which |
|
crypto-map goes with which access-list. The easiest way to do this is |
|
to use the same name or number for both components. |
|
|
seq-num |
Because you can add multiple crypto-maps to the PIX, you must give |
|
each a sequence number so that the system can process each in the |
|
correct order. The lower the number, the higher the priority. |
|
|
ipsec-isakmp |
Indicates that the PIX uses IKE to negotiate the SA. This is the |
|
recommended configuration. |
|
|
ipsec-manual |
Indicates that the SA is configured manually and that IKE is not used to |
|
negotiate it. This is not the recommended configuration, because it is |
|
difficult to ensure that both peers are configured correctly and because a |
|
manual session does not expire (no renegotiation of the keys). |
|
|
set session-key |
Manually specifies the session keys within the crypto map entry. |
|
|
inbound |
Manual IPSec requires that session keys be configured directionally. |
|
You must specify both inbound and outbound session keys. |
|
|
outbound |
Manual IPSec requires that session keys be configured directionally. |
|
You must specify both inbound and outbound session keys. |
|
|

Configuring the PIX Firewall as a VPN Gateway 179
Table 10-4 crypto-map Arguments and Options (Continued)
Argument/Option |
Description |
match address |
Identifies the access list for the IPSec SA. |
|
|
acl_name |
The name of the access list that indicates that the traffic should be |
|
encrypted. |
|
|
set peer |
Specifies the SA peer using either of the following two arguments. |
|
|
hostname |
Identifies the SA peer’s host name and any backup gateways. |
|
|
ip-address |
Identifies the SA peer’s IP address(es) and any backup gateways. |
|
|
interface |
Identifies the interface that is to be used for the local SA peer address. |
|
|
if_name |
The interface name. |
|
|
set pfs |
Initiates Perfect Forward Secrecy (PFS). PFS provides an additional |
|
layer of security to the SA negotiation and renegotiation. It requires that |
|
a new Diffie-Hellman exchange occur every time a key negotiation |
|
takes place. This causes the key exchange to use a new key for every |
|
negotiation rather than renegotiating based on a key that is currently |
|
being used. This process increases the processor load on both peers. |
|
|
group 1 |
Indicates that the Diffie-Hellman group 1 (768-bit) modulus should be |
|
used when the key exchange for the esp-des and esp-3des transforms is |
|
performed. |
|
|
group 2 |
Indicates that the Diffie-Hellman group 2 (1024-bit) modulus should be |
|
used when the key exchange for the esp-des and esp-3des transforms is |
|
performed. |
|
|
set transform-set |
Specifies the transform to be used for the crypto-map entry. You can |
|
list multiple transform-sets by priority. The PIX automatically selects |
|
the most secure transform that is listed on both peers. |
|
|
transform-set name |
Specifies the transform-set by name. |
|
|
set security- |
A second location for configuring the SA lifetime. |
association lifetime |
|
|
|
seconds seconds |
The SA lifetime in seconds. |
|
|
kilobytes kilobytes |
The SA lifetime in kilobytes. |
|
|
dynamic |
Specifies that the crypto-map entry must reference a preexisting |
|
dynamic crypto map. |
|
|
dynamic-map-name |
Specifies the dynamic crypto-map. |
|
|
aaa-server-name |
Specifies the AAA server that authenticates the user during IKE |
|
authentication. The PIX Firewall supports TACACS+ and RADIUS for |
|
this function. |
|
|

180 Chapter 10: Virtual Private Networks
sysopt connection permit-ipsec
The sysopt command reconfigures the system options. The command sysopt connection permit-ipsec implicitly permits all packets that arrive via the IPSec tunnel to bypass any checking of access lists, conduits, or access-group command statements for IPSec connections. If the sysopt connection permit-ipsec command is not specified, an explicit rule (conduit or ACL) must be coded to allow the traffic arriving from the IPSec tunnel through the firewall.
Example 10-5 shows the current configuration with this command included.
Example 10-5 sysopt connection permit-ipsec
tgpix (config)# isakmp policy 10 authentication pre-share tgpix (config)# isakmp policy 10 encryption 3des
tgpix (config)# isakmp policy 10 group 2 tgpix (config)# isakmp policy 10 hash md5
tgpix (config)# isakmp policy 10 lifetime 86400 tgpix (config)# isakmp enable outside
tgpix (config)# isakmp identity address
tgpix (config)# isakmp key abc123 address 192.168.1.2 netmask 255.255.255.255 tgpix (config)# access-list 90 permit ip 10.10.10.0 255.255.2550.0 10.10.20.0
255.255.255.0
tgpix (config)# crypto ipsec transform-set strong esp-3des esp-md5-hmac tgpix (config)# crypto map gonder 10 ipsec-isakmp
tgpix (config)# crypto map gonder 10 match address 90
tgpix (config)# crypto map gonder 10 set transform-set strong tgpix (config)# crypto map gonder 10 set peer 192.168.1.2 tgpix (config)# crypto map gonder interface outside
tgpix (config)# sysopt connection permit-ipsec
Troubleshooting Your VPN Connection
Configuring an SA peer can be extremely complicated and must be exact. If both peers are not configured correctly, they cannot successfully establish the VPN connection. The most common VPN issue is an incorrect configuration of either of the SA peers. The first step of troubleshooting a VPN should always be to compare the configurations of both peers and verify that they match. Three commands and a variety of command options are available to help you troubleshoot VPN issues:
•show
•clear
•debug
Configuring the PIX Firewall as a VPN Gateway 181
show Command
The show command lets you view different portions of the configuration and see the condition of ISAKMP and IPSec SAs. Table 10-5 explains the different show commands.
Table 10-5 show Commands
Command |
Description |
show isakmp |
Displays all ISAKMP configurations. |
|
|
show isakmp policy |
Displays only configured ISAKMP policies. |
|
|
show access-list |
Displays configured access lists. |
|
|
show crypto-map |
Displays all configured crypto map entries. |
|
|
show crypto ipsec transform-set |
Displays all configured IPSec transform sets. |
|
|
show crypto ipsec security-association |
Displays configured SA lifetimes, including the |
lifetime |
default value. |
|
|
show crypto isakmp sa |
Displays the status of current IKE SAs. |
|
|
show crypto ipsec sa |
Displays the status of current IPSec SAs. |
|
|
Example 10-6 displays the output from the show crypto isakmp sa command on the PIX Firewall in Los Angeles that is configured for a VPN connection to Boston.
Example 10-6 show crypto isakmp sa Command Output
tgpix# show crypto isakmp sa |
|
|
||
dst |
src |
state |
conn-id |
slot |
192.168.2.1 |
192.168.1.1 |
QM_IDLE |
1 |
0 |
|
|
|
|
|
Example 10-7 displays the output from show crypto ipsec sa for the same firewall.
Example 10-7 show crypto ipsec sa Command Output
tgpix# show crypto ipsec sa interface: outside
Crypto map tag: 10, local addr. 192.168.1.1
local ident (addr/mask/prot/port): (10.10.10.0/255.255.255.0/0/0) remote ident (addr/mask/prot/port): (192.168.2.1/255.255.255.255/0/0) current_peer: 10.10.2.5
dynamic allocated peer ip: 192.168.2.1 PERMIT, flags={}
#pkts encaps: 345, #pkts encrypt: 345, #pkts digest 0 #pkts decaps: 366, #pkts decrypt: 366, #pkts verify 0 #pkts compressed: 0, #pkts decompressed: 0
#pkts not compressed: 0, #pkts compr. failed: 0, #pkts decompress failed: 0 #send errors 0, #recv errors 0
local crypto endpt.: 192.168.1.1, remote crypto endpt.: 192.168.2.1 path mtu 1500, ipsec overhead 56, media mtu 1500
current outbound spi: 9a46ecae inbound esp sas:
continues

182 Chapter 10: Virtual Private Networks
Example 10-7 show crypto ipsec sa Command Output (Continued)
spi: 0x50b98b5(84646069)
transform: esp-3des esp-md5-hmac , in use settings ={Tunnel, }
slot: 0, conn id: 1, crypto map: Chapter10
sa timing: remaining key lifetime (k/sec): (460800/21) IV size: 8 bytes
replay detection support: Y inbound ah sas:
inbound pcp sas: outbound esp sas:
spi: 0x9a46ecae(2588339374) transform: esp-3des esp-md5-hmac , in use settings ={Tunnel, }
slot: 0, conn id: 2, crypto map: Chapter10
sa timing: remaining key lifetime (k/sec): (460800/21) IV size: 8 bytes
replay detection support: Y outbound ah sas:
clear Command
The clear command allows you to remove current settings. You must be very careful when using the clear command to ensure that you do not remove portions of your configuration that are needed. The most common use of the clear command for troubleshooting VPN connectivity is to clear current sessions and force them to regenerate. Table 10-6 explains the two clear commands used to troubleshoot VPN connectivity.
Table 10-6 clear Commands
Command |
Description |
clear crypto isakmp sa Clears all active ISAKMP SAs.
clear crypto ipsec sa |
Clears all active IPSec SAs. |
debug Command
The debug command lets you watch the VPN negotiation take place. This command is available only from configuration mode on the PIX. Table 10-7 explains the two debug commands most commonly used to troubleshoot VPN connectivity.
Table 10-7 debug Commands
Command |
Description |
debug crypto isakmp |
Displays IKE communication between the PIX and its IPSec peers. |
|
|
debug crypto ipsec |
Displays IPSec communication between the PIX and its IPSec |
|
peers. |
|
|

Configuring the PIX Firewall as a VPN Gateway 183
Example 10-8 displays the output from the debug crypto isakmp command on the PIX Firewall in Los Angeles that is configured for a VPN connection to Boston. Note the highlighted comments “atts are not acceptable” and “atts are acceptable” that are generated during the negotiation as address transforms attempt to find a match.
Example 10-8 debug crypto isakmp Command Output
crypto_isakmp_process_block: src 192.168.1.1, dest 192.168.2.1 OAK_AG exchange
ISAKMP (0): processing SA payload. message ID = 0
ISAKMP (0): Checking ISAKMP transform 1 against priority 1 policy
ISAKMP: |
encryption DES-CBC |
ISAKMP: |
hash MD5 |
ISAKMP: |
default group 1 |
ISAKMP: |
auth pre-share |
ISAKMP (0): atts are not acceptable. Next payload is 3
ISAKMP (0): Checking ISAKMP transform 3 against priority 1 policy
ISAKMP: |
encryption ESP_3DES |
ISAKMP: |
hash HMAC-MD5 |
ISAKMP: |
default group 2 |
ISAKMP: |
auth pre-share |
ISAKMP (0): atts are acceptable. Next payload is 3 ISAKMP (0): processing KE payload. message ID = 0 ISAKMP: Created a peer node for 192.168.2.1
OAK_QM exchange
ISAKMP (0:0): Need config/address
ISAKMP (0:0): initiating peer config to 192.168.2.1. ID = 2607270170 (0x9b67c91a) return status is IKMP_NO_ERROR
crypto_isakmp_process_block: src 192.168.2.1, dest 192.168.1.1 ISAKMP_TRANSACTION exchange
ISAKMP (0:0): processing transaction payload from 192.168.2.1. message ID = 2156506360
ISAKMP: Config payload CFG_ACK
ISAKMP (0:0): peer accepted the address! ISAKMP (0:0): processing saved QM. oakley_process_quick_mode:
OAK_QM_IDLE
ISAKMP (0): processing SA payload. message ID = 448324052 ISAKMP : Checking IPSec proposal 1
ISAKMP: transform 1, ESP_DES
ISAKMP: |
attributes in transform: |
ISAKMP: |
authenticator is HMAC-MD5 |
ISAKMP: |
encaps is 1 |
IPSec(validate_proposal): transform proposal (prot 3, trans 2, hmac_alg 1) not supported
ISAKMP (0): atts not |
acceptable. Next payload is 0 |
|
ISAKMP : Checking IPSec proposal 2 |
||
ISAKMP: transform 1, |
ESP_3DES |
|
ISAKMP: |
attributes |
in transform: |
ISAKMP: |
authenticator is HMAC-MD5 |
|
ISAKMP: |
encaps is 1 |
|
ISAKMP (0): atts are acceptable. |
|
|
|||
ISAKMP (0): processing NONCE payload. message |
ID = 448324052 |
||||
ISAKMP |
(0): processing |
ID |
payload. message ID |
= |
44 |
ISAKMP |
(0): processing |
ID |
payload. message ID |
= |
44 |
INITIAL_CONTACTIPSec(key_engine): got a queue |
event... |
||||