

Address Translation 71
6Any packets that do not match the session object exactly are dropped and logged.
7The source completes the connection by responding with an ACK. The acknowledgment number is not randomized as it passes through the PIX, and the connection slot is marked as active-established.
8The embryonic counter is reset, and data is transmitted between the nodes.
The process used by the PIX to handle UDP traffic is completely different from the process for TCP traffic. This is due to UDP’s characteristics. UDP is a connectionless protocol that does not negotiate a connection. Without any setup or termination, it is very difficult to determine the state of a UDP session. Because of the inability to determine session state, it is very easy to spoof UDP packets and hijack a UDP session. Some applications use UDP rather than TCP for data transfer. Many of these are real-time applications or applications that have no reliability requirements. These applications include network video applications, Common Internet File System (CIFS), NetBIOS Domain Name System (DNS), and remote procedure call (RPC).
The default security policy allows UDP packets to pass from a higher security level to a lower security level. For UDP packets to pass in the other direction, they must be allowed by the security policy. It is very important to restrict inbound UDP access as much as possible. Due to UDP’s limitations, many applications that operate over UDP are targets for exploitation by hackers.
The Cisco PIX Firewall handles UDP traffic in the following manner:
1The source machine initiates the UDP connection. It is received by the PIX Firewall en route to the destination. The PIX applies the default rule and any necessary translation, creates a session object in the state table, and allows the connection to pass to the outside interface.
2Any return traffic is matched with the session object, and the session timeout is applied. The session timeout is 2 minutes by default. If the response does not match the session object or is not within the timeout, the packet is dropped. If everything matches, the response is allowed through to the requesting source.
3Any inbound UDP sessions from a lower security level to a higher security level must be allowed by the security policy, or the connection is dropped.
Address Translation
The current Internet Protocol standard being used is version 4 (IPv4). IPv4 consists of 32 bits, which represents approximately 4 billion individual IP addresses. This seems like a tremendous number of addresses, but the Internet continues to grow at an incredible rate, and with the current standard, we will run out of addresses. Two factors are being implemented to help deal with this issue. This first is Internet Protocol version 6 (IPv6). IPv6 is a total redesign of the Internet Protocol and is still in development. The second factor that is being used to conserve the public address space is RFC 1918, which defines address

72 Chapter 5: Understanding Cisco PIX Firewall Translation and Connections
allocation for private internets. RFC 1918 sets aside network space to be used for private networks. This address space is not accessible via the public Internet. The Internet Assigned Numbers Authority (IANA) reserved the following address space for private networks:
10.0.0.0 through 10.255.255.255: 16,777,214 hosts 172.16.0.0 through 172.31.255.255: 1,048,574 hosts 192.168.0.0 through 192.168.255.255: 65,534 hosts
RFC 1918 has had a tremendous impact on Internet addressing and the design of public and private networks. The challenge to RFC 1918 addressing is that private addresses cannot be publicly routed. Hence, address translation is implemented. Not only does address translation provide a method of conserving public address space, it also provides an additional level of protection for internal nodes, because there is no way to route to a private address from the Internet.
Address translation is the method used by the Cisco PIX Firewall to give internal nodes with private IP addresses access to the Internet. The internal node addresses that are translated are called local addresses, and the addresses that are translated to are called global addresses. nat and global commands are applied to specific interfaces. Most commonly, Network Address Translation (NAT) takes place, translating internal addresses to external addresses, although the PIX is not limited to this configuration. It is possible to translate any address at one interface to another address at any other interface. Two types of NAT can be implemented on a Cisco PIX Firewall:
•Dynamic address translation—Translates multiple local addresses into a limited number of global public addresses or possibly a single global address. This is called dynamic address translation because the firewall selects the first available global address and assigns it when creating an outbound connection. The internal source retains the global address for the duration of the connection. Dynamic address translation is broken into two types:
—Network Address Translation (NAT)—Translating multiple local addresses to a pool of global addresses.
—Port Address Translation (PAT)—Translating multiple local addresses to a single global address. This method is called Port Address Translation because the firewall uses a single translated source address but changes the source port to allow multiple connections via a single global address. The limitation for PAT is approximately 64,000 hosts due to the limited number of available ports (65,535) and the number of ports already assigned to specific services. Some applications do not work through PAT because they require specific source and destination ports.
•Static translation—Allows for a one-to-one ratio of local to global addresses. Static translation is commonly used when the internal node must be accessed from the Internet. Web servers and mail servers must have static addresses so that users on the Internet can connect to them via their global address.

Address Translation 73
Translation Commands
Table 5-1 describes the commands and arguments used to configure NAT, PAT, and static translation on a Cisco PIX Firewall. All the PIX commands are covered in much greater detail in Chapter 6. This table helps you understand the syntax of the commands given in the following examples.
Table 5-1 |
Translation Commands |
|
|
|
|
|
Command |
Description |
|
|
|
|
nat |
Associates a network with a pool of global addresses. |
|
|
|
|
global |
Identifies the global addresses to be used for translation. |
|
|
|
|
static |
Maps the one-to-one relationship between local addresses and global |
|
|
addresses. |
|
|
|
|
netmask |
A reserved word that is required to identify the network mask. |
|
|
|
|
dns |
Specifies that DNS replies that match the xlate should be translated. |
|
|
|
|
outside |
Allows you to enable or disable address translation for the external |
|
|
addresses. |
|
|
|
|
timeout |
Sets the idle timeout for the translation slot. |
|
|
|
|
id |
Also called the nat_id. The number that matches the nat statement with |
|
|
the global statement. This is how the PIX determines which local |
|
|
addresses translate to which global address pool. |
|
|
|
|
internal_if_name |
The interface name for the network with the higher security level. |
|
|
|
|
external_if_name |
The interface name for the network with the lower security level. |
|
|
|
|
local_ip |
The IP addresses or network that are to be translated. This can be a specific |
|
|
network segment (10.10.10.0) or can include all addresses (0.0.0.0). |
|
|
|
|
global_ip |
The IP address or range of IP addresses that the local addresses translate |
|
|
to. |
|
|
|
|
network_mask |
The network mask for a specific network segment. This applies to both |
|
|
local and global addresses. |
|
|
|
|
max_cons |
The maximum number of concurrent connections allowed through a static |
|
|
translation. |
|
|
|
|
em_limit |
The maximum number of allowed embryonic connections. The default is |
|
|
0, which allows unlimited connections. You can limit the number of |
|
|
embryonic connections to reduce an attack’s effectiveness by flooding |
|
|
embryonic connections. |
|
|
|
|
norandomseq |
This option stops the ASA from randomizing the TCP sequence numbers. |
|
|
This normally is used if the firewall is located inside another firewall and |
|
|
data is being scrambled, with both firewalls randomizing the sequence |
|
|
number. |
|
|
|

74 Chapter 5: Understanding Cisco PIX Firewall Translation and Connections
Network Address Translation
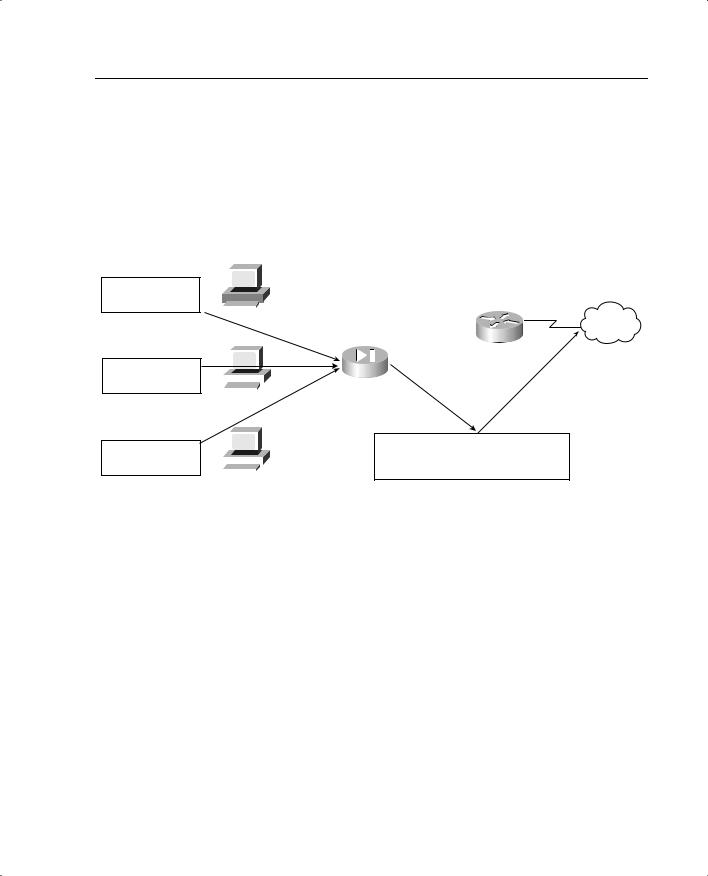
NAT allows you to translate a large number of local addresses behind a limited number of global addresses. This lets you keep your internal network addressing scheme hidden from external networks. To configure NAT on a Cisco PIX Firewall, you simply need to define the local and global addresses. In Figure 5-4, all nodes on the internal network are being translated to a pool of addresses on the external network.
Figure 5-4 Network Address Translation
|
|
|
|
|
|
|
|
A global pool of addreses is 192.168.0.10 to 192.168.0.62. |
|
||
|
|
|
|
|
|
|
|
All internal nodes will be translated to one of these addreses when |
|
||
|
|
|
|
|
|
|
|||||
#1. Request from |
|
|
|
|
|
|
|
making outbound connections. |
|
||
|
|
|
|
|
|
||||||
|
|
|
|
|
|
|
|
|
|
|
|
10.10.10.10 |
|
|
|
|
|
|
|
|
|
|
|
|
|
|
|
|
|
|
|
|
|
|
|
|
10.10.10.10 |
|
|
|
Internet |
||||||
|
|
|
|
||||||||
|
|
|
|
|
|
|
|
|
|
||
|
|
|
|
|
|
|
10.10.10.1 |
|
|
|
|
|
|
|
|
|
|
|
|
|
192.168.0.1 |
|
|
|
|
|
|
|
|
|
|||||
#2. Request from |
|
|
|
|
|
|
|
|
Perimeter Router |
||
|
|
|
|
|
|
|
|
||||
|
|
|
|
|
|
|
|
|
|
|
|
10.10.10.11 |
|
|
|
|
|
|
192.168.0.2 |
|
|
|
|
|
|
|
|
|
|
|
|
|
|||
|
10.10.10.11 |
|
|
|
|||||||
#3. Request from |
|
#1. Request from 192.168.0.62 |
|||||||||
|
|
|
|
|
|
|
|||||
|
|
|
|
|
|
|
|||||
|
|
|
|
|
|
||||||
|
|
|
|
|
|
|
#2. Request from 192.168.0.61 |
||||
10.10.10.12 |
|
|
|
|
|
|
|
||||
|
|
|
|
|
|
|
#3. Request from 192.168.0.60 |
||||
|
|
|
|
|
|
|
|||||
|
10.10.10.12 |
|
|||||||||
|
|
|
|
|
|
||||||
Two commands are required to complete this configuration:
• nat—Defines the addresses to be translated:
LabPIX(config)# [nat] [(internal_if_name)] [id] [local_ip] [network_mask]
Here’s an example:
LabPIX(config)# nat (inside) 1 0.0.0.0 0.0.0.0
• global—Defines the pool of addresses to translate to:
LabPIX(config)# [global] [(external_if_name)] [id] [global_ip] [netmask] [network_mask]
Here’s an example:
LabPIX(config)# global (outside) 1 192.168.0.10-192.168.0.62 netmask 255.255.255.192
Notice the [id] in both the nat and global commands. It allows you to assign specific addresses to translate. The addresses in the nat command translate to the addresses in the global command that contains the same ID. The only ID that cannot be used here is 0. The command nat 0 is used on the PIX to identify addresses that are not to be translated. The nat 0 command is commonly called the “no nat” command.
Address Translation 75
Port Address Translation
PAT allows you to translate your local addresses behind a single global address. The commands required to perform PAT are exactly the same as NAT. The only difference in defining PAT is that you define a single global address rather than a range. Figure 5-5 shows all local nodes behind a single global address being translated.
Figure 5-5 Port Address Translation
|
|
|
|
|
|
|
|
An internal nodes will be translated to 192.168.0.10 |
|
||
|
|
|
|
|
|
|
|
when making outbound connections. The PIX will |
|
||
|
|
|
|
|
|
|
|||||
#1. Request from |
|
|
|
|
|
|
|
change the source port number to allow multiple |
|
||
|
|
|
|
|
|
|
connections from a single source IP. |
|
|||
|
|
|
|
|
|
||||||
10.10.10.10:3310 |
|
|
|
|
|
|
|
|
|
|
|
|
|
|
|
|
|
|
|
|
|
|
|
|
10.10.10.10 |
|
|
|
|
Internet |
|||||
|
|
|
|
|
|||||||
|
|
|
|
|
|
|
|
|
|
|
|
|
|
|
|
|
|
|
10.10.10.1 |
|
|
|
|
|
|
|
|
|
|
|
|
|
192.168.0.1 |
|
|
|
|
|
|
|
|
|
|
|
|
||
#2. Request from |
|
|
|
|
|
|
|
|
Perimeter Router |
||
|
|
|
|
|
|
|
|
||||
|
|
|
|
|
|
|
|
|
|
|
|
10.10.10.11:3310 |
|
|
|
|
|
|
192.168.0.2 |
|
|
|
|
|
|
|
|
|
|
|
|
|
|||
|
10.10.10.11 |
|
|
|
|||||||
#3. Request from |
|
#1. Request from 192.168.0.10:61235 |
|||||||||
|
|
|
|
|
|
|
|||||
|
|
|
|
|
|
|
|||||
|
|
|
|
|
|
||||||
|
|
|
|
|
|
|
#2. Request from 192.168.0.10:61222 |
||||
10.10.10.12:3310 |
|
|
|
|
|
|
|
||||
|
|
|
|
|
|
|
#3. Request from 192.168.0.10:43441 |
||||
|
|
|
|
|
|
|
|
||||
|
10.10.10.12 |
||||||||||
|
|
|
|
|
|
||||||
Here’s the nat command syntax:
LabPIX(config)# [nat] [(internal_if_name)] [id] [local_ip] [network_mask]
Here’s an example:
LabPIX(config)# nat (inside) 1 0.0.0.0 0.0.0.0
Here’s the global command syntax:
LabPIX(config)# [global] [(external_if_name)] [id] [global_ip] [netmask] [network_mask]
Here’s an example:
LabPIX(config)# global (outside) 1 192.168.0.10 netmask 255.255.255.255
Static Translation
Although static translation is not an exam topic, it is very important for you to understand how it works. Static translation maps a single local address to a single global address. It is most commonly used when the local node must be accessed from the public space (Internet). In the following command, the local node 10.10.10.9 is configured to have a
76 Chapter 5: Understanding Cisco PIX Firewall Translation and Connections
global address of 192.168.0.9. Remember that the static command configures only the address translation. To allow access to the local node from a lower security level interface, you need to configure either a conduit or an access list:
LabPIX(config)# [static] [(internal_if_name, external_if_name)] [global_ip] [local_ip]
LabPIX(config)# static (inside, outside) 192.168.0.9 10.10.10.9 LabPIX(config)# conduit permit tcp host 192.168.0.9 eq www any
or
LabPIX(config)# access-list 101 permit tcp any host 192.168.0.9 eq www
If you are using an access list, you need to create an access group to apply the access list to the correct interface:
LabPIX(config)# access-group 101 in interface outside
NOTE |
Chapter 7, “Configuring Access,” discusses conduits and access lists in greater detail. |
|
|
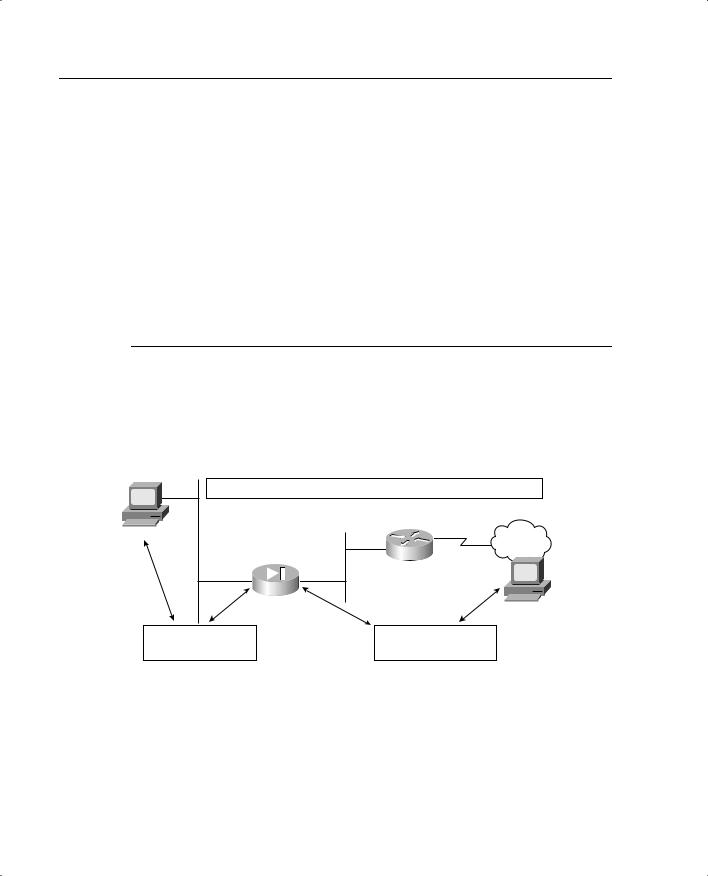
This is the configuration used in Figure 5-6. Note that the node is now accessible from the Internet.
Figure 5-6 Static Translation
The server 10.10.10.9 always has the translated address of 192.168.0.9.
10.10.10.9 |
Internet |
|
|
|
10.10.10.1 |
|
192.168.0.1 |
|
Perimeter Router |
|
192.168.0.2 |
Request to 10.10.10.9 |
Request to 192.168.0.9 |
Reply from 10.10.10.9 |
Reply from 192.168.0.9 |

Address Translation 77
Using the static Command for Port Redirection
One of the improvements of PIX OS version 6.0 is that the static command can be used to redirect services to specific ports as well as translate the host’s address. This command allows the outside user to connect to a specific address/port and have the PIX redirect the traffic to the appropriate inside/DMZ server. The syntax for this command is as follows:
LabPIX(config)# [static] [(internal_if_name, external_if_name)] {tcp | udp} [global_ip] [global_port] [local_ip] [local_port] [netmask mask]
[max connections [emb_limit[noramdomseq]]]
For example:
LabPIX(config)# static (inside, outside) tcp 192.168.0.9 ftp 10.10.10.9 2100 netmask
255.255.255.255 0 0
Configuring Multiple Translation Types on the Cisco PIX Firewall
It is a good practice to use a combination of NAT and PAT. If you have more internal hosts than external IP addresses, you can configure both NAT and PAT. Your first group of hosts translates to the global addresses that are listed, and the remaining hosts use PAT and translate to the single global address. If you do not configure NAT and PAT, the PIX automatically performs NAT starting at the highest IP of the global IP range and performs PAT with the lowest IP after all other addresses have been used. If the location has any servers that need to be accessed from the Internet (web servers, mail servers, and so on), they must be configured for static translation.
In the following syntax examples, the internal network consisting of 254 hosts translates to 52 external addresses (192.168.0.10 to 192.168.0.62). This means that the remaining 202 hosts translate to 192.168.0.63.
LabPIX(config)# [nat] [(internal_if_name)] [id] [local_ip] [network_mask] LabPIX(config)# nat (inside) 1 10.10.10.0 255.255.255.0
LabPIX(config)# [global] [(external_if_name)] [id] [global_ip] [netmask] [network_mask]
LabPIX(config)# global (outside) 1 192.168.0.10-192.168.0.62 netmask 255.255.255.192
LabPIX(config)# [global] [(external_if_name)] [id] [global_ip] [netmask] [network_mask]
LabPIX(config)# global (outside) 1 192.168.0.63 netmask 255.255.255.255
NOTE It is recommended that any devices that have a static translation and are accessed from the Internet be segregated from the rest of the internal network. These devices should be on a separate network segment that connects to an additional interface on the PIX Firewall. This is normally called a demilitarized zone (DMZ) segment.
The addresses assigned for static translation cannot be part of the global IP pool. This is a one-to-one relationship between the outside address and the address being translated.
78 Chapter 5: Understanding Cisco PIX Firewall Translation and Connections
Example 5-1 shows the commands for this type of configuration.
Example 5-1 Configuring Multiple Translation Types
LabPIX(config)# nat (inside) 1 0.0.0.0 0.0.0.0
LabPIX(config)# global (outside) 1 192.168.0.10-192.168.0.61 netmask
255.255.255.192
LabPIX(config)# global (outside) 1 192.168.0.62 netmask 255.255.255.255 LabPIX(config)# static (DMZ, outside) 192.168.0.3 172.16.1.2 LabPIX(config)# static (DMZ, outside) 192.168.0.4 172.16.1.3 LabPIX(config)# static (DMZ, outside) 192.168.0.5 172.16.1.4
LabPIX(config)# access-list 101 permit tcp [specific source] host 192.168.0.3 eq smtp
LabPIX(config)# access-list 101 permit tcp any host 192.168.0.4 eq www
LabPIX(config)# access-list 101 permit udp [specific source] host 192.168.0.5 eq domain
LabPIX(config)# access-group 101 in interface outside
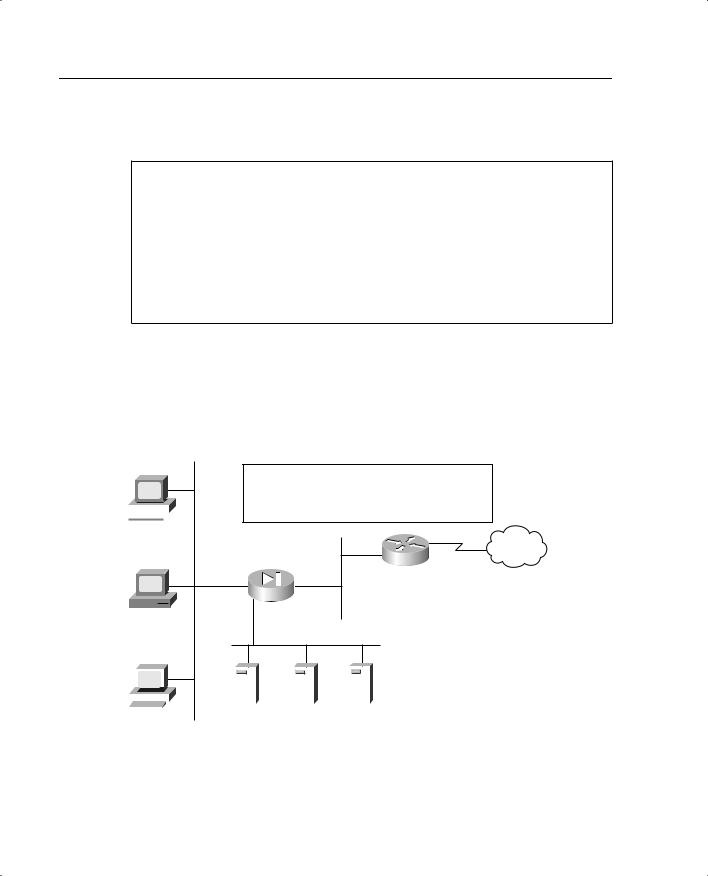
Figure 5-7 depicts the configuration shown in Example 5-1. Note that the traffic that is allowed inbound is routed to the DMZ rather than going to the internal network. Remember that static translation provides the mechanism for external hosts to connect to internal nodes, but because the connection is from a lower security level to a higher security level, there must be a rule in the security policy allowing the connection.
Figure 5-7 Combined NAT, PAT, and Static Translation
An internal nodes will be NAT to 192.168.0.10 to 192.168.0.61 and then PAT to 192.168.0.62.
All devices on the DMZ segment will have a static
 translation to 192.168.0.3 (mail), .4 (web), .5 (DNS) 10.10.10.10
Internet
10.10.10.1
192.168.0.1 Perimeter Router
 192.168.0.2 10.10.10.11
DMZ Segment
|
|
|
|
|
|
|
|
|
|
|
|
|
|
|
|
|
|
|
|
|
|
|
|
|
|
|
|
|
|
|
|
|
|
|
|
|
|
|
|
|
|
|
|
|
|
|
|
|
|
|
|
|
|
|
|
|
|
|
|
|
|
|
|
|
|
|
|
|
|
|
|
|
DNS |
|
10.10.10.12 |
|
|
Web |
|
||||||||||
|
|
|
|
|
|
172.16.1.2 |
172.16.1.3 |
172.16.1.4 |
||||||