

C H A P T E R 6
Using Mac OS X Technologies
Fonts
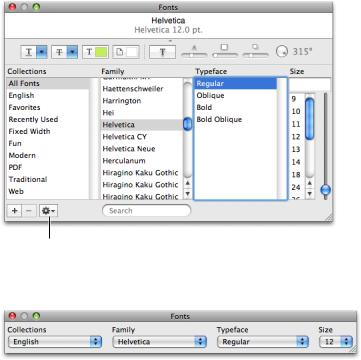
If your program supports typography and text layout using user-selectable fonts, you should use the Fonts window to obtain the user’s font selection. Users can select fonts and sizes in both the standard (Figure 6-5) and the minimized (Figure 6-6) view of the Fonts window. In the standard view, there are also controls for fine-tuning the display characteristics of fonts. Most important, the Fonts window is implemented for you. You do not have to create a Fonts menu or other special user interface to display and gather font information from the user.
Figure 6-5 |
Fonts window |
Action menu
Figure 6-6 Minimal Fonts window
The Fonts window also provides advanced typography controls for fonts that support those options. The user can open a Typography inspector by choosing Typography from the action menu. Figure 6-7 shows the typography controls for the Zapfino font.
74 Fonts
2008-06-09 | © 1992, 2001-2003, 2008 Apple Inc. All Rights Reserved.

C H A P T E R 6
Using Mac OS X Technologies
Figure 6-7 Typography inspector
For more information about font selection and management in Cocoa applications, see FontPanel; for Carbon applications, see Apple Type Services for Fonts Programming Guide.
Preferences
Preference settings are user-defined parameters that your software remembers from session to session. Preferences can be a way for your application to offer choices to users about how the application runs. Preferences often affect the behavior of the application or the default appearance of content created with the application.
To reduce the complexity of your application, be picky about which features should have preferences and which should not. Avoid implementing all the preferences you can think of. Instead, be decisive and focus your preferences on the features users might really want to modify.
A preference should be a setting that the user changes infrequently. If a user might change the attributes of a feature many times in a work session, avoid using preferences to set those attributes. Instead, give the user modeless access to the controls for modifying that feature. For example, you might implement the feature using a menu item or a control in a palette or window.
Because a user does not change preference settings frequently, you should not provide a preferences toolbar item. Instead, provide access to application-level preferences in the application menu (see “The Application Menu” (page 173) for more information) and to document-specific preferences in the File menu (see “The File Menu” (page 175) for more information).
For information on implementing preferences with Cocoa, see User Defaults Programming Topics for Cocoa. For information on implementing preferences with Core Foundation, see Preferences Programming Topics for Core Foundation.
Preferences |
75 |
2008-06-09 | © 1992, 2001-2003, 2008 Apple Inc. All Rights Reserved.

C H A P T E R 6
Using Mac OS X Technologies
Printing
Mac OS X includes an advanced printing system. Because of all the options this system provides, it is important that you use the standard printing dialogs so that users understand the options that are available to them without getting lost in features. The printing architecture allows users to print “digital paper” documents that can be sent to a printer, faxed, or saved as a PDF file (Figure 6-8). These features are all available automatically when you use the Mac OS X printing system in your application.
Figure 6-8 Print options available in Mac OS X
See “The Print Dialog” (page 247) for information about the standard printing dialog. See Mac OS X Printing System Overview for general information about the printing system. For information on how to extend the Print dialog to include options not provided in the standard panes, see Extending Printing Dialogs.
Security
Mac OS X provides numerous technologies to help you perform secure operations. Using these technologies, you can store secret information locally, authorize a user for specific operations, or transport information securely across a network.
Consider the following guidelines when you need to work with sensitive information or work in a secure environment:
■Factor out code that requires privileged access into a separate process. Factoring isolates the secure code from the nonsecure code and makes it easier to verify that no rogue operations are occurring that could do damage, whether intentionally or unintentionally.
■Avoid storing passwords and secrets in plain-text files. Even if you restrict access to the file using file permissions, the information is much safer in a keychain.
■Avoid inventing your own authentication schemes. If you want a client-server operation to be secure, use the authorization APIs to guarantee the identity of the client.
■Avoid loading plug-ins from privileged code. Plug-ins receive the same privileges as the parent process.
■Avoid calling potentially dangerous functions, such as system or popen, from privileged code.
■Don’t assume only one user is logged in. With fast user switching, multiple users may be active on the same system. See Multiple User Environments for more information.
■Don’t assume that keychains are always stored as files.
■Avoid relying solely on passwords for authentication. Mac OS X already supports smart card devices. Biometric devices such as fingerprint scanners may also be available some day.
If your application stores passwords or other sensitive information, such as credit card numbers, store that information using Keychain Services. The keychain mechanism in Mac OS X provides the following benefits:
76 Printing
2008-06-09 | © 1992, 2001-2003, 2008 Apple Inc. All Rights Reserved.
C H A P T E R 6
Using Mac OS X Technologies
■It provides a secure, predictable, consistent experience for users when dealing with passwords and other secret information.
■Users can modify settings for all of the passwords as a group or create separate keychains for different activities, with each keychain having its own activation settings. (By default, passwords are modified as a group.)
■The Keychain Access application provides a simple user interface for managing keychains and their settings, relieving you of this task.
For information and links to security-related documentation in Mac OS X, see Getting Started With Security.
Speech
Mac OS X contains speech technologies that enable software to recognize and speak U.S. English. These technologies provide benefits for all users and present the possibility of a new paradigm for human-computer interaction.
Speech recognition is the ability for the computer to recognize and respond to a person’s speech. Using speech recognition, users can accomplish tasks comprising multiple steps—for example, “Schedule a meeting next Friday at 3 p.m. with John, Paul, and George” or “Create a 3-by-3 table”—with one spoken command. Mac OS X users can control the computer by voice rather than be limited to the mouse or keyboard; consequently, speech-recognition technology is very important for people with special needs and also for general users. Developers can take advantage of the speech engine and API included with Mac OS X, as well as the built-in user interface.
Speech synthesis also called text-to-speech (TTS), converts text into audible speech. It provides a way to deliver information to users without forcing them to shift attention from their current task. For example, the computer could, in the background, deliver such messages as “Your download is complete; one of the files has been corrupted” and “You have email from your boss; would you like to read it now?” TTS is also crucial for users with vision or attention disabilities. As with speech recognition, Mac OS X TTS provides both an API and several user interface features.
For information about implementing speech synthesis and recognition, see the documents in Guides > User Experience > Speech Technologies.
Spotlight
Spotlight is a powerful Mac OS X search technology available to both users and application developers. Built on top of Search Kit and integrated with the file system, Spotlight makes searching for files on the computer as easy as searching the web. With Spotlight, users can search for things using attributes that have meaning for them, such as the intended audience for a document, the orientation of an image, or the key signature of the music in an audio file. Information like this (called metadata) is embedded in a file by the application that created it. Spotlight’s power comes from being able to extract, store, update, and organize the metadata of files to allow fast, comprehensive searches.
Spotlight is always available to users to help them find their files on the computer. Even better, the search technologies that power Spotlight are available to developers to help them find files to display, plug-ins to load, and data to use in their applications. For example, a developer can define complex queries to find only
Speech |
77 |
2008-06-09 | © 1992, 2001-2003, 2008 Apple Inc. All Rights Reserved.

C H A P T E R 6
Using Mac OS X Technologies
the types of files an application needs to work with or provide Spotlight functionality from within an application. The rest of this section introduces the user’s view of Spotlight and describes some of the ways an application can take advantage of its features.
Users can easily initiate a Spotlight search using the Spotlight icon at the far right end of the menu bar. Figure 6-9 (page 78) shows the Spotlight icon and search field displayed when a user clicks the icon.
Figure 6-9 The Spotlight icon and search field
In addition, a user can select a word or phrase in a text document and Control-click to reveal a contextual menu that allows a Spotlight search for the selected text. Figure 6-10 (page 78) shows this contextual menu.
Figure 6-10 Spotlight search in a contextual menu
Whichever way a search is initiated, Spotlight quickly displays the results, conveniently sorted into categories the user can adjust in Spotlight Preferences. Figure 6-11 (page 79) shows the standard Spotlight results window.
78 Spotlight
2008-06-09 | © 1992, 2001-2003, 2008 Apple Inc. All Rights Reserved.

C H A P T E R 6
Using Mac OS X Technologies
Figure 6-11 A Spotlight results window
To applications, Spotlight provides almost limitless ability to find files and to give advanced file-search capabilities to users within the context of the application. For example, an application might choose to replicate the Spotlight contextual-menu item (shown in Figure 6-10 (page 78)) with a button that initiates a Spotlight search for the user’s selected text. The application could then display its own window that contains all the search results or a filtered subset of them.
An application might also choose to give users access to Spotlight searches in a rounded search field (for more information on this control, see “Search Fields” (page 317)). A user often needs to work on a file that was saved in an atypical place or given an unexpected or forgotten name. If an application offers only a Finder-based Open dialog, it might force the user to waste a lot of time navigating the file system, trying to remember what the file was named and where it was saved. Instead, an application can provide a Spotlight-powered search that allows the user to search the entire file system, using meaningful attributes other than the filename.
Applications can also use Spotlight functionality behind the scenes to find needed files or plug-ins. For example, an application that provides a back-up service might allow the user to choose a broad category of file type to back up, such as images. Instead of asking users to identify all the folders that contain their images or just backing up a Pictures folder, the application could perform a Spotlight search to find every image file in the file system, regardless of its location.
It’s important to emphasize that Spotlight is tuned to search for files; it’s not intended to do extensive text-based searching within a document. If you need to do fine-grained textual searching, you should use Search Kit technologies instead. An application that stores data in database records, for example, should not base its database search on Spotlight because the data are not stored in separate files. For more information on using Search Kit in your application, see Search Kit Programming Guide.
Spotlightoffersunparalleledsearchfunctionalitytobothusersanddevelopers. Alongwiththeseopportunities, however, comes an important developer responsibility. If your application uses a custom file format, you must supply a plug-in (called a Spotlight importer) that describes the types of metadata your file format contains. This ensures that a user will be able to search for the files your application creates using the attributes described by the metadata your files contain. For comprehensive information on how to do this, see Spotlight Importer Programming Guide.
Spotlight |
79 |
2008-06-09 | © 1992, 2001-2003, 2008 Apple Inc. All Rights Reserved.