

Microsoft Windows XP Networking Inside Out
.pdfPart 4: Network Resources
15 Chapter
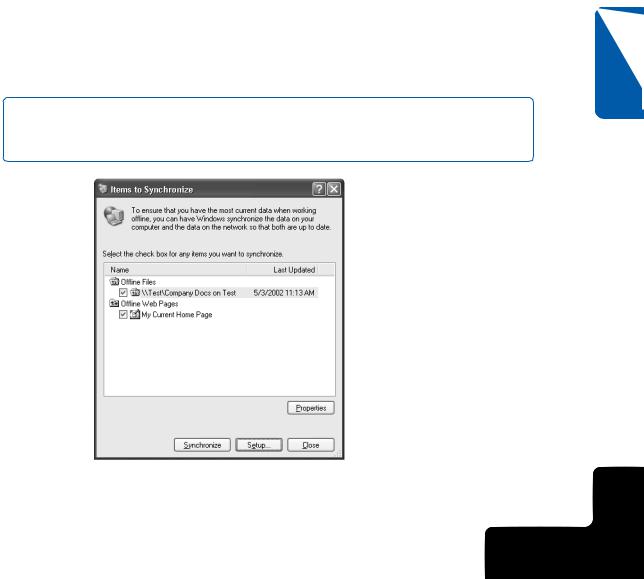
Figure 15-3. This dialog box appears when you have files and folders that need to be synchronized.
●If you have made changes to the offline file and someone else has made changes to the network file, you’ll see the Resolve File Conflicts dialog box, which is shown in Figure 15-4. You have the choice of saving both copies (under different names of course), replacing the network version with your version, or replacing your version with the network version. Also notice that you can make your decision the default by selecting the Do This For All Conflicts check box if you don’t need to examine conflicts on a case-by-case basis.
Figure 15-4. The Resolve File Conflicts dialog box provides you with three ways to resolve file synchronization conflicts.
458
4: Network Resources
Chapter 15: Making Files Available Offline
●If either the offline or network copy of a file is deleted, the file on the other computer is deleted as well, if no changes have been made to the remaining file. If changes have been made to one of the files and the other one has been deleted, you’ll be given the option of deleting the remaining file or saving the changed file to both locations.
Setting Synchronization Options
In addition to manually synchronizing when logging on and when logging off, you can specify other synchronization options using the Synchronization Manager, which you can open by choosing Start, All Programs, Accessories, Synchronize. In the Items To Synchronize dialog box, you can configure synchronization when the computer is idle, according to a schedule, or immediately. The following steps show you how to select these options.
1Choose Start, All Programs, Accessories, Synchronize.
2The Items To Synchronize dialog box appears as shown here. If you want to manually synchronize immediately, click the Synchronize button. If you want to configure how synchronization occurs, click the Setup button.
note Remember that the synchronization tool can only be used to synchronize items you have already made available offline. You cannot use this tool to make items available offline.
Chapter 15
459
4: Network Resources

Part 4: Network Resources
3Clicking the Setup button opens the Synchronization Settings dialog box. On the Logon/Logoff tab, shown next, you can choose the files or folders that you want synchronized when you log on or log off. Notice that you can select Ask Me Before Synchronizing The Items if you want to receive a prompt before synchronization actions occur—doing so lets you override the settings you select on this tab. If you have more than one network connection, you can set different synchronization settings for each connection by selecting the connection in the When I Am Using This Network Connection list. For example, you might want to synchronize a partial list of your offline folders and files when you’re using a slow dial-up connection and all your files when you’re using a network or broadband connection.
15 Chapter
4The On Idle tab, shown next, allows you to select items to be synchronized when the computer is idle. This feature allows you to synchronize the items more often but without interfering with your work. But if your computer never goes idle, this option will not be terribly useful. Your computer might never go idle if it’s running a CPU-intensive application in the background, such as screen saver utilities that use your idle CPU cycles to iterate massive numerical calculations. SETI@home is one such fascinating cycle-scavenging program that uses your CPU’s idle time to exhaustively analyze astronomical data for signs of intelligent life from deep space (http://setiathome.ssl.berkeley.edu).
460
4: Network Resources

Chapter 15: Making Files Available Offline
5If you click the Advanced button on the On Idle tab, you see the Idle Settings dialog box shown here. You can specify how long the computer must remain idle before synchronization will begin (15 minutes is the default) and how often synchronization should be repeated while the computer remains idle (60 minutes by default). You can also choose to prevent idle-time synchronization when the computer is running on battery power.
6If you select the Scheduled tab in the Synchronization Settings dialog box, you will see a list of scheduled synchronizations, and you can schedule a
Chapter 15
461
4: Network Resources

Part 4: Network Resources
synchronization by clicking Add. Scheduling is useful if you want to synchronize files at specific times, perhaps when the computer is on but not being used or if you have certain files that need to be synchronized at particular times or intervals. Click Add to create a schedule.
7The Scheduled Synchronization Wizard appears. Click Next.
8Select a network connection and the offline files and folders that you want to schedule. You can also select the option at the bottom of the page if you want Windows XP to automatically connect to the network when the scheduled synchronization occurs, if it’s not already connected at that time. Click Next.
9On the wizard page shown here, select the start time, start date, and the interval for the synchronization schedule. Click Next.
15 Chapter
10Give the schedule a name. Click Next, and then click Finish.
The scheduled synchronization now appears on the Scheduled tab. You can select the desired scheduled synchronization and remove it at any time or adjust the schedule by clicking Edit.
tip Using Multiple Synchronization Schedules
You can run the wizard as often as you like to carry out these tasks:
●Schedule other files and folders for synchronization.
●Create schedules using other dates, times, or intervals; or schedule synchronizations using alternate connections.
462
4: Network Resources

Chapter 15: Making Files Available Offline
Stop Using an Offline File or Folder
There might come a time when you want to stop using a particular offline file or folder. In this case, all you need to do is right-click the offline file or folder and choose Make Available Offline so that the option is no longer selected. If you want to stop using Offline Files altogether, clear the Enable Offline Files option on the Offline Files tab
of Folder Options.
Managing Caching Options on the Server
If the files you are sharing reside on a Windows 2000 or Windows XP computer, you can adjust their caching settings. Although offline folders and files are selected by users working from their local computers, caching options are set as part of the sharing process on the serving computers. The following caching options can be applied to network shares:
●Manual Caching Of Documents. By default, all shared files and folders start out with manual caching. Manual caching means that the user has to select the files and folders for them to be made available offline. A characteristic of manual caching is that the selected files and folders are always available offline because they are downloaded to the local computer when the resource is first marked for offline use. On the other hand, only the files and folders that the user manually chooses (by selecting Make Available Offline) are cached. Manual caching is most appropriate for users who spend a lot of time working off the network, such as those using portable computers they take home from their office network or use while traveling.
●Automatic Caching Of Documents. Both types of automatic caching copy files to the user’s local computer as they are requested, that is, as they are opened. The server automatically caches the file or folder on your computer. When you open your locally cached copy, the server also opens its copy to prevent multiple users from writing to the file at the same time. Automatic caching is useful on networks that have occasional disconnections, so users can continue working during outages. However, there is no guarantee that the needed files will be available offline because as the user’s cache space fills up, older files are deleted from the cache. This method
of caching generally isn’t a good solution for users of portable computers because they have to open the file while they’re connected to the network before the file will be copied to their portable computer. On the plus side, the user doesn’t have to wait for large numbers of folders to be entirely downloaded and synchronized on the local computer: Files are only downloaded as they are needed. Automatic caching of documents is especially useful for document folders or files that the user must be able to update.
Chapter 15
463
4: Network Resources
15 Chapter
Part 4: Network Resources
●Automatic Caching Of Programs And Documents. This automatic caching option is useful for folders and files that are used for read-only access, such as applications and reference documents. By caching these types of files, the user can access them more quickly because the network doesn’t need to be repeatedly accessed as the program or document is used.
To set the caching options for a network share, follow these steps:
1Right-click the shared folder or file and choose Properties.
2On the Sharing tab, click the Caching button.
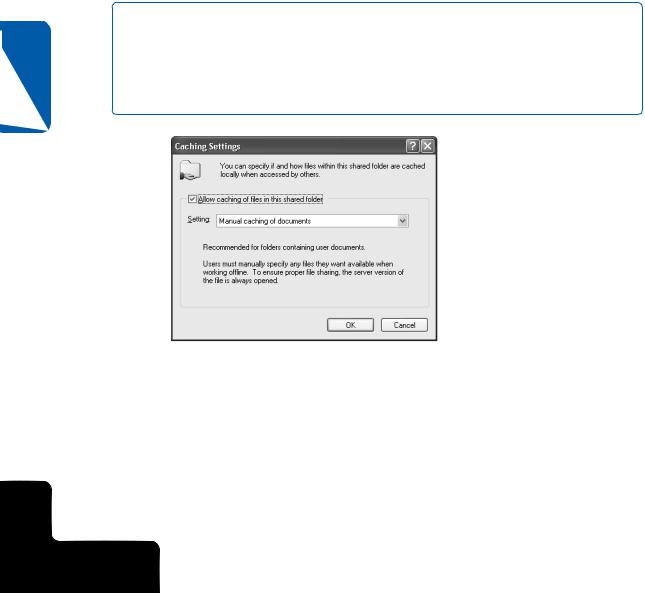
3In the Caching Settings dialog box, shown in Figure 15-5, select one of the three cache options from the Settings list.
note If you are using Windows XP Home Edition, this option is not available because Simple File Sharing is always in use and doesn’t permit setting caching options. If you’re using Windows XP Professional, you’ll need to make sure Simple File Sharing is turned off to see the version of the Sharing tab that contains the Caching button. See Chapter 14, “Understanding Resource Sharing and NTFS Security,” for more information about Simple File Sharing.
Figure 15-5. When you first share a folder, caching is set to manual caching, but you can change that setting in this dialog box.
Handling Network Disconnections
One issue that can come up with Offline Files concerns how Windows should respond when a network connection is lost. In other words, if you are working on a cached file, can you continue to work on the file when the connection to the other computer is
464
4: Network Resources
Chapter 15: Making Files Available Offline
abruptly lost? The choice is up to you. By default, when a network connection is lost, a message appears in the notification area informing you that you are disconnected from
the network and that you can continue working offline with any folders and files you previously made available offline or that were automatically cached on your local computer. This is the usual behavior you’ll want, but there are other choices available as well.
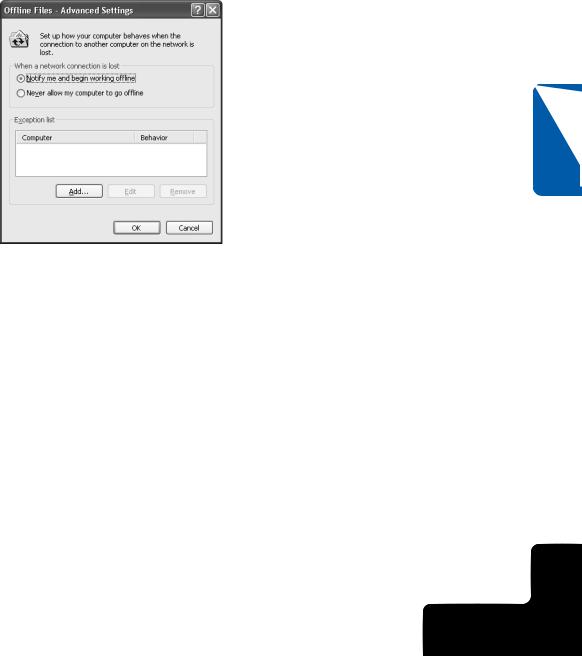
To alter how your computer responds to going offline, open Folder Options in Control Panel, select the Offline Files tab, and click the Advanced button to open the Offline Files—Advanced Settings dialog box, shown in Figure 15-6.
Chapter 15
Figure 15-6. Use the Offline Files—Advanced Settings dialog box to control access to offline files when a network connection is lost.
You have two options that govern how your computer behaves when a network connection is lost:
●Notify Me And Begin Working Offline. When you use this default setting, network files you made available offline will continue to be available to you. You can work offline when the network connection is lost, and you’ll see a message informing you that you are working offline.
●Never Allow My Computer To Go Offline. If you select this setting and then lose your network connection, you’ll be notified that you are offline, but you will not be permitted to use the offline files cached on your local computer. Ordinarily, this defeats the purpose of offline files, so you usually wouldn’t apply this option globally. However, this feature is useful when it’s applied to specific serving computers whose content you might never want to make available offline.
465
4: Network Resources

15 Chapter
Part 4: Network Resources
Rather than choose one of these settings for all your offline files, you can assign a mix of these settings to different network computers by using the Exception List section of this dialog box. For example, suppose that the default setting is Notify Me And Begin Working Offline. There might be a particular network computer whose shares you only want to use when you are online. In this case, you can leave your default setting configured and create an exception to the rule for that server only. To do this, click the Add button, type the network computer’s name in the Add Custom Action dialog box that appears, and tag that computer with one of the two preceding options listed. When you click OK, the computer’s name along with the behavior of your offline access to its network shares will be listed in the Exception List section. You can repeat this process to add more network computers.
Troubleshooting Offline Files
Once configured, offline files are generally easy to use and problem free, but there are some difficulties that you might encounter:
●Offline Files and Fast User Switching. Offline Files and Fast User Switching are not compatible with each other. In Windows XP Professional, you can use one or the other, but not both features at the same time. (Offline Files is not available in Windows XP Home Edition.)
●Network disconnects. If you lose access to an online file when the network is disconnected, make sure you have actually configured the file for offline use. If you have, check the Offline Files—Advanced Settings dialog box and make sure you have selected Notify Me And Begin Working Offline, as discussed in the preceding section.
●Certain files are not synchronized, or you receive an error message. If Windows cannot synchronize certain files, or you receive an error message, there are two possible explanations. First, the server that holds the file is offline. If this is the case, Windows cannot connect to the server and therefore cannot synchronize your files. The second possibility is that someone else has the file open over the network. In this case, Windows will not be able to synchronize the file because it is already open. You’ll simply have to wait until a later time to synchronize the file.
note Files with .mdb, .ldb, .mdw, .mde, and .db extensions are not synchronized by default. This is to prevent potential corruption of these file formats that can occur via synchronization. Also, network Group Policy can prohibit the use of offline files. If your computer is a member of a Windows domain and you cannot use Offline Files, most likely there is a policy configured that prohibits it.
466
4: Network Resources

Chapter 15: Making Files Available Offline
●No offline file availability. If you cannot make a file or folder available offline, you probably have Fast User Switching enabled. Disable Fast User Switching to make Offline Files available.
●Slow synchronization. Synchronization can require a lot of network bandwidth, especially if several users are trying to synchronize at the same time. One solution is to configure synchronization for nonpeak network usage times. If you have more than one type of network connection, try to synchronize when you are using the faster connection.
Using Briefcase
Briefcase is a tool that appeared in several previous versions of Windows and is also included in Windows XP. Briefcase allows you to copy files for offline use, and then synchronize the files when you are reconnected.
Briefcase is not as easy to use as Offline Files and requires more manual synchronization work on your part; however, it does support synchronization of files using removable media (such as floppy disks or Zip disks) or Direct Cable Connection, whereas Offline Files requires file sharing via SMB, which limits you to files and folders you can reach over a standard network connection, such as Ethernet. This makes Briefcase the tool to use if you do not have a local area connection. It’s also your only option when using Windows XP Home Edition.
Briefcases act as containers, holding files that you want to synchronize with other systems, either across the network or on removable media. You can maintain as many briefcases as you need on your system, allowing you to synchronize different content from different locations.
Creating a Briefcase
Creating a new briefcase is easy:
1In Windows Explorer or My Computer, navigate to a folder for which you want to create a briefcase (or simply use the desktop).
2Right-click in the folder (or on the desktop) and choose New, Briefcase.
Once you’ve created a briefcase, you need to insert files you’d like to synchronize. To do so, simply drag the files into the briefcase. Then, when you’re ready to use those files in another location, copy the briefcase to the remote computer (when using a network or Direct Cable Connection) or to a removable disk.
Chapter 15
467
4: Network Resources