

Microsoft Windows XP Networking Inside Out
.pdf3: Network Connectivity
Part 3: Network Connectivity
12 Chapter
If the ping test is not successful, you might see either a “Request timed out” message or a “Destination host unreachable” message, which is shown in Figure 12-3.
Figure 12-3. A host unreachable message is one message that can appear if the ping test is not successful.
What are the differences between the two ping error messages? A “Request timed out” message means that the ping packets appear to have been sent on the network, but the destination computer did not respond within the allotted time. This can mean a number of different things:
●The remote computer is not turned on or has crashed, its NIC is not functioning, its NIC is not connected to the network, or the remote computer has an incorrect IP address or subnet mask.
●If you cannot ping any hosts on your network, your computer probably has an incorrect IP address or subnet mask, assuming the loopback test was successful. Check the IP address and subnet mask of each computer by opening Network Connections, and then opening the LAN connection. Select the Support tab to see the current IP address and subnet mask. It’s also possible that your network’s hub or switch is malfunctioning, thus breaking network connectivity on all systems on your network.
●If you cannot ping any hosts beyond a router or default gateway, but you can ping hosts on the same subnet, the problem is with the router or default gateway, or your computer has an incorrect IP address for the router or default gateway.
A “Destination host unreachable” message is more specific. This message means that your computer (or an intervening router) does not know how to contact the remote address. The possible explanations include
●Your computer has been disconnected from the network.
●Your router or default gateway, or another router between you and the destination, has been disconnected from the remote network.
348

3: Network Connectivity
Chapter 12: Solving Connectivity Problems
●Your router, or an intervening router, knows that a remote network is down, or has no way of knowing how to route traffic to that remote address. The latter reason is usually due to a misconfiguration of the router.
Testing Connectivity Using a Host Name
In addition to testing connectivity to network computers using their IP addresses, you can also use their host names. For example, if you want to contact a computer named Pentium, type ping Pentium at the command prompt. If you cannot ping a computer using the host name, try pinging its IP address. If you can ping the computer using its IP address but not its host name, this indicates that the connection is working, but the name resolution process in which the host name is translated to an IP address is not functioning correctly. This distinction can help you diagnose the source of the problem.
You can also use the Ping command on the Internet to test connectivity to Web sites. Simply specify the Web site’s URL in the command, such as ping www.microsoft.com. This allows you to test your Internet connection for connectivity. However, many Web sites (and routers) block ICMP traffic as a security measure (including www.microsoft.com), so just because you receive a “Request timed out” message does not prove that you don’t have connectivity. Make sure you ping several sites before drawing a conclusion. If you receive the error message “Ping Request Could Not Find Host URL,” you can be pretty certain that you’re not connected to the Internet. This message appears because the name you typed couldn’t be resolved to an IP address, which would normally occur if your ping could reach your ISP’s Domain Name System (DNS) servers. On the other hand, if you ping a URL and the first line of the ping response includes the IP address of the URL but the next four lines read “Request timed out,” you should conclude that your ping reached the Internet or at least your ISP’s DNS servers (because Ping was able to return the IP address), and that the Web site is just blocking ICMP traffic. In this case, if you open a browser, you should be able to retrieve a page from the URL, even though the ping appears to have failed.
note If you are using Internet Connection Firewall (ICF), all ICMP packets arriving at your ICF-enabled computer are blocked by default, which means that no one can ping your computer. However, you can still ping another computer if that computer isn’t blocking ICMP packets. You can use ICF but configure it to allow ICMP traffic to pass through. To learn how to enable ICMP traffic over an ICF connection, read “Allowing ICMP Traffic,” page 133.
Other Ping Options
In addition to the basic ping test, there are several command-line options you can specify (also known as switches) to gather more information. These options are easy to use. The most commonly used options are listed in Table 12-1 on the next page, but keep in mind that they are case sensitive. To see all of the options, just type ping at the command prompt and press Enter.
Chapter 12
349

3: Network Connectivity
12 Chapter
|
Part 3: Network Connectivity |
Table 12-1. Ping Utility Options |
|
Option |
Action |
–t |
This switch pings the specified host until you stop the test. For example, |
|
ping –t 10.0.0.1 pings the host until you press Ctrl+C to stop the test. |
|
|
–a |
This switch resolves the IP address to the host name. For example, if |
|
you type ping –a 10.0.0.1, the host name is returned along with the |
|
ping echoes. |
|
|
–n count |
This option pings the address for the number of echo requests speci- |
|
fied in count. If you are having problems pinging a host or the ping is |
|
successful intermittently, you can use the –n count switch, such as |
|
ping –n 30 10.0.0.1, for a longer test than the default ping of four |
|
echo requests. |
|
|
–l size |
This option allows you to set the buffer size for the test. By default, an |
|
echo request is 32 bytes in size. You can try higher size numbers for |
|
longer connectivity tests and observe how the elapsed time changes with |
|
ping size. Use this option with care: Very large buffer sizes can actually |
|
crash remote computers using older, unpatched TCP/IP software. |
|
|
–f |
This switch keeps the ping test from fragmenting packets. Some firewalls |
|
will not allow fragmented packets, and this switch ensures that no |
|
fragmented packets are used. If, on the other hand, you’re using an |
|
ICMP packet size (see the –l option) that is too large for your gateway |
|
(or an intervening gateway) to preserve without fragmentation, setting |
|
this option might cause the ping test to return an error message. |
|
|
–i TTL |
This option allows you to specify a Time to Live (TTL) value. If the |
|
route to the host crosses multiple networks, you can provide a longer |
|
TTL to give the test more time to succeed. |
|
|
–r count |
This option displays the IP address of each server your ping request |
|
passes through on its way to the host—up to a maximum of nine. |
|
|
–v TOS |
This option allows you to specify the quality of service with which the |
|
packets generated by the ping test will be delivered by routers. Most |
routers ignore these values, but some highly advanced networks use multiple connections (to a backbone such as the Internet, or to each other), allowing, for example, one connection to be dedicated to general traffic, one for traffic that requires a minimum amount of delay, and another for traffic that must be delivered with maximum reliability. This value is only necessary for extremely advanced TCP/IP diagnostics, and its values won’t be covered in this table.
350
3: Network Connectivity
Chapter 12: Solving Connectivity Problems
Your network connectivity appears normal, but Ping does not work.
When using Ping on the Internet or on a large Windows network, it is important to remember that ICMP requests can be considered a security threat. Hackers can use ICMP tricks to cause problems on computers and Web servers. For this reason, many firewalls do not allow ICMP traffic, including ICF, the software firewall provided in Windows XP. In fact, depending on your environment, some routers might even be configured to drop ICMP packets instead of forwarding them to the next subnet. Therefore, when you use Ping and other related tools, keep in mind that routers and even computers might block the echo requests, which will result in a failed ping test. For more information on how Ping and other ICMP tools relate to security, see Chapter 20, “Maintaining Network Security.”
Using Tracert
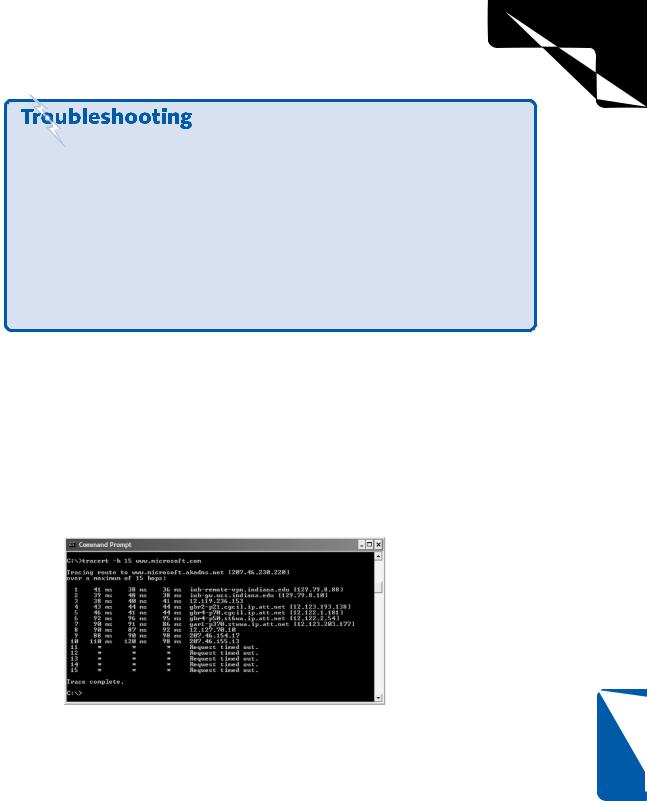
Tracert (Trace Route) is a utility that traces the route to a host you specify. This utility can be used within a LAN to list the computers or routers from your computer to another computer. Each step or leg of the journey is called a hop. A hop consists of each computer or router your request must pass through to reach its destination. You can also use Tracert to trace the route to Internet URLs. Simply type tracert host at the command prompt, where host is an IP address or URL of a network computer or Internet site, and you’ll see a listing of the resolution process to the host or Web site, as shown in Figure 12-4.
Figure 12-4. Tracert traces the path to a target host. In this case, an intervening router appears to be blocking ICMP traffic.
Chapter 12
351

3: Network Connectivity
Part 3: Network Connectivity
In terms of a LAN or WAN, Tracert can be helpful in situations where you are having problems connecting to a particular host or in a case where connectivity is intermittent. Tracert allows you to track the path to the host so that you can begin troubleshooting that path. This helps you see if the connectivity problem is at the host or at some router between the remote host and your computer.
For example, although Ping will only indicate whether or not you can communicate with a remote address, Tracert helps you to see where the breakdown in communication is taking place. If you’re seeing the trace stall at a particular IP address, there might be a faulty router or broken network connection. If the trace seems to get close to the host but does not reach the host, the host computer might be down. If you don’t see any hops beyond your Internet connection, your ISP might be having problems. If you see a large number of hops (or an infinite loop in the hops), your ISP’s Internet connection might be misconfigured, or the ISP might not have a high-quality uplink to the Internet.
tip When using Tracert, you can use the –d switch to stop the resolution of IP addresses to host names to speed up the trace. You can also use the –h maximum_hops switch to set a maximum hop limit.
Using PathPing
PathPing is a combination of the Ping and Tracert tools, and it contains options not found in Ping and Tracert. PathPing pings a host computer and traces the route to that host. When using PathPing, you’ll see router hops, such as those you see with the Tracert tool, and you’ll see the reply information. The advantage of PathPing is that it gives you an easy interface to see each hop and the response time from each. This can help you determine whether a particular router is congested or causing problems along the path. For each hop, you’ll see a percentage of dropped packets; any hop with a high percentage of dropped packets is suspect. Figure 12-5 shows a sample PathPing session.
To use this tool, type pathping host at the command prompt, where host is the URL or IP address of an Internet site or network host. You can also specify additional options on the command line to control the information you receive and the maximum number of hops allowed. Table 12-2 shows you the important options you are likely to use. To see all of the available switches, type pathping at the command prompt.
12 Chapter
352

3: Network Connectivity
Chapter 12: Solving Connectivity Problems
Figure 12-5. PathPing provides a much more detailed picture of the network conditions between your computer and a remote host.
Table 12-2. PathPing Utility Options
Option |
Action |
–h maximum_hops This switch lets you specify the maximum number of hops to use when searching for a target host. This essentially allows you to place a limit on the search.
–n |
This switch stops PathPing from resolving IP addresses to |
|
host names. Using this switch, each hop reported back to |
|
you will be listed by IP address only. This might make the |
|
test run faster, but the information you receive will certainly |
|
be less descriptive. |
|
|
–6 |
This switch forces the use of Internet Protocol version 6 (IPv6). |
|
If you are pathpinging a host on an IPv6 backbone, consider |
|
using this switch for additional IPv6 testing purposes. |
Chapter 12
353
3: Network Connectivity
Part 3: Network Connectivity
tip If you’re using a residential gateway device and you find yourself unable to use PathPing across it, you might need to upgrade your device to the latest firmware revision. For more information, visit your device manufacturer’s Web site.
Using Ipconfig
Ipconfig is a popular command-line tool that gives you complete TCP/IP information for the adapters configured on your computer. Use Ipconfig to identify a NIC’s Media Access Control (MAC) address, IP address, subnet mask, default gateway, DNS server, Dynamic Host Configuration Protocol (DHCP) server, and so on. Ipconfig is a great tool for troubleshooting because you can quickly gain all of the TCP/IP configuration data about a computer.
note The information that you’ll find when using Ipconfig is the same information that is displayed in the Winipcfg graphical tool, which was included in Microsoft Windows 95, Microsoft Windows 98, and Microsoft Windows Me. Winipcfg is not included in Windows XP, but you can acquire the same information using Ipconfig or by opening Network Connections, right-clicking a network connection, and choosing Status to open the connection’s status dialog box.
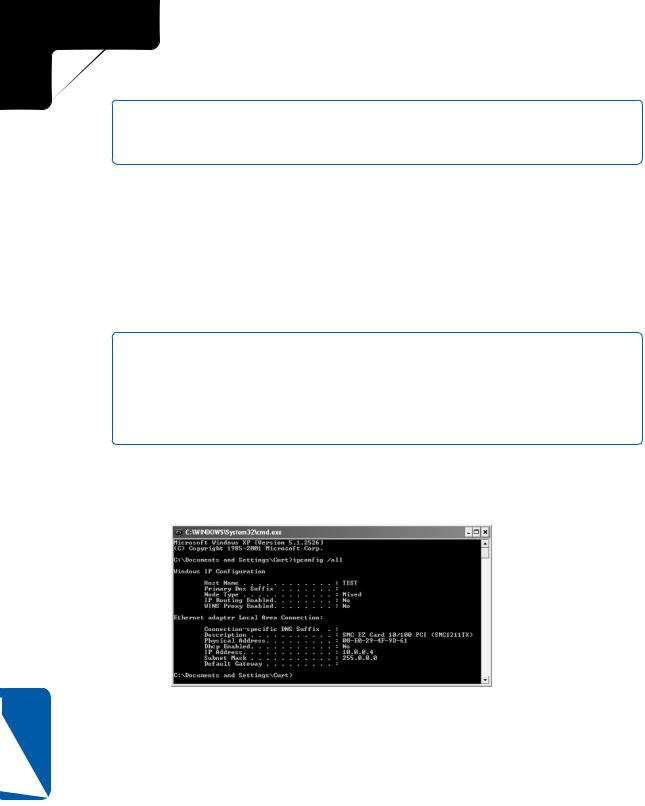
The most commonly used option in Ipconfig is the /all option. At the command prompt, type ipconfig /all. You’ll see a listing of the computer’s current IP address configuration, as shown in Figure 12-6.
12 Chapter
Figure 12-6. Typing ipconfig /all gives you complete IP addressing information.
There are additional switches that you can use with Ipconfig, but you should exercise caution because some of these switches will disrupt your computer’s network connectivity. However, these options can help you solve IP addressing problems. The most commonly used options are listed in Table 12-3. To see a complete list of options, type ipconfig /? at the command prompt.
354
3: Network Connectivity
Chapter 12: Solving Connectivity Problems
Table 12-3. Ipconfig Command Options
Option |
Action |
[none] |
Shows basic IP configuration information for all NICs and |
|
active IP connections on the computer. |
|
|
/all |
Shows the host name and detailed IP configuration infor- |
|
mation for all NICs and active IP connections on the computer. |
|
|
/release |
Releases an IP address lease assigned to the NIC by DHCP. |
|
|
/renew |
Sends a lease renewal request to a DHCP server for the NIC. |
|
|
/flushdns |
Purges all entries in the DNS Resolver cache. |
|
|
/registerdns |
Reregisters all DNS names and refreshes DHCP leases. |
|
|
Using Netstat
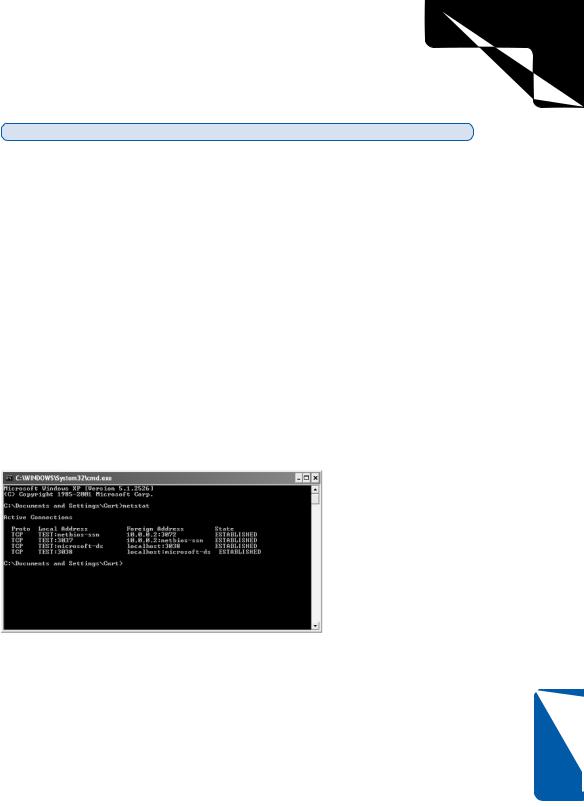
Netstat displays all the active connections to your computer. You can also use Netstat to view the bytes sent and received from your computer as well as any dropped network packets. As shown in Figure 12-7, typing the basic form of the command, netstat, displays each connection’s protocol, local (MAC) address, foreign (IP) address, and the current state of the connection.
Figure 12-7. Use Netstat to see your computer’s current network connections.
There are several helpful options, or switches, you can specify on the command line. Table 12-4 on the next page lists the most common, and you can view all of them by typing netstat /? at the command prompt.
Chapter 12
355

3: Network Connectivity
|
Part 3: Network Connectivity |
Table 12-4. Netstat Command Options |
|
Option |
Action |
–a |
This switch displays all connections and listening ports. |
|
|
–e |
This switch displays Ethernet statistics. You can also use this |
|
switch with the –s switch. |
|
|
–n |
This switch displays addresses and ports in numerical form. |
|
This option can make Netstat data more difficult to read, but |
|
is useful if you need numerical data. |
|
|
–o |
This switch displays the numeric process ID associated with |
|
each IP connection. This allows you to determine which pro- |
|
gram is maintaining the IP connections established by (or to) |
|
your computer. For more information on this option, see |
|
“Using Netstat to Observe IP Connections,” page 584. |
|
|
–p protocol |
This option allows you to specify which protocol statistics you |
|
want to see. For example, netstat –p udp only displays UDP |
|
connections. |
|
|
–s |
This switch displays connection statistics classified by protocol. |
|
|
12 Chapter
Using Nbtstat
Nbtstat (NetBIOS over TCP/IP) is a tool for troubleshooting NetBIOS names over TCP/IP. This tool is helpful when TCP/IP is having problems resolving NetBIOS names to IP addresses. Type nbtstat at the command prompt to see a list of command-line options for this command. For example, typing nbtstat –c will list the NetBIOS names of computers on your network from the NetBIOS over TCP/IP (NBt) protocol cache maintained by Windows XP along with their IP addresses. You can learn more about Nbtstat by visiting the Help And Support Center (choose Start, Help And Support).
Running Additional Network Support Tools
In addition to the built-in command-line tools included in Windows XP, you’ll also find a few additional tools that can help you troubleshoot network connectivity and network connections. One tool, Network Diagnostics, is found in the Help And Support Center, and another set of tools, Windows Support Tools, must be installed from the Windows XP CD-ROM.
Running Network Diagnostics
Network Diagnostics is a Windows XP tool that is built into the Microsoft Help And Support Center. Network Diagnostics scans your computer system and gathers
356

3: Network Connectivity
Chapter 12: Solving Connectivity Problems
network-related information about your computer. The tool runs a series of tests on your computer and reports a pass or fail status for each test. When testing is complete, you can save the results to a file where you can view it at a later time and use the information for troubleshooting purposes.
To use the Network Diagnostics tool, follow these steps:
1From the Start menu, choose Help And Support.
2In the Help And Support Center window under Pick A Task, select Use Tools To View Your Computer Information And Diagnose Problems.
3In the left pane under Tools, select Network Diagnostics, as shown in Figure 12-8.
|
Figure 12-8. Network Diagnostics is a tool located in the Help And |
|
|
Support Center. |
|
4 |
In the right pane, you see an option to either scan your system or set scan- |
|
|
ning options. Select Scan Your System. |
|
5 |
Network Diagnostics begins a scan of your system. If you’re not connected |
|
|
to the Internet, you’ll be prompted to connect so that the diagnostic tool can |
|
|
check the connection as part of its network tests. |
|
6 |
When the test is complete, a list of tested items appears, and some tests will |
12 |
You can expand a category by clicking the plus sign next to it. As shown in |
Chapter |
|
|
be marked as Passed or Failed, as shown in Figure 12-9 on the next page. |
|
Figure 12-10 on the next page, the IPAddress test is actually a ping test.
357