

Microsoft Windows XP Networking Inside Out
.pdf3: Network Connectivity
Part 3: Network Connectivity
Logging On to a Windows Domain
11 Chapter
Once you have restarted your computer, you’ll notice that a few things are different. The Windows XP Welcome screen no longer appears. That’s right, you can’t select your local user account and log on from the Welcome screen. Rather, you see the Welcome To Windows dialog box, which instructs you to press Ctrl+Alt+Delete to start logging on. Next, you see the Log On To Windows dialog box where you enter your user name and password. If the dialog box is in its collapsed form, click the Options button to expand it. The Log On To box lets you choose to log on to the local computer or the domain. Click OK to finish logging on.
In fact, you’ll find more changes than the way you log on:
●Fast User Switching is not available when you are logged on to a domain. Only one user can be logged on to a computer at a time when the computer is connected to a domain.
●The automatic logon is not supported. However, see the Inside Out tip on this page.
●There are no password hints available should you forget your password.
●When you log off or shut down the computer, you see the Log Off Windows or Shut Down Windows dialog box, which resembles the way you log off or shut down Windows 2000.
There are other changes to the appearance of Windows XP Professional after you join a domain. To learn more, see “Surveying Windows XP Changes in a Domain Setting,” page 330.
Bypassing the Logon Screen
Automatic logon does not work when you are set up to log on to a Windows domain, or at least it first appears that way. In fact, you can bypass the Ctrl+Alt+Delete Welcome To Windows dialog box and Log On To Windows dialog box when you log on to a domain from a Windows XP Professional computer. The question is should you?
Keep in mind that if these two dialog boxes are disabled, anyone who can physically access your computer can log on to the domain. This is because autologon stores your user name and password in the registry and uses this information to log on. If a user can simply start your computer, logon will occur automatically, which can be a very serious security breach, depending on your network. You should check with your network administrator to see if autologon is supported because many domain security tools will not allow autologon to be used.
328

3: Network Connectivity
Chapter 11: Understanding Domain Connectivity
However, if you work on a small network where security is not an issue, you can use autologon by performing the steps that follow. But note that these steps require a registry change, and great care should be taken when editing the registry because incorrect settings can keep your computer from starting:
1Log on to the local computer with an administrator account. You cannot perform these steps while logged on to the domain.
2Choose Start, Run.
3In the Run dialog box, type regedit and press Enter.
4When Registry Editor opens, navigate to HKLM\Software\Microsoft\ Windows NT\CurrentVersion\Winlogon.
5Select Winlogon in the left pane, select AutoAdminLogon in the right pane, and press Enter. In the Value Data box, type 1 and press Enter. (This enables autologon.)
6Next, select DefaultUserName in the right pane and press Enter. Type the user name of the domain account you want to use when you automatically log on.
7Select DefaultDomainName, and make sure it is set to the name of the domain you want to automatically log on to. If it is set to the local computer name, press Enter, type the domain name, and press Enter again.
8Open DefaultPassword in the right pane, and type the password for the user name.
If the DefaultPassword value does not exist, create a new string with this value. Choose Edit, New, String Value. Type the name of the value as DefaultPassword and press Enter. Press Enter again, and type the password in the Value Data field.
Notice that your password is stored in plain text in this key. Anyone who turns on your computer and logs on automatically using this method can also open the registry to this key and obtain your password.
9Close Registry Editor. You can now log on automatically.
If you later decide to disable autologon, simply open User Accounts in Control Panel. On the Users tab, select Users Must Enter A User Name And Password To Use This Computer. Click OK. The AutoAdminLogon value in the registry will be reset to 0, which disables the feature.
Chapter 11
329
3: Network Connectivity
Part 3: Network Connectivity
Ensuring That You Have
Logged On to the Domain
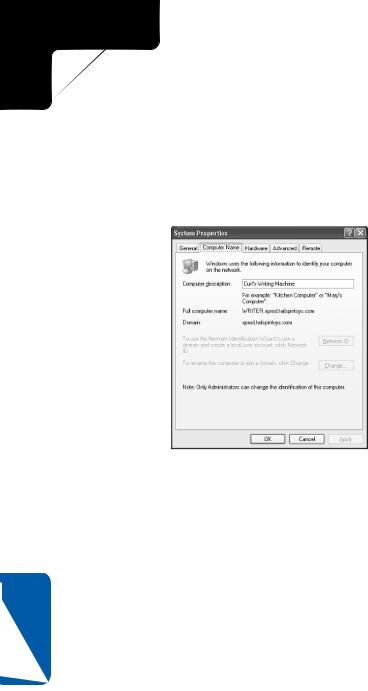
Once you log on, you can make certain that you are in fact logged on to the domain by opening the Computer Name tab of the System Properties dialog box. Figure 11-8 indicates that the computer is logged on to the domain.
Figure 11-8. Check the Domain field of the Computer Name tab to confirm that you’re logged on to the domain.
11 Chapter
Surveying Windows XP
Changes in a Domain Setting
After you have completed the logon process, you’ll notice several differences in the Windows XP interface when connected to a domain. Some of these changes are major, while others are just minor differences that make Windows XP look more like Windows 2000, which most domain users will be more familiar with. These options won’t radically change the way you use Windows XP, but they might stump you if you are not expecting them!
Start Menu
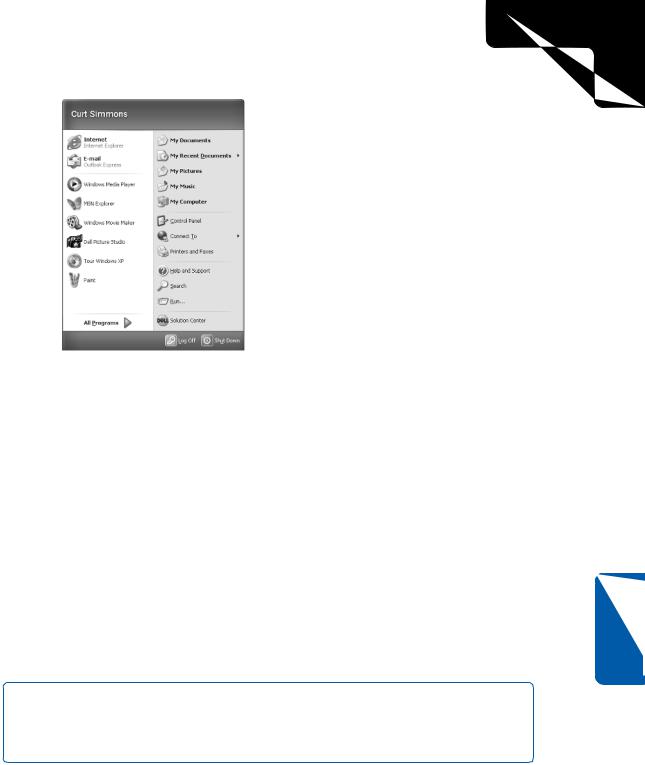
The Start menu looks and acts the same, as shown in Figure 11-9, but there is one minor difference: the Start menu displays your full name as stored in your domain user account instead of your user name.
330
3: Network Connectivity
Chapter 11: Understanding Domain Connectivity
Figure 11-9. The Start menu now displays your name as stored in your domain user account.
Ctrl+Alt+Delete
When you use Windows XP on a stand-alone computer or in a workgroup, the Task Manager appears when you press Ctrl+Alt+Delete. When you configure Windows XP Professional to log on to a Windows domain, the Windows Security dialog box appears instead. In this dialog box, you can choose Lock The Computer, Log Off, Change Password, or Task Manager. Choose Task Manager to use it as you would with Windows XP in a workgroup situation. This of course is not a major change, but it is one that can cause some confusion.
User Accounts
In Windows XP, User Accounts in Control Panel is used to manage your local user accounts. When you configure Windows XP Professional to log on to a Windows domain, User Accounts still appears in Control Panel, but its interface changes, as shown in Figure 11-10 on the next page.
note If the domain user account that you used to log on to the domain does not have administrative privileges on the local machine as well, a dialog box will appear. This dialog box prompts you to enter the user name and password of a local account that does have administrative privileges, which allows you to make changes to user accounts.
Chapter 11
331

3: Network Connectivity
Part 3: Network Connectivity
Figure 11-10. The User Accounts interface changes when you are logged on to a
Windows domain.
User Accounts gives you a simple way to add, remove, and manage local user accounts. You can also reset passwords. Keep in mind that these accounts only affect the local computer, not the domain. Users with a valid domain name and password can still log on to the domain at the local computer using that name and password. Any user who wants to log on to the local computer but not the domain, however, must have a valid user name and password configured in User Accounts on the local machine.
On the Advanced tab, shown in Figure 11-11, you can manage passwords. This option allows you to use different passwords to access other network resources during the
11 Chapter
Figure 11-11. The Advanced tab contains account and password management features.
332
3: Network Connectivity
Chapter 11: Understanding Domain Connectivity
current session. You can manage passwords such as saved dial-up or virtual private network (VPN) passwords or your .NET Passport. You can also open the Local Users And Groups console (which is also available in Computer Management) where local users and groups can be managed. In addition, you can require that users press Ctrl+Alt+Delete before logging on.
Why Use Ctrl+Alt+Delete to Log On?
Pressing Ctrl+Alt+Delete during logon is a security measure that can help protect your computer and network security. Universally, programs running on Windows cannot intercept the Ctrl+Alt+Delete keystroke, except Winlogon.exe, the Windows service that enables logging on and logging off. Virus programs known as Trojan horses can present a fake logon dialog box when you start up your computer. If you were to type your user name and password into such a rogue dialog box the Trojan horse could steal your name and password. However, requiring Ctrl+Alt+Delete to be pressed when logging on ensures that the next dialog box you see is the authentic Log On To Windows dialog box. When you set Windows XP to require you to press Ctrl+Alt+Delete to log on, you can rest assured that the logon dialog box presented to you is authentic.
Aside from these changes, joining a domain also adds two global security groups to your local account database. These group additions are Domain Admins and Domain Users. The purpose of these group additions is to give users who log on to your computer certain rights. For example, users who log on to your computer as members of the Domain Admins group can log on locally to your computer and have all the rights and privileges that a local administrator has. Users that are members of the Domain Users group have the same local permissions that a limited user has in Windows XP.
So, which group do you belong to? The Domain Admins group is a powerful group that typically contains domain administrators. Your account is a member of the Domain Users group by default. You can examine the group memberships by opening the Local Users And Computers console found in Computer Management or by selecting the Advanced tab of User Accounts and clicking the Advanced button. Select Groups in the left pane, and double-click the desired group account in the right console pane to open its properties dialog box. You’ll see a list of members, both locally and in the domain, as shown in Figure 11-12 on the next page.
Chapter 11
333

3: Network Connectivity
Part 3: Network Connectivity
11 Chapter
Figure 11-12. The Administrators Properties dialog box shows that the local Administrator account and the domain’s Domain Admins account are members of the Administrators group.
But what if you need more permission on the local computer than the limited local control the Domain Users group affords? For example, suppose your domain account has Domain Users group membership, which gives it the same privileges as a limited account on the local computer, and you need this domain account to have administrative privileges on the local computer. Can you change it? Yes, you can use either User Accounts or the Local Users And Groups console to change the local account group permission. The following steps show you how to change the account using User Accounts, which is the easier of the two:
1Open User Accounts in Control Panel.
2If you are not currently logged on with an account that has administrative privileges on the local computer, a dialog box appears. Type the user name and password of an account that does have administrative privileges on the local computer. Click OK.
3On the Users tab, select the User whose group membership you want to change and click Properties.
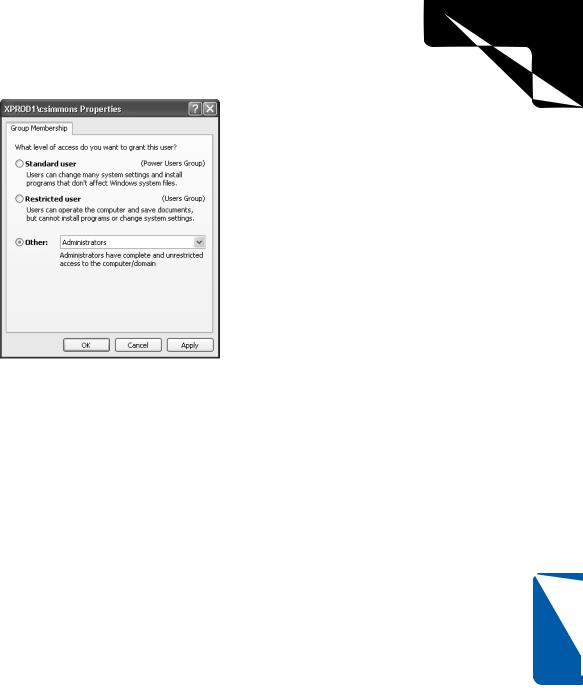
4On the Group Membership tab of the properties dialog box that appears, shown in Figure 11-13, select the level of access you want applied to the user account by selecting which group the user account should belong to. If you select Other, you can then choose a group from the list. Click OK.
334
3: Network Connectivity
Chapter 11: Understanding Domain Connectivity
Figure 11-13. The Other selection lets you choose from a list of group memberships including the Administrators group.
Internet Time
You might have noticed that before your Windows XP Professional computer joined a domain there was an Internet Time tab in the Date And Time Properties dialog box, which is opened by double-clicking Date And Time in Control Panel. When you use Windows XP Professional on a stand-alone computer or in a workgroup setting, you can synchronize your computer’s clock with an Internet time server if you are logged on under an account with administrative privileges. Once you join a domain, this Internet Time tab is removed—in fact, if you don’t have administrative privileges, you won’t even be able to open Date And Time. In a Windows domain, time synchronization is administered by the domain controllers because server versions of Windows 2000 use time synchronization as part of the authentication process, and improperly altering the time synchronization between the workstation and the server could cause the authentication to fail.
Chapter 11
Simple File Sharing
Simple File Sharing is enabled by default in Windows XP. You can find this option by opening Folder Options in Control Panel, selecting the View tab, and scrolling the Advanced Settings list to find the Use Simple File Sharing (Recommended) setting.
This setting provides an easy way to share files with other members of your workgroup while keeping your personal files private. However, Simple File Sharing does not apply when you are logged on to a Windows domain due to domain security features and
335
3: Network Connectivity
Part 3: Network Connectivity
11 Chapter
resource management. See Chapter 14, “Understanding Resource Sharing and NTFS Security,” to learn more about Simple File Sharing.
Finding Domain Resources
You can access domain resources in much the same way as you access resources in a workgroup. Locating resources is rather easy—using them might be another story, depending on your permissions. Keep in mind that many different resources, such as folders, printers, and even applications, might be shared in a domain. In fact, depending on the size of the domain, there might be thousands of shared resources. However, to use those resources, you must have permission. In other words, the administrator or user who owns the shared resource has to give you permission to access it. Without that permission, you’ll receive an “Access Is Denied” message. If you want to find and use resources for which you do have permission, you’ll find three common ways to do so, which are explored in the next three sections.
tip Keep in mind that if you cannot access a shared resource, the reason might be due to security. If you believe that you should be able to access the resource, check with your network administrator. The denied access you encounter might simply be an error that can easily be corrected by a network administrator or the user who owns the shared resource.
How Domain Administrators Share Resources
Whether you are a member of a domain or a workgroup, resources, such as folders and printers, are shared in the same way (which you can learn all about in Chapter 14, “Understanding Resource Sharing and NTFS Security”). You share the resource and assign permissions to users, and users can then access the shared resource over the network.
But what about domain administrators who have thousands of users in a domain? How can access and permissions be managed in a logical and efficient manner? The answer is by using groups. Network administrators make resources available to standard groups, such as the Domain Users group. In other words, permissions are not assigned to individual users (except in rare and special cases); they are assigned to groups to which users belong. Domain administrators can create specialized groups to meet the networking environment’s specific needs. For example, domain administrators might assign Print permission for an office printer to the Domain Users group so that everyone who is a member of Domain Users can print to the printer. However, there might also be a Management group that contains members of the management team. This group could be
336

3: Network Connectivity
Chapter 11: Understanding Domain Connectivity
assigned the Print permission as well as the Manage Documents permission so that members of the group can have more control over the printer. Permissions and shared resources can become very complex in domain environments. For this reason, domain administrators spend a lot of time developing groups, carefully identifying group members, and carefully choosing which groups can use particular resources. As with most things in the networking world, simplicity is always best, and that same philosophy holds true for shared resources and permissions in a Windows domain.
Browsing for Resources
You can browse for resources in a Windows domain by opening My Network Places. In My Network Places, you’ll see all of the computers in the domain. You can double-click a computer icon to open a list showing the shared resources available on that computer. You can then access the shared resource if your user account has the proper permission or if you belong to a group with the necessary permission.
Browsing is a good way to search for items in a domain, especially if the domain is small. But in large domains, you can spend a lot of time stumbling around looking for items if you don’t already know where they’re located in the domain. But if your Windows XP Professional computer is part of a Windows 2000 domain, you can search Active Directory for the resource that you want.
Searching Active Directory
Windows 2000 networks use Active Directory to store user accounts, computer accounts, OUs, and all other shared resources, such as folders and printers. This storehouse of information gives administrators an easy way to manage information and an easy way for network users to find the information they need. For example, suppose there are 15,000 computers in your domain and over 1000 shared printers, and you need to print to a color printer that can staple pages. You could browse for the printer, but an easier method is to simply query Active Directory, find the appropriate printer, and connect to it automatically to print your document.
Active Directory uses the Lightweight Directory Access Protocol (LDAP), which is a standard directory access protocol for performing queries against a directory database. By searching for particular items and attributes, or qualities, of those items, you can find the resources you need quickly and easily.
Searching Active Directory is easy, just follow these steps:
1Open My Network Places.
2Under Network Tasks in the left pane, click Search Active Directory. This option only appears if your computer is part of a domain.
Chapter 11
337