

Microsoft Windows XP Networking Inside Out
.pdf14 Chapter
Part 4: Network Resources
Connecting to a Network-Ready Printer
Most printers connect directly to a single computer on a network through a computer’s parallel, USB, IEEE (FireWire), or infrared port, especially in home and small office networks. You then share that printer with other network clients who access the printer through your computer on the network.
However, you might have a printer that is outfitted with a NIC and connects directly to your network hub (particularly in a larger office). In this case, the printer is not installed on a computer, but instead acts as a stand-alone network device that connects to the network just like any computer. Every computer on the network can then access the printer directly and print to it.
In the case of a network-enabled printer, you can connect to the printer through its IP address. To do so, you have to define a TCP/IP port. Follow these steps:
1Connect the printer to the network and turn it on.
2Open Printers And Faxes from the Start menu or Control Panel, and click the Add A Printer link under Printer Tasks in the left pane. (You can also choose File, Add Printer.)
3When the Add Printer Wizard appears, click Next.
4On the Local Or Network Printer page, select Local Printer Attached To This Computer. Clear the option beneath it, Automatically Detect And Install My Plug And Play Printer, and then click Next.
5On the Select A Printer Port page, shown here, select Create A New Port, and then select Standard TCP/IP Port in the Type Of Port box. Click Next.
418
4: Network Resources

Chapter 14: Understanding Resource Sharing and NTFS Security
6The Add Standard TCP/IP Printer Port Wizard appears. Click Next.
7On the Add Port page, enter the IP address of the printer. You can get this information by having the printer print a configuration page. See the printer’s documentation for details. The Port Name field will be filled in automatically, but you can change the name if necessary. Click Next.
8The computer connects to the Internet printer and displays a connection page. Click Finish.
The network-ready printer will now be available in Printers And Faxes along with any printers shared through a network computer connection or the Internet, or connected directly to the local computer. Although any computer on the network can print directly to the printer using this technique, it often simplifies the management of printers to have one computer (normally a server) connect to the printer directly, and then share that printer to other clients. This provides all the advantages of print queuing, allowing the computer to manage documents with its ample hard disk space instead of relying on the printer and its limited amount of onboard RAM. Using a print queue also adds reliability, allowing documents to be held on the server in case the printer goes offline.
It’s also wise to manage networked printers through print queues on Windows computers for security reasons. See “Securiting Printers,” page 585, for more information.
Sharing Files
Shared files are another important network resource that people come to depend on, particularly in large corporate environments. They can also be handy in home and small office networks. You can do such things as maintain central stores for commonly used files and collaborate on larger documents.
By default, Windows XP computers that are not members of a domain use a new feature called Simple File Sharing, which was designed to streamline the process of managing file shares (and NTFS permissions, when NTFS is used instead of FAT32 as the underlying file system).
newfeature!
Sharing Resources with Simple File Sharing Enabled
Simple File Sharing is a computer-wide setting in Windows XP that provides you with a measure of security and makes NTFS permissions easy for users to manage. When you share a resource such as a file on the network with Simple File Sharing enabled, other users can read (but not change) the resource. Depending on your preferences, you can also give full control to users so they can make changes as well. Simple File Sharing enables you to make your personal files private and to quickly share resources over your network.
Chapter 14
419
4: Network Resources
14 Chapter
420
Part 4: Network Resources
note Windows XP computers that are participating in a domain cannot use Simple File Sharing.
Sharing Folders
One of the most common network shares is shared folders. After all, you can put just about any kind of document, picture, or file in a folder and share it. Network users can then browse the network, locate the folder you have shared, and access the information inside the folder, depending on the permissions you have assigned.
To share a folder with Simple File Sharing enabled, you first need to ensure that the folder does not currently reside in a private folder. If it does, you’ll need to either remove the private setting from the parent folder or move the folder to another location. To share the folder, follow these steps:
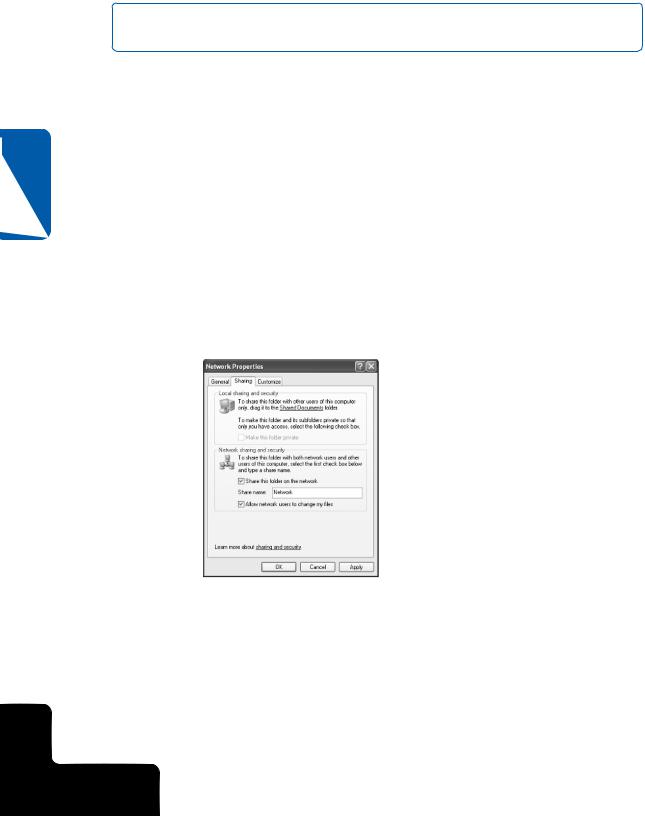
1Right-click the folder you want to share and choose Sharing And Security.
2On the Sharing tab, shown here, select Share This Folder On The Network, and then enter a name for the folder in the Share Name box.
The name of the share is the name network users will see. It can be completely different from the actual folder name.
3After you select Share This Folder On The Network, the option beneath it becomes available—Allow Network Users To Change My Files. If this option is selected, users will have full control to edit and even delete files. If you only want users to be able to read your files, clear this check box. Click OK.
The folder is now shared. An open hand appears as part of the folder’s icon, signifying that the object is shared on the network.
4: Network Resources
Chapter 14: Understanding Resource Sharing and NTFS Security
Limitations on Network
Security with Simple File Sharing
Simple File Sharing doesn’t give you many security options. When you share a network folder, users can either read the contents, or they can have full control. This lack of flexibility in determining who can view or modify data on your computer makes Simple File Sharing unsuitable on any computer that is accessible over the Internet because it makes your computer extremely vulnerable to hackers and to software worms. For this reason, it is strongly recommended that you not use Simple File Sharing unless its use is absolutely necessary (or if your computer is not connected in any way to the Internet). If you are using Windows XP Professional, you can disable Simple File Sharing and assign NTFS permissions manually, which you can learn more about in “Managing Permissions with Simple File Sharing Disabled,” page 426.
If you are using Windows XP Home Edition, however, Simple File Sharing is your only option. This makes Windows XP Home Edition somewhat unsuitable for sharing files over the network, particularly if you need to write or create files from a remote location. If you are using Windows XP Home Edition, and you must share files with others, be certain that your computer is firewalled from the Internet (either via Internet Connection Firewall [ICF] or a hardware device), and that you aggressively use antivirus software to protect your computer from threats that can be propagated via other computers on your network. For more information about the security limitations of Simple File Sharing, see “Evaluating Simple File Sharing,” page 585.
Chapter 14
tip Using Friendly Share Names
Remember that users access shared folders by the share name, which doesn’t need to match the folder name. To make network users’ lives easier, use share names that are readily understandable. If you keep company documents on your hard disk in a folder named CMPYDCS, rather than accepting the folder name as the default share name, give the share a meaningful name, such as Company Docs. Many users on your network might not have the skills and networking knowledge that you do, so make network share names simple and descriptive.
Before you share network folders, consider the implications of sharing carefully—even on a home network. After all, do you really want your kids accidentally deleting your files and folders? In an office setting, do you really want other network users to have access to all the shared folder’s files? You should think through these issues carefully as you decide whether to share files with other users. Because of the security and management issues involved, consider adopting these practices:
●Only share files that need to be shared. That sounds obvious, but make sure you are not sharing folders that contain some files that need to be shared as
421
4: Network Resources

14 Chapter
422
Part 4: Network Resources
well as other files that don’t. Sharing folders that contain more than the files you really need to share tends to make management more difficult for you.
●Create folders that are used just for network sharing. Give the folders network-friendly names, and make sure subfolder names are easily understandable. This will help you manage the files that are shared more easily.
Sharing Drives
Similar to sharing folders, to share a drive, simply right-click the drive, and then choose Sharing And Security. The difference is that the Sharing tab will warn you that sharing an entire drive is not recommended. To continue you’ll have to click the link that reads If You Understand The Risk But Still Want To Share The Root Of The Drive, Click Here. You’ll then see the familiar Sharing tab, where you select Share This Folder On The Network and give the drive a share name. But the advice to not share an entire drive should be taken seriously. If you decide to share your boot and system volume, other users on the network will have complete access to your drive and could render your machine inoperable by deleting important system files.
But there might be times when sharing an entire drive makes sense. For example, suppose you have a home network with three computers, and only one computer has a Zip drive. If you want to store data on the Zip drive from all three computers, you could create a network share on the computer with the drive where users can store data, and then you could copy that data to the Zip drive. However, why not just share the Zip drive? If you keep a disk inside the Zip drive for storing data, you can access the drive from any computer and copy data to the drive. The same concept is true with a writable (CD-R) or rewritable (CD-RW) drive. There are even times when you might want to share a fixed disk volume. Suppose you’ve used Microsoft Windows Media Player to create a digital library of your entire CD collection. If you place that library on its own volume and share it, the entire music collection is available from any computer. This can save you from having to buy extra hard disk capacity for each machine because the music remains stored on only one computer.
Always stop and think carefully before you share an entire hard disk drive. Under no circumstances should you give access to the Everyone group (as is done by Simple File Sharing), unless your computers are not connected to the Internet in any way, as doing so would leave the volume extremely vulnerable to Trojan horse programs and Internet worms. Even in home networks, files are accidentally deleted and problems arise. So when you share a drive, consider that you are giving everyone complete access to the drive. If you are not comfortable doing this, look for an alternative way to reach your network share goals.
Sharing Applications
Some applications can be shared so that they can be accessed over the network by network users. However, before you begin sharing applications, there are some important items to consider:
4: Network Resources

Chapter 14: Understanding Resource Sharing and NTFS Security
●Some programs will not work in a shared environment. Because of the way the programs install on the local machine, they cannot be run remotely on the network.
●The licensing agreement accompanying some programs might not permit you to share the program over the network or at least not without paying additional licensing fees. Check the licensing agreement carefully.
●Sharing applications over a network can consume a lot of network bandwidth and create excessive network traffic. Carefully consider your available bandwidth and the need for application sharing before doing so.
tip Using Remote Desktop as an Alternative to Sharing Applications
You can run nearly any application remotely by running the computer on which it resides remotely, using Remote Desktop. Applications accessed by remotely running the computer on which they’re installed will avoid the first two issues in the previous list— incompatibility because of the way programs are installed on the remote computer and licensing restrictions. The third issue, network bandwidth, can still be an issue. Also, running software remotely in this fashion is not really a replacement for application sharing among multiples users, because a computer that is providing remote services can’t be used by another user at the same time. See “Exploring Remote Desktop,” page 473, for more information about Remote Desktop.
If you decide to share an application, locate the application’s folder (typically a folder within %SystemRoot%\Program Files) and share the entire application folder. You might have to assign users the Full Control permission to the application’s folder for them to be able to launch the application and use it. If you don’t want to grant users the Full Control permission, you can experiment with more restrictive permissions to find the minimum level of permissions that allows the application to run correctly.
Making Folders Private
In a home or small office network, a sense of trust is usually established among users, and for this reason, Simple File Sharing gives you an easy way to make shares available to network users. However, what about users that log on to the same computer? By default, when a new user account is created in Windows XP, the account is set up with a profile and a series of folders. The user has full control of these folders. But users with an administrator account (or the operating system’s built-in System account) also have full control of these folders. In fact, there might be several users accessing your local computer who have administrator accounts, and if you are working with sensitive data that you don’t want others to see, you can choose to make any or all of your user profile folders private.
If you are using NTFS, when you make a folder private, the Administrators group and the
Chapter 14
423
4: Network Resources

Part 4: Network Resources
built-in System account are removed from the resource’s access control list (ACL), leaving only the user in control of the folder and able to view and alter its contents. ACLs are discussed in more detail in “Configuring NTFS Permissions,” page 433.
To make one of your user profile folders private, right-click the folder, and then choose Sharing And Security. On the Sharing tab, shown in Figure 14-16, select Make This Folder Private. Once you make a folder private, all its subfolders are made private as well.
14 Chapter
Figure 14-16. Selecting Make This Folder Private removes the Administrators group and the built-in System account from the ACL of the folder and its subfolders.
note If your Sharing tab is different from the one shown in Figure 14-16 and you also see a Security tab, Simple File Sharing is turned off on your Microsoft Windows XP Professional computer. If you want to turn it on and you’re not a member of a Windows domain, you can open Folder Options in Control Panel and select the View tab. In the Advanced Settings list, select Use Simple File Sharing (Recommended). In Windows XP Home Edition, Simple File Sharing is always in effect and cannot be disabled.
If the Make This Folder Private check box is already selected but the option appears dimmed, the folder is a subfolder of another folder that has been made private. To change this subfolder from being private, you either have to remove the private setting from the parent folder (you might have to navigate up several levels to find the top level at which the folders were shared), or you have to drag the folder to the Shared Documents folder. If the Make This Folder Private option appears dimmed but is not selected, it means you can’t make the folder private. The folder might not be in your user profile, it might belong to another user or one of the All Users (shared) folders, or it might not be a user profile folder at all. Only NTFS drives are able to use the security features of Simple File Sharing to restrict how local users access files, and Simple File Sharing only makes your own user folders private.
424
4: Network Resources
Chapter 14: Understanding Resource Sharing and NTFS Security
caution As discussed in Chapter 13, “Selecting a File System,” FAT drives do not maintain any security-related data about files; thus, although shares can prevent remote users from accessing files on your computer, any user who is logged on to your system locally can access any file on a FAT partition. To prevent this, format or convert your drives to NTFS.
Using the Shared Documents Folder
Windows XP maintains a Shared Documents folder (and subfolders) that is available to anyone who has an account on the computer. Users that have administrative privileges have full control over the Shared Documents folder and its subfolders (which include Shared Music and Shared Pictures). Users with Limited accounts (as well as remote users who use the Guest account when Simple File Sharing is enabled) can browse the folders and read the data, but they cannot create new folders or files, and they cannot move or copy existing files and folders to this location. The purpose of the Shared Documents folder is to provide a way for administrators to make common documents and files available to all users on the computer. The Shared Documents folder is a subfolder of the All Users folder located in the Documents And Settings folder. You can also find the Shared Documents folder listed in My Computer.
Chapter 14
The Truth About Private Folders
Private folders give users an easy way to keep folders private from anyone else on the computer, including computer administrators. However, they also have serious limitations.
●You can make folders private only in your own user profile. If the folder is on a different NTFS volume or in another folder that is not within your user profile hierarchy of folders, you cannot make the folder private. A good example is application data, which is often saved in a specific application folder. Because the folder is not within your user profile, you cannot make it private. Therefore, you are somewhat limited as to what you can make private.
●Private folders are private without exception. You cannot override the private settings and give another user access when Simple File Sharing is enabled. Once you make the folder private, only you can access the folder.
●All files and subfolders in the private folder are also made private. You cannot apply different settings to individual subfolders or individual files.
●Private folders cannot be shared on the network.
(continued)
425
4: Network Resources
14 Chapter
Part 4: Network Resources
Inside Out (continued) It is important to keep in mind that private folders are applied to the local computer and users who log on locally. Network users do not have access to local folders unless they are specifically shared, so it is important to understand the difference between shared folders and private folders. Private folders are beneficial when multiple people log on to the same computer, and you want to make sure that no one with administrative privileges is able to read or access data in a particular folder.
caution If you are a Windows XP Professional user, don’t assume that you can simply encrypt the folder that you want to make private instead of using the Make This Folder Private option. Keep in mind that system recovery agents (discussed in “Managing EFS,” page 595) might be able to decrypt the files!
Managing Permissions with Simple File Sharing Disabled
The concept of permissions often causes considerable trepidation even on the part of experienced computer users, and rightly so. Permissions can be complicated and confusing. For this reason, when Windows XP was released, Microsoft recommended using Simple File Sharing and enabled it by default in Windows XP. Using Simple File Sharing, users have basic Read access to network shares, or you can assign them Full Control access to the shares, depending on your needs. However, this simplistic network security model is not sufficient in these days of constant security threats and Internet worms. When using Windows XP Professional, it’s normally a better idea to turn off Simple File Sharing. This section explores the possibilities that turning off Simple File Sharing provides to users of Windows XP Professional.
Removing Simple File Sharing
If you’re running Windows XP Professional, you can disable Simple File Sharing by changing a single setting. If you choose to do this, the full range of NTFS permissions and security features become available to you. Of course, make sure that you really want to administer NTFS permissions manually before disabling Simple File Sharing because Simple File Sharing is your easiest choice.
To remove Simple File Sharing from Windows XP Professional, follow these steps:
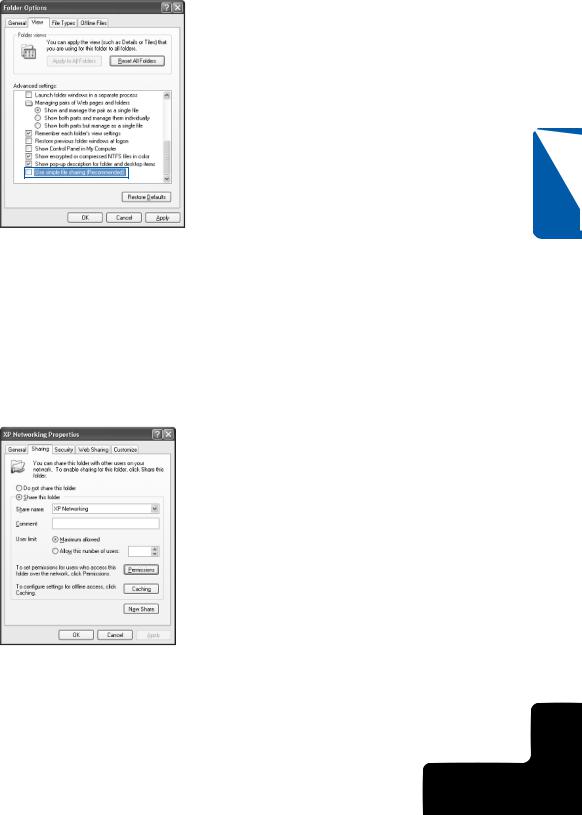
1Choose Start, Control Panel, and open Folder Options. You can also access Folder Options from Windows Explorer or most folder windows by choosing Tools, Folder Options.
2In the Folder Options dialog box, select the View tab. Scroll to the bottom of the Advanced Settings list and clear the Use Simple File Sharing (Recommended) option, as shown next. Click OK.
426
4: Network Resources
Chapter 14: Understanding Resource Sharing and NTFS Security
Chapter 14
Assigning Share and NTFS Permissions
Once Simple File Sharing is disabled, you’ll find several significant changes when you access the properties dialog box for a folder, drive, or application that you want to share. The Sharing tab changes its appearance so that the Simple File Sharing components and the Make This Folder Private feature are no longer displayed. Instead, you see a Sharing tab that resembles the one found in Windows 2000, where you can share the object, limit the number of concurrent connections to it, and set permissions, as shown in Figure 14-17. In addition, there’s an entirely new tab, the Security tab, which is used
to assign NTFS permissions. (The Security tab won’t be present on a FAT volume.)
Figure 14-17. The Sharing tab changes to a Windows 2000 style once Simple File Sharing is turned off.
427
4: Network Resources