

Microsoft Windows XP Networking Inside Out
.pdf5: Advanced Networking
Part 5: Advanced Networking
Enabling Remote Assistance
16 Chapter
Before your computer can use Remote Assistance, you must make sure the feature is enabled. (It’s enabled by default in both Windows XP Professional and XP Home Edition.) Follow these steps:
1Open Control Panel and double-click System.
2On the Remote tab, select Allow Remote Assistance Invitations To Be Sent From This Computer, as shown here.
3Click the Advanced button. You can use the dialog box shown in the following illustration to allow the expert to control your machine when connected via a Remote Assistance session. Note that if you do not enable remote control, the expert will be able to see your computer, but will not be able to make any configuration changes. You can also specify the maximum period of time that an invitation can remain active. By default, an invitation is good for one hour, but you can change this value if necessary when you create each invitation.
498
5: Advanced Networking
Chapter 16: Remote Desktop and Remote Assistance
note You only need to enable Remote Assistance if you plan on asking for assistance. You can accept remote assistance invitations without enabling Remote Assistance on your computer.
Requesting Remote Assistance
Requesting remote assistance can take several forms, from using messaging software such as Windows Messenger to saving an invitation file to a floppy disk and hand delivering it to the expert. The easiest place for the novice to start is the Window XP Help And Support Center. Follow these steps:
1From the Start menu, choose Help And Support.
2Under the Ask For Assistance section, click the link labeled Invite A Friend To Connect To Your Computer With Remote Assistance.
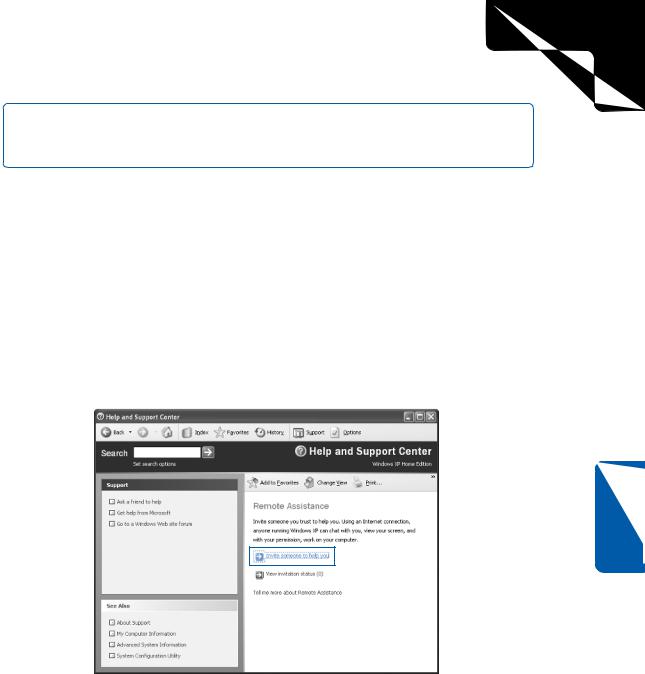
3On the Remote Assistance page that appears, click the Invite Someone To Help You link, as shown here.
Chapter 16
4You can request assistance of an expert in three different ways:
■Use Windows Messenger. Sign in to Windows Messenger if you’re not already online, choose an expert from the Online list, and click Invite This Person. The expert receives the request in Windows Messenger and can accept your invitation.
499
5: Advanced Networking
Part 5: Advanced Networking
tip Note that you can also bypass the Windows Help And Support Center and use Windows Messenger directly to start a Remote Assistance session. In Windows Messenger, choose Actions, Ask For Remote Assistance.
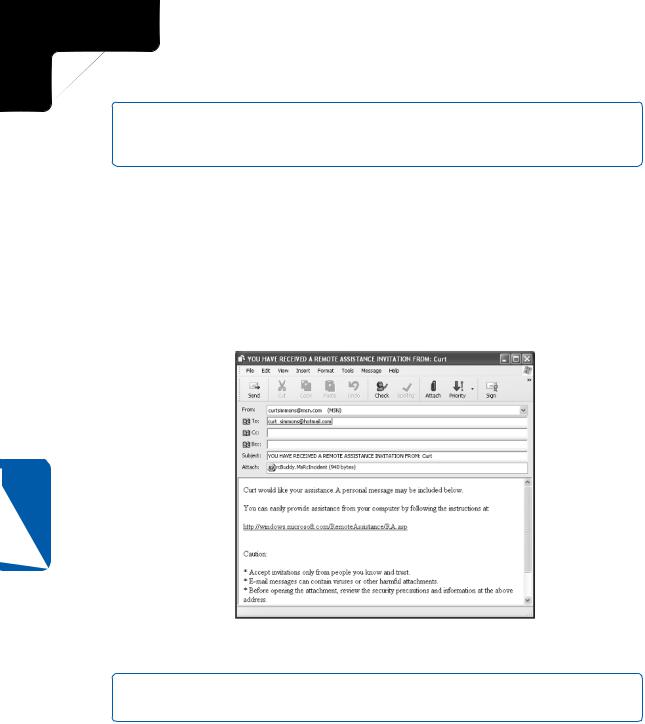
■E-mail. You can send the invitation via e-mail by entering the e-mail address in the Type An E-mail Address box and then clicking the Invite This Person link below it. In the window that appears, enter your name and a message and click Continue. In the next window, specify a time duration for the invitation and enter a password the user must enter to access your computer. Click Send Invitation. The message is entered in your default mail client (such as Outlook Express). As shown in Figure 16-14, the e-mail contains instructions and a file called rcBuddy.MsRcIncident. When the user receives the file, he can doubleclick the attachment to start the Remote Assistance session.
16 Chapter
Figure 16-14. A Remote Assistance invitation can be sent as an e-mail attachment.
tip For security purposes, it’s always wise to avoid sending the password needed to access your computer via the same method the invitation was sent.
■Invitation file. If you cannot e-mail the invitation or use Windows Messenger, you can save the invitation as a file, which can then be given to the expert. Using this option, you can also enter a duration for the invitation and a password. The file is saved as RAInvitation.MsRcIncident. You can then transfer the file by hand, in an e-mail, or via a network share.
500
5: Advanced Networking
Chapter 16: Remote Desktop and Remote Assistance
note In the event that the novice needs to cancel the invitation, the novice can click the View Invitation Status link in Remote Assistance. The novice can then select and delete any pending invitations.
You want to use Remote Assistance with a dynamic IP address.
If you are using a dial-up account to the Internet, you’ll need to connect to the Internet before generating and sending the invitation so that the correct public IP address will be used in the invitation. Because ISPs use dynamic IP addressing, your computer usually has a different IP address each time you connect to the Internet. To make Remote Assistance work, you need to connect and stay connected until the expert assists you and the remote session is over. If you are disconnected at any time, you might need to cancel the invitation and start over with a new invitation that will convey your new dynamic IP address.
Using Remote Assistance
Once the expert accepts the invitation, the novice’s computer validates the password supplied by the expert and confirms that the invitation is still valid. If all of the components are in order, the novice’s computer notifies the novice that the expert wants to connect to his computer. The novice must complete the process by accepting the Remote Assistance session.
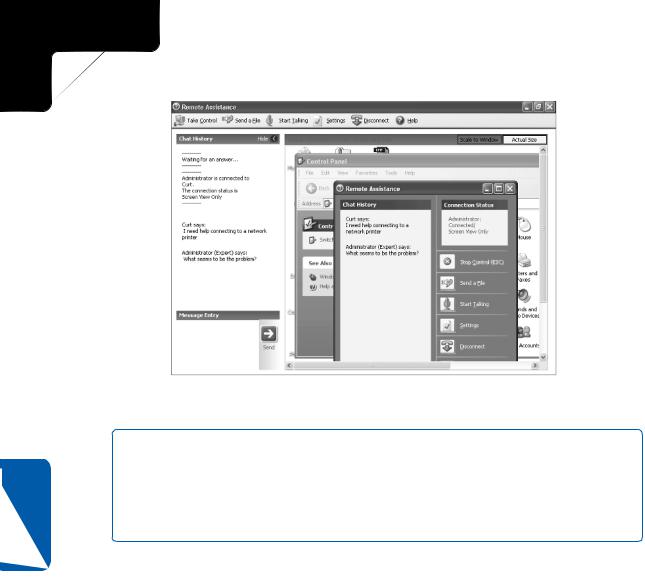
Once the session begins, the Remote Assistance window appears on the novice’s and expert’s computers, and a console window opens on the expert’s computer showing the novice’s desktop, as shown in Figure 16-15 on the next page. The desktop view is updated in real time, and the responsiveness of the remote session depends on the bandwidth of the network connection.
The expert can take control of the novice’s computer by choosing Take Control on the Remote Assistance menu. The novice is then prompted on whether to permit the expert to share control of the computer. If the novice clicks Yes, the expert will be able to take control of the novice computer. At this point, the novice and the expert are essentially sharing the same computer. Should the novice decide to take back control and end the session, the novice can press the Esc key or click the Stop Control button in the Remote Assistance window.
Chapter 16
501
5: Advanced Networking
Part 5: Advanced Networking
16 Chapter
Figure 16-15. The expert user can see the novice’s desktop and control it if the novice accepts the Remote Assistance session.
caution The expert has only as much control over the novice’s system as the novice has. For example, if the novice only has a limited account, the expert will only have limited permissions. Remote Assistance does not override existing Windows permissions. If solving a novice’s problems necessitates making changes that require the permissions of an administrator account, and the novice has only a limited account, the expert won’t be able to fix the problem.
502
Chapter 17
Using |
504 |
Remote Access |
|
Understanding |
|
Virtual Private |
513 |
Networking |
5: Advanced Networking
Remote Access
and Virtual
Private Networking
Modern computing, more often than not, involves the sharing of information between one or more systems. This information sharing requires a network, most often a local area network (LAN). However, what if the network you need to connect to is not local? For example, your company might have an office in Paris and one in New York. You work at the New York office, but you need to connect to the private network in Paris. Or perhaps you’re attending a conference in Dallas, but you need to connect to the New York office. How can you make these connections?
LAN networking and its various components were examined in earlier chapters. This chapter focuses on the methods for connecting a Microsoft Windows XP computer to a remote network. For the purposes of this chapter, a remote network can be considered any network that is physically distinct and separate from the network that you are currently connected to. The concept of a remote network applies to any separate network, whether it’s in a different building across the street or thousands of miles away.
In this chapter, remote access services available with Windows XP will be examined in two categories. The first part of the chapter covers providing remote access dial-up services using Windows XP. Remote access connections are commonly used to connect computers to the Internet or to connect telecommuters to their work-based servers. The second part of the chapter discusses virtual private network (VPN) connections, including the concepts behind using them, providing VPN connections to others, and troubleshooting VPN connections.
503
5: Advanced Networking
Part 5: Advanced Networking
Using Remote Access
A wide area network (WAN) refers to any network that includes links provided by telecommunications providers. In terms of remote access and remote networking, connectivity typically involves the use of WAN technologies such as modems, an Integrated Services Digital Network (ISDN), a Digital Subscriber Line (DSL), and broadband cable. For example, if a user makes a connection to the Internet using a dial-up modem, the user is using a remote access connection. Because the Internet does not reside on the user’s LAN, the modem makes a connection to a remote server, which then provides access to the remote network (the Internet). The same concept is true when accessing remote networks that are private.
Access to private networks from remote locations is accomplished through remote access. The term remote access typically implies that a dial-on-demand technology, such as dial-up modem or ISDN, is used to connect to a private network. Remote access also includes the use of VPN connections and broadband Internet connections.
You can learn more about the types of connections that can be used with remote access in “Types of Internet Connections,” page 85.
Remote access can be used to establish connections with both dial-up services that use Point-to-Point Protocol (PPP), a standard protocol for encapsulating network protocols such as TCP/IP over dialup, as well as Windows remote access servers, which also leverage PPP. “Creating New Internet Connections,” page 103, covers using remote access services to dial up to a standard ISP using PPP. This chapter focuses on using remote access services to connect to remote Windows networks running remote access servers.
17 Chapter
Configuring Remote Access Connections
This section examines how to configure some of Windows XP’s remote access services. Windows XP does not distinguish between remote access connections to the Internet and to a private network; after all, the connection is much the same. For an Internet connection, you connect to an ISP’s dial-up server. For a remote access connection to a private network, you connect to a private remote access server.
note Windows servers include the Routing and Remote Access Service (RRAS), so it is not unusual for a server to function solely as a remote access server to support remote network clients.
You use a modem (or possibly an ISDN connection) to connect to the remote access server, which then authenticates you so that you can gain access to the network. Typically, you use the same user name and password as you would use when you are connected to the domain.
504
5: Advanced Networking
Chapter 17: Remote Access and Virtual Private Networking
Once the hardware is installed for either a modem or an ISDN connection, the next step is to create a connection profile that can be used to initiate a connection to the remote network. To create a remote access connection, you use the New Connection Wizard. The following steps walk you through the process.
1Choose Start, Connect To, Show All Connections.
2In the Network Connections window, click the Create A New Connection link under Network Tasks.
3The New Connection Wizard appears. Click Next.
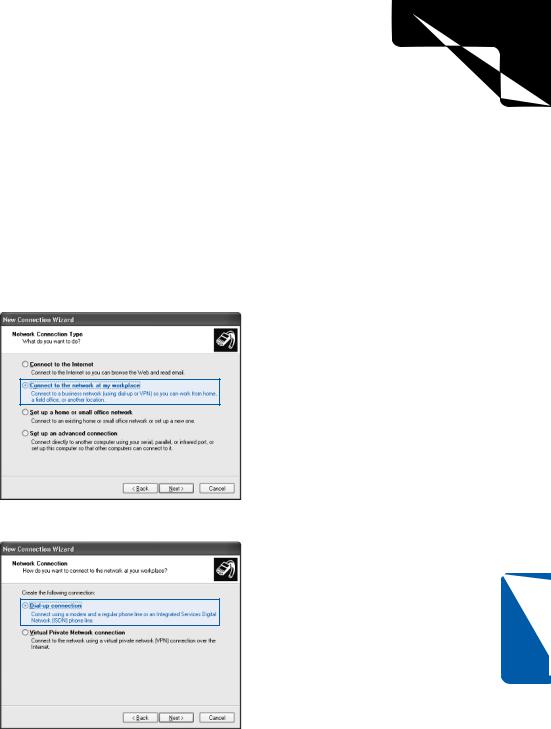
4Four options appear. Select the option to Connect To The Network At My Workplace, shown here. Click Next.
5 Choose the Dial-Up Connection option, as shown here, and click Next.
Chapter 17
6Type a name for the connection and click Next.
7Type a phone number to dial. Remember to use a 1 and the area code if necessary. Click Next.
505

5: Advanced Networking
Part 5: Advanced Networking
17 Chapter
8If Fast User Switching is disabled (or if your computer participates in a domain), you’ll be asked whether you want the connection to be available for anyone using this computer or just for your use. Select the option you prefer, and click Next.
9Click Finish.
10The connection dialog box appears, shown next. Type the user name and password required to create the connection to the remote network.
Configuring Remote Access Security
Each remote access connection has a set of properties that can be configured. The properties dialog box you’ll find by right-clicking the connection’s icon and choosing Properties is identical to the properties dialog box you see for any modem connection.
See “Configuring Modems and Broadband Hardware,” page 96, to learn more about modem configuration and troubleshooting.
Besides the basic modem configuration options, there are a number of potential security configurations that might be required to connect to a remote access server. The security configuration used depends on your network, so you’ll need information from the remote access server administrator to make sure you choose the correct security settings.
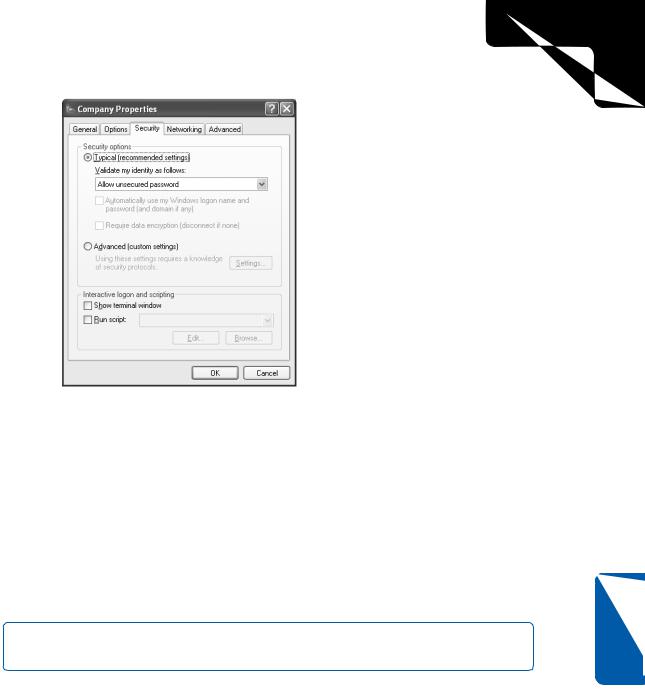
To access the security settings for the connection, select the Security tab in the connection’s properties dialog box, as shown in Figure 17-1.
506
5: Advanced Networking
Chapter 17: Remote Access and Virtual Private Networking
Figure 17-1. Remote access connection security settings are configured on the Security tab.
The default setting is Typical (Recommended Settings), which is used for Internet connections. However, in many cases, network security requires stronger security settings. If this is the case, all security settings can be configured on this tab. The window is divided into two general sections, Security Options and Interactive Logon And Scripting.
In many situations, the Typical setting is selected, but a secured password is also required. In Figure 17-2 on the next page, the Require Secured Password option is selected, and the options to use your Windows logon name and password as well as data encryption are selected. These settings are appropriate for dialing into a private network. You can also select Use Smart Card instead of Require Secured Password if smart cards, a form of hardware-based secure authentication, are used in your environment.
caution Keep in mind that your settings must match those of the server you are dialing into. If they do not, the connection will fail.
In some networks, custom security settings are used, and in this case, Windows XP allows you to specify the authentication protocol that should be used. Select the Advanced (Custom Settings) option on the Security tab, and then click the Settings button. As shown in Figure 17-3 on the next page, you can choose a data encryption method and the desired logon security. These are all different authentication protocols that can be used by the remote access server.
Chapter 17
507