

Microsoft Windows XP Networking Inside Out
.pdf5: Advanced Networking
Part 5: Advanced Networking
20 Chapter
single most important improvement to IIS security comes with Windows XP, where IIS is not installed by default. On Windows XP, the user must deliberately choose to install IIS if its services are needed.
The previous section discussed disabling or removing various components of IIS to increase system security. However, if you actually need to serve Internet content from Windows XP, these recommendations are not practical. Instead, if you choose to enable IIS, follow these guidelines to secure your IIS installation.
Prepare for security before installing IIS A default installation of IIS contains a number of vulnerabilities that can be remotely exploited, and computers across the Internet are actively scanning IP addresses around the world looking for vulnerable computers. Make sure that you have the latest service pack for Windows XP and the latest security hotfixes for IIS downloaded and available (either on your local hard disk or removable media) before installing IIS. Although Windows Update will download and install these patches once it has been run, an unpatched and exposed IIS system can easily be exploited during the few minutes between product installation and updating. It’s also a good idea to have the IIS Lockdown Tool (see “Run the IIS Lockdown Tool,” page 580) and the MBSA handy before you install IIS.
You can learn more about MBSA in “Detecting Windows XP Security Issues,” page 572. You can download these and other tools, and program patches, and subscribe to security notification e-mail lists at www.microsoft.com/security.
Install IIS while disconnected from the network This prevents a remote attacker from detecting and exploiting an unpatched copy of IIS immediately after its installation. Alternatively, effectively firewalling the computer from the Internet (and from other IIS installations, which could be infected with a worm such as Code Red) provides sufficient protection from such an exploit.
Install only those IIS features that are absolutely necessary For example, if the Windows XP computer doesn’t need to act as an e-mail server, do not install SMTP. If it isn’t intended to act as an FTP server, do not install FTP. And, if the computer will not be used to host content developed and posted via Microsoft FrontPage, do not install the FrontPage Server Extensions. Also, it’s wise to avoid installing any of the default applications or virtual directories that come with IIS, such as the Printers and Scripts virtual directories and the Remote Desktop Web Connection. To remove unneeded services, take these actions:
1Open Add Or Remove Programs in Control Panel.
2Click Add/Remove Windows Components.
3Scroll through the Windows Components Wizard list of components to Internet Information Services. Select Internet Information Services (IIS), and click the Details button.
578
5: Advanced Networking
Chapter 20: Maintaining Network Security
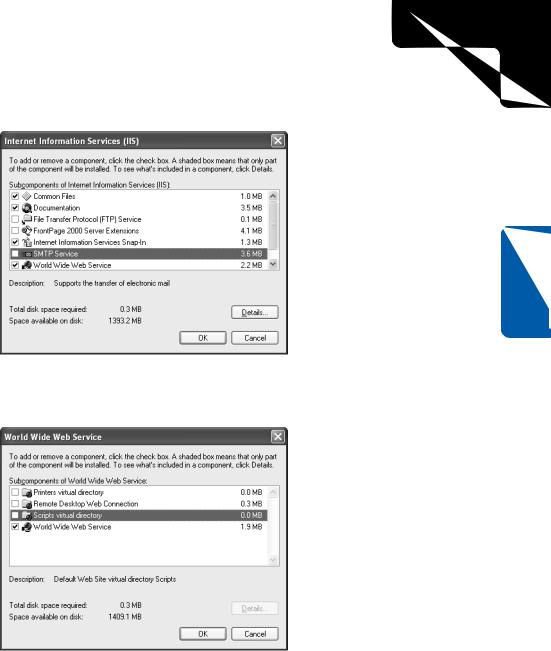
4 Clear the check boxes of subcomponents of IIS you don’t need, as shown here.
Chapter 20
5To remove default IIS applications and virtual directories, select World Wide Web Service (but don’t select its check box), and then click the Details button. This figure shows that only the World Wide Web Service has been enabled.
Update IIS immediately and often Install the newest Windows XP service pack (if not already installed) as well as all current IIS security hotfixes immediately after installing IIS. Additionally, enable automatic notification with Windows Update to remain notified of new IIS vulnerabilities and hotfixes. It’s also wise to subscribe to Microsoft’s security notification e-mail lists to learn about those security hotfixes that are not released via Windows Update.
579

5: Advanced Networking
20 Chapter
Part 5: Advanced Networking
Remove all virtual directories that are not absolutely required by your Web site
IIS often installs sample virtual directories, such as the Printers and Scripts directories already mentioned. These virtual directories contain script code and other features that are common to many IIS installations, and they are often relied upon by attackers who want to compromise IIS installations. Removing these virtual directories therefore reduces the ability of IIS to be hacked.
Disable parent paths for all virtual directories Parent paths allow remote users who connect to a virtual directory, such as http://www.tailspintoys.com/data/, to specify a parent file or directory on the Web server’s file system using standard Windows directory syntax. For example, if the virtual directory was located on the Web server
in C:\Inetsrv\Data, a remote user could request http://www.tailspintoys.com/data/.. to display the contents of the directory C:\Inetsrv. Allowing the hacker to traverse directories in such a fashion leaves the computer very vulnerable.
Run the IIS Lockdown Tool The IIS Lockdown Tool uses templates for various types of Web server configurations and modifies the IIS configuration of your computer according to the template chosen to provide only the minimum required permissions that accomplish the tasks at hand. The IIS Lockdown Tool is available from www.microsoft.com/security. If you have trouble finding it, search for IIS Lockdown Tool on the site.
tip Using the IIS Lockdown Tool Effectively
The IIS Lockdown Tool should be run after IIS has been installed and updated. It will automatically perform some of the other recommended procedures for securing IIS, and it might also undo others, or even restrict some features so much that they won’t work at all. Running the Lockdown Tool first allows you to review the changes it makes, implement additional changes it hasn’t made, and undo changes you don’t like.
Avoid using FTP, if at all possible FTP passes unencrypted data, including user names and passwords, across the network. If you must provide FTP services, avoid using anonymous FTP. Anonymous FTP will allow anyone to access your FTP server, giving them whatever rights the IIS Anonymous account has on your Windows XP installation. To disable anonymous access, right-click Default FTP Site in the Internet Information Services snap-in (located in the Administrative Tools folder). Choose Properties, select the Security Accounts tab, and clear the Allow Anonymous Connections check box. A warning message will appear informing you that FTP logons are unencrypted. Click Yes, and then click OK.
Configure IIS logging properly To identify attacks and track successful security violations, it is critical to properly log all attempted and successful accesses to IIS. To do this, follow these steps:
580

5: Advanced Networking
Chapter 20: Maintaining Network Security
1Open the Internet Information Services snap-in located in the Administrative Tools folder. Expand Web Sites in the left pane of the console, and click Default Web Site, as shown here.
Chapter 20
2 Right-click Default Web Site and choose Properties from the shortcut menu.
3On the Web Site tab of the Default Web Site Properties dialog box, select Enable Logging. Select W3 Extended Log File Format in the Active Log Format list, and then click the Properties button.
4In the Extended Logging Properties dialog box, shown on the next page, select the Extended Properties tab. Click to place a check mark next to Extended Properties, and then select the following extended properties: Client IP Address, User Name, Server IP Address, Server Port, Method, URI Stem, Protocol Status, Win32 Status, and User Agent. Click OK.
581

5: Advanced Networking
Part 5: Advanced Networking
20 Chapter
5If you’re providing FTP services, repeat the process, but this time start with the FTP Sites folder.
Examining Log Files
The W3C Extended Log File Format is extremely common. It is used by IIS to log accesses made to its FTP, HTTP, and SMTP servers, as well as by ICF to log inbound network accesses. Understanding this log file format is key for debugging problems with applications and for detecting both attempted and successful network attacks.
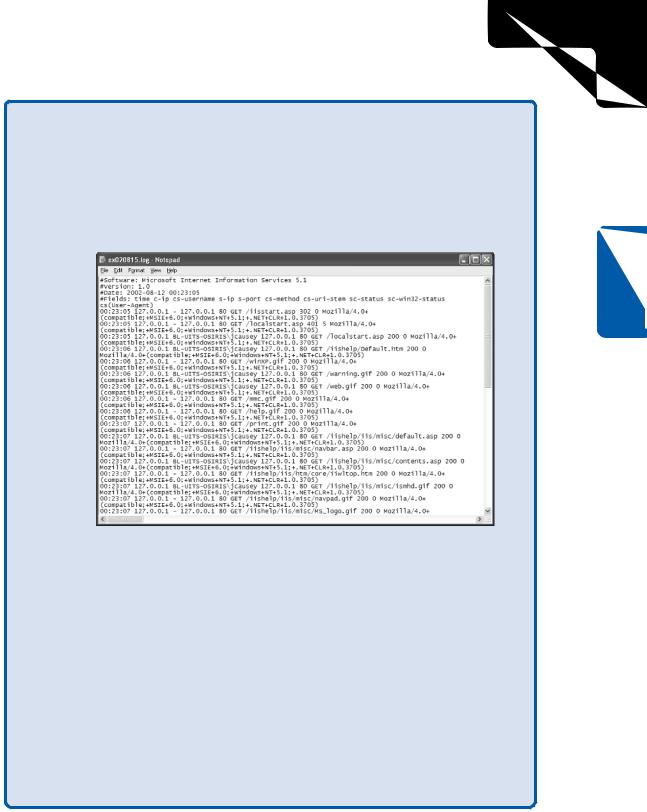
Figure 20-1 shows an IIS log file opened with Notepad that shows HTTP accesses to an IIS server that has been configured with the extended logging properties previously recommended.
On smaller screens, the individual rows of the log file might wrap. The log file begins with comments showing the name and version of the application that created the log as well as the date and time it was created. Each row of the example log file corresponds with one HTTP request made to the server. Empty fields are indicated with a hyphen. In order, the fields show:
●The time of the request (in GMT format)
●The IP address of the remote client (in this example, the client was running on the same computer, so the client address is localhost)
●The user name supplied by the browser client
●The IP address of the server that the browser client connected to
●The IP port on the server that the browser client connected to
582
5: Advanced Networking
Chapter 20: Maintaining Network Security
●The HTTP method request (such as GET or POST) made by the client
●The Uniform Resource Identifier (URI) stem of the requested document
●The status message returned by the server to the browser client, such as 200 (“OK”) or 404 (“File not found”)
●The Win32 status message generated when IIS attempted to carry out the browser client’s request
●The identification string passed to the server by the browser client
Chapter 20
Figure 20-1. Notepad is used to view HTTP accesses in this W3C Extended
Log File Format log file.
These log files can be found in the %SystemRoot%\System32\Logfiles directory. IIS HTTP logs can be found in the W3SVC1 subfolder in Windows XP Professional, and FTP logs can be found in the MSFTPSVC1 subfolder. By default, one log file will be created each day that each service is accessed.
Examining these log files is a key troubleshooting step when trying to determine why IIS (or another application using this log file format) is behaving unexpectedly. Examining them regularly is also important for detecting attempted security violations as well as successful attacks. It’s also valuable for performing forensic analysis after a break-in has taken place.
Paging through tons of log file entries can be extremely tedious. Rather than reading them manually with Notepad, there are utilities available that can automatically generate reports from W3C log files, such as AWStats (available at their Web site, http://awstats.sourceforge.net).
583
5: Advanced Networking
Part 5: Advanced Networking
Using Netstat to Observe IP Connections
20 Chapter
One important skill when attempting to determine if an attack is under way involves viewing TCP/IP connections established between Windows XP and remote hosts. The Netstat command-line tool included with Windows XP is a powerful tool for viewing these connections.
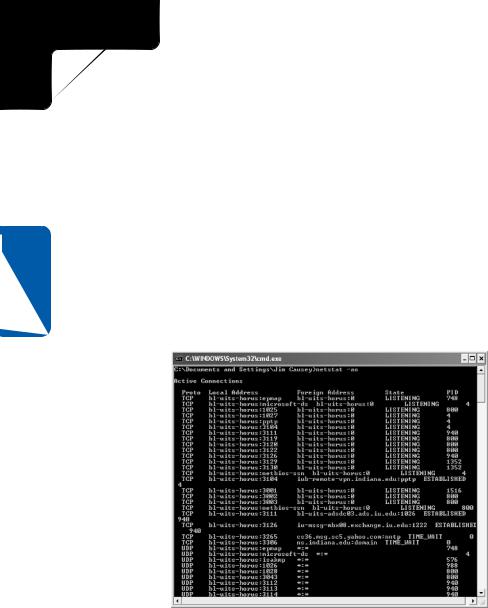
The best way to view current TCP and UDP connections, as well as determine which Windows XP application maintains each connection, is to open a command prompt and type netstat –ao. The –a option displays all connections and listening ports, and the –o option displays the process ID that owns each TCP/IP connection, as shown in Figure 20-2. You can use Windows Task Manager to determine which application has each process ID listed by Netstat. To do this, open Windows Task Manager (Ctrl+Alt+Del) and select the Processes tab. If you don’t see a column labeled PID, choose View, Select Columns. Select the PID column (and any others you’d like to view) and click OK.
Figure 20-2. Netstat is a powerful tool for viewing active TCP and UDP connections.
The first column displayed by this netstat command shows whether the connection has been made via TCP or UDP. The second column shows the local address or host name and port for the connection, and the third shows the remote host and port for the connection. The fourth column shows the state of the connection, and the last column shows which local Windows XP process ID is responsible for the connection.
The most effective use for Netstat is to view the output in search of remote addresses that are unfamiliar to you. Once suspect addresses are located, you can determine whether the applications they are connected to are legitimate (for instance, perhaps the connection is
584

5: Advanced Networking
Chapter 20: Maintaining Network Security
accessing your Web server or maintaining a Windows Messenger conversation with your computer) or whether they are a Trojan horse application installed on your computer. You can also determine if a DoS attack is being attempted on your computer by looking for large numbers of connections in the CLOSE_WAIT or SYN_RECEIVED states.
Configuring Network Shares
Improperly configured network file and printer shares can pose significant security vulnerabilities. By default, Windows XP grants the Everyone group Full Control on a newly created share (except for printer shares, where Everyone is granted Print rights). On a system using the FAT32 file system, this allows anyone to write, change, or delete any files found within the share. On a system using the NTFS file system, unless rights are specifically removed at the file system level, the same conditions will exist. Additionally, with printer shares, allowing anyone to submit documents grants anyone the ability to consume printer resources or even cause the printer or the Print Spooler service to crash by sending a malformed document.
These conditions leave Windows computers (and the networks on which they reside) dangerously vulnerable to worms such as the famous Nimda worm, which scanned the network for available Windows systems and saved copies of itself to any share that provided Everyone access. This simple process served as a DoS attack, filling hard disks and bringing networks across the Internet to their knees with SMB traffic.
For maximum safety, the Everyone group should never be used on a file share.
tip Evaluating Simple File Sharing
Simple File Sharing was added as a feature to Windows XP to simplify the process of sharing resources with friends, colleagues, and family members. Simple File Sharing uses the Everyone group extensively and does not distinguish between network users. For this reason, to provide security, Simple File Sharing should be disabled on any computer connected to the Internet. In fact, because worms such as Nimda are often triggered via macros in e-mail or document files, the use of Simple File Sharing is an unacceptable vulnerability on any computer that participates in a network that connects in any way via e-mail or otherwise with the outside world. To remove Simple File Sharing, see “Removing Simple File Sharing,” page 426.
Chapter 20
Securing Printers
In addition to removing access to printer shares via the Everyone group, it’s important to understand the security risks posed by printers connected directly to the network.
585

5: Advanced Networking
Part 5: Advanced Networking
20 Chapter
These printers, which typically offer TCP/IP, AppleTalk, IPX/SPX, and DLC among other network printing protocols, are normally configured out of the box to allow anyone to remotely administer them (either by not requiring remote logon authentication or by using a standard user name and password) and to use insecure SNMP for management.
It’s important to lock down these features immediately when bringing a printer online. Disable all protocols that will not be used to print directly to the printer, change the administrative password (and user name, if possible), disable SNMP (if possible, and if SNMP is not needed), and update the printer’s firmware to the latest available revision.
In fact, it’s often wise to configure a network-connected printer to allow incoming connections only from the computer that will share the printer itself (as well as any other specified computers that might need to remotely manage the printer). This will cause any attempts to hack into the printer to be dropped. This allows the network printer to receive documents from the computer that manages its print queues, as well as allowing system administrators to control the printer remotely, without exposing it to attack from the network as a whole.
Why all this concern for a networked printer? At best, an insecure printer can be used to print unauthorized documents; at worst, it can become the target of a DoS attack, rendering it unable to print when needed and consuming paper and ink supplies needlessly. In fact, a network firmware upgrade or buffer overrun exploit could allow a remote attacker to take control of the printer and use it as a local packet sniffer or as part of a DDoS network.
Securing Remote Access Connections
Chapter 17, “Remote Access and Virtual Private Networking,” covers the process of establishing both inbound and outbound remote access and VPN connections, and briefly mentions the use of security options. What are the best security options to use when configuring your own remote access connections?
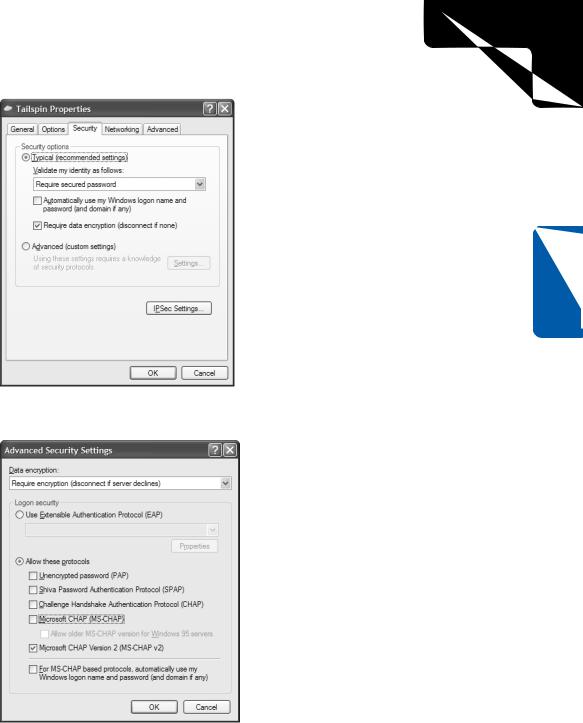
The basic security options on the Security tab for a connection allow identities to be established using either a password or a smart card, or to automatically pass Windows logon names and passwords (and domains, if applicable) to the remote access server, and/or to connect only if data encryption is available on both the client and the server, as shown in Figure 20-3.
For more security options, select Advanced (Custom Settings) instead of Typical (Recommended Settings), and click the Settings button to open the Advanced Security Settings dialog box shown in Figure 20-4.
586
5: Advanced Networking
Chapter 20: Maintaining Network Security
Chapter 20
Figure 20-3. Remote access and VPN connections enforce basic security through the Typical setting.
Figure 20-4. More advanced remote access and VPN security settings can be configured in the Advanced Security Settings dialog box.
587