

Microsoft Windows XP Networking Inside Out
.pdf5: Advanced Networking
Part 5: Advanced Networking
tip Using a Dynamic DNS Service
16 Chapter
If you need to regularly connect to a computer that has both a dynamic DNS name and a dynamic IP address, you might want to look into a service that maps your dynamic IP address to a fixed DNS name. Such services typically run client software on your computer that registers your IP address with them, and they use dynamic DNS to update a fixed DNS name to point to the IP address. Two vendors that provide this service are CanWeb Internet Services (www.dynip.com) and Tzolkin (www.tzo.com).
The point, however, is that you must know the DNS name or IP address of the Remote Desktop host computer in order to connect to it. To find the current IP address of the host computer’s Internet connection, work at the remote computer and double-click the Internet connection icon in Network Places. Select the Support tab; you’ll see a listing for the client IP address. On the computer from which you are launching the Remote Desktop client, you can specify this IP address as the remote host address.
If the remote computer is using a dial-up connection, you must connect the remote computer to the Internet, determine the IP address for that session, and then remain connected so that the computer can be accessed remotely. If the remote computer is protected by a firewall (which it should be), the firewall administrator needs to configure the firewall to allow Remote Desktop traffic in these ways:
●If you are using Internet Connection Firewall (ICF), you’ll need to open the connection’s properties dialog box, select Advanced, click Settings, and on the Services tab, enable the Remote Desktop service. See “Enabling Services,” page 141, to learn more.
●If you are using a different firewall product or the computer resides on a network with a server firewall product, the network administrator needs to configure the firewall to allow incoming access to TCP port 3389. As shown in the following illustration, the client computer accesses the remote desktop across the Internet, but the remote desktop traffic is allowed over the firewall because TCP port 3389 is open.
Client Computer Reaching Remote Computer Through Port 3389 |
|
Internet |
TCP port |
3389 open |
|
Client |
Remote |
computer |
computer |
478 |
Remote |
firewall |
|

5: Advanced Networking
Chapter 16: Remote Desktop and Remote Assistance
tip Remote Desktop and Bandwidth
If you are accessing a remote computer over a LAN connection or a broadband Internet connection, you will see fast performance with Remote Desktop. However, if you are using a dial-up connection to access a remote desktop (or the remote desktop has a dial-up connection), you might find that Remote Desktop operates very slowly. Because Remote Desktop must display the remote computer’s desktop for you, the connection has to carry a lot of graphics data, which can make screen updates painfully slow. However, there are some ways you can reduce this problem when using Remote Desktop over a dial-up connection. See “Optimizing Remote Desktop Performance,” page 490, for more information.
Using Remote Desktop Through a Remote Access Server
If you access a corporate LAN by dialing into a remote access server, the Remote Desktop connection works in a similar fashion to other remote desktop connections. Dial into the remote access server. Once authenticated, you begin the Remote Desktop session. However, if a firewall is in use between your remote access server and the Remote Desktop computer, the firewall must support Remote Desktop traffic on TCP port 3389.
tip Dialing into Your Own Workstation
You can configure your own Windows XP Professional computer to provide remote access dial-up connectivity so that you can dial directly into it to access the network and/or to use the Remote Desktop service. To learn more about this process, see “Allowing Clients to Dial in to Your Computer,” page 510.
If you need to connect to a LAN using a VPN connection, you can still connect to a remote desktop on that LAN. To do so, establish a VPN connection with the network.
Then, start Remote Desktop and specify the IP address or machine name of the remote computer you want to access. Whether you are using a VPN or simply dialing up to a remote access server, you must first connect to the private network before you try to access the remote computer because the remote computer’s IP address is private and is not exposed to the Internet. As shown in the following illustration, the client connects to the VPN server, and then connects to the remote computer inside the network. To learn more about remote access servers and VPN, see Chapter 17, “Remote Access and Virtual Private Networking.”
Chapter 16
479

5: Advanced Networking
Part 5: Advanced Networking
16 Chapter
Client Computer Reaching Remote Computer Through VPN Server
|
Internet |
Client |
VPN |
server |
|
computer |
|
|
Remote |
|
computer |
Configuring the Client Computer
Once you have enabled Remote Desktop on a Windows XP Professional computer and have examined your connectivity options, you can configure your client computer—the computer from which you will access the remote computer. If you’re using Windows XP Professional or Windows XP Home Edition as your client computer, there is nothing you need to install. The Remote Desktop Connection software is already installed on your system. See “Opening a Remote Desktop Connection in Windows XP,” opposite.
Installing Remote Desktop Connection on non–Windows XP Computers
Before Remote Desktop, a program known as a terminal services client was used to create sessions with the hosts running Terminal Services. With Windows XP, a new client known as Remote Desktop Connection is used. This tool is backward compatible with the older Terminal Services software included with Windows 2000, Windows 2000 Server, and Windows NT 4.0 TSE, and it is the preferred method for connecting to a remote computer. If you want to use another version of Windows as a Remote Desktop client, the client software is available on both the Windows XP Professional and Windows XP Home Edition installation CDs, or it can be downloaded from Microsoft at www.microsoft.com/windowsxp/pro/downloads/rdclientdl.asp.
To install the Remote Desktop Connection client software from one of the Windows XP installation CDs, insert the CD and choose Perform Additional Tasks when the Welcome To Microsoft Windows XP menu appears. Then, choose Set Up Remote Desktop Connection. Follow the simple installation instructions that appear. If you
480
5: Advanced Networking
Chapter 16: Remote Desktop and Remote Assistance
are installing the Remote Desktop Connection software from the download, just run the executable file to set up the software.
tip Installing Remote Desktop Connection on Several Computers
If you need to install the Remote Desktop client software on several computers that are not running Windows XP, you might want to put the installation package onto a CD or Zip disk so you can carry the required software with you as you move about and configure each machine. (The download is 3.4 MB in size, so it is too large for a floppy disk.)
Opening a Remote Desktop Connection in Windows XP
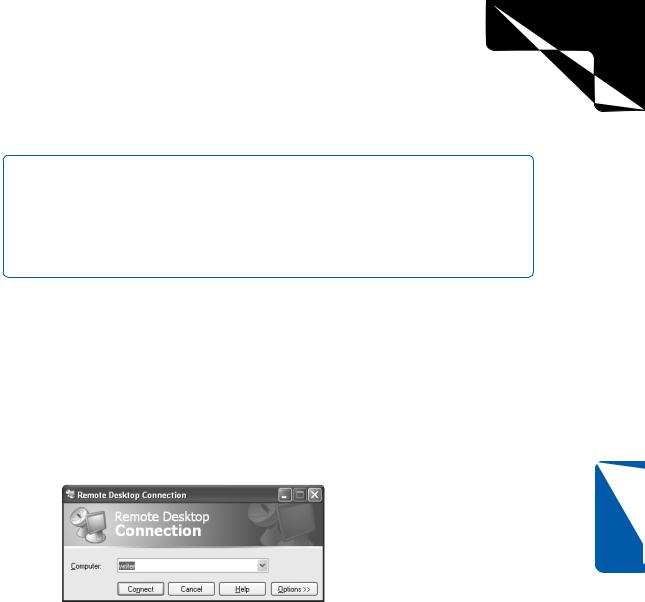
To start a Remote Desktop session from a Windows XP computer, ensure that you have installed the software. Choose Start, All Programs, Accessories, Communications, Remote Desktop Connection. The Remote Desktop Connection dialog box appears, as shown in Figure 16-1. Enter the name of the remote computer or IP address, depending on how you intend to connect. If the computer’s name can be resolved via DNS, you can enter the computer name; otherwise, you might need to use the IP address. This dialog box also contains an Options button that lets you adjust various settings for your remote session. These settings are discussed in “Choosing Remote Desktop Options,” page 490. Click the Connect button to begin the Remote Desktop session.
Chapter 16
Figure 16-1. Enter the name or IP address of the remote computer.
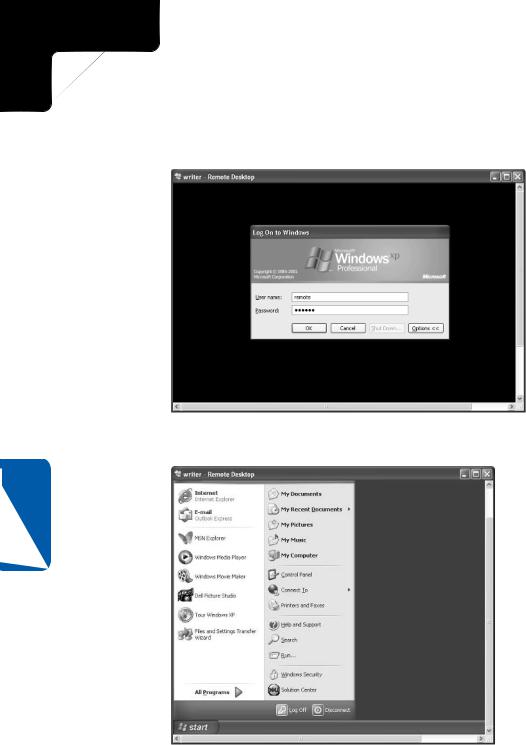
Once the initial connection is established, the Log On To Windows dialog box appears, as shown in Figure 16-2 on the next page. Enter the user name and password of an account that is a member of the Remote Desktop Users group or one that has administrative privileges on the remote computer. Click OK to complete the connection.
Once the connection is complete, the remote desktop appears, as shown in Figure 16-3 on the next page. By default, the window is maximized so that it appears as though you are actually working on the remote computer. You can now open applications,
481
5: Advanced Networking
Part 5: Advanced Networking
create and save files, make system configuration changes (if you are logged on with an administrator account), and do anything else you would do if you were logged on locally.
Figure 16-2. Log on to the remote computer using an account with administrative privileges or one that’s a member of the Remote Desktop Users group.
16 Chapter
Figure 16-3. You can now use the Remote Desktop session as if you were actually sitting in front of the remote computer.
482
5: Advanced Networking
Chapter 16: Remote Desktop and Remote Assistance
Saving Files in a Remote Desktop Connection
When you are using the Remote Desktop connection, you can create and save files as though you are actually working at that the remote computer. You have the ability to create and save files to the remote hard disk drive as well as to any network share for which your user account has permissions.
However, keep in mind that during a Remote Desktop session, you are actually working on the remote computer. What you see at your end of the connection is only a terminal display of what is happening at the remote end. For this reason, although you can create and save files on the remote computer, you cannot drag and drop them to your computer without taking advantage of Remote Desktop’s ability to map your system’s drives to the Remote Desktop session. For more information on this process, see “Configuring Local Resources,” page 492.
Connecting to a Remote Computer When Another User Is Logged On
When you make a Remote Desktop connection, you are quickly and easily connected if no one else is using the remote computer. If, however, another user is logged on to the computer, one of two things will happen:
●If Fast User Switching is enabled on the remote computer, you’ll see the message shown in Figure 16-4 on the next page, and the remote user will see the message shown in Figure 16-5. The remote user has the opportunity to reject your message. If no one is actually sitting at the remote computer to answer your message, the remote user account is switched off after a few seconds of inaction. The remote user’s session actually remains logged on because Fast User Switching allows more than one person to be logged on, and no unsaved files or documents will be lost because the user has technically not logged off. However, the user at the remote computer won’t be able to actually use the computer until you log off or until the user decides to take control. The remote computer displays the Windows Welcome screen (if it’s enabled on the remote machine) while the client is using the remote computer. In other words, no one at the remote computer can see what you are doing, although from the Welcome menu they can see that you are signed on. But if a user with an account on the remote computer wants to use it, he can click his icon on the Welcome screen, sign on, and terminate the client’s Remote Desktop session.
Chapter 16
483

5: Advanced Networking
Part 5: Advanced Networking
16 Chapter
Figure 16-4. When you attempt to log on, you see a message telling you that another user is logged on. Click Yes to continue.
Figure 16-5. A user logged on at the remote computer sees this message, which lets that person decide whether you can log on.
●If Fast User Switching is not enabled on the remote computer, things do not work as nicely. Figure 16-6 shows that you have the option of forcefully ending the user’s session without even giving the user an opportunity to save any open files.
Figure 16-6. Without Fast User Switching enabled, another user’s session can be forcefully ended.
484
5: Advanced Networking
Chapter 16: Remote Desktop and Remote Assistance
caution To ensure that users do not lose any data, it is a good idea to use Fast User Switching with Remote Desktop; however, if the Remote Desktop host is a member of a domain, using Fast User Switching is not an option. This is usually not a problem because machines that participate in domains usually only have one regular user, and you’re not likely to kick anyone off your office computer.
If the remote computer is using Fast User Switching and a user is signed on at the remote computer, the user has time to save his or her data before the Remote Desktop session begins, or if the user does not save the data, it is not lost because the user is not actually logged off. In fact, the user at the remote computer can even deny permission for the Remote Desktop session. Of course, if you are the only one who uses your computer, this issue is of no consequence.
Note that any user with administrative privileges can disrupt a remote session by simply logging on at the remote computer. Also, if more than one person uses the same account, logging on locally with the same account that is being used remotely disconnects the remote user. In fact, whatever the client was working on remotely appears on screen at the remote machine where that user has signed on. This allows the user at the remote computer to save the work that was interrupted in the Remote Desktop session or to simply discard it. Of course, if you want to maintain privacy, you should never share user accounts in the first place.
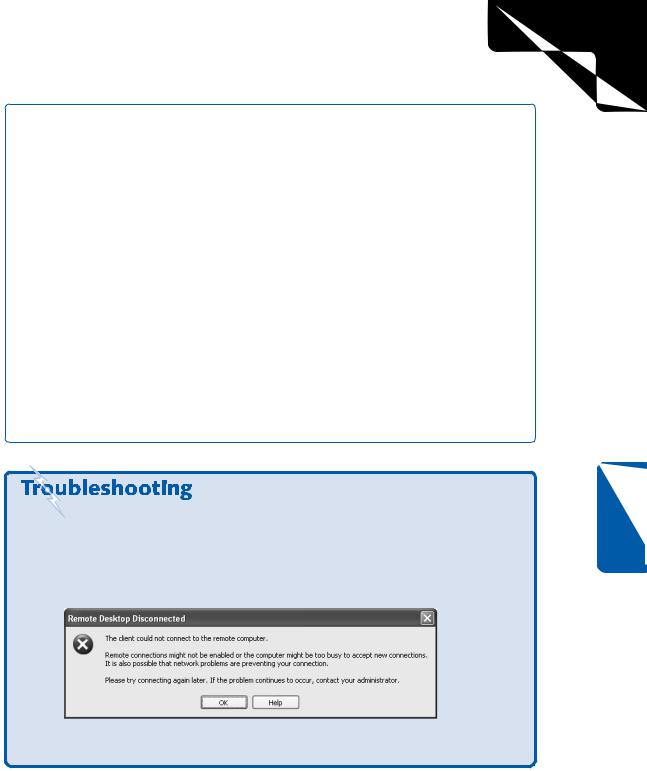
You cannot connect to a Remote Desktop host.
If you attempt to make a Remote Desktop connection and you see the message displayed in Figure 16-7, your Remote Desktop connection has been rejected. Most frequently this occurs when Remote Desktop has not been enabled on the remote machine.
Chapter 16
Figure 16-7. This message often indicates that permission to run Remote Desktop is not enabled on the remote computer.
(continued)
485

5: Advanced Networking
Part 5: Advanced Networking
16 Chapter
Troubleshooting (continued) To remedy this situation, make sure that Remote Desktop has been enabled on the remote computer, and then check that the user account that couldn’t complete the remote connection has an administrator account on the computer or has been added to the Remote Desktop Users group. Next, from the client computer, if you’re using a computer name to access the remote computer, make sure that the computer name can be resolved by DNS. If you’re using an IP address, make sure you can reach that IP address from the client computer, and that no firewalls are blocking Remote Desktop between the client computer and the Remote Desktop host.
Logging On Automatically
If you routinely use Remote Desktop to connect to a remote computer, you can save yourself a bit of effort in the logon process by configuring Remote Desktop to log you on automatically. For example, you might want to do this if you typically use your home computer in the evening to log on to your office computer and check e-mail. To configure the automatic logon option, follow these steps:
1Choose Start, All Programs, Accessories, Communications, Remote Desktop Connection.
2In the Remote Desktop Connection dialog box, click the Options button.
3On the General tab that appears, enter the computer you want to connect to, the user name, password, and domain (if necessary.) Select the Save My Password check box, shown here.
486

5: Advanced Networking
Chapter 16: Remote Desktop and Remote Assistance
4Click the Save As button. By default the file is saved as Default.rdp in the My Documents folder using the Remote Desktop Files format (with a .rdp file extension). If you want the settings you entered to be your default settings, click Save. If not, type a different name.
5Click Connect to make the connection. From now on, you’ll not be asked to provide the user name and password when you make the Remote Desktop connection.
tip If you are logging on to different remote computers, you can double-click the appropriate .rdp file, and the connection will be launched automatically.
Generating a Remote Desktop
Session with Microsoft Internet Explorer
If you don’t have access to the full version of Remote Desktop from the computer you have available (for example, you might be logging on from a public computer in an airport terminal or library), you can open a Remote Desktop session using Internet Explorer 4 or later if the Windows XP Professional remote computer is configured to allow you to do so. However, this process requires the use of IIS, and because Web servers are the most commonly attacked networking software, it’s important to recognize the responsibility you’ll have for configuring and securing IIS once it’s running. For more information, see “Securing IIS,” page 577.
Configuring Windows XP Professional for Web Access
If you want to access Windows XP Professional Remote Desktop connections using Internet Explorer, you have to configure IIS to allow the connection. If you do not have IIS currently installed or you need to learn more about IIS, see Chapter 9, “Using Internet Information Services.” To configure IIS to allow Remote Desktop, you must run the Remote Desktop Web Connection software. Follow these steps:
1Open Add Or Remove Programs in Control Panel.
2Select Add/Remove Windows Components.
3When the Windows Components Wizard appears, select Internet Information Services (IIS), and click the Details button.
4In the Internet Information Services (IIS) dialog box, select World Wide Web Service and click Details.
5In the World Wide Web Service dialog box shown on the next page, select Remote Desktop Web Connection and click OK. Click OK, click Next, and then click Finish to complete the wizard.
Chapter 16
487