

Microsoft Windows XP Networking Inside Out
.pdf5: Advanced Networking
Part 5: Advanced Networking
Figure 17-2. Additional security settings can be chosen with the Typical setting to increase security.
17 Chapter
Figure 17-3. The Advanced Security Settings dialog box provides encryption and protocol settings.
508

Chapter 17: Remote Access and Virtual Private Networking
The following list defines each protocol.
●Extensible Authentication Protocol (EAP). EAP provides security extensions, such as authentication based on token cards, that administrators can use in addition to the security technologies built into Windows servers.
●Password Authentication Protocol (PAP). PAP is a clear-text authentication scheme. The hosting server asks for the user name and password, and the PAP process returns the user response in an unencrypted or clear-text format. This authentication method is not robust, and it is certainly not secure. Malicious users can use a packet sniffer or similar tool to obtain the user name and password passed with PAP because they are unencrypted. Note that this authentication scheme does not work if the option Require Encryption (Disconnect If Server Declines) is selected in the Data Encryption field.
●Shiva Password Authentication Protocol (SPAP). This protocol is used with Shiva (now Intel) remote access servers, but does not work with the Require Encryption (Disconnect If Server Declines) setting.
●Challenge Handshake Authentication Protocol (CHAP). CHAP is an encrypted authentication mechanism that does not transmit the password across the connection. The remote access server sends a request known as a challenge to the potential remote access client. This information includes a session ID and an arbitrary challenge string. The remote access client
responds with its user name and a Message Digest 5 (MD5) hash of the password, the challenge string, and the session ID. In this way, proof of knowledge of the user’s password is sent without actually sending the password. To calculate the MD5 hash, passwords must be stored on the server in a reversibly encrypted form. A malicious user using a network sniffer to capture the CHAP traffic will only find a user name followed by the MD5 hash.
●Microsoft CHAP (MS-CHAP). The MS-CHAP protocol makes use of an encrypted authentication process that is in many ways similar to CHAP. Two key differences exist between CHAP and MS-CHAP. Passwords are encrypted using both the MD4 hash algorithm and the Data Encryption Standard (DES) algorithm. MS-CHAP also makes use of encrypted server/ client messaging that allows the client to securely change its password from a remote location.
●Microsoft CHAP version 2 (MS-CHAP v2). Version 2 of the MS-CHAP protocol utilizes a more complex authentication system that provides twoway authentication. Not only does the server verify that the client is using the correct password for the provided user name, but the client also verifies
5: Advanced Networking
Chapter 17
509
5: Advanced Networking
Part 5: Advanced Networking
that the server has knowledge of the user name and password as well. One application of this protocol is to prevent malicious users from impersonating a server. For a higher level of protection, MS-CHAP v2 establishes independent encryption keys for incoming and outgoing data transmissions.
Allowing Clients to Dial in to Your Computer
Suppose you have a small home network and carry a laptop computer with you when you travel. If you often need files and data from the computers in your home network while you are traveling, a computer running Windows XP can act like a miniature remote access server for dial-in capabilities on home and small office networks. This feature allows you to access shared files and even printers from a remote location.
Using the client computer, you configure a dial-up connection just as you would any other dial-up connection. From the home or small office computer that will act as the remote access server, connect the modem to the desired phone line, and then follow these steps:
1Choose Start, Connect To, Show All Connections.
2In the Network Connections window, click the Create A New Connection link under Network Tasks.
3Click Next on the New Connection Wizard’s opening page.
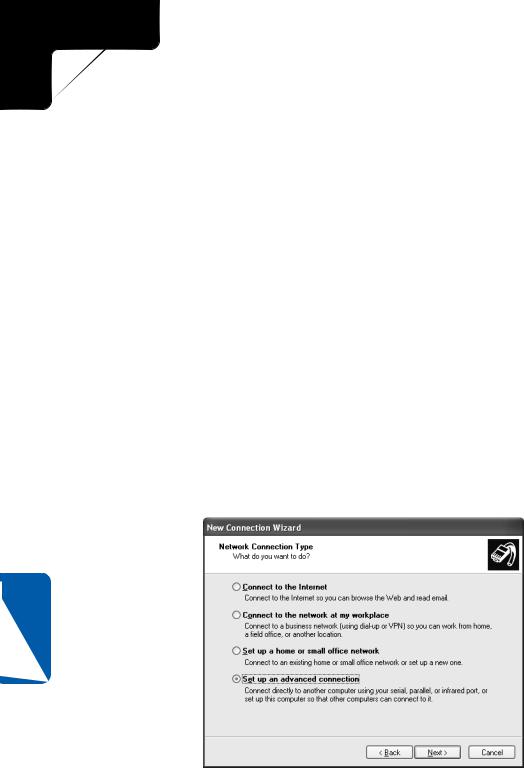
4On the Network Connection Type page shown here, select Set Up An Advanced Connection and click Next.
17 Chapter
5On the Advanced Connection Options page shown next, select Accept Incoming Connections and click Next.
510

5: Advanced Networking
Chapter 17: Remote Access and Virtual Private Networking
6On the Devices For Incoming Connections page, select the device that will be used to accept the incoming connection, such as a modem. Click Next.
7On this page, you can choose whether to accept VPN connections. Choose Do Not Allow Virtual Private Connections and click Next.
8On the User Permissions page, shown here, select the local user accounts that are allowed to use the connection. If a user account on the local computer does not exist for the user who will be dialing in, click Add to create it. Click Next.
Chapter 17
9On the Networking Software page, you can choose to install additional networking software if needed. To gain full access to network resources, you need to select File And Printer Sharing For Microsoft Networks (if it is not enabled by default). Click Next and then click Finish.
511
5: Advanced Networking
Part 5: Advanced Networking
The Incoming Connections entry now appears in Network Connections in the
Incoming section.
Making the Incoming Connection Secure
Even with a simple incoming connection, you can still require users to submit an encrypted password, which gives you a stronger level of security and helps ensure that someone doesn’t dial your modem’s number and try to break into your computer or private network. To configure this option, perform these steps:
1In Network Connections, right-click Incoming Connections and choose Properties.
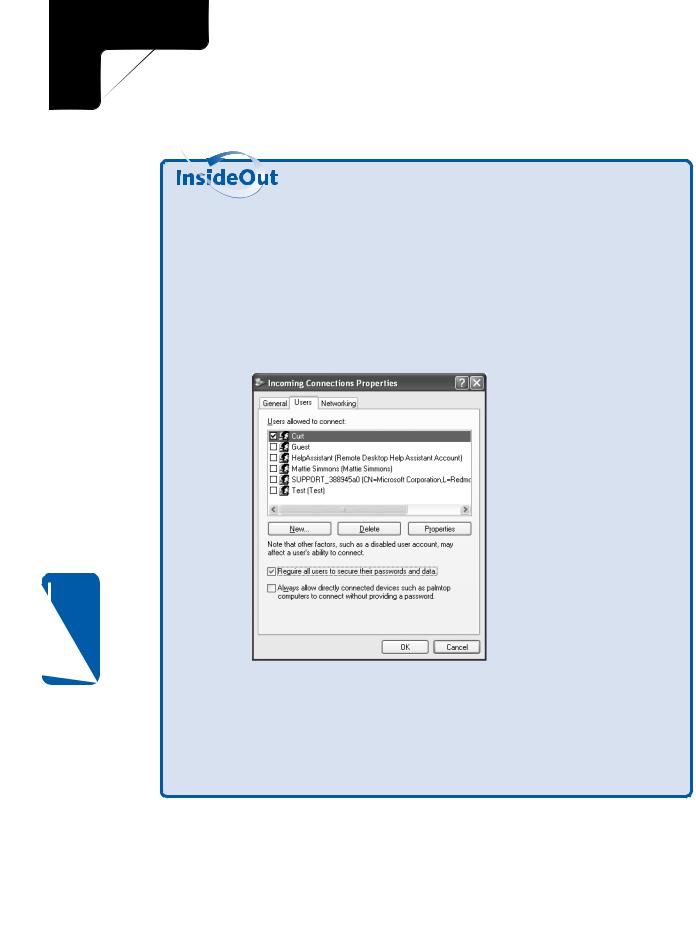
2Select the Users tab, shown next. Select Require All Users To Secure Their Passwords And Data and click OK.
17 Chapter
3On the users’ computers, open the properties dialog boxes for the dial-up connection that dials in to your computer.
4On the Security tab, select Requires Secured Password in the Validate My Identity As Follows box, and then select the Require Data Encryption (Disconnect If None) option. Click OK. Computers that do not have this configuration will not be able to connect because Windows XP requires that a suitable authentication protocol be used and data be encrypted.
512

5: Advanced Networking
Chapter 17: Remote Access and Virtual Private Networking
For more information on the best ways to secure remote access connections, see “Securing Remote Access Connections,” page 586.
Understanding Virtual Private Networking
A VPN is an extension of a private network that encompasses links across shared or public networks such as the Internet. This virtual network allows the connected users to interact as if they were all on the same private network. To compare VPN connections to other network types, think of a VPN connection as a WAN link that exists by tunneling traffic through the Internet. The individual VPN connection behaves in the same manner as a direct point-to-point link, such as a leased line or a Frame Relay link.
To emulate a point-to-point link, data is encapsulated in a manner that allows it to traverse the Internet and reach the other VPN host. To ensure that the data on this private network remains private, encryption is used. If a malicious user intercepts the packets traveling between a VPN client and server, the data will be meaningless because it requires an encryption key to decrypt.
VPN connections are extremely useful because a computer can use virtually any Internet connection to reach the private network. Whether using a residential high-speed Internet connection or using a dial-up modem from a hotel room, the process is the same (of course the speed of the connection will vary). The user can connect to the protected network as needed. This is not only useful to telecommuters and traveling employees, but VPN connections can also allow a company to leverage cheaper, high-speed access methods (cable and DSL for example) to connect remote offices instead of using expensive leased lines or building its own Frame Relay network.
When building a remote network infrastructure, most companies and individuals will want to preserve the security requirements that they have for the existing LAN or WAN. A proper VPN implementation will allow the connection of remote users without compromising internal security. In fact, VPN connections are often more secure because of their encryption than normal LAN or WAN traffic. The following features make VPN traffic secure:
●Authentication. A VPN server will verify the VPN client’s identity and prevent access from being assigned to unknown or unauthorized users. Most VPN servers have the capability to log all users who have connected. As an example, Microsoft Windows 2000 Server VPN services can log the user name, the IP address the user is connecting from, the IP address assigned to the VPN tunnel, the connection time, the connection duration, and other features of each VPN connection session.
●Address management. VPN servers, using Windows 2000 as an example, assign the network addresses to VPN clients (such as IP addresses).
Chapter 17
513

5: Advanced Networking
Part 5: Advanced Networking
17 Chapter
●Encryption. Because the information transmitted using a VPN connection must cross a public medium, it is important to protect the data. Encryption of the transmitted data is used to secure it from prying eyes.
●Key management. Dynamic encryption keys are generated as part of the authentication process.
A VPN connection makes use of tunneling to transport data securely. Tunneling is the act of moving data destined for one network over the infrastructure of another network. The following is an example. Traffic from a computer on network #1 is delivered to another computer on network #1 using the components of network #2. Most virtual private networking solutions make use of one of two tunneling protocols. The protocols most widely used are Point-to-Point Tunneling Protocol (PPTP) and Layer Two Tunneling Protocol (L2TP) with Internet Protocol Security (IPSec) because they are flexible and widely supported. The VPN client encapsulates packets that are destined to be routed between the two tunnel endpoints. The information that is added during the encapsulation process allows the VPN packets to traverse the intermediate network to the VPN server.
Understanding VPN Protocols
What are the differences between the two VPN protocols supported by Windows XP, and when should you use each?
PPTP was developed by Microsoft and was originally delivered with Windows NT 4.0. It builds upon the foundations of standard PPP to both encapsulate and encrypt IP traffic (as well as other protocols). When configured to use MS-CHAP v2, PPTP is quite secure. Few non-Microsoft platforms can use PPTP tunneling without buying commercial VPN client software.
L2TP/IPSec uses a newer, Internet standard-based protocol for establishing remote VPN connections. L2TP/IPSec provides an extremely secure environment because it encrypts and authenticates each password transmitted across the network. In addition, it is supported by multiple platforms including UNIX-based and Macintosh systems.
It does, however, require an infrastructure for allocating computer encryption certificates. Only Windows 2000, Windows XP, and later Windows operating systems support L2TP/IPSec.
Not sure which protocol to use? If you must support older Windows VPN clients, or you cannot maintain a certificate distribution system, PPTP is your best choice. However, if you want to support multiple platforms and are only using very recent Windows clients, and your network administrators are willing to maintain a certificate system, L2TP/ IPSec might be the way to go.
514
5: Advanced Networking
Chapter 17: Remote Access and Virtual Private Networking
Creating a Connection to a VPN Server
Now that you understand what a VPN is, it is time to configure Windows XP to use a VPN connection. Think of a VPN connection as similar to a dial-up connection. They both allow access to remote resources. In the case of the VPN, an existing connection to the Internet is utilized rather than making a direct connection to a modem at the remote location. To make a VPN connection, the steps are almost the same as those used to create a dial-up connection.
1In Network Connections, click the Create A New Connection link to start the New Connection Wizard.
2Click Next on the Welcome screen, and then select the Connect To The Network At My Workplace option. Click Next.
3Choose Virtual Private Network Connection and click Next.
4Enter a name for the connection and click Next.
5On the Public Network page, you can choose to have Windows automatically dial the connection so that the VPN connection can be established, or you can manually dial the connection as needed. If you are using a broadband connection that is always connected, select Do Not Dial The Initial Connection. If you select Automatically Dial This Initial Connection, you should choose the connection that will be used. Make your selection and click Next.
6On the VPN Server Selection page, enter the fully qualified domain name (FQDN) or IP address of the VPN server that you will connect to. Click Next and then click Finish.
note Keep in mind that the VPN connection works on top of the Internet connection. To use the VPN connection, you must first be connected to the Internet.
Chapter 17
Using a VPN might interrupt your Internet connection.
If you are using a VPN connection and other Internet applications such as Microsoft Internet Explorer stop working, your VPN connection is configured to use the default gateway on the remote network as your Internet connection, but the remote network is not routing traffic to the Internet. To stop attempting to use the remote default gateway for Internet access, open the VPN connection’s properties dialog box and select the Networking tab. Select Internet Protocol (TCP/IP) from the list and click Properties. Click the Advanced button and on the General tab of the Advanced TCP/ IP Settings dialog box, clear the Use Default Gateway On Remote Network check box.
(continued)
515
5: Advanced Networking
Part 5: Advanced Networking
Troubleshooting (continued) Once this is done, standard Internet traffic will be routed out using the local network’s default gateway, and the VPN connection will still be used for traffic to and from the private network.
Configuring Windows XP to Act as a VPN Server
Just as you can allow incoming connections on your Windows XP computer, you can also configure Windows XP to accept VPN connections from VPN clients. Basically, this process works the same as allowing incoming connections. Follow these steps:
1Open Network Connections and start the New Connection Wizard by clicking the Create A New Connection link.
2Click Next on the New Connection Wizard’s opening page.
3On the Network Connection Type page, select Set Up An Advanced Connection and click Next.
4On the Advanced Connection Options page, select Accept Incoming Connections and click Next.
5On the Devices For Incoming Connections page, select the modem or broadband device you want to use to allow incoming connections. Click Next.
6Select Allow Virtual Private Connections and click Next.
7On the User Permissions page, select the local user accounts that are allowed to connect to the computer via a VPN connection. If a user account on the local computer does not exist for the client, click Add to create one. Click Next.
8On the Networking Software page, you can install and select, or clear or uninstall, the mix of networking software that can be used over the incoming VPN connection. Click Next and then click Finish.
17 Chapter
Your VPN connection is blocked by a firewall.
For the most part, utilizing VPN connectivity when one endpoint is behind a firewall is not an issue. Most firewalls allow liberal privileges when it comes to outgoing connections. Incoming connections are another story. For a VPN server that sits behind a firewall to accept incoming connections, the firewall needs to be configured to allow PPTP and/or L2TP/IPSec traffic.
A number of different techniques for setting up a VPN server allow you to connect to a network that is placed behind a firewall device that you manage. One technique is to
516

5: Advanced Networking
Chapter 17: Remote Access and Virtual Private Networking
configure the firewall device to allow inbound traffic from a series of IP addresses that you specify. Unless you have a static IP address (or set of static addresses) from which you want to guarantee inbound connectivity, this solution is less than ideal because it’s normally impossible to determine which IP addresses you’ll be given by a Dynamic Host Configuration Protocol (DHCP) server, particularly if you travel with a laptop or use a number of remote networks. Even if you do have one or more static IP addresses that you want to grant access to, this solution is of limited value unless you can guarantee that only machines that you manage will use those addresses. You must also guarantee that those machines will always be well patched and not run any malicious Internet worms or Trojan horse applications. Additionally, a clever hacker could determine the range of IP addresses that are commonly connecting to your network and configure his system to spoof, or appear to be connecting from, one of those addresses to penetrate your firewall.
Another option is to configure your firewall device to be managed remotely (via the Internet or a WAN connection). Then, whenever you want to connect remotely, you simply determine your local client’s IP address and reconfigure the firewall to allow inbound traffic from that address. Again, this solution is less than ideal because it requires a number of steps, it leaves your firewall vulnerable to hackers who might attempt to gain control of it remotely, and it requires you to remember to disable those addresses when you’re done.
Yet another option is to place the computer that provides the VPN connection in the firewall’s demilitarized zone (DMZ). Computers that have been configured to use the firewall’s DMZ are completely exposed to the outside network (and if the firewall is also providing network address translation [NAT], a computer in the DMZ is exposed using the firewall’s external IP address). This computer should be locked down tightly using a software firewall and should be configured to provide only VPN server services. This will allow external computers to establish a VPN connection safely into the network.
If the firewall is also providing NAT, the firewall could instead be configured to forward VPN traffic to the VPN server behind the firewall. External hosts cannot directly request access to hosts on a private LAN, so the firewall is left to play matchmaker and ensure that the incoming requests are forwarded to the correct internal server and nowhere else. Most software firewalls offer relatively simple interfaces for configuring the incoming ports, whereas many hardware firewalls (especially business class equipment) can require moderate expertise to configure them correctly.
You might also want to consider purchasing a firewall/gateway/switch device that includes a built-in VPN server. These devices are becoming increasingly common and allow for the greatest ease of setup when you want to provide secure VPN services to a small-to-medium size network.
For more information on configuring firewalls to work with a VPN, see the white paper “Virtual Private Networking with Windows 2000: Deploying Remote Access VPNs,” available at www.microsoft.com/windows2000/techinfo/planning/incremental/vpndeploy.asp.
Chapter 17
517