

Microsoft Windows XP Networking Inside Out
.pdf5: Advanced Networking
19 Chapter
Part 5: Advanced Networking
Using the Infrared Connection
You can use an infrared link to link two devices directly, or you can link up to a network. The following sections describe how to use the different connections.
Establishing an infrared link An infrared link allows one computer or device to transmit information to another infrared device or computer. To establish an infrared link, follow these steps:
1Move the infrared computers or devices so that the infrared receivers are facing each other and are within about one meter of each other.
When the infrared device is detected, an icon appears in the notification area of the taskbar, and the Wireless Link icon appears on the desktop.
2Right-click the Wireless Link icon and choose Connect. The connection is made and data can be transferred.
tip You can receive files from a Windows XP computer, a Microsoft Windows 2000 computer, or a Microsoft Windows 98 computer. You can also receive files and data from other IrDA devices such as PDAs and digital cameras.
Establishing an infrared network connection An infrared link allows you to transfer files and data to another computer. An infrared network connection provides a direct connection between two infrared computers where the two computers can communicate with each other over the network connection. One computer acts as the host, and one computer acts as the guest. The guest computer primarily accesses shared resources on the host computer. The guest computer must have a user account configured on the host computer, just as if this were a direct network connection. The guest provides the user name and password to the host computer, and then the host computer authenticates and lets the guest access shared information from the host computer. The authenticated guest can connect to shared resources on the host computer, just like with a typical wired network connection. To set up an infrared network connection between two computers, follow these steps:
1On the host computer, create a user account for the guest computer if necessary.
2Align the two computers so that the infrared transceivers are within about one meter of each other and are pointing at each other.
The infrared icon appears in the taskbar’s notification area, and the Wireless Link icon appears on the desktop.
3To establish the network connection, open Network Connections on the host computer, and click Create A New Connection.
548
5: Advanced Networking
Chapter 19: Wireless Networking
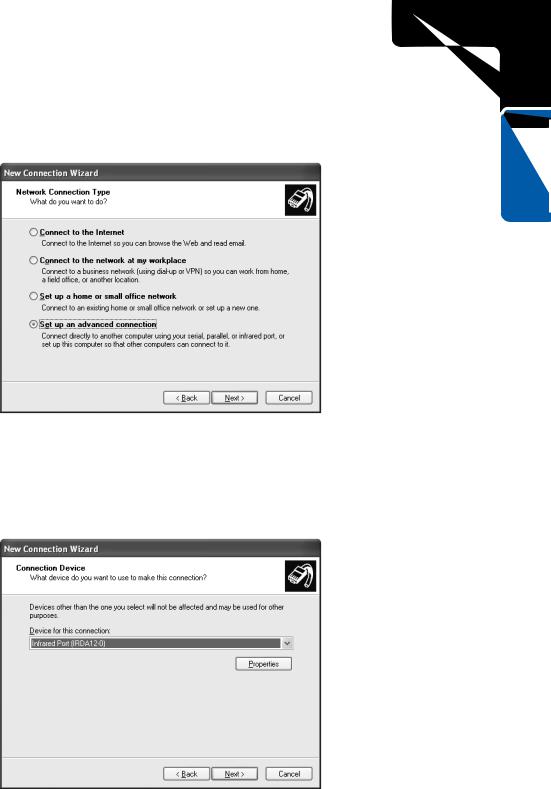
4 Click Next on the New Connection Wizard Welcome page. On the Network Connection Type page, shown here, select Set Up An Advanced Connection.
Click Next. 19 Chapter
5On the Advanced Connection Options page, select Connect Directly To Another Computer and click Next.
6Choose the role of the computer, which is Host in this procedure. Click Next.
7On the Connection Device page, select the infrared port as the connection device, as shown here. Click Next.
549
5: Advanced Networking
19 Chapter
Part 5: Advanced Networking
8On the User Permissions page, select the accounts that can connect over the infrared port. Click Add if you need to add additional accounts. Click Next.
9Click Finish. The connection now appears in Network Connections as Incoming Connections.
10Repeat these steps on the guest computer, but select the Guest option in step 6. You’ll also be prompted for the name of the host computer you’ll be connecting to. When the wizard is completed on the guest computer, the network connection appears in Network Connections with the name of the host computer, and a Connect dialog box automatically opens. The guest can sign on to the host by entering a valid user name and password and clicking the Connect button. At any time in the future, the connection can be reestablished from the guest computer by right-clicking the connection in Network Connections and choosing Connect from the shortcut menu that appears.
Linking Your Laptop to the Internet via an Infrared-Capable Cellular Phone
If you travel frequently with your laptop computer, you might want to check your e-mail at times when a phone jack is not available for establishing a dial-up connection from your laptop. If you also carry an infrared-enabled cellular phone, you can establish a dial-up link through the cellular phone wherever you have cellular phone coverage, such as in an airport or a car. With current cellular phone technology, this kind of Internet link will not give you very good speed, but it might be your only option when a broadband or wired dial-up connection is unavailable. To create the connection, you’ll need to check your cellular phone’s manual to make sure that such connections are supported. If they are, follow these steps:
1Align your cellular phone and laptop so that the infrared transceivers are facing each other and are within one meter.
2Once the link is established, use the New Connection Wizard in Network Connections to create a new dial-up connection. Configure the connection and choose the infrared port as the dial-up hardware.
3After configuring the dial-up connection, use the connection to launch the dial-up sequence. The infrared port will send the data to the cellular phone, which will then dial the number to your ISP. Once connected, you can use the Internet as you normally would, but you will be limited to the speed of the cellular phone’s connection to the phone network (which will typically be slower than your laptop’s infrared link to the cellular phone).
Note that some cellular phone service providers do not allow the use of a cellular phone as a dial-up connection device. Again, check your cellular phone’s documentation for details and restrictions.
550

5: Advanced Networking
Chapter 19: Wireless Networking
You encounter problems with infrared connections.
Infrared connections are generally easy and problem free, but there are some common snags that people sometimes experience. Keep these points in mind as you work with infrared connections:
●Make sure the infrared transceivers are aligned and close enough to each other for transmission to occur. Watch the icon in the notification area. If it fades in and out, the devices need to be closer together or better aligned.
●If you want your digital camera or another computer to send files to your computer, make sure you have enabled the option on the Image Transfer tab of the Wireless Link dialog box.
●If the connection seems to work intermittently, open the infrared device’s properties dialog box in Device Manager. On the IrDA Settings or Advanced tab, try reducing the maximum connection speed.
Setting Up a Wi-Fi Network
Chapter 19
Infrared connections work great for temporary network connections where you need to exchange files and such. But if you want a true wireless network, Wi-Fi is the way to go. As mentioned earlier in the chapter, Windows XP is fully Wi-Fi compatible and compliant. However, be sure to purchase wireless networking hardware that
●Is completely 802.11 compliant (most wireless devices on the market are)
●Is compatible with Windows XP
●Includes a driver that supports the Windows XP Wireless Zero Configuration service
The following sections explore the setup and configuration of a Wi-Fi network.
Installing the Wireless Equipment
Once you have made a topology decision and have purchased the required hardware, you can set up your Wi-Fi network. Follow the manufacturer’s installation instructions for the hardware. Your hardware devices might also include setup CDs to install drivers or software.
551
5: Advanced Networking
19 Chapter
Part 5: Advanced Networking
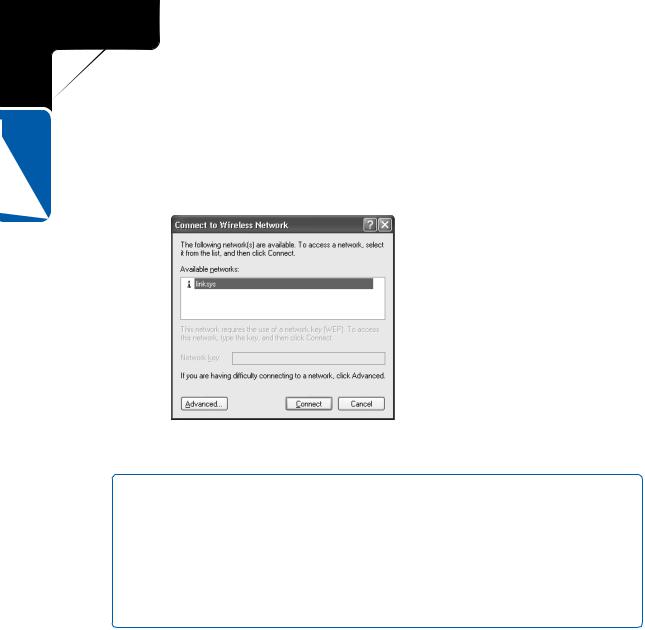
By default, the Windows XP Wireless Zero Configuration service automatically tries to associate with an infrastructure mode wireless network. If one is not found, an association with an ad hoc network is tried. As the wireless network adapter looks for a network to connect to, you’ll see a Connect To Wireless Network dialog box, as shown in Figure 19-5. If there is more than one network, select the network you want to connect to. If WEP is required, enter the WEP key in the Network Key box.
Figure 19-5. The wireless network adapter presents you with a choice of available networks.
tip Manage Your Wireless Connection from the Notification Area
If the Connect To Wireless Network dialog box does not appear, or you need to connect to a different wireless network at a later time, just right-click the wireless icon in the notification area and choose View Available Wireless Networks. The Connect To Wireless Network dialog box will appear. If you are having problems connecting, you can click the Advanced button in the dialog box. This opens the Wireless Net-
works tab of the wireless connection’s properties dialog box, which is examined in the next section.
Configuring Wireless Settings
Windows XP, using the 802.11 standard and the Wireless Zero Configuration service, does a good job of locating wireless networks for you and gives you the option to connect to those networks. However, the wireless connection’s properties dialog box also provides a Wireless Networks tab where you can manually configure some settings if they are required. The following steps show you the options and how to configure them.
552

5: Advanced Networking
Chapter 19: Wireless Networking
1Open Network Connections and right-click the wireless connection. Choose Properties.
2On the Wireless Networks tab, shown here, notice that by default Windows configures the wireless network settings for you. You see the available networks and the preferred networks. If you need to configure an available network that you want to connect to, select the network in the Available Networks list and click Configure.
caution Remember that Windows XP usually does a good job of managing your wireless network settings. If you have connectivity and everything seems to be working well, do not change any of the settings on the Wireless Networks tab!
3The Wireless Network Properties dialog box appears, shown next. By default, data encryption and network authentication are enabled. If you need to enter the network key manually, do so in this dialog box and configure any necessary options. Check the network adapter’s documentation for details. For home or small office networks (where IEEE 802.1x is not used), clear The Key Is Provided For Me Automatically and type the key in the Network Key box. If you are use using ad hoc mode, you can disable the settings on this tab by selecting This Is A Computer-To-Computer Network. Click OK.
Chapter 19
553

5: Advanced Networking
Part 5: Advanced Networking
19 Chapter
4In the Preferred Networks list on the Wireless Networks tab, you can reorganize the list if you have more than one network by clicking the Move Up or Move Down button. Place the network that you use most often at the top of the list to speed up your initial access to that network.
5If you only want to connect in infrastructure mode, or you only want to connect in ad hoc mode, click the Advanced button at the bottom of the Wireless Networks tab. The Advanced dialog box opens, shown here. By default, Any Available Network (Access Point Preferred) is selected. If you want to restrict the connection, select either Access Point (Infrastructure) Networks Only or Computer-To-Computer (Ad Hoc) Networks Only.
554

5: Advanced Networking
Chapter 19: Wireless Networking
You encounter problems with your Wi-Fi connections.
If you are having problems connecting to a wireless network, check the following items:
●If you are connecting in infrastructure mode, make sure the wireless access point is available and within range.
●If you are connecting in ad hoc mode, make sure other ad hoc clients are available and within range.
●Make sure your wireless adapter is functioning properly. Open Network Connections and double-click the wireless connection. Check the speed and signal strength on the General tab, as shown in Figure 19-6.
●If you are having problems connecting to a specific access point, check the access point’s settings and manually configure your NIC on the Wireless Networks tab to connect to that access point. Provide any security keys needed.
Figure 19-6. Check the wireless connection’s General tab for possible connection problems.
Chapter 19
555
This page intentionally left blank

Chapter 20
Examining |
|
Windows |
558 |
Security History |
|
Understanding |
560 |
Security Threats |
|
Protecting |
|
Windows XP |
|
from Security |
566 |
Threats |
5: Advanced Networking
Maintaining
Network Security
Understanding potential security issues has always been an advanced topic, particularly in the Windows world. For many years, Windows clients were used in isolated LANs or as limited Internet clients. In either case, Windows systems were expected to have little or no interaction with the outside world, and serious security concerns were left to be dealt with by system administrators of other operating systems.
However, two major changes in the Windows networking arena have shattered this utopia forever. Ever since the introduction of Microsoft Windows NT, the Windows family of operating systems has gradually grown more powerful and functional in WAN environments and has become more and more Internetaware. In addition, the continued popularity of Windows on the desktop, as well as the expanding popularity of Windows in Internet server environments, has created a massive number of potential security targets for hackers to exploit.
Out of the box, Microsoft Windows XP is the most secure operating system ever produced by Microsoft, and most remaining potential security liabilities can be addressed using the tools included with Windows XP along with the right know-how.
In this chapter, you’ll learn about the most common threats to running a secure Windows XP installation and the countermeasures you can take to make your computing safe and secure.
557