

Microsoft Windows XP Networking Inside Out
.pdfPart 4: Network Resources
Setting Permissions for Network Shares
Notice that the Sharing tab now includes a Permissions button. If you click the Permissions button, you can set the permissions for the shared folder, as shown in Figure 14-18.
14 Chapter
Figure 14-18. Permissions are configured by accessing the Share Permissions tab.
Permissions for file shares are controlled very much like permissions for printer shares. See “Assigning Printer Permissions,” page 402, for more information on setting individual permissions on a share.
caution By default, on a file share, the Everyone group has the Full Control permission.
This permission should always be removed! If the underlying NTFS permissions are not correctly maintained (or if you’re using the FAT file system), allowing the Everyone group Full Control to a share makes your share accessible to anyone who can reach your computer over the network and allows for the propagation of Internet worms and Trojan horse programs. It also allows people to stash data in that share without your knowledge. If you want everyone in your home or company to be able to write to a volume, create a group that specifically lists those people and grant rights to that group. See “Configuring Network Shares,” page 585, for more information.
Before proceeding, it is important to keep in mind how network share permissions interact with NTFS permissions. When network share permissions and NTFS permissions are both active (which is the case whenever a folder or file is shared on an NTFS drive), the most restrictive permission applies. For example, if a user has the Full Control permission for the network share but his NTFS permission is set to Read, the user can
428
4: Network Resources

Chapter 14: Understanding Resource Sharing and NTFS Security
only read the resource. If a user has the Full Control permission for a network share but his NTFS permission is Modify, the user can only modify the resource. If a user has no NTFS permission whatsoever on the file, the user cannot access the file. The effective (or resultant) permissions between network share and NTFS permissions can be confusing. Keep the following points in mind as you work with network shares on NTFS volumes:
●Network share permissions only apply to users accessing a folder or file over the network, not to a user directly logged on to the computer that contains the resource. Network share permissions are assigned from the Sharing tab of a resource’s properties dialog box.
●NTFS permissions apply equally to both network users and local users of the computer, and they are assigned from the Security tab of the resource’s properties dialog box.
Chapter 14
Managing Shares with Network Tools
Once you have set up the network shares that you want to make available and have configured any necessary NTFS permissions (if you are not using Simple File Sharing), your management tasks for the shares are rather minimal. When the network share is available, the only tasks you need to perform are as follows:
●Adjust network share contents. In the case of a shared folder, you might need to change items that are available in the share from time to time by adding and removing files and folders. However, you can perform this addition and removal of files and folders as needed without any additional configuration to the network share. Because the share is created at the folder level, you don’t have to worry about setting permissions on individual files that you add to the folder. Simply move them in and out of the folder as needed.
●Adjust network share permissions. Over time, the content of a shared resource can change, and the permissions that you apply to that shared content might need to change as well. Also, as new users who should have access to the network share are created, the users must be added to groups that have access to the shared resource.
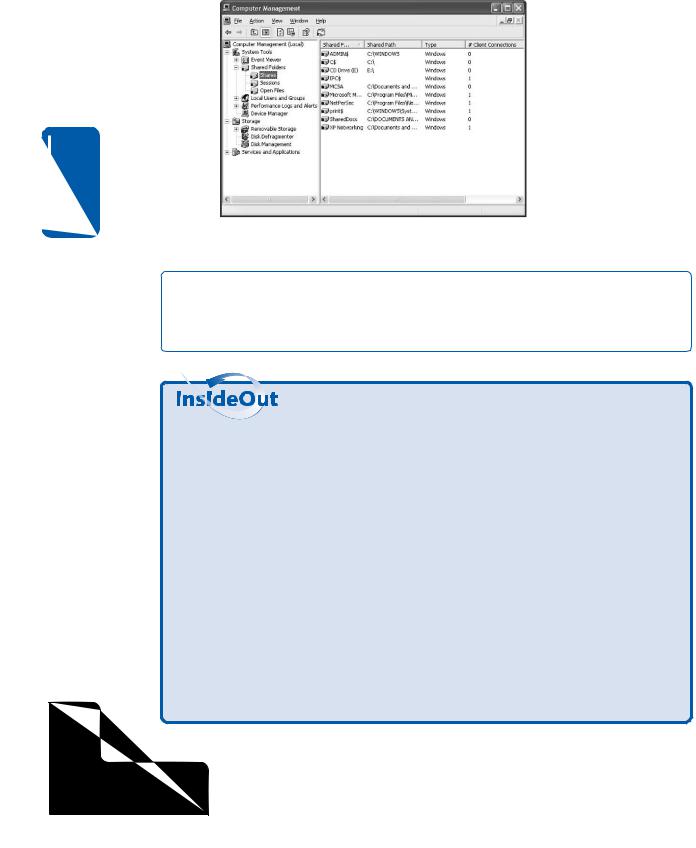
●Monitor the network share. Depending on the share, you might want to monitor the share from time to time. You can easily monitor all of your shared folders through the Computer Management console, which is found in the Administrative Tools folder in Control Panel. This monitoring tool allows you to see the shared folders, current connections, and current open shares, as shown in Figure 14-19 on the next page. You can right-click a share or user connected to a share and stop sharing the resource or disconnect the user. You can also access the share’s properties and change permissions. This console provides a great way to keep track of which users are accessing different shares and for what amount of time.
429
4: Network Resources
Part 4: Network Resources
14 Chapter
Figure 14-19. Use Computer Management to keep track of shared folders and connections to those folders.
tip You can also open the Shared Folders snap-in more quickly without opening Computer Management by typing fsmgmt.msc at any command prompt. Also, note that this console is not available if sharing has not been enabled on the computer or if Simple File Sharing is in use.
What Are the Admin$, C$, IPC$, Print$, and Fax$ Shared Folders?
If you open the Shared Folders snap-in in Computer Management, you’ll see the Admin$, C$, IPC$, and Print$ shared folders. These shares are administrative shares that are automatically configured by Windows XP and are hidden from the network (all share names ending with a dollar sign are hidden shares). When the dollar sign is used to make these shares invisible, users do not see them when they browse your computer for shared resources over the network. However, if a user on the network knows the names of these shares, he or she can connect to them by name. These shares are necessary. In fact, you cannot permanently delete them. If you delete one, it will reappear the next time the Server service is started or when you restart your computer. The hidden administrative shares and a brief description of each follows:
●C$ (or D$, E$, and so on). These shares give members of the Administrators and Backup Operators groups access to the root folder of a hard disk. These shares are used for backup purposes and also allow administrators to remotely access a system’s disks even if no shares have been created.
●Admin$. This share is used for remote administration, and it maps to the %SystemRoot% folder on the particular computer, which is usually C:\Windows.
430
4: Network Resources
Chapter 14: Understanding Resource Sharing and NTFS Security
●IPC$. This share is used when remote computers are viewing resources on your computer. The share provides the named pipes that programs use to communicate with each other.
●Print$. This share is established when you share a printer, and it is used for remote administration of printers.
●Fax$. If you have a fax server attached to your computer, this share is used by clients to send faxes and access cover pages that are stored on the server.
You can also manage shares using the Net command. This command gives you fast and easy information about your network and other Windows services, and you can even manage network shares with it. The following sections review several uses of the Net command.
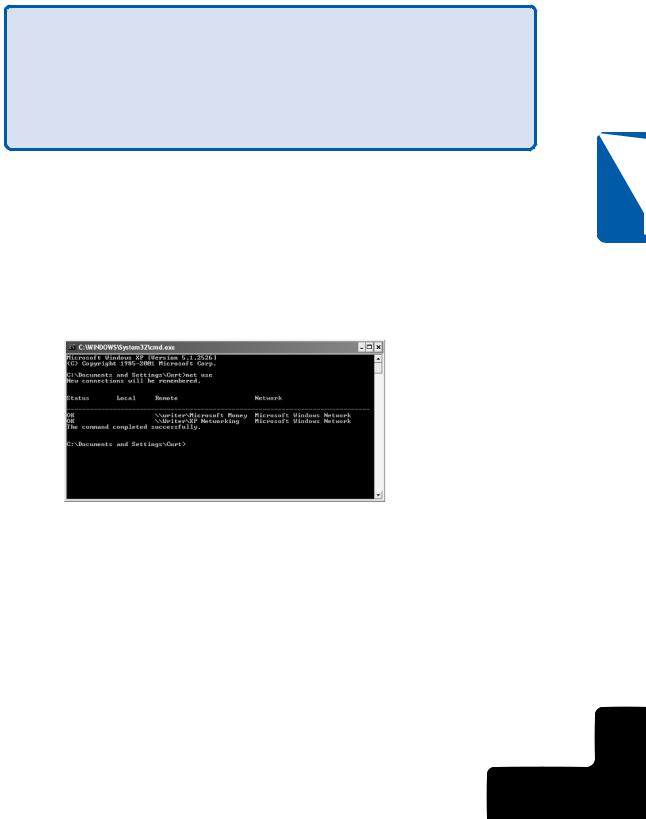
Net Use
You use the Net Use command to connect to a shared resource on another computer or to view the resources to which you are currently connected. At the command prompt, type net use to see the current network connections, as shown in Figure 14-20.
Chapter 14
Figure 14-20. The Net Use command lists the resources you are currently connected to.
To connect to shared resources, type net use \\computername\sharename. Using Net Use, you can also map a network drive to a share by choosing a drive letter and typing net use driveletter: \\computername\sharename. If you simply want to use any available drive letter, use an asterisk (*) instead of specifying the drive letter, and an available drive letter will be assigned starting from the end of the alphabet (Z) and moving backward. For a listing of additional switches you can use with Net Use, type net use /? at the command prompt.
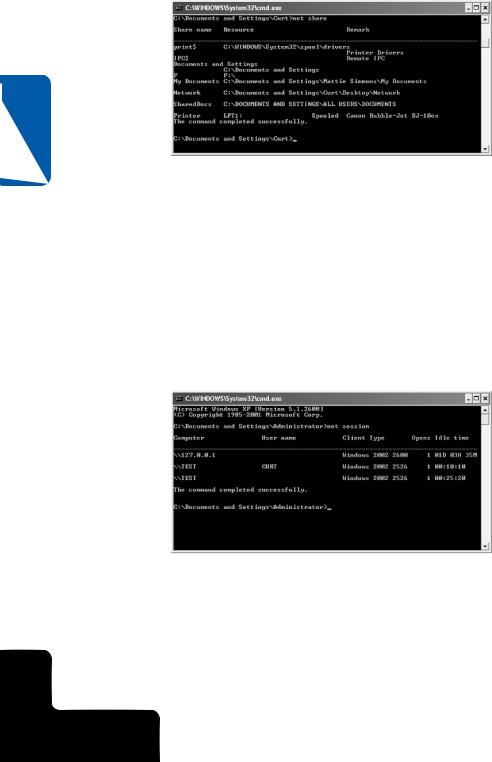
Net Share
The Net Share command works like the Shared Folders console in that you can view, create, modify, and delete shared resources on your computer. If you type net share at
431
4: Network Resources
Part 4: Network Resources
a command prompt, you’ll see a listing of the computer’s shared resources, as shown in Figure 14-21.
14 Chapter
Figure 14-21. The Net Share command provides a command line interface where you can manage shares.
If you type the Net Share command followed by the name of the shared resource, such as net share SharedDocs, you’ll see basic information listing the full path of the network share, the users connected to the share, the type of caching for the share, and the maximum number of users permitted to access the share at one time. You can add, modify, and delete network shares by using the appropriate switches at the command line. To learn more about these switches, type net help share at the command prompt.
Net Session
You can quickly view a list of the current sessions on your computer by typing net session at the command prompt, shown in Figure 14-22.
Figure 14-22. The Net Session command lists the users connected to any of your computer’s network shares as well as their number of connections and their computers’ operating systems.
You can disconnect all sessions by typing net session /delete, or you can disconnect a specific computer by typing net session \\computername /delete, where computername is the IP address of the connecting computer.
432
4: Network Resources

Chapter 14: Understanding Resource Sharing and NTFS Security
Net File
The Net File command lets you view the files that are open in network shares and close the files as needed. Type net file to see the current open files. An ID number is displayed next to each open file. To close a file, type net file IDnumber /close.
Solving Common Problems with Network Shares
Under most circumstances, shared folders will not give you much trouble in terms of connection or access problems, but there are three main issues you are likely to run into as you work with shared folders.
●Incorrectly set permissions are the most common source of problems you are likely to encounter. Users might complain about not being able to access shares or not having the needed level of permission.
●Remember that you can’t set individual NTFS permissions on a resource when Simple File Sharing is in use. There is no workaround for this condition, so don’t waste your time trying to find workarounds with Simple File Sharing enabled. You must disable Simple File Sharing in Windows XP Professional to control NTFS permissions. Simple File Sharing cannot
be disabled in Windows XP Home Edition. You can use the Cacls.exe command-line utility to set NTFS permissions in Windows XP Home Edition (and Windows XP Professional), but it’s not as easy as working in a graphical environment. If you want to administer NTFS permissions on your network, Windows XP Professional is your best choice.
●If you are using NTFS permissions and users report intermittent access to the share, check the User Limit settings on the Sharing tab of the resource’s properties dialog box. The network share might have a limited number of concurrent connections that is periodically being exceeded. You can select Maximum Allowed to provide the maximum number of concurrent connections permitted, which is five concurrent connections for Windows XP Home Edition and 10 concurrent connections for Windows XP Professional Edition. If you need to provide more network connections than the maximum number allowed, you must purchase a server version of Windows along with the correct number of needed client access licenses.
Configuring NTFS Permissions
Every file and folder on an NTFS volume contains an object called a security descriptor. This object maintains information about which users create files, own them, and have the ability to access them. The security descriptor contains two ACLs: the discretionary access control list and the system access control list.
Chapter 14
433
4: Network Resources
14 Chapter
Part 4: Network Resources
The system access control list (SACL) determines which types of file system access will be tracked by the operating system. For more information on how SACLs are used, see “Auditing File System Access,” page 594.
The discretionary access control list (DACL) maintains the list of user accounts that can access a particular file or folder and which types of access they have been granted (or explicitly denied).
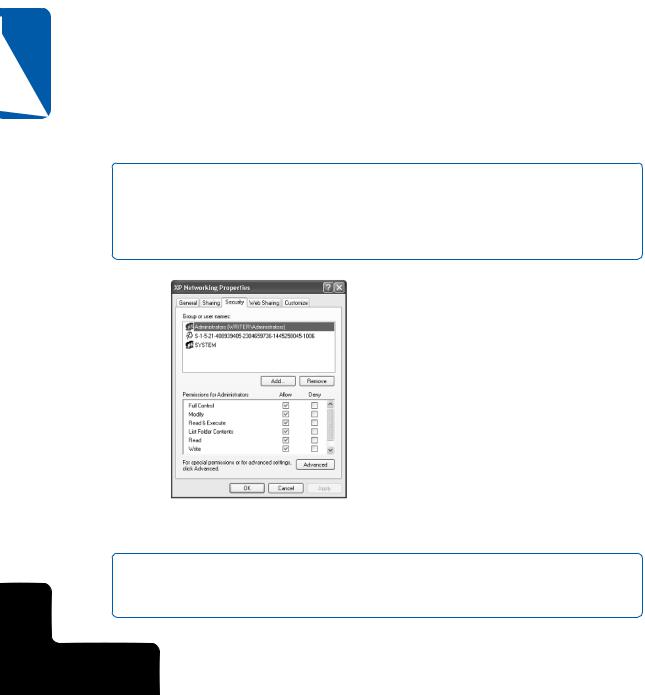
For each file and folder housed on an NTFS volume, there are six basic security rights that can be assigned to any user or group. In addition to these six basic access rights, there are a number of additional access rights that fall under the category of special permissions. NTFS permissions should not be confused with share permissions, which apply to folders or other resources shared over the network. When you right-click a file or folder on an NTFS volume and choose either Properties or Sharing And Security, the properties dialog box that appears shows both a Sharing and a Security tab. The Sharing tab is used for creating network shares, whereas the Security tab is used to configure NTFS permissions, as shown in Figure 14-23.
note If you don’t see a Security tab, make sure the volume is an NTFS volume, not a FAT volume. If it is an NTFS volume, you probably have Simple File Sharing enabled. Turn off Simple File Sharing by opening Folder Options in Control Panel. Select the View tab, and scroll through the Advanced Settings list until you find Use Simple File Sharing (Recommended). Clear the check box and click OK.
Figure 14-23. NTFS permissions are configured on the Security tab of the properties dialog box of a file or folder.
note NTFS permissions exist in Windows XP Home Edition and Windows XP Professional. However, with Windows XP Home Edition, you cannot directly access the NTFS permissions. The rest of this section assumes that Windows XP Professional is being used.
434
4: Network Resources
Chapter 14: Understanding Resource Sharing and NTFS Security
To assign permissions to additional different users and groups for a folder or file, follow these steps:
1Right-click the folder or file (or a group of files) and choose Properties.
2Select the Security tab and click the Add button.
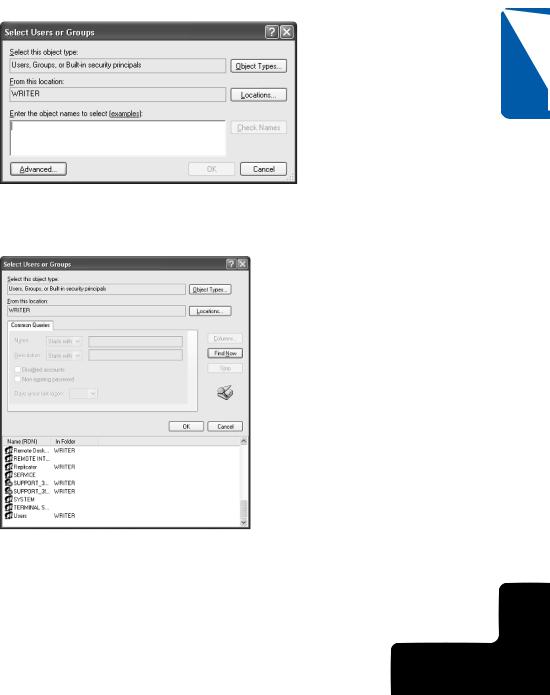
3In the Select Users Or Groups dialog box, shown here, click the Advanced button.
Chapter 14
4A larger Select Users Or Groups dialog box appears. Click the Find Now button, and a list of all users and groups defined on the local computer appears in the dialog box, as shown here.
5Select the user or group for which you want to configure permissions. If you want to add more than one group or user account at a time, press the Ctrl key, and click each account you want to configure. Click OK in each dialog box to return to the Security tab.
435
4: Network Resources
Part 4: Network Resources
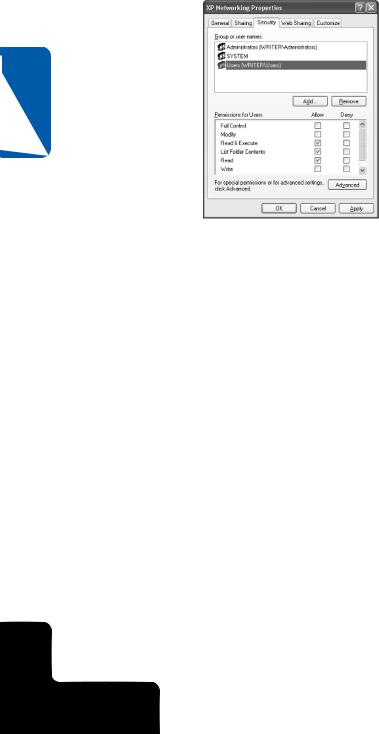
6The selected user or group now appears on the Security tab. Select the user or group in the upper list, and then set its permissions in the lower list, as shown here. You can also modify permissions for the existing default groups, such as Administrators or Users, in the same way.
14 Chapter
As you are planning and working with NTFS permissions, it is important to keep a few concepts in mind that will make your work easier and your users’ access to network resources less complicated:
●Always try to assign permissions on a shared resource to a group, such as Users, rather than to an individual user account, such as Curt. This allows you to set one standard permission for all users who belong to the configured group and a different setting to members of the Administrators group or other special groups. Permissions applied to individual users are certainly fine when necessary, but this approach should only be used when you can’t achieve the same results using group permissions. This will make managing permissions for the resource easier to implement and much easier to manage on a continuing basis.
●Remember that NTFS permissions are cumulative. If a user is a member of two different groups and one group has Read permission and the other group has Write permission, the user has both Read and Write permission. The exception to this cumulative rule is if you assign the Deny permission, which overrides all matching Allow permissions. For example, if a user has the Write permission in one group (the Allow check box next to Write is selected), and in another group the user has the Write permission denied (the Deny check box next to Write is selected), the user’s Write permission will be denied, even though it was granted in the first group. As you are planning and assigning permissions, make sure you consider how permissions work across multiple groups and that some users might be members of
436
4: Network Resources
Chapter 14: Understanding Resource Sharing and NTFS Security
several groups. Because the Deny permission breaks the cumulative rule in evaluating effective permissions, avoid its use as much as possible to make the effective permissions of your users easier to understand.
Setting Advanced NTFS Permissions
You can also set advanced NTFS permissions on folders and files. The more important consideration, however, is whether you should. To make NTFS permissions as robust as possible, you can manipulate the special permissions that make up the standard NTFS permissions. Although this capability gives you a very fine level of control over users and the permissions they have on network resources, those special permissions often become complex, and you might not achieve your desired outcome. If you think that you need to alter special permissions, stop and consider your real reasons. Can the apparent need for different permissions be managed by selecting different groups of users and configuring their standard permissions?
If you do determine that you need to configure special permissions, you should apply those permissions to a test user account (one not accessible to anyone on the network but you), and then test the account’s effective permissions to see if the special permissions have the effect you intended. To set special permissions, follow these steps:
1Right-click the folder or file you want to manage and choose Properties.
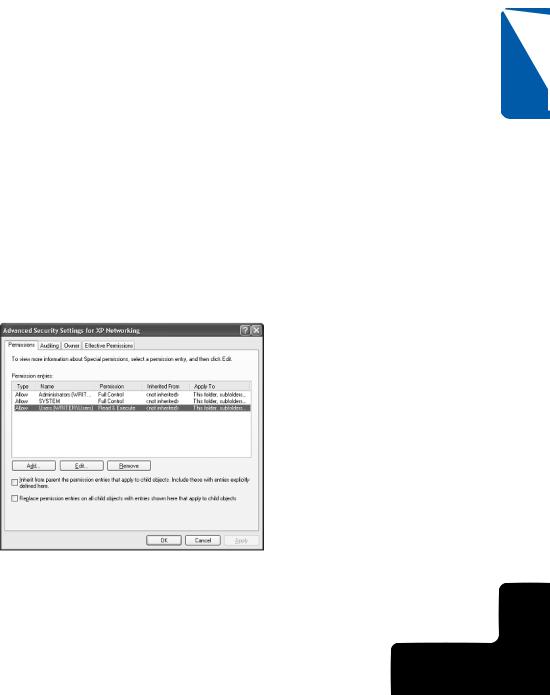
2Select the Security tab and click the Advanced button.
3In the Advanced Security Settings dialog box shown here, select the user or group in the Permission Entries list for whom you want to configure special permissions, and then click the Edit button.
Chapter 14
437
4: Network Resources