

Microsoft Windows XP Networking Inside Out
.pdf3: Network Connectivity
Part 3: Network Connectivity
3The Find Users, Contacts, And Groups window appears. In the Find box, select what you want to search for, such as Shared Folders, as shown in Figure 11-14.
Figure 11-14. Active Directory can be searched for users, groups, folders, computers, and other network resources.
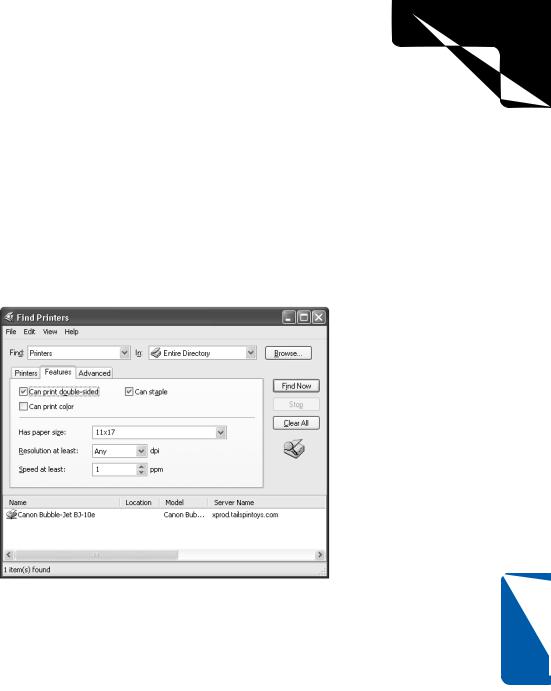
4Complete the fields required for starting a search, which will vary depending on what you are looking for. For example, you can search for a printer by name, location, or model, as shown in Figure 11-15. You can even search for printers with certain features on the Features tab or by using more advanced fields (such as Pages Per Minute or Model) on the Advanced tab. Enter your search information and click Find Now. The results appear in a pane that unfolds at the bottom of the window. Simply double-click the shared resource that you want to access.
11 Chapter
Figure 11-15. A user searches for printers of model type Canon and finds one match.
338
3: Network Connectivity
Chapter 11: Understanding Domain Connectivity
5Depending on the resource that you are searching for, you can also search for the resource based on features or other information. For example, you can search for a shared printer based on its characteristics by clicking the Features tab, as shown in Figure 11-16. This allows you to search for color printers, printers that staple, and so on. If these options do not give you the results you want, try the Advanced tab, where you can choose fields, conditions, and values for the search. For example, you could select Pages Per Minute in the Field list and Greater Than Or Equal To in the Condition list, and then type a number in the Value list, such as 15 to obtain a list of printers that can print at least 15 pages per minute. If you select multiple criteria on the various tabs, your search will reveal printers that meet all the conditions you have specified.
Figure 11-16. The Features tab contains the most common criteria for the type of object you’re searching for. The Advanced tab offers even more selections.
Creating a Network Place or Mapping a Network Drive
Suppose you find a shared folder that contains the documents you need, and you want to make this folder easy to access directly from your desktop. You can perform this action in both a domain and a workgroup setting by adding a network place or by mapping a network drive. Both features basically give you the same result. They make the shared folder or resource appear as though it resides directly on your computer so you can easily access it any time you are connected to the network.
Chapter 11
339

3: Network Connectivity
Part 3: Network Connectivity
Creating a Network Place
A network place is a shortcut that connects you directly to a network folder or drive. If you want to create a network place, follow these steps:
1Open My Network Places. (If you’re not sure how to find My Network Places, see “Finding My Network Places,” opposite.)
2Click the Add A Network Place link under Network Tasks. This opens the Add Network Place Wizard. Click Next to move past the opening page.
3You have the option of signing up for online storage with a storage provider. But to create a network place that points to a location in your domain or your workgroup, select Choose Another Network Location, and then
click Next.
4On the What Is The Address Of This Network Place page, type the network address, or click the Browse button to open the Browse For Folder dialog box.
5If you opened the Browse For Folder dialog box, browse to the network resource for which you want to create a network place, as shown in Figure 11-17. You’ll want to expand the Entire Network link, expand Microsoft Windows Network, and then expand your domain or workgroup name. The network computers will be listed. Expand a computer and a drive, and then select a folder. Click OK. The address appears in the Internet Or Network Address box. Click Next.
11 Chapter
Figure 11-17. In the Browse For Folder dialog box, you select the network location for which you will create a network place.
6On the What Do You Want To Name This Place page, type a friendly name that will identify the network place for you. Click Next, and then click Finish.
340
3: Network Connectivity
Chapter 11: Understanding Domain Connectivity
tip Finding My Network Places
If you’re having trouble locating My Network Places, you can customize Windows XP in three ways to make it easy to find.
First, you can display My Network Places as a shortcut on your desktop. To do so, rightclick on your desktop, and choose Properties. Select the Desktop tab, and click the Customize Desktop button. On the General tab of the Desktop Items dialog box, you can activate shortcuts on the desktop to My Documents, My Computer, Internet Explorer, and My Network Places by selecting the appropriate check boxes. Click OK to close each dialog box. Now, the shortcuts you’ve activated will appear on your desktop.
Second, you can add My Network Places to the Start menu. Right-click the Start button and choose Properties. Select the Start Menu tab and click the Customize button next to the Start Menu selection. On the Advanced tab of the Customize Start Menu dialog box, scroll through the Start Menu Items list, and select My Network Places.
Click OK to close each dialog box. Now, when you open the Start menu, you’ll see My Network Places in the right pane.
Third, as a more drastic measure, you can revert to the Windows 2000–style Start menu, which will also place My Network Places on your desktop. Right-click Start and choose Properties. On the Start Menu tab, select Classic Start Menu, and click OK.
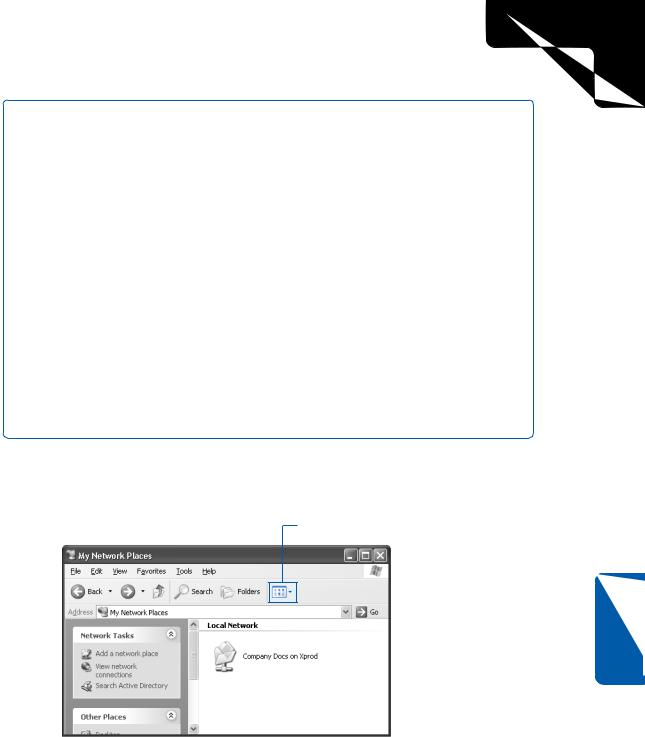
The network place now appears in your My Network Places folder, as shown in Figure 11-18. You can drag the icon to your desktop, another folder, or even the Start menu for easier access to the network resource.
View Menu button
Chapter 11
Figure 11-18. Double-click a network place in My Network Places to open it. Use the View Menu button to select the view you want to work with.
341
3: Network Connectivity
Part 3: Network Connectivity
Mapping a Network Drive
Besides creating a network place, you can also map a shared resource to a drive letter. For example, if your local computer has a drive C and a drive D as well as a CD-ROM drive as drive E, you can map a folder or an entire drive on another network computer to an unused drive letter on your machine, in this case, drive F, G, or so on. Mapping a drive does essentially the same thing as creating a network place in that you’ll have a handy link to the shared network resource and be able to access it as if it were on your local machine. In fact, creating a mapped network drive is faster than creating a network place, so you might opt for this choice. To map a network drive, follow these steps:
1Open My Network Places. (You can also use Microsoft Windows Explorer or My Computer.)
2Choose Tools, Map Network Drive.
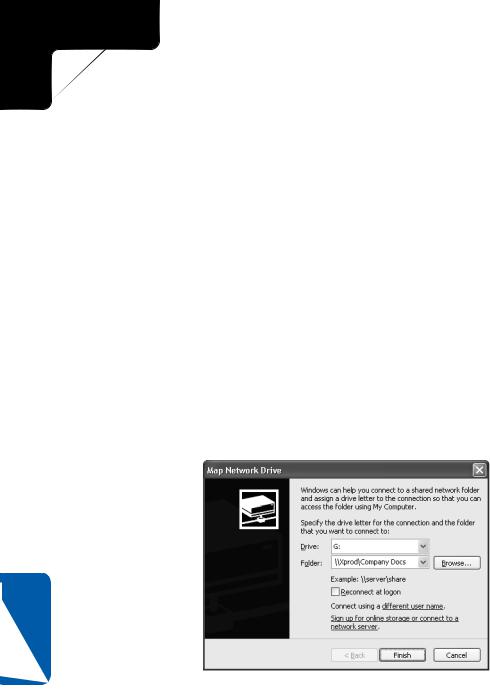
3In the Map Network Drive dialog box, select a drive letter from the Drive list that will represent the network location. Drive letters that are already in use will not be displayed. Next, use the Folder box to enter the network path in the form \\servername\sharename, shown in Figure 11-19, or click Browse to navigate to the resource. Keep in mind that sharename refers to the shared folder’s name, not necessarily the name of the network place. Click Finish when you’re done.
11 Chapter
Figure 11-19. After clicking Finish, drive G will access the Company Docs folder on the Xprod computer as if it were a drive on the local computer.
4The drive now appears in My Computer under the category of Network Drives. You can create a shortcut to the drive and place the shortcut anywhere on your computer. You might also want to click the Folders button on the toolbar to toggle off the task pane and display the mapped drive in a hierarchical folder list in the left pane along with your physical drives.
342
3: Network Connectivity
Chapter 11: Understanding Domain Connectivity
tip Removing a Mapped Drive or a Network Place
You can disconnect a network drive by right-clicking the drive and choosing Disconnect. You can also remove a network place by right-clicking the icon and choosing Delete.
Using the UNC Path or HTTP Address
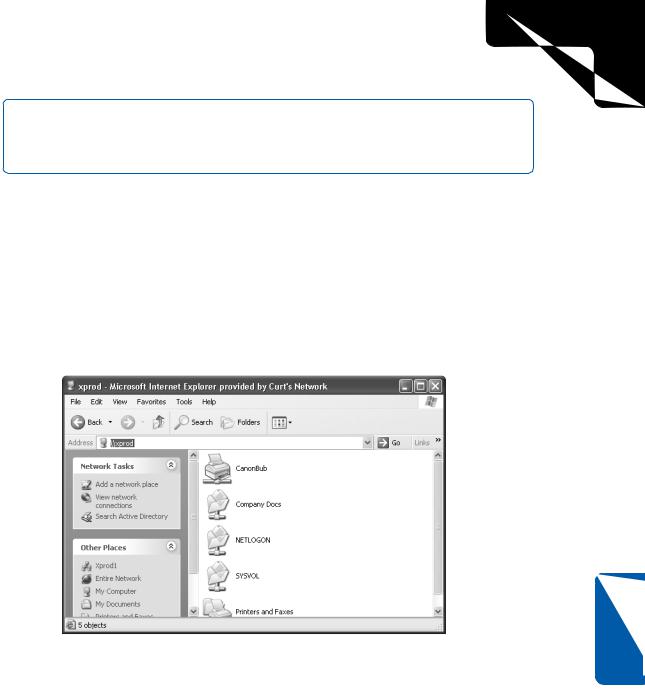
You can access any network resource directly from the Run dialog box (choose Start, Run), from any window’s Address box, or from within Internet Explorer by typing its Universal Naming Convention (UNC) path. The UNC path accesses network resources using the format \\servername\sharename. For example, if a shared folder called Docs resides on a server called Server1, the UNC path is \\server1\docs. Notice that you type two backslashes before the server name and one backslash before the share name. You can easily access the shared resource or the computer that holds the shared resource by typing the UNC path in the Address box in any window, as shown in Figure 11-20.
Figure 11-20. The Xprod network computer is being accessed by typing its UNC path (\\xprod) in Internet Explorer.
If a server has Internet Information Services (IIS) installed with shared virtual directories defined in IIS, you can also access the server or computer using the format http:// servername/sharename. See Chapter 9, “Using Internet Information Services,” to learn more about IIS.
Chapter 11
343

3: Network Connectivity
Part 3: Network Connectivity
Leaving a Domain
Should the time come when you need to leave a Windows domain so that your computer can become a member of a workgroup (or be a stand-alone computer), you can easily leave the domain by basically reversing the steps you took to join it. If you need to leave a domain, follow these steps:
1Log on to the local computer as a user with administrative privileges.
2Open System in Control Panel, and select the Computer Name tab.
3Click the Change button. If the Change button is grayed out, you need to log on with a local administrator account.
4In the Computer Name Changes dialog box, select Workgroup in Member Of, and then type the name of the workgroup. Click OK.
5A second Computer Name Changes dialog box appears. You must provide the user name and password of a domain account that has the credentials to remove a computer from the domain. See a domain administrator for assistance if necessary.
Accessing Domain Resources from Windows XP Home Edition
11 Chapter
Windows XP Home Edition cannot join a domain—it doesn’t have the required software to join a domain and take advantage of all that a domain has to offer. But what if you have a Windows XP Home Edition computer that you want to connect to a domain? Can you make this connection and still use domain resources? The answer is yes!
If you have a valid domain user name and password, you can log on to the domain from a Windows XP Home Edition computer. You can then access shared folders and printers over the network, but keep in mind that none of the services and features of a domain, such as Group Policy, will work on Windows XP Home Edition. Therefore, Windows XP Professional is definitely your best choice for working in a domain environment.
To access a shared resource on a domain, browse for the resource using My Network Places, or you can use the UNC path to access the shared resource. You’ll be prompted for a user name and password to access the resource because you are not logged on to the domain. The user name and password are kept alive for a single session, but you have to start all over each time you log on. This workaround provides some functionality for Windows XP Home Edition in a Windows domain.
344

Chapter 12
Using |
|
Command-line |
|
Tools Included |
345 |
in Windows XP |
|
Running |
|
Additional Network |
356 |
Support Tools |
|
Finding Helpful |
|
Utilities on |
363 |
the Internet |
|
Troubleshooting |
|
Network |
366 |
Connections |
3: Network Connectivity
Solving
Connectivity
Problems
Difficulties connecting to the network and problems accessing resources can range from the simple to the complex, and they are often complicated enough to stump even the most experienced network users. What do you do when one computer on the network will not connect to the other network clients?
What do you do when network connectivity seems to be slow? How do you solve other connectivity problems?
These issues, along with many others, fall under the collective umbrella of troubleshooting. Whether you have a small home network or you help manage a larger network, troubleshooting issues will most certainly appear from time to time. The good news is that Microsoft Windows XP has a number of built-in tools that can help you solve connectivity problems, and there are free or inexpensive utilities available on the Internet that can also help. This chapter explores the troubleshooting process and networking tools that will help you troubleshoot connectivity problems.
To find out more about troubleshooting problems when accessing resources, see Chapter 14, “Understanding Resource Sharing and NTFS Security.”
Using Command-line Tools
Included in Windows XP
To troubleshoot network connections and gather information about the state of your network, you can turn to a number of troubleshooting tools. Most of these tools are command-line utilities that have been around for years, and they have proven
345

3: Network Connectivity
Part 3: Network Connectivity
12 Chapter
helpful time and time again. You should become familiar with them because they can certainly help you resolve problems. Some of these tools perform tests for you, whereas others simply provide information that can help you find the source of difficulties. This section explores the tools included in Windows XP.
Using Ping
One of the most popular and common connectivity tests is the ping test. Ping uses the Internet Control Message Protocol (ICMP) to send data packets known as echo requests to a remote computer on a network (including the world’s largest network, the Internet). The echo requests are packets that ask for a reply (an echo), which the remote computer sends back to your computer. This lets you determine whether you have basic connectivity with that computer. There are a couple of different ways that you can use the test, as detailed next.
note The name for the ping test derives from sonar terminology. Sending out a brief blast of active sonar to try to locate an object is called pinging, which is the sound the sonar wave makes when it hits the metal hull of a ship or submarine.
Checking Your Network Interface Card (NIC)
Let’s assume that your computer cannot access other computers on the network. One of the first actions you should take is to perform a ping loopback test, which tests whether your computer can talk to your own NIC—the one in your own computer. This test simply lets you determine whether your NIC is working or not. If the loopback test fails, you know something is wrong with the NIC (such as an improper driver, an IRQ conflict, or a simple failure of the NIC itself), and it must be fixed
before you can gain network connectivity.
The loopback test works by pinging the reserved loopback IP address, which is 127.0.0.1. When you ping 127.0.0.1, echo request packets are sent to your own NIC. To perform a ping loopback test, follow these steps:
1From the Start menu, choose Run.
2In the Run dialog box, type cmd and press Enter.
3In the Command Prompt window that appears, type ping 127.0.0.1 and press Enter.
tip You can also type ping localhost to perform a loopback test. This is the same as typing ping 127.0.0.1.
346
3: Network Connectivity
Chapter 12: Solving Connectivity Problems
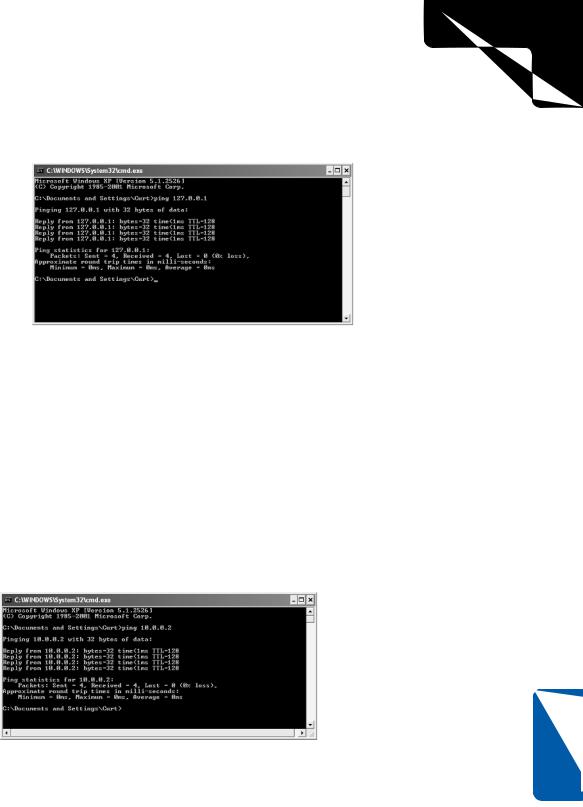
4The loopback test is performed. If the loopback is successful, you’ll see a series of replies, as shown in Figure 12-1. If the loopback is not successful, you’ll see a series of “Request timed out” messages.
Figure 12-1. The four lines beginning with “Reply from” indicate that the loopback test is successful. The time value reveals how long it took the echo request to be received.
Testing Connectivity to a Network Computer
If the loopback test works, your next troubleshooting step is to ping a computer on your network to test for basic network connectivity. This allows you to determine whether you actually have connectivity with other hosts on your network. If it appears that you have connectivity, you should also ping your computer from another network computer to prove that other computers can successfully ping your computer.
To ping a computer, you’ll need the computer’s IP address. Once you have the IP address, return to the Command Prompt window and type ping ipaddress where ipaddress is the IP address of the remote computer. If the ping test is successful, you’ll see the reply message shown in Figure 12-2.
Figure 12-2. This ping test was sent to a computer with the IP address of 10.0.0.2 and was successful.
Chapter 12
347