![](/user_photo/1438_p9ksI.png)
- •Using Your Sybex Electronic Book
- •Acknowledgments
- •Introduction
- •Assessment Test
- •Answers to Assessment Test
- •Types of Network Security Threats
- •Types of Security Weaknesses
- •Technology Weaknesses
- •Configuration Weaknesses
- •Policy Weaknesses
- •Types of Network Attacks
- •Eavesdropping
- •Denial-of-Service Attacks
- •Unauthorized Access
- •WareZ
- •Masquerade Attack (IP Spoofing)
- •Session Hijacking or Replaying
- •Rerouting
- •Repudiation
- •Smurfing
- •Password Attacks
- •Man-in-the-Middle Attacks
- •Application-Layer Attacks
- •Trojan Horse Programs, Viruses, and Worms
- •HTML Attacks
- •The Corporate Security Policy
- •Summary
- •Exam Essentials
- •Key Terms
- •Written Lab
- •Review Questions
- •Answers to Written Lab
- •Answers to Review Questions
- •Authentication Methods
- •Windows Authentication
- •Security Server Authentication
- •PAP and CHAP Authentication
- •PPP Callback
- •Configuring the NAS for AAA
- •Securing Access to the Exec Mode
- •Enable AAA Locally on the NAS
- •Authentication Configuration on the NAS
- •Authorization Configuration on the NAS
- •Accounting Configuration on the NAS
- •Verifying the NAS Configuration
- •Troubleshooting AAA on the Cisco NAS
- •Summary
- •Exam Essentials
- •Key Terms
- •Commands Used in This Chapter
- •Written Lab
- •Review Questions
- •Hands-On Labs
- •Lab 2.1: Setting the Line Passwords
- •Lab 2.2: Setting the Enable Passwords
- •Lab 2.3: Encrypting your Passwords
- •Lab 2.4: Creating Usernames and Logging In
- •Lab 2.5: Configuring AAA Authentication on the NAS
- •Answers to Written Lab
- •Answers to Review Questions
- •Introduction to the CiscoSecure ACS
- •Using User Databases for Authentication
- •Populating the User Database Population
- •New ACS Features
- •Installing CiscoSecure ACS 3.0
- •Administering CiscoSecure ACS
- •TACACS+ Overview
- •Configuring TACACS+
- •Using RADIUS
- •CiscoSecure User Database NAS Configuration for RADIUS
- •Verifying TACACS+
- •Summary
- •Exam Essentials
- •Key Terms
- •Commands Used in This Chapter
- •Written Lab
- •Review Questions
- •Answers to Written Lab
- •Answers to Review Questions
- •Solving Eavesdropping and Session Replay Problems
- •Fighting Rerouting Attacks
- •Fighting Denial-of-Service Attacks
- •Turning Off and Configuring Network Services
- •Blocking SNMP Packets
- •Disabling Echo
- •Turning Off BOOTP and Auto-Config
- •Disabling the HTTP Interface
- •Disabling IP Source Routing
- •Disabling Proxy ARP
- •Disabling Redirect Messages
- •Disabling the Generation of ICMP Unreachable Messages
- •Disabling Multicast Route Caching
- •Disabling the Maintenance Operation Protocol (MOP)
- •Turning Off the X.25 PAD Service
- •Enabling the Nagle TCP Congestion Algorithm
- •Logging Every Event
- •Disabling Cisco Discovery Protocol
- •Disabling the Default Forwarded UDP Protocols
- •Summary
- •Exam Essentials
- •Key Terms
- •Commands Used in This Chapter
- •Written Lab
- •Review Questions
- •Hands-On Lab
- •Lab 4.1: Controlling TCP/IP Services
- •Answers to Written Lab
- •Answers to Review Questions
- •Understanding the Cisco IOS Firewall
- •Authentication Proxy and IDS
- •Context-Based Access Control
- •CBAC Compared to ACLs
- •CBAC-Supported Protocols
- •Introduction to CBAC Configuration
- •Using Audit Trails and Alerts
- •Configuring Global Timeouts and Thresholds
- •Configuring PAM
- •Defining Inspection Rules
- •Applying Inspection Rules and ACLs to Router Interfaces
- •Configuring IP ACLs at the Interface
- •Testing and Verifying CBAC
- •Summary
- •Exam Essentials
- •Key Terms
- •Commands Used in This Chapter
- •Written Lab
- •Review Questions
- •Hands-On Labs
- •Lab 5.1: Configure Logging and Audit Trails
- •Lab 5.2: Define and Apply Inspection Rules and ACLs
- •Lab 5.3: Test and Verify CBAC
- •Answers to Written Lab
- •Answers to Review Questions
- •Introduction to the Cisco IOS Firewall Authentication Proxy
- •Configuring the AAA Server
- •Configuring AAA
- •Configuring the Authentication Proxy
- •Testing and Verifying Your Configuration
- •show Commands
- •Clearing the Cache
- •Introduction to the Cisco IOS Firewall IDS
- •Initializing Cisco IOS Firewall IDS
- •Configuring, Disabling, and Excluding Signatures
- •Creating and Applying Audit Rules
- •Setting Default Actions
- •Creating an Audit Rule
- •Applying the Audit Rule
- •Verifying the Configuration
- •Stopping the IOS Firewall IDS
- •Summary
- •Exam Essentials
- •Key Terms
- •Commands Used in This Chapter
- •Written Lab
- •Review Questions
- •Hands-On Labs
- •Lab 6.1: Enabling the IOS Firewall Authentication Proxy
- •Lab 6.2: Enabling the IOS Firewall IDS
- •Answers to Written Lab
- •Answers to Review Questions
- •What is a Virtual Private Network?
- •Introduction to Cisco IOS IPSec
- •IPSec Transforms
- •IPSec Operation
- •The Components of IPSec
- •IPSec Encapsulation
- •Internet Key Exchange (IKE)
- •Summary
- •Exam Essentials
- •Key Terms
- •Written Lab
- •Review Questions
- •Answers to Written Lab
- •Answers to Review Questions
- •Configuring Cisco IOS IPSec for Pre-Shared Keys Site-to-Site
- •Preparing for IKE and IPSec
- •Configuring IKE
- •Configuring IPSec
- •Testing and Verifying IPSec
- •Configuring IPSec Manually
- •Configuring IPSec for RSA-Encrypted Nonces
- •Configuring Cisco IOS IPSec Certificate Authority Support Site-to-Site
- •Configuring CA Support Tasks
- •Preparing for IKE and IPSec
- •Configuring CA Support
- •Configuring IKE Using CA
- •Configuring IPSec for CA
- •Testing and Verifying IPSec for CA
- •Summary
- •Exam Essentials
- •Key Terms
- •Commands Used in This Chapter
- •Written Lab
- •Review Questions
- •Hands-On Labs
- •Lab 8.1: Configure IKE on Lab_A and Lab_B
- •Lab 8.2: Configure IPSec on Lab_A and Lab_B
- •Answers to Written Lab
- •Answers to Review Questions
- •Answers to Hands-On Labs
- •Answer to Lab 8.1
- •Answer to Lab 8.2
- •Introduction to Cisco Easy VPN
- •The Easy VPN Server
- •Introduction to the Cisco VPN 3.5 Client
- •Easy VPN Server Configuration Tasks
- •Pre-Configuring the Cisco VPN 3.5 Client
- •Summary
- •Exam Essentials
- •Key Terms
- •Written Lab
- •Review Questions
- •Hands-On Lab
- •Lab 9.1: Installing the Cisco VPN 3.5 Client Software on Windows
- •Answers to Written Lab
- •Answers to Review Questions
- •Network Separation
- •Three Ways through a PIX Firewall
- •PIX Firewall Configuration Basics
- •Configuring Interfaces
- •Saving Your Configuration
- •Configuring Access through the PIX Firewall
- •Configuring Outbound Access
- •Configuring Inbound Access
- •Configuring Multiple Interfaces and AAA on the PIX Firewall
- •Configuring Multiple Interfaces
- •Implementing AAA on the PIX Firewall
- •Configuring Advanced PIX Firewall Features
- •Failover
- •Outbound Access Control
- •Logging
- •SNMP Support
- •Java Applet Blocking
- •URL Filtering
- •Password Recovery
- •Glossary
![](/html/1438/356/html_23OY49ciqg.iQJr/htmlconvd-veJkuU109x1.jpg)
Installing CiscoSecure ACS 3.0 |
79 |
Database replication
Scheduled ACS system backup and the ability to restore from the backup file
These and other features give you totally granular control over the AAA process, putting the matter of user access in your hands. In addition, CSNT gives you the tools you need to completely monitor the CSNT server and manipulate the user database.
And there’s more! CS ACS 3.0.2 also has the following features and capabilities:
802.1x support
LEAP support
Extensible Authentication Protocol (EAP) support (EAP-MD5, EAP-TLS)
Command authorization sets
MS-CHAP version 2 support
Per-user access control lists
Shared network access restrictions (NARs)
Wildcards in NARs
Multiple devices per AAA client configuration
Multiple LDAP lookups and LDAP failover
User-defined RADIUS vendor-specific attributes (VSAs)
Installing CiscoSecure ACS 3.0
Want it short and sweet? The CS ACS installation can be condensed into the following steps:
1.Verify that the NAS and the Windows server can communicate over a LAN using TCP/IP. Ping will work just fine for this job.
2.Install the ACS 3.0 ACS on the Windows 2000 server platform. Although this supposedly works with Windows NT 4.0, it is recommended that you use a Windows 2000 server.
3.Disable IAS on the Windows 2000 server (if it’s running), or the Cisco RADIUS server will not work.
4.Bring up the web browser interface of the ACS server.
5.Configure the NAS for AAA using TACACS+ and/or RADIUS.
6.Verify the installation and operation of the NAS and ACS server.
Exercise 3.1 assumes that step 1 has been completed and gets right into the installation of the ACS software.
Copyright ©2003 SYBEX Inc., 1151 Marina Village Parkway, Alameda, CA 94501. |
www.sybex.com |
![](/html/1438/356/html_23OY49ciqg.iQJr/htmlconvd-veJkuU110x1.jpg)
80 Chapter 3 Configuring CiscoSecure ACS and TACACS+
E X E R C I S E 3 . 1
CiscoSecure ACS 3.0 Installation
After you bring up and test network connectivity between the Windows server and the NAS server, install the ACS on the Windows server using the following steps:
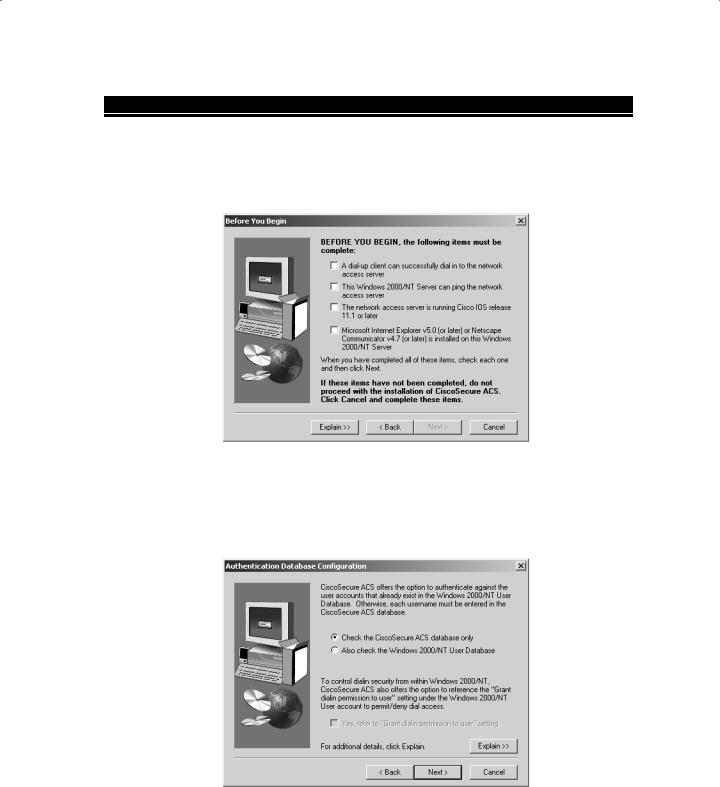
1.Once you click the Setup file, the ACS program displays the Before You Begin screen:
This screen asks you to verify that you have some basic configuration on the NAS before the ACS is installed. Be sure you don’t miss the note about the minimum IOS Version on the NAS—especially if you’re studying for your SECUR exam!
2.After you’ve completed the basic configuration needed to install the ACS, click Next and the Authentication Database Configuration screen appears:
Copyright ©2003 SYBEX Inc., 1151 Marina Village Parkway, Alameda, CA 94501. |
www.sybex.com |
![](/html/1438/356/html_23OY49ciqg.iQJr/htmlconvd-veJkuU111x1.jpg)
Installing CiscoSecure ACS 3.0 |
81 |
E X E R C I S E 3 . 1 ( c o n t i n u e d )
This is where you choose to use a local database on the ACS server or use the Windows server database.
3.Next, you’ll be prompted to configure the ACS to talk to the NAS on the CiscoSecure ACS Network Access Server Details screen:
Look at the bottom right-hand corner of the screen. See that Explain button? If you click it, an Explanation of CiscoSecure ACS Network Access Server Details screen appears:
Copyright ©2003 SYBEX Inc., 1151 Marina Village Parkway, Alameda, CA 94501. |
www.sybex.com |
![](/html/1438/356/html_23OY49ciqg.iQJr/htmlconvd-veJkuU112x1.jpg)
82 Chapter 3 Configuring CiscoSecure ACS and TACACS+
E X E R C I S E 3 . 1 ( c o n t i n u e d )
The Explanation screen can be unbelievably helpful to you. Yes! A help screen that is actually helpful—what do you know? Read through this information, and you’ll learn what each file in the Details screen requires. On the CiscoSecure ACS Network Access Server Details screen, I entered the name of the NAS and the IP address of the NAS F0/0 interface. For the key, I just made up a unique and extremely hard key to break.
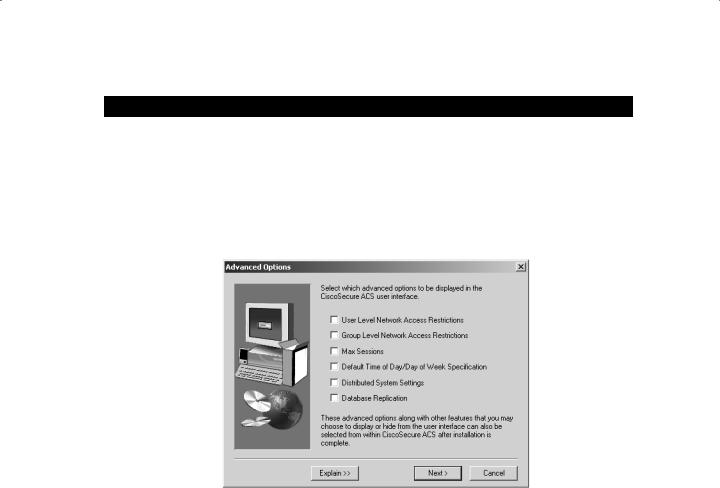
4.The next screen, Advanced Options, asks you to enter any advanced information to be displayed when using the ACS user interface:
Copyright ©2003 SYBEX Inc., 1151 Marina Village Parkway, Alameda, CA 94501. |
www.sybex.com |
![](/html/1438/356/html_23OY49ciqg.iQJr/htmlconvd-veJkuU113x1.jpg)
Installing CiscoSecure ACS 3.0 |
83 |
E X E R C I S E 3 . 1 ( c o n t i n u e d )
Again, to find out why you would choose each option, click the Explain button in the bottom left-hand corner. The Explanation of Advanced Options Configuration screen appears. Believe it—this is actually another helpful help screen—really!
5.The next screen, Active Service Monitoring, gives you an opportunity to configure monitoring on the ACS as shown here:
Copyright ©2003 SYBEX Inc., 1151 Marina Village Parkway, Alameda, CA 94501. |
www.sybex.com |
![](/html/1438/356/html_23OY49ciqg.iQJr/htmlconvd-veJkuU114x1.jpg)
84 Chapter 3 Configuring CiscoSecure ACS and TACACS+
E X E R C I S E 3 . 1 ( c o n t i n u e d )
The Active Service Monitoring screen provides a great way to set up your e-mail notification in case of failure. The Explain button in the bottom left-hand corner describes what the options are, but you probably won’t need to go there because they’re really self-explanatory.
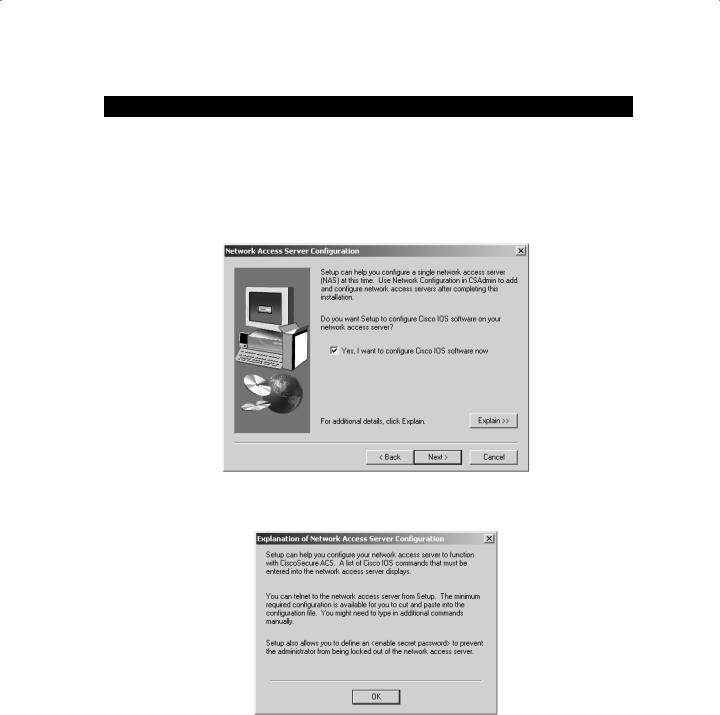
6.The Network Access Server Configuration screen allows you to configure the ACS so that it configures the NAS server. This is so much easier than the local authentication configuration that you did in the last chapter!
Again, clicking that Explain button in the bottom right-hand corner displays additional information:
Copyright ©2003 SYBEX Inc., 1151 Marina Village Parkway, Alameda, CA 94501. |
www.sybex.com |
![](/html/1438/356/html_23OY49ciqg.iQJr/htmlconvd-veJkuU115x1.jpg)
Installing CiscoSecure ACS 3.0 |
85 |
E X E R C I S E 3 . 1 ( c o n t i n u e d )
7.Next you’ll see the Enable Secret Password screen. It asks you for the enable secret password of the NAS and explains what the ACS installation is trying to accomplish:
8.This next screen, Access Server Configuration, tells you that the ACS will show you how to configure the NAS, step by step. Nice!
Copyright ©2003 SYBEX Inc., 1151 Marina Village Parkway, Alameda, CA 94501. |
www.sybex.com |
![](/html/1438/356/html_23OY49ciqg.iQJr/htmlconvd-veJkuU116x1.jpg)
86 Chapter 3 Configuring CiscoSecure ACS and TACACS+
E X E R C I S E 3 . 1 ( c o n t i n u e d )
9.Just click Next to see the configuration you need to type into the NAS on the NAS Configuration screen:
10.Keep scrolling down and you can see the entire configuration you need to configure on the NAS. The last two configuration screens appear as follows:
Copyright ©2003 SYBEX Inc., 1151 Marina Village Parkway, Alameda, CA 94501. |
www.sybex.com |