
- •Using Your Sybex Electronic Book
- •Acknowledgments
- •Introduction
- •Assessment Test
- •Answers to Assessment Test
- •Types of Network Security Threats
- •Types of Security Weaknesses
- •Technology Weaknesses
- •Configuration Weaknesses
- •Policy Weaknesses
- •Types of Network Attacks
- •Eavesdropping
- •Denial-of-Service Attacks
- •Unauthorized Access
- •WareZ
- •Masquerade Attack (IP Spoofing)
- •Session Hijacking or Replaying
- •Rerouting
- •Repudiation
- •Smurfing
- •Password Attacks
- •Man-in-the-Middle Attacks
- •Application-Layer Attacks
- •Trojan Horse Programs, Viruses, and Worms
- •HTML Attacks
- •The Corporate Security Policy
- •Summary
- •Exam Essentials
- •Key Terms
- •Written Lab
- •Review Questions
- •Answers to Written Lab
- •Answers to Review Questions
- •Authentication Methods
- •Windows Authentication
- •Security Server Authentication
- •PAP and CHAP Authentication
- •PPP Callback
- •Configuring the NAS for AAA
- •Securing Access to the Exec Mode
- •Enable AAA Locally on the NAS
- •Authentication Configuration on the NAS
- •Authorization Configuration on the NAS
- •Accounting Configuration on the NAS
- •Verifying the NAS Configuration
- •Troubleshooting AAA on the Cisco NAS
- •Summary
- •Exam Essentials
- •Key Terms
- •Commands Used in This Chapter
- •Written Lab
- •Review Questions
- •Hands-On Labs
- •Lab 2.1: Setting the Line Passwords
- •Lab 2.2: Setting the Enable Passwords
- •Lab 2.3: Encrypting your Passwords
- •Lab 2.4: Creating Usernames and Logging In
- •Lab 2.5: Configuring AAA Authentication on the NAS
- •Answers to Written Lab
- •Answers to Review Questions
- •Introduction to the CiscoSecure ACS
- •Using User Databases for Authentication
- •Populating the User Database Population
- •New ACS Features
- •Installing CiscoSecure ACS 3.0
- •Administering CiscoSecure ACS
- •TACACS+ Overview
- •Configuring TACACS+
- •Using RADIUS
- •CiscoSecure User Database NAS Configuration for RADIUS
- •Verifying TACACS+
- •Summary
- •Exam Essentials
- •Key Terms
- •Commands Used in This Chapter
- •Written Lab
- •Review Questions
- •Answers to Written Lab
- •Answers to Review Questions
- •Solving Eavesdropping and Session Replay Problems
- •Fighting Rerouting Attacks
- •Fighting Denial-of-Service Attacks
- •Turning Off and Configuring Network Services
- •Blocking SNMP Packets
- •Disabling Echo
- •Turning Off BOOTP and Auto-Config
- •Disabling the HTTP Interface
- •Disabling IP Source Routing
- •Disabling Proxy ARP
- •Disabling Redirect Messages
- •Disabling the Generation of ICMP Unreachable Messages
- •Disabling Multicast Route Caching
- •Disabling the Maintenance Operation Protocol (MOP)
- •Turning Off the X.25 PAD Service
- •Enabling the Nagle TCP Congestion Algorithm
- •Logging Every Event
- •Disabling Cisco Discovery Protocol
- •Disabling the Default Forwarded UDP Protocols
- •Summary
- •Exam Essentials
- •Key Terms
- •Commands Used in This Chapter
- •Written Lab
- •Review Questions
- •Hands-On Lab
- •Lab 4.1: Controlling TCP/IP Services
- •Answers to Written Lab
- •Answers to Review Questions
- •Understanding the Cisco IOS Firewall
- •Authentication Proxy and IDS
- •Context-Based Access Control
- •CBAC Compared to ACLs
- •CBAC-Supported Protocols
- •Introduction to CBAC Configuration
- •Using Audit Trails and Alerts
- •Configuring Global Timeouts and Thresholds
- •Configuring PAM
- •Defining Inspection Rules
- •Applying Inspection Rules and ACLs to Router Interfaces
- •Configuring IP ACLs at the Interface
- •Testing and Verifying CBAC
- •Summary
- •Exam Essentials
- •Key Terms
- •Commands Used in This Chapter
- •Written Lab
- •Review Questions
- •Hands-On Labs
- •Lab 5.1: Configure Logging and Audit Trails
- •Lab 5.2: Define and Apply Inspection Rules and ACLs
- •Lab 5.3: Test and Verify CBAC
- •Answers to Written Lab
- •Answers to Review Questions
- •Introduction to the Cisco IOS Firewall Authentication Proxy
- •Configuring the AAA Server
- •Configuring AAA
- •Configuring the Authentication Proxy
- •Testing and Verifying Your Configuration
- •show Commands
- •Clearing the Cache
- •Introduction to the Cisco IOS Firewall IDS
- •Initializing Cisco IOS Firewall IDS
- •Configuring, Disabling, and Excluding Signatures
- •Creating and Applying Audit Rules
- •Setting Default Actions
- •Creating an Audit Rule
- •Applying the Audit Rule
- •Verifying the Configuration
- •Stopping the IOS Firewall IDS
- •Summary
- •Exam Essentials
- •Key Terms
- •Commands Used in This Chapter
- •Written Lab
- •Review Questions
- •Hands-On Labs
- •Lab 6.1: Enabling the IOS Firewall Authentication Proxy
- •Lab 6.2: Enabling the IOS Firewall IDS
- •Answers to Written Lab
- •Answers to Review Questions
- •What is a Virtual Private Network?
- •Introduction to Cisco IOS IPSec
- •IPSec Transforms
- •IPSec Operation
- •The Components of IPSec
- •IPSec Encapsulation
- •Internet Key Exchange (IKE)
- •Summary
- •Exam Essentials
- •Key Terms
- •Written Lab
- •Review Questions
- •Answers to Written Lab
- •Answers to Review Questions
- •Configuring Cisco IOS IPSec for Pre-Shared Keys Site-to-Site
- •Preparing for IKE and IPSec
- •Configuring IKE
- •Configuring IPSec
- •Testing and Verifying IPSec
- •Configuring IPSec Manually
- •Configuring IPSec for RSA-Encrypted Nonces
- •Configuring Cisco IOS IPSec Certificate Authority Support Site-to-Site
- •Configuring CA Support Tasks
- •Preparing for IKE and IPSec
- •Configuring CA Support
- •Configuring IKE Using CA
- •Configuring IPSec for CA
- •Testing and Verifying IPSec for CA
- •Summary
- •Exam Essentials
- •Key Terms
- •Commands Used in This Chapter
- •Written Lab
- •Review Questions
- •Hands-On Labs
- •Lab 8.1: Configure IKE on Lab_A and Lab_B
- •Lab 8.2: Configure IPSec on Lab_A and Lab_B
- •Answers to Written Lab
- •Answers to Review Questions
- •Answers to Hands-On Labs
- •Answer to Lab 8.1
- •Answer to Lab 8.2
- •Introduction to Cisco Easy VPN
- •The Easy VPN Server
- •Introduction to the Cisco VPN 3.5 Client
- •Easy VPN Server Configuration Tasks
- •Pre-Configuring the Cisco VPN 3.5 Client
- •Summary
- •Exam Essentials
- •Key Terms
- •Written Lab
- •Review Questions
- •Hands-On Lab
- •Lab 9.1: Installing the Cisco VPN 3.5 Client Software on Windows
- •Answers to Written Lab
- •Answers to Review Questions
- •Network Separation
- •Three Ways through a PIX Firewall
- •PIX Firewall Configuration Basics
- •Configuring Interfaces
- •Saving Your Configuration
- •Configuring Access through the PIX Firewall
- •Configuring Outbound Access
- •Configuring Inbound Access
- •Configuring Multiple Interfaces and AAA on the PIX Firewall
- •Configuring Multiple Interfaces
- •Implementing AAA on the PIX Firewall
- •Configuring Advanced PIX Firewall Features
- •Failover
- •Outbound Access Control
- •Logging
- •SNMP Support
- •Java Applet Blocking
- •URL Filtering
- •Password Recovery
- •Glossary

Now that you’ve been introduced to the AAA (Authentication, Authorization, and Accounting) interface, and you’re familiar with the configuration of an NAS (network access server) for
AAA using the local database, you’re ready to put these great tools to use.
And that’s exactly where we’re going in this chapter. I’m going to guide you through configuring AAA using a TACACS+ or RADIUS-enabled security server as a centralized database. I’m also going to explain how to use the access control servers (ACSs) that support this centralized security process.
This chapter begins by looking at Cisco’s ACS product on the Microsoft Windows NT/ 2000 platform, zooming in on how efficient the CiscoSecure ACS 3.0 for Windows NT or Windows 2000 technology can be when it’s placed between the NAS and one of several existing user databases. Doing this facilitates AAA without requiring yet another user database— one that you’ll have to take the time to configure and maintain. It’s a very cool strategy! Next, you’ll get a quick tour through CiscoSecure ACS 2.3 for Unix (CSU), an enterprise product that runs on the Solaris platform.
This chapter wraps up by discussing the communication between the NAS and ACS. You’ll see that Cisco has truly provided all that’s needed for both TACACS+ and RADIUS communications between the NAS and ACS. So roll up your sleeves and let’s get started!
Introduction to the CiscoSecure ACS
As is true with life, change on your network is inevitable. This is a good thing—it keeps you employed! And products that are adaptable can minimize cost while giving you the options you need to meet the changing business requirements with speed and agility. So the built-in capacity for growth and change is something you really love to see in a product. Think chameleon. And
CiscoSecure (CS) ACS 3.0 for Windows NT (CSNT) or Windows 2000 is just that product— it blends in and works well with any network access device. It can be used with dial-up NASs and firewalls, or it can be used to manage access to switches and routers. The NAS can be literally any device capable of using the TACACS+ or RADIUS protocol—a beautiful chameleon indeed.
Copyright ©2003 SYBEX Inc., 1151 Marina Village Parkway, Alameda, CA 94501. |
www.sybex.com |

Introduction to the CiscoSecure ACS |
75 |
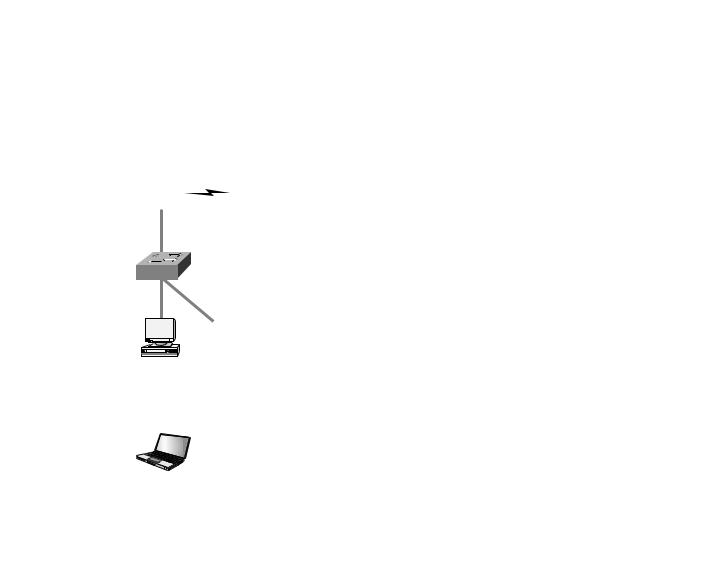
Let’s look at how CiscoSecure ACS 3.0 for Windows NT or Windows 2000 works in a simple example. Suppose that you have a network such as the one introduced in the last chapter, illustrated in the following graphic:
Lab_A |
HostA HostB
172.16.2.0/24
|
Perimeter |
WWW Server |
DNS Server |
|
10.1.1.0/24 |
Router |
172.16.1.2/24 |
172.16.1.3/24 |
|
Internet |
|
|
|
|
|
Lab_B |
|
|
|
|
|
|
172.16.1.0/24 |
|
|
F0/0 |
"Dirty DMZ" |
|
|
172.16.1.254/24 |
|
|||
|
|
|
||
Protected DMZ |
|
|
|
|
|
PIX |
|
Bastion Host |
|
|
|
|
F0/0 |
|
|
|
192.168.254.254/24 |
|
|
Bastion Host |
|
|
|
|
NAS |
|
|
|
|
|
F0/0 |
|
|
|
192.168.254.252/24 |
|
|
|
|
|
CiscoSecure ACS 3.0 |
Management Station |
||
|
192.168.254.253/24 |
192.168.254.251/24 |
The NAS must be configured so that the user access request is redirected to CS ACS for authentication and authorization rather than checking local user databases for authentication. The NAS uses either the RADIUS or TACACS+ protocol to send the authentication request to CS ACS. CS ACS then verifies the username and password (I’ll discuss that process shortly) and replies to the NAS. Once the user has been authenticated, CS ACS sends a set of authorization attributes to the NAS. Finally, if configured, the NAS accounting functions can take effect.
Copyright ©2003 SYBEX Inc., 1151 Marina Village Parkway, Alameda, CA 94501. |
www.sybex.com |

76 Chapter 3 Configuring CiscoSecure ACS and TACACS+
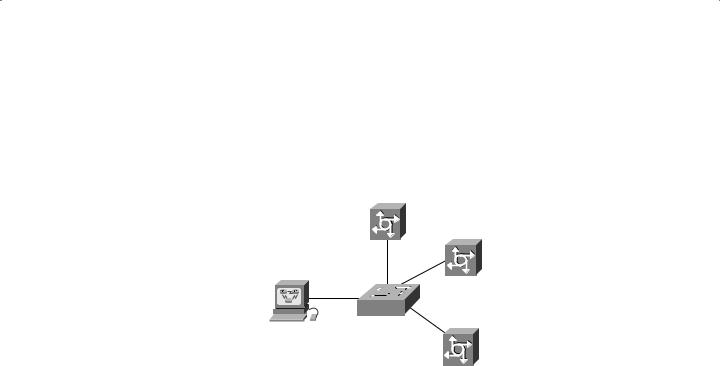
This can be a real advantage in situations where you have multiple NASs. Check out the network in Figure 3.1.
F I G U R E 3 . 1 A network with multiple NAS devices
Network access server
CiscoSecure
ACS NT server
Network access server
In Figure 3.1, multiple NASs are configured using TACACS+ or RADIUS to send their user access requests to a single CS ACS server.
Let’s move on to discuss the database used for authentication on the CiscoSecure ACS.
Using User Databases for Authentication
CiscoSecure ACS 3.0 for Windows NT or Windows 2000 maintains its own database called the CiscoSecure User Database. When a user access request arrives at CiscoSecure ACS 3.0 for Windows NT or Windows 2000, it goes to that database first to check for information regarding that user.
If no matching information is found in the CiscoSecure User Database, CiscoSecure ACS 3.0 for Windows NT or Windows 2000 can be configured to check a number of additional user databases—a fine example of that wonderful flexibility—including the following options:
Windows NT/2000
Novell Directory Services (NDS)
Directory Services (DS)
Token Server
Microsoft Commercial Internet System Lightweight Directory Access Protocol (MCIS LDAP)
Open Database Connectivity (ODBC)
Copyright ©2003 SYBEX Inc., 1151 Marina Village Parkway, Alameda, CA 94501. |
www.sybex.com |

Introduction to the CiscoSecure ACS |
77 |
The CiscoSecure ACS 3.0 for Windows NT or Windows 2000 can use any of the following token-card servers (the most secure method) for authentication:
ActivCard
CRYPTOCard
Vasco
RSA ACE/Server
Secure Computing SafeWord
AXENT Defender
CS ACS for NT or Windows 2000 supports the following authentication protocols:
ASCII/PAP
CHAP
MS-CHAP
LEAP
EAP-CHAP
EAP-TLS
EAP-MD5
ARAP
Populating the User Database Population
And your options don’t end with authentication. To provide you with even more flexibility, the CiscoSecure User Database can be populated in a number of ways:
Manually
With the Database Replication utility
With the Database Import utility
Manual population really means “by hand.” Unless you’re really bored, you’ll want to avoid all this work by using the replication and import utilities provided with the Cisco ACS.
The Database Replication utility provides fault tolerance and redundancy of your CiscoSecure User Database by allowing several independent CS ACS servers to synchronize their data. This means you can introduce a new CS ACS server that’s configured for database replication to the network and can be populated with a replica of the existing CiscoSecure User Database—sweet!
If you have an existing ODBC-compliant database, you can also use the included Database Import utility CSUtil.exe to import user information from that database. (Refer to Cisco’s documentation for formatting and import syntax.)
Copyright ©2003 SYBEX Inc., 1151 Marina Village Parkway, Alameda, CA 94501. |
www.sybex.com |