

36 Chapter 2 Introduction to AAA Security
PAP and CHAP Authentication
One of the key benefits of PPP is the ability to add authentication services provided by PAP or CHAP. Although you should be familiar with what PAP is and how it works, you should opt for CHAP because it’s the more secure of the two protocols. If your server authenticates based on a Windows NT user database, you have to use PAP or MS-CHAP (a Microsoft proprietary version of the CHAP protocol).
PAP
PAP (Password Authentication Protocol) provides only basic security authentication for connections. It offers a simple way for the remote client to establish its identity using a two-way handshake that happens only after initial PPP link establishment.
That sounds good, but the username and password information is transmitted in cleartext, and as you know by now, that opens up a world of opportunities for a hacker to find ways into your network. The bad news is that there are a few older systems that support only PAP—not the more secure CHAP.
PAP usernames and passwords are transmitted in cleartext, reducing the security benefits of the protocol. Use CHAP instead whenever possible.
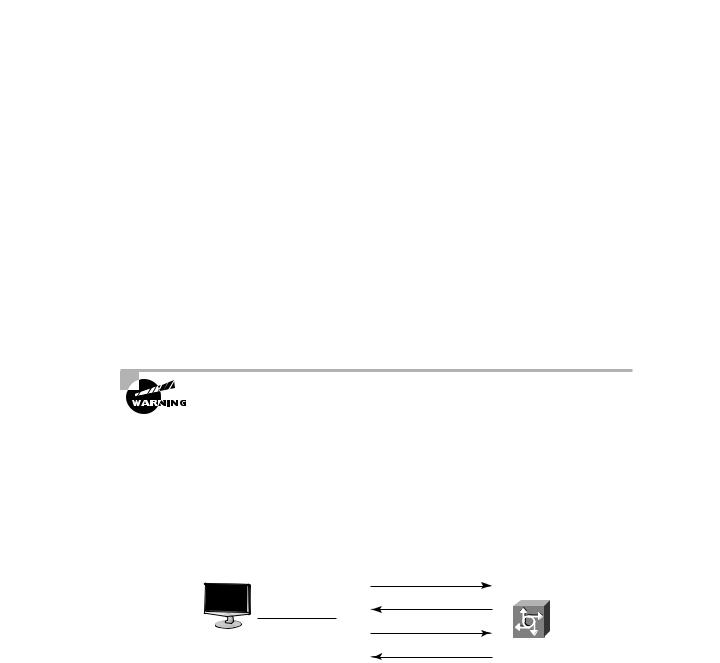
PAP works by first establishing a connection and then checking the username and password information. After this link-establishment phase is complete, a username/password pair is repeatedly sent by the peer system to the authenticator until authentication is acknowledged or the connection is terminated. If the username and password information matches, an OK message is returned, and the session is allowed to proceed. Figure 2.1 illustrates how PAP performs authentication.
F I G U R E 2 . 1 PAP authentication
Run PAP
Use PAP
Username, password
Remote user |
Modem |
Accept/reject
To configure PAP, you have to establish both the service and a database of usernames and passwords as follows:
encapsulation ppp
ppp authentication {chap | chap pap | pap chap |
pap} [if-needed][list-name | default] [callin]
Copyright ©2003 SYBEX Inc., 1151 Marina Village Parkway, Alameda, CA 94501. |
www.sybex.com |
Authentication Methods |
37 |
Usernames and passwords are addressed to the router with the username name password secret command.
That’s pretty much it—there isn’t much more to PAP. It works with a minimal amount of configuration mostly because of its lack of security. Be familiar with it and be aware of it, but don’t use this protocol in current designs! PAP is defined in RFC 1334.
CHAP
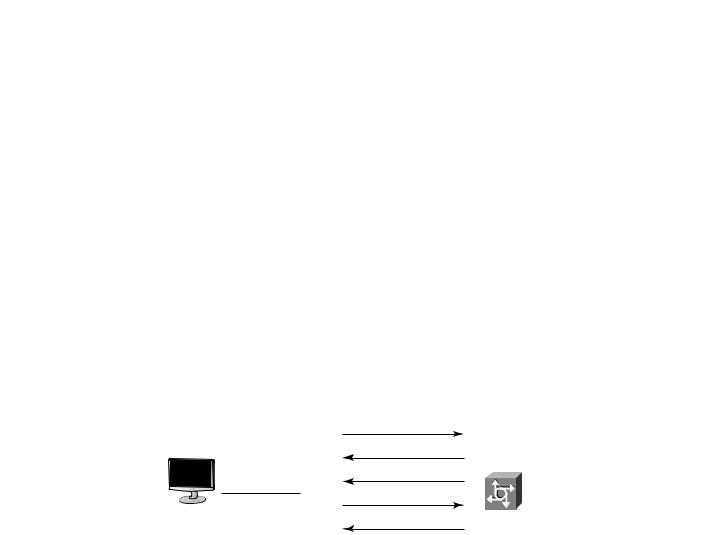
CHAP (Challenge Handshake Authentication Protocol) is way more secure than PAP, mostly because of the mechanism it uses to transfer the username and password. CHAP periodically verifies the identity of the peer using a three-way handshake that initially occurs upon link establishment, and is repeated any time after the link has been established.
CHAP protects against playback hacking—resending the packet as part of an attack—by using a hash value that’s valid only for that transaction. If a hacker captures the CHAP session and replays the dialogue in an attempt to access the network, the hash method will prevent the connection. In addition, the password is also hidden from the attacker because it’s never sent over the circuit. The hash is valid for a relatively short period of time, and no hacker-enabling unencrypted information is sent over the link. Figure 2.2 illustrates how CHAP performs authentication.
F I G U R E 2 . 2 CHAP authentication
|
Run CHAP |
|
Use CHAP |
|
Challenge hash |
|
Response |
Remote user |
Modem |
|
Accept/reject |
CHAP’s configuration commands are a lot like PAP’s configuration commands, except that instead of selecting PAP in the ppp authentication command, you use the chap keyword. The following commands are used to enable PPP (a requirement for CHAP) and to configure the router for CHAP authentication:
Encapsulation ppp
ppp authentication {chap | chap pap | pap chap |
pap} [if-needed][list-name | default] [callin]
Did you notice that you get two additional options here: chap pap and pap chap? These keywords give you a way to select both protocols to be attempted in exactly that order; chap pap tries to authenticate via the CHAP protocol first. Why would you want to do this? You would use this configuration option only during a transitional phase when moving on from PAP to CHAP.
Copyright ©2003 SYBEX Inc., 1151 Marina Village Parkway, Alameda, CA 94501. |
www.sybex.com |

38 Chapter 2 Introduction to AAA Security
Usernames and passwords are added to the router with the username name password secret command.
And if you use the debug ppp authentication command to debug PPP authentication, you’ll see the following output when you connect:
1d16h: %LINK-0-UPDOWN: Interface Serial0, changed state to up
*Oct 17 11:22:15.297: Se0 PPP: Treating connection as a dedicated line
*Oct 17 11:22:15.441: Se0 PPP: Phase is AUTHENTICATING, by this end
*Oct 17 11:22:15.445: Se0 CHAP: O CHALLENGE id 7 len 29 from *NASx
In the preceding example, you see that this connection is established on serial interface 0 and that the user is authenticating using CHAP.
In the Windows networking environment, you’re given the choice to select password encryption, which works as long as you haven’t set PAP to be the only authentication method on your router. Your Windows clients will try to connect with MS-CHAP, but if the box that designates that the password must be encrypted is checked, either PAP or CHAP will be used instead.
MS-CHAP Authentication
Okay, but what is Microsoft Challenge Handshake Authentication Protocol (MS-CHAP) anyway? It’s Microsoft’s version of CHAP, and it enables PPP authentication between a PC using Microsoft Windows and an NAS.
MS-CHAP differs from standard CHAP in these ways:
MS-CHAP is enabled while the remote client and the NAS negotiate PPP parameters after link establishment.
The MS-CHAP Response packet is in a format designed for compatibility with Microsoft’s Windows networking products.
MS-CHAP enables the network security server (authenticator) to control retry and password-changing mechanisms. MS-CHAP allows the remote client to change the MS-CHAP password.
MS-CHAP defines a set of reason-for-failure codes returned to the remote client by the NAS.
PPP Callback
It’s always great to have tricks up your sleeve for tightening up your security. With PPP, you can beef it up by using a feature called PPP callback. PPP callback commands the access server to disconnect the incoming connection and re-establish the connection via outbound dialing. In addition, PPP callback demands that the caller be in a single physical location, so if a username and
Copyright ©2003 SYBEX Inc., 1151 Marina Village Parkway, Alameda, CA 94501. |
www.sybex.com |
Authentication Methods |
39 |
password happens to get nicked by bad guys, the damage they can do is greatly diminished. You can also use the PPP callback feature to control costs because all connections appear to be from the remote-access server—read volume-based discounts! RFC 1570 documents PPP callback.
The snag here concerns your mobile users. Callback to a hotel room would require repeated configuration and a mechanism to deal with extensions. But some callback solutions allow the remote user to enter the callback number, which removes the physical location restrictions and enhances mobility.
Cisco’s PPP callback feature does not permit remote users to dynamically enter the callback number.
Consider the security you get using a callback configuration:
The remote client (the user) must connect into the remote-access server.
Using an authentication protocol such as CHAP, the user must authenticate.
If authentication is successful, the session will terminate and the remote-access server will call the remote client back. If the authentication fails, the connection will terminate.
Upon callback, the client and server can again perform a password verification.
Clearly, these extra steps are worth your effort.
To configure callback, use the ppp callback accept command on the interface that receives the inbound call.
PPP callback will not make repeated retries to establish a return connection. This means that a busy signal or other impediment will require the client side to re-request the session.
Let’s move on to look at the corporate network that you’ll configure with NAS.
Configuring Your Corporate Network
This section presents the network diagram of devices that you’ll be working with and configuring throughout this book. Take some time to really study it carefully. And while you’re doing that, imagine that you’re an expert consultant who’s been hired to set up secure administrative and remote access to the NAS routers using the AAA best practices. You’ll be configuring Phase 1 of the project in this chapter.
During Phase 1, you’ll configure basic AAA services on the NAS using local databases. (During Phase 2, you’ll migrate the local AAA database over to a CiscoSecure Access Control System. But that’s going to happen in Chapter 3, “Configuring CiscoSecure ACS and TACACS+.”)
Copyright ©2003 SYBEX Inc., 1151 Marina Village Parkway, Alameda, CA 94501. |
www.sybex.com |
40 Chapter 2 Introduction to AAA Security
The following graphic illustrates the network you’ve been hired to secure:
Lab_A |
HostA HostB
172.16.2.0/24
|
Perimeter |
WWW Server |
DNS Server |
|
10.1.1.0/24 |
Router |
172.16.1.2/24 |
172.16.1.3/24 |
|
Internet |
|
|
|
|
|
Lab_B |
|
|
|
|
|
|
172.16.1.0/24 |
|
|
F0/0 |
"Dirty DMZ" |
|
|
172.16.1.254/24 |
|
|||
|
|
|
||
Protected DMZ |
|
|
|
|
|
PIX |
|
Bastion Host |
|
|
|
|
F0/0 |
|
|
|
192.168.254.254/24 |
|
|
Bastion Host |
|
|
|
|
NAS |
|
|
|
|
|
F0/0 |
|
|
|
192.168.254.252/24 |
|
|
|
|
|
CiscoSecure ACS 3.0 |
Management Station |
||
|
192.168.254.253/24 |
192.168.254.251/24 |
||
Let’s go over a few terms in this diagram since you’ll be using it throughout this book.
The bastion host is a computer that plays a crucial part in implementing your network security policy—a fact you can guess from its name. The word “bastion” refers to the well-armed defenses stationed around the perimeter of medieval castles. Think of them as the first line of defense—front-line soldiers that you have to ensure are tightly secured because of their exposed position. They are the computers between you and the untrusted or unknown networks that hackers will most often use to get to you and to break into your network. It’s pretty common to find bastion hosts multitasking by providing things such as web services and public access systems.
Copyright ©2003 SYBEX Inc., 1151 Marina Village Parkway, Alameda, CA 94501. |
www.sybex.com |