

The Official Guide to Learning OpenGL, Version 1.1 (Redbook Second Edition)
.pdfOpenGL Programming Guide (Addison-Wesley Publishing Company)
System, the color-display mode is an attribute of the X Visual. An X Visual must be specified before the window is created. Once it is specified, it cannot be changed for the life of the window. After you create a window with a double-buffered, RGBA display mode, you're stuck with it.
A tricky solution to this problem is to create more than one window, each with a different display mode. Then you must control the visibility of the windows (for example, mapping or unmapping an X Window, or managing or unmanaging a Motif or Athena widget) and draw the object into the appropriate, visible window.
Specifying a Color and a Shading Model
OpenGL maintains a current color (in RGBA mode) and a current color index (in color-index mode). Unless you're using a more complicated coloring model such as lighting or texture mapping, each object is drawn using the current color (or color index). Look at the following pseudocode sequence:
set_color(RED); draw_item(A); draw_item(B); set_color(GREEN); set_color(BLUE); draw_item(C);
Items A and B are drawn in red, and item C is drawn in blue. The fourth line, which sets the current color to green, has no effect (except to waste a bit of time). With no lighting or texturing, when the current color is set, all items drawn afterward are drawn in that color until the current color is changed to something else.
Specifying a Color in RGBA Mode
In RGBA mode, use the glColor*() command to select a current color.
void glColor3{b s i f d ub us ui} (TYPEr, TYPEg, TYPEb);
void glColor4{b s i f d ub us ui} (TYPEr, TYPEg, TYPEb, TYPEa); void glColor3{b s i f d ub us ui}v (const TYPE*v);
void glColor4{b s i f d ub us ui}v (const TYPE*v);
Sets the current red, green, blue, and alpha values. This command can have up to three suffixes, which differentiate variations of the parameters accepted. The first suffix is either 3 or 4, to indicate whether you supply an alpha value in addition to the red, green, and blue values. If you don't supply an alpha value, it's automatically set to 1.0. The second suffix indicates the data type for parameters: byte, short, integer, float, double, unsigned byte, unsigned short, or unsigned integer. The third suffix is an optional v, which indicates that the argument is a pointer to an array of values of the given data type.
For the versions of glColor*() that accept floating-point data types, the values should typically range between 0.0 and 1.0, the minimum and maximum values that can be stored in the framebuffer. Unsigned-integer color components, when specified, are linearly mapped to floating-point values such that the largest representable value maps to 1.0 (full intensity), and zero maps to 0.0 (zero intensity).
http://heron.cc.ukans.edu/ebt-bin/nph-dweb/dynaw.../@Generic__BookTextView/9601;cs=fullhtml;pt=6635 (10 of 14) [4/28/2000 9:45:19 PM]

OpenGL Programming Guide (Addison-Wesley Publishing Company)
Signed-integer color components, when specified, are linearly mapped to floating-point values such that the most positive representable value maps to 1.0, and the most negative representable value maps to -1.0 (see Table 4-1).
Neither floating-point nor signed-integer values are clamped to the range [0,1] before updating the current color or current lighting material parameters. After lighting calculations, resulting color values outside the range [0,1] are clamped to the range [0,1] before they are interpolated or written into a color buffer. Even if lighting is disabled, the color components are clamped before rasterization.
Table 4-1 : Converting Color Values to Floating-Point Numbers
Specifying a Color in Color-Index Mode
In color-index mode, use the glIndex*() command to select a single-valued color index as the current color index.
void glIndex{sifd ub}(TYPE c);
void glIndex{sifd ub}v(const TYPE *c);
Sets the current color index to c. The first suffix for this command indicates the data type for parameters: short, integer, float, double, or unsigned byte. The second, optional suffix is v, which indicates that the argument is an array of values of the given data type (the array contains only one value).
http://heron.cc.ukans.edu/ebt-bin/nph-dweb/dynaw.../@Generic__BookTextView/9601;cs=fullhtml;pt=6635 (11 of 14) [4/28/2000 9:45:20 PM]

OpenGL Programming Guide (Addison-Wesley Publishing Company)
In "Clearing the Window" in Chapter 2, you saw the specification of glClearColor(). For color-index mode, there is a corresponding glClearIndex().
void glClearIndex(GLfloat cindex);
Sets the current clearing color in color-index mode. In a color-index mode window, a call to glClear(GL_COLOR_BUFFER_BIT) will use cindex to clear the buffer. The default clearing index is 0.0.
Note: OpenGL does not have any routines to load values into the color-lookup table. Window systems typically already have such operations. GLUT has the routine glutSetColor() to call the window-system specific commands.
Advanced
The current index is stored as a floating-point value. Integer values are converted directly to floating-point values, with no special mapping. Index values outside the representable range of the color-index buffer aren't clamped. However, before an index is dithered (if enabled) and written to the framebuffer, it's converted to fixed-point format. Any bits in the integer portion of the resulting fixed-point value that don't correspond to bits in the framebuffer are masked out.
Specifying a Shading Model
A line or a filled polygon primitive can be drawn with a single color (flat shading) or with many different colors (smooth shading, also called Gouraud shading). You specify the desired shading technique with glShadeModel().
void glShadeModel (GLenum mode);
Sets the shading model. The mode parameter can be either GL_SMOOTH (the default) or
GL_FLAT.
With flat shading, the color of one particular vertex of an independent primitive is duplicated across all the primitive's vertices to render that primitive. With smooth shading, the color at each vertex is treated individually. For a line primitive, the colors along the line segment are interpolated between the vertex colors. For a polygon primitive, the colors for the interior of the polygon are interpolated between the vertex colors. Example 4-1 draws a smooth-shaded triangle, as shown in "Plate 11" in Appendix I.
Example 4-1 : Drawing a Smooth-Shaded Triangle: smooth.c
#include <GL/gl.h> #include <GL/glut.h>
void init(void)
{
glClearColor (0.0, 0.0, 0.0, 0.0); glShadeModel (GL_SMOOTH);
}
void triangle(void)
{
http://heron.cc.ukans.edu/ebt-bin/nph-dweb/dynaw.../@Generic__BookTextView/9601;cs=fullhtml;pt=6635 (12 of 14) [4/28/2000 9:45:20 PM]

OpenGL Programming Guide (Addison-Wesley Publishing Company)
glBegin (GL_TRIANGLES); glColor3f (1.0, 0.0, 0.0); glVertex2f (5.0, 5.0); glColor3f (0.0, 1.0, 0.0); glVertex2f (25.0, 5.0); glColor3f (0.0, 0.0, 1.0); glVertex2f (5.0, 25.0); glEnd();
}
void display(void)
{
glClear (GL_COLOR_BUFFER_BIT); triangle ();
glFlush ();
}
void reshape (int w, int h)
{
glViewport (0, 0, (GLsizei) w, (GLsizei) h); glMatrixMode (GL_PROJECTION); glLoadIdentity ();
if (w <= h)
gluOrtho2D (0.0, 30.0, 0.0, 30.0*(GLfloat) h/(GLfloat) w); else
gluOrtho2D (0.0, 30.0*(GLfloat) w/(GLfloat) h, 0.0, 30.0); glMatrixMode(GL_MODELVIEW);
}
int main(int argc, char** argv)
{
glutInit(&argc, argv);
glutInitDisplayMode (GLUT_SINGLE | GLUT_RGB); glutInitWindowSize (500, 500); glutInitWindowPosition (100, 100); glutCreateWindow (argv[0]);
init (); glutDisplayFunc(display); glutReshapeFunc(reshape); glutMainLoop();
return 0;
}
With smooth shading, neighboring pixels have slightly different color values. In RGBA mode, adjacent pixels with slightly different values look similar, so the color changes across a polygon appear gradual. In color-index mode, adjacent pixels may reference different locations in the color-index table, which
http://heron.cc.ukans.edu/ebt-bin/nph-dweb/dynaw.../@Generic__BookTextView/9601;cs=fullhtml;pt=6635 (13 of 14) [4/28/2000 9:45:20 PM]

OpenGL Programming Guide (Addison-Wesley Publishing Company)
may not have similar colors at all. Adjacent color-index entries may contain wildly different colors, so a smooth-shaded polygon in color-index mode can look psychedelic.
To avoid this problem, you have to create a color ramp of smoothly changing colors among a contiguous set of indices in the color map. Remember that loading colors into a color map is performed through your window system rather than OpenGL. If you use GLUT, you can use glutSetColor() to load a single index in the color map with specified red, green, and blue values. The first argument for glutSetColor() is the index, and the others are the red, green, and blue values. To load thirty-two contiguous color indices (from color index 16 to 47) with slightly differing shades of yellow, you might call
for (i = 0; i < 32; i++) {
glutSetColor (16+i, 1.0*(i/32.0), 1.0*(i/32.0), 0.0);
}
Now, if you render smooth-shaded polygons that use only the colors from index 16 to 47, those polygons have gradually differing shades of yellow.
With flat shading, the color of a single vertex defines the color of an entire primitive. For a line segment, the color of the line is the current color when the second (ending) vertex is specified. For a polygon, the color used is the one that's in effect when a particular vertex is specified, as shown in Table 4-2. The table counts vertices and polygons starting from 1. OpenGL follows these rules consistently, but the best way to avoid uncertainty about how a flat-shaded primitive will be drawn is to specify only one color for the primitive.
Table 4-2 : How OpenGL Selects a Color for the ith Flat-Shaded Polygon
OpenGL Programming Guide (Addison-Wesley Publishing Company)
http://heron.cc.ukans.edu/ebt-bin/nph-dweb/dynaw.../@Generic__BookTextView/9601;cs=fullhtml;pt=6635 (14 of 14) [4/28/2000 9:45:20 PM]
OpenGL Programming Guide (Addison-Wesley Publishing Company)
OpenGL Programming Guide (Addison-Wesley Publishing Company)
Chapter 5
Lighting
Chapter Objectives
After reading this chapter, you'll be able to do the following:
●Understand how real-world lighting conditions are approximated by OpenGL
●Render illuminated objects by defining the desired light sources and lighting model
●Define the material properties of the objects being illuminated
●Manipulate the matrix stack to control the position of light sources
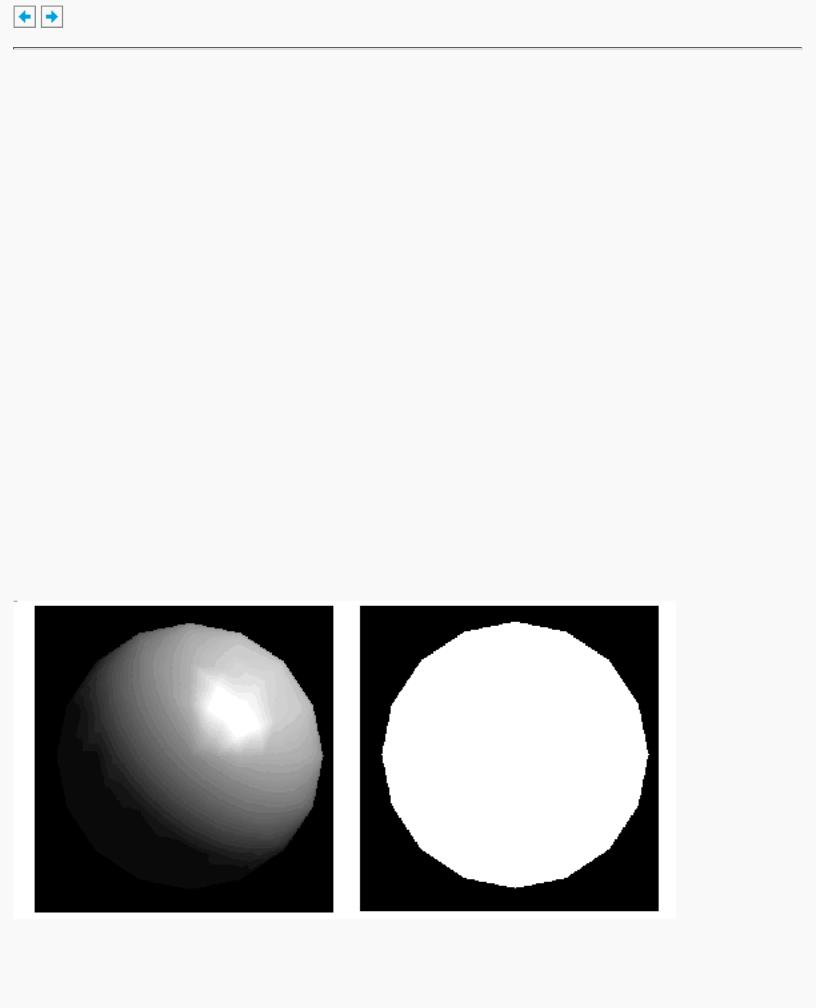
As you saw in Chapter 4, OpenGL computes the color of each pixel in a final, displayed scene that's held in the framebuffer. Part of this computation depends on what lighting is used in the scene and on how objects in the scene reflect or absorb that light. As an example of this, recall that the ocean has a different color on a bright, sunny day than it does on a gray, cloudy day. The presence of sunlight or clouds determines whether you see the ocean as bright turquoise or murky gray-green. In fact, most objects don't even look three-dimensional until they're lit. Figure 5-1 shows two versions of the exact same scene (a single sphere), one with lighting and one without.
Figure 5-1 : A Lit and an Unlit Sphere
http://heron.cc.ukans.edu/ebt-bin/nph-dweb/dynaw...@Generic__BookTextView/10431;cs=fullhtml;pt=9601 (1 of 35) [4/28/2000 9:45:36 PM]

OpenGL Programming Guide (Addison-Wesley Publishing Company)
As you can see, an unlit sphere looks no different from a two-dimensional disk. This demonstrates how critical the interaction between objects and light is in creating a three-dimensional scene.
With OpenGL, you can manipulate the lighting and objects in a scene to create many different kinds of effects. This chapter begins with a primer on hidden-surface removal. Then it explains how to control the lighting in a scene, discusses the OpenGL conceptual model of lighting, and describes in detail how to set the numerous illumination parameters to achieve certain effects. Toward the end of the chapter, the mathematical computations that determine how lighting affects color are presented.
This chapter contains the following major sections:
●"A Hidden-Surface Removal Survival Kit" describes the basics of removing hidden surfaces from view.
●"Real-World and OpenGL Lighting" explains in general terms how light behaves in the world and how OpenGL models this behavior.
●"A Simple Example: Rendering a Lit Sphere" introduces the OpenGL lighting facility by presenting a short program that renders a lit sphere.
●"Creating Light Sources" explains how to define and position light sources.
●"Selecting a Lighting Model" discusses the elements of a lighting model and how to specify them.
●"Defining Material Properties" explains how to describe the properties of objects so that they interact with light in a desired way.
●"The Mathematics of Lighting" presents the mathematical calculations used by OpenGL to determine the effect of lights in a scene.
●"Lighting in Color-Index Mode" discusses the differences between using RGBA mode and color-index mode for lighting.
A Hidden-Surface Removal Survival Kit
With this section, you begin to draw shaded, three-dimensional objects, in earnest. With shaded polygons, it becomes very important to draw the objects that are closer to our viewing position and to eliminate objects obscured by others nearer to the eye.
When you draw a scene composed of three-dimensional objects, some of them might obscure all or parts of others. Changing your viewpoint can change the obscuring relationship. For example, if you view the scene from the opposite direction, any object that was previously in front of another is now behind it. To
http://heron.cc.ukans.edu/ebt-bin/nph-dweb/dynaw...@Generic__BookTextView/10431;cs=fullhtml;pt=9601 (2 of 35) [4/28/2000 9:45:36 PM]

OpenGL Programming Guide (Addison-Wesley Publishing Company)
draw a realistic scene, these obscuring relationships must be maintained. Suppose your code works like this:
while (1) { get_viewing_point_from_mouse_position(); glClear(GL_COLOR_BUFFER_BIT); draw_3d_object_A();
draw_3d_object_B();
}
For some mouse positions, object A might obscure object B. For others, the reverse may hold. If nothing special is done, the preceding code always draws object B second (and thus on top of object A) no matter what viewing position is selected. In a worst case scenario, if objects A and B intersect one another so that part of object A obscures object B and part of B obscures A, changing the drawing order does not provide a solution.
The elimination of parts of solid objects that are obscured by others is called hidden-surface removal. (Hidden-line removal, which does the same job for objects represented as wireframe skeletons, is a bit trickier and isn't discussed here. See "Hidden-Line Removal" in Chapter 14 for details.) The easiest way to achieve hidden-surface removal is to use the depth buffer (sometimes called a z-buffer). (Also see Chapter 10.)
A depth buffer works by associating a depth, or distance, from the view plane (usually the near clipping plane), with each pixel on the window. Initially, the depth values for all pixels are set to the largest possible distance (usually the far clipping plane) using the glClear() command with GL_DEPTH_BUFFER_BIT. Then the objects in the scene are drawn in any order.
Graphical calculations in hardware or software convert each surface that's drawn to a set of pixels on the window where the surface will appear if it isn't obscured by something else. In addition, the distance from the view plane is computed. With depth buffering enabled, before each pixel is drawn a comparison is done with the depth value already stored at the pixel. If the new pixel is closer than (in front of) what's there, the new pixel's color and depth values replace those that are currently written into the pixel. If the new pixel's depth is greater than what's currently there, the new pixel is obscured, and the color and depth information for the incoming pixel is discarded.
To use depth buffering, you need to enable depth buffering. This has to be done only once. Before drawing, each time you draw the scene, you need to clear the depth buffer and then draw the objects in the scene in any order.
To convert the preceding code example so that it performs hidden-surface removal, modify it to the following:
glutInitDisplayMode (GLUT_DEPTH | .... ); glEnable(GL_DEPTH_TEST);
...
while (1) {
glClear(GL_COLOR_BUFFER_BIT | GL_DEPTH_BUFFER_BIT); get_viewing_point_from_mouse_position(); draw_3d_object_A();
http://heron.cc.ukans.edu/ebt-bin/nph-dweb/dynaw...@Generic__BookTextView/10431;cs=fullhtml;pt=9601 (3 of 35) [4/28/2000 9:45:36 PM]

OpenGL Programming Guide (Addison-Wesley Publishing Company)
draw_3d_object_B();
}
The argument to glClear() clears both the depth and color buffers.
Depth-buffer testing can affect the performance of your application. Since information is discarded rather than used for drawing, hidden-surface removal can increase your performance slightly. However, the implementation of your depth buffer probably has the greatest effect on performance. A "software" depth buffer (implemented with processor memory) may be much slower than one implemented with a specialized hardware depth buffer.
Real-World and OpenGL Lighting
When you look at a physical surface, your eye's perception of the color depends on the distribution of photon energies that arrive and trigger your cone cells. (See "Color Perception" in Chapter 4.) Those photons come from a light source or combination of sources, some of which are absorbed and some of which are reflected by the surface. In addition, different surfaces may have very different properties - some are shiny and preferentially reflect light in certain directions, while others scatter incoming light equally in all directions. Most surfaces are somewhere in between.
OpenGL approximates light and lighting as if light can be broken into red, green, and blue components. Thus, the color of light sources is characterized by the amount of red, green, and blue light they emit, and the material of surfaces is characterized by the percentage of the incoming red, green, and blue components that is reflected in various directions. The OpenGL lighting equations are just an approximation but one that works fairly well and can be computed relatively quickly. If you desire a more accurate (or just different) lighting model, you have to do your own calculations in software. Such software can be enormously complex, as a few hours of reading any optics textbook should convince you.
In the OpenGL lighting model, the light in a scene comes from several light sources that can be individually turned on and off. Some light comes from a particular direction or position, and some light is generally scattered about the scene. For example, when you turn on a light bulb in a room, most of the light comes from the bulb, but some light comes after bouncing off one, two, three, or more walls. This bounced light (called ambient) is assumed to be so scattered that there is no way to tell its original direction, but it disappears if a particular light source is turned off.
Finally, there might be a general ambient light in the scene that comes from no particular source, as if it had been scattered so many times that its original source is impossible to determine.
In the OpenGL model, the light sources have an effect only when there are surfaces that absorb and reflect light. Each surface is assumed to be composed of a material with various properties. A material might emit its own light (like headlights on an automobile), it might scatter some incoming light in all directions, and it might reflect some portion of the incoming light in a preferential direction like a mirror or other shiny surface.
The OpenGL lighting model considers the lighting to be divided into four independent components: emissive, ambient, diffuse, and specular. All four components are computed independently and then
http://heron.cc.ukans.edu/ebt-bin/nph-dweb/dynaw...@Generic__BookTextView/10431;cs=fullhtml;pt=9601 (4 of 35) [4/28/2000 9:45:36 PM]

OpenGL Programming Guide (Addison-Wesley Publishing Company)
added together.
Ambient, Diffuse, and Specular Light
Ambient illumination is light that's been scattered so much by the environment that its direction is impossible to determine - it seems to come from all directions. Backlighting in a room has a large ambient component, since most of the light that reaches your eye has first bounced off many surfaces. A spotlight outdoors has a tiny ambient component; most of the light travels in the same direction, and since you're outdoors, very little of the light reaches your eye after bouncing off other objects. When ambient light strikes a surface, it's scattered equally in all directions.
The diffuse component is the light that comes from one direction, so it's brighter if it comes squarely down on a surface than if it barely glances off the surface. Once it hits a surface, however, it's scattered equally in all directions, so it appears equally bright, no matter where the eye is located. Any light coming from a particular position or direction probably has a diffuse component.
Finally, specular light comes from a particular direction, and it tends to bounce off the surface in a preferred direction. A well-collimated laser beam bouncing off a high-quality mirror produces almost 100 percent specular reflection. Shiny metal or plastic has a high specular component, and chalk or carpet has almost none. You can think of specularity as shininess.
Although a light source delivers a single distribution of frequencies, the ambient, diffuse, and specular components might be different. For example, if you have a white light in a room with red walls, the scattered light tends to be red, although the light directly striking objects is white. OpenGL allows you to set the red, green, and blue values for each component of light independently.
Material Colors
The OpenGL lighting model makes the approximation that a material's color depends on the percentages of the incoming red, green, and blue light it reflects. For example, a perfectly red ball reflects all the incoming red light and absorbs all the green and blue light that strikes it. If you view such a ball in white light (composed of equal amounts of red, green, and blue light), all the red is reflected, and you see a red ball. If the ball is viewed in pure red light, it also appears to be red. If, however, the red ball is viewed in pure green light, it appears black (all the green is absorbed, and there's no incoming red, so no light is reflected).
Like lights, materials have different ambient, diffuse, and specular colors, which determine the ambient, diffuse, and specular reflectances of the material. A material's ambient reflectance is combined with the ambient component of each incoming light source, the diffuse reflectance with the light's diffuse component, and similarly for the specular reflectance and component. Ambient and diffuse reflectances define the color of the material and are typically similar if not identical. Specular reflectance is usually white or gray, so that specular highlights end up being the color of the light source's specular intensity. If you think of a white light shining on a shiny red plastic sphere, most of the sphere appears red, but the shiny highlight is white.
In addition to ambient, diffuse, and specular colors, materials have an emissive color, which simulates light originating from an object. In the OpenGL lighting model, the emissive color of a surface adds
http://heron.cc.ukans.edu/ebt-bin/nph-dweb/dynaw...@Generic__BookTextView/10431;cs=fullhtml;pt=9601 (5 of 35) [4/28/2000 9:45:36 PM]