

The Official Guide to Learning OpenGL, Version 1.1 (Redbook Second Edition)
.pdfOpenGL Programming Guide (Addison-Wesley Publishing Company)
Figure 8-11 : Reading Pixels with glReadPixels()
1.If the pixels to be read aren't indices (that is, the format isn't GL_COLOR_INDEX or GL_STENCIL_INDEX), the components are mapped to [0.0,1.0] - that is, in exactly the opposite way that they are when written.
2.Next, the scales and biases are applied to each component. If GL_MAP_COLOR is GL_TRUE, they're mapped and again clamped to [0.0,1.0]. If luminance is desired instead of RGB, the R, G, and B components are added (L = R + G + B).
3.If the pixels are indices (color or stencil), they're shifted, offset, and, if GL_MAP_COLOR is GL_TRUE, also mapped.
4.If the storage format is either GL_COLOR_INDEX or GL_STENCIL_INDEX, the pixel indices are masked to the number of bits of the storage type (1, 8, 16, or 32) and packed into memory as previously described.
5.If the storage format is one of the component kind (such as luminance or RGB), the pixels are always mapped by the
http://heron.cc.ukans.edu/ebt-bin/nph-dweb/dynaw...Generic__BookTextView/14979;cs=fullhtml;pt=14035 (26 of 27) [4/28/2000 9:46:18 PM]

OpenGL Programming Guide (Addison-Wesley Publishing Company)
index-to-RGBA maps. Then, they're treated as though they had been RGBA pixels in the first place (including potential conversion to luminance).
6.Finally, for both index and component data, the results are packed into memory according to the GL_PACK* modes set with glPixelStore*().
The scaling, bias, shift, and offset values are the same as those used when drawing pixels, so if you're both reading and drawing pixels, be sure to reset these components to the appropriate values before doing a read or a draw. Similarly, the various maps must be properly reset if you intend to use maps for both reading and drawing.
Note: It might seem that luminance is handled incorrectly in both the reading and drawing operations. For example, luminance is not usually equally dependent on the R, G, and B components as it may be assumed from both Figure 8-10 and Figure 8-11. If you wanted your luminance to be calculated such that the R component contributed 30 percent, the G 59 percent, and the B 11 percent, you can set GL_RED_SCALE to .30, GL_RED_BIAS to 0.0, and so on. The computed L is then .30R + .59G + .11B.
Tips for Improving Pixel Drawing Rates
As you can see, OpenGL has a rich set of features for reading, drawing and manipulating pixel data. Although these features are often very useful, they can also decrease performance. Here are some tips for improving pixel draw rates.
●For best performance, set all pixel-transfer parameters to their default values, and set pixel zoom to (1.0,1.0).
●A series of fragment operations is applied to pixels as they are drawn into the framebuffer. (See "Testing and Operating on Fragments" in Chapter 10.) For optimum performance disable all fragment operations.
●While performing pixel operations, disable other costly states, such as texturing and lighting.
●If you use an image format and type that matches the framebuffer, you can reduce the amount of work that the OpenGL implementation has to do. For example, if you are writing images to an RGB framebuffer with 8 bits per component, call glDrawPixels() with format set to RGB and type set to UNSIGNED_BYTE.
●For some implementations, unsigned image formats are faster to use than signed image formats.
●It is usually faster to draw a large pixel rectangle than to draw several small ones, since the cost of transferring the pixel data can be amortized over many pixels.
●If possible, reduce the amount of data that needs to be copied by using small data types (for example, use GL_UNSIGNED_BYTE) and fewer components (for example, use format GL_LUMINANCE_ALPHA).
●Pixel-transfer operations, including pixel mapping and values for scale, bias, offset, and shift other than the defaults, may decrease performance.
OpenGL Programming Guide (Addison-Wesley Publishing Company)
http://heron.cc.ukans.edu/ebt-bin/nph-dweb/dynaw...Generic__BookTextView/14979;cs=fullhtml;pt=14035 (27 of 27) [4/28/2000 9:46:18 PM]

OpenGL Programming Guide (Addison-Wesley Publishing Company)
OpenGL Programming Guide (Addison-Wesley Publishing Company)
Chapter 9
Texture Mapping
Chapter Objectives
After reading this chapter, you'll be able to do the following:
●Understand what texture mapping can add to your scene
●Specify a texture image
●Control how a texture image is filtered as it's applied to a fragment
●Create and manage texture images in texture objects and, if available, control a high-performance working set of those texture objects
●Specify how the color values in the image combine with those of the fragment to which it's being applied
●Supply texture coordinates to indicate how the texture image should be aligned to the objects in your scene
●Use automatic texture coordinate generation to produce effects like contour maps and environment maps
So far, every geometric primitive has been drawn as either a solid color or smoothly shaded between the colors at its vertices - that is, they've been drawn without texture mapping. If you want to draw a large brick wall without texture mapping, for example, each brick must be drawn as a separate polygon. Without texturing, a large flat wall - which is really a single rectangle - might require thousands of individual bricks, and even then the bricks may appear too smooth and regular to be realistic.
Texture mapping allows you to glue an image of a brick wall (obtained, perhaps, by scanning in a photograph of a real wall) to a polygon and to draw the entire wall as a single polygon. Texture mapping ensures that all the right things happen as the polygon is transformed and rendered. For example, when the wall is viewed in perspective, the bricks may appear smaller as the wall gets farther from the viewpoint. Other uses for texture mapping include depicting vegetation on large polygons representing the ground in flight simulation; wallpaper patterns; and textures that make polygons look like natural substances such as marble, wood, or cloth. The possibilities are endless. Although it's most natural to think of applying textures to polygons, textures can be applied to all primitives - points, lines, polygons, bitmaps, and images. Plates 6, 8, 18-21, 24-27, and 29-31 all demonstrate the use of textures.
Because there are so many possibilities, texture mapping is a fairly large, complex subject, and you must make several programming choices when using it. For instance, you can map textures to surfaces made of a set of polygons or to curved surfaces, and you can repeat a texture in one or both directions to cover the surface. A texture can even be one-dimensional. In addition, you can automatically map a texture onto an object in such a way that the texture indicates contours or other properties of the item being viewed. Shiny objects can be textured so that they appear to be in the center of a room or other environment, reflecting the surroundings off their surfaces. Finally, a texture can be applied to a surface in different ways. It can be painted on directly (like a decal placed on a surface), used to modulate the color the surface would have been painted otherwise, or used to blend a texture color with the surface color. If this is your first exposure to texture mapping, you might find that the discussion in this chapter moves fairly quickly. As an additional reference, you might look at the chapter on texture mapping in Fundamentals of Three-Dimensional Computer Graphics
http://heron.cc.ukans.edu/ebt-bin/nph-dweb/dynaw...Generic__BookTextView/17383;cs=fullhtml;pt=14979 (1 of 38) [4/28/2000 9:46:36 PM]
OpenGL Programming Guide (Addison-Wesley Publishing Company)
by Alan Watt (Reading, MA: Addison-Wesley Publishing Company, 1990).
Textures are simply rectangular arrays of data - for example, color data, luminance data, or color and alpha data. The individual values in a texture array are often called texels. What makes texture mapping tricky is that a rectangular texture can be mapped to nonrectangular regions, and this must be done in a reasonable way.
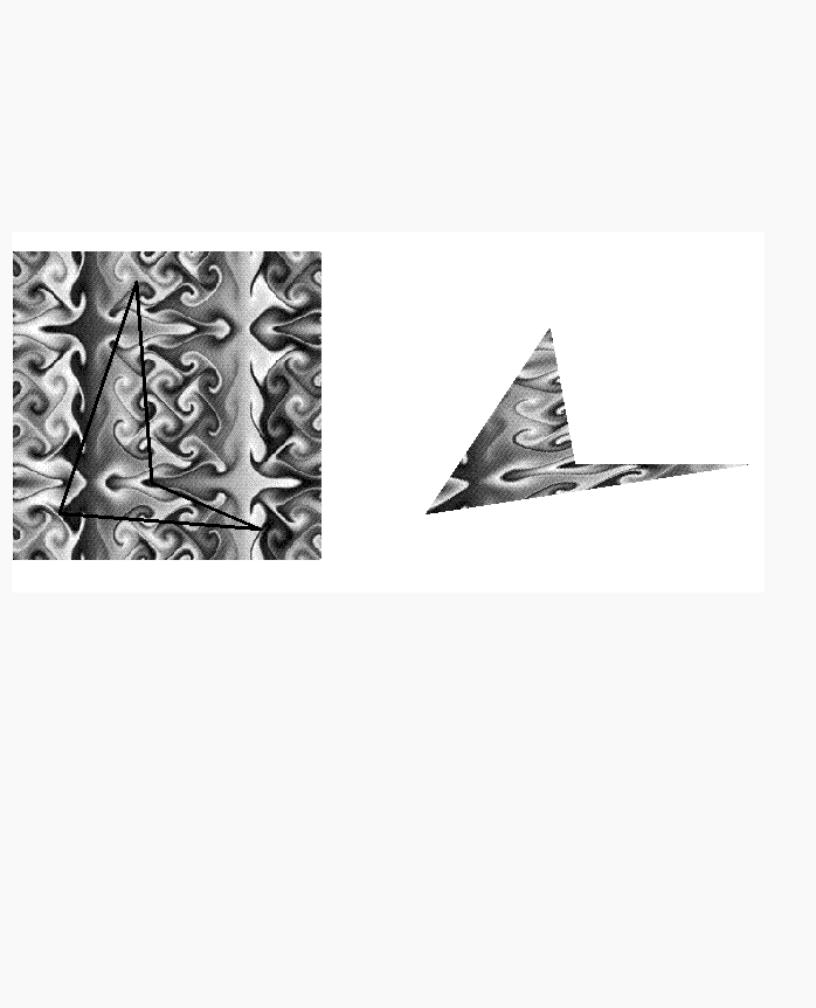
Figure 9-1 illustrates the texture-mapping process. The left side of the figure represents the entire texture, and the black outline represents a quadrilateral shape whose corners are mapped to those spots on the texture. When the quadrilateral is displayed on the screen, it might be distorted by applying various transformations - rotations, translations, scaling, and projections. The right side of the figure shows how the texture-mapped quadrilateral might appear on your screen after these transformations. (Note that this quadrilateral is concave and might not be rendered correctly by OpenGL without prior tessellation. See Chapter 11 for more information about tessellating polygons.)
Figure 9-1 : Texture-Mapping Process
Notice how the texture is distorted to match the distortion of the quadrilateral. In this case, it's stretched in the x direction and compressed in the y direction; there's a bit of rotation and shearing going on as well. Depending on the texture size, the quadrilateral's distortion, and the size of the screen image, some of the texels might be mapped to more than one fragment, and some fragments might be covered by multiple texels. Since the texture is made up of discrete texels (in this case, 256 × 256 of them), filtering operations must be performed to map texels to fragments. For example, if many texels correspond to a fragment, they're averaged down to fit; if texel boundaries fall across fragment boundaries, a weighted average of the applicable texels is performed. Because of these calculations, texturing is computationally expensive, which is why many specialized graphics systems include hardware support for texture mapping.
An application may establish texture objects, with each texture object representing a single texture (and possible associated mipmaps). Some implementations of OpenGL can support a special working set of texture objects that have better performance than texture objects outside the working set. These high-performance texture objects are said to be resident and may have special hardware and/or software acceleration available. You may use OpenGL to create and delete texture objects and to determine which textures constitute your working set.
This chapter covers the OpenGL's texture-mapping facility in the following major sections.
http://heron.cc.ukans.edu/ebt-bin/nph-dweb/dynaw...Generic__BookTextView/17383;cs=fullhtml;pt=14979 (2 of 38) [4/28/2000 9:46:36 PM]

OpenGL Programming Guide (Addison-Wesley Publishing Company)
●"An Overview and an Example" gives a brief, broad look at the steps required to perform texture mapping. It also presents a relatively simple example of texture mapping.
●"Specifying the Texture" explains how to specify oneor two-dimensional textures. It also discusses how to use a texture's borders, how to supply a series of related textures of different sizes, and how to control the filtering methods used to determine how an applied texture is mapped to screen coordinates.
●"Filtering" details how textures are either magnified or minified as they are applied to the pixels of polygons. Minification using special mipmap textures is also explained.
●"Texture Objects" describes how to put texture images into objects so that you can control several textures at one time. With texture objects, you may be able to create a working set of high-performance textures, which are said to be resident. You may also prioritize texture objects to increase or decrease the likelihood that a texture object is resident.
●"Texture Functions" discusses the methods used for painting a texture onto a surface. You can choose to have the texture color values replace those that would be used if texturing wasn't in effect, or you can have the final color be a combination of the two.
●"Assigning Texture Coordinates" describes how to compute and assign appropriate texture coordinates to the vertices of an object. It also explains how to control the behavior of coordinates that lie outside the default range - that is, how to repeat or clamp textures across a surface.
●"Automatic Texture-Coordinate Generation" shows how to have OpenGL automatically generate texture coordinates so that you can achieve such effects as contour and environment maps.
●"Advanced Features" explains how to manipulate the texture matrix stack and how to use the q texture coordinate. Version 1.1 of OpenGL introduces several new texture-mapping operations:
Thirty-eight additional internal texture image formats
Texture proxy, to query whether there are enough resources to accommodate a given texture image
Texture subimage, to replace all or part of an existing texture image rather than completely deleting and creating a texture to achieve the same effect
Specifying texture data from framebuffer memory (as well as from processor memory)
Texture objects, including resident textures and prioritizing
If you try to use one of these texture-mapping operations and can't find it, check the version number of your implementation of OpenGL to see if it actually supports it. (See "Which Version Am I Using?" in Chapter 14.)
http://heron.cc.ukans.edu/ebt-bin/nph-dweb/dynaw...Generic__BookTextView/17383;cs=fullhtml;pt=14979 (3 of 38) [4/28/2000 9:46:36 PM]

OpenGL Programming Guide (Addison-Wesley Publishing Company)
An Overview and an Example
This section gives an overview of the steps necessary to perform texture mapping. It also presents a relatively simple texture-mapping program. Of course, you know that texture mapping can be a very involved process.
Steps in Texture Mapping
To use texture mapping, you perform these steps.
1.Create a texture object and specify a texture for that object.
2.Indicate how the texture is to be applied to each pixel.
3.Enable texture mapping.
4.Draw the scene, supplying both texture and geometric coordinates.
Keep in mind that texture mapping works only in RGBA mode. Texture mapping results in color-index mode are undefined.
Create a Texture Object and Specify a Texture for That Object
A texture is usually thought of as being two-dimensional, like most images, but it can also be one-dimensional. The data describing a texture may consist of one, two, three, or four elements per texel, representing anything from a modulation constant to an (R, G, B, A) quadruple.
In Example 9-1, which is very simple, a single texture object is created to maintain a single two-dimensional texture. This example does not find out how much memory is available. Since only one texture is created, there is no attempt to prioritize or otherwise manage a working set of texture objects. Other advanced techniques, such as texture borders or mipmaps, are not used in this simple example.
Indicate How the Texture Is to Be Applied to Each Pixel
You can choose any of four possible functions for computing the final RGBA value from the fragment color and the texture-image data. One possibility is simply to use the texture color as the final color; this is the decal mode, in which the texture is painted on top of the fragment, just as a decal would be applied. (Example 9-1 uses decal mode.) The replace mode, a variant of the decal mode, is a second method. Another method is to use the texture to modulate, or scale, the fragment's color; this technique is useful for combining the effects of lighting with texturing. Finally, a constant color can be blended with that of the fragment, based on the texture value.
Enable Texture Mapping
You need to enable texturing before drawing your scene. Texturing is enabled or disabled using glEnable() or glDisable() with the symbolic constant GL_TEXTURE_1D or GL_TEXTURE_2D for oneor two-dimensional texturing, respectively. (If both are enabled, GL_TEXTURE_2D is the one that is used.)
Draw the Scene, Supplying Both Texture and Geometric Coordinates
You need to indicate how the texture should be aligned relative to the fragments to which it's to be applied before it's "glued on." That is, you need to specify both texture coordinates and geometric coordinates as you specify the objects in your scene. For a two-dimensional texture map, for example, the texture coordinates range from 0.0 to 1.0 in both directions, but the coordinates of the items being textured can be anything. For the brick-wall example, if the wall is square and meant to represent one copy of the texture, the code would probably assign texture coordinates (0, 0), (1, 0),
http://heron.cc.ukans.edu/ebt-bin/nph-dweb/dynaw...Generic__BookTextView/17383;cs=fullhtml;pt=14979 (4 of 38) [4/28/2000 9:46:36 PM]
OpenGL Programming Guide (Addison-Wesley Publishing Company)
(1, 1), and (0, 1) to the four corners of the wall. If the wall is large, you might want to paint several copies of the texture map on it. If you do so, the texture map must be designed so that the bricks on the left edge match up nicely with the bricks on the right edge, and similarly for the bricks on the top and those on the bottom.
You must also indicate how texture coordinates outside the range [0.0,1.0] should be treated. Do the textures repeat to cover the object, or are they clamped to a boundary value?
A Sample Program
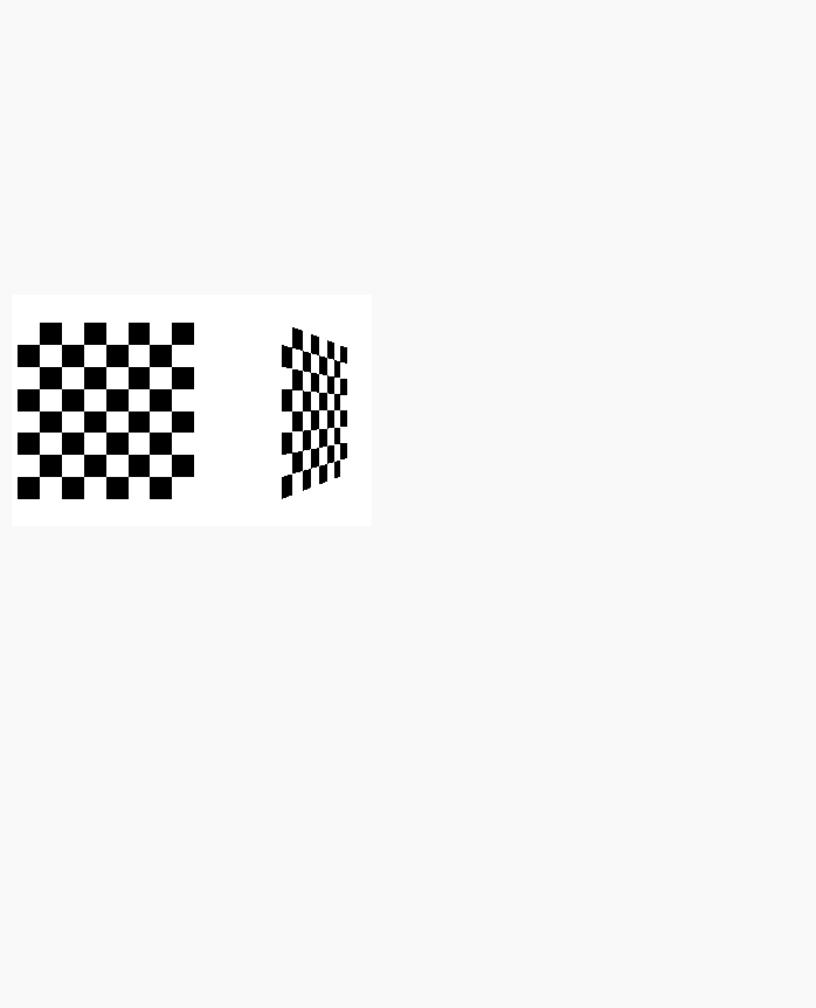
One of the problems with showing sample programs to illustrate texture mapping is that interesting textures are large. Typically, textures are read from an image file, since specifying a texture programmatically could take hundreds of lines of code. In Example 9-1, the texture - which consists of alternating white and black squares, like a checkerboard - is generated by the program. The program applies this texture to two squares, which are then rendered in perspective, one of them facing the viewer squarely and the other tilting back at 45 degrees, as shown in Figure 9-2. In object coordinates, both squares are the same size.
Figure 9-2 : Texture-Mapped Squares
Example 9-1 : Texture-Mapped Checkerboard: checker.c
#include <GL/gl.h> #include <GL/glu.h> #include <GL/glut.h> #include <stdlib.h> #include <stdio.h>
/* Create checkerboard texture */ #define checkImageWidth 64
#define checkImageHeight 64
static GLubyte checkImage[checkImageHeight][checkImageWidth][4];
static GLuint texName;
void makeCheckImage(void)
{
int i, j, c;
for (i = 0; i < checkImageHeight; i++) { for (j = 0; j < checkImageWidth; j++) {
http://heron.cc.ukans.edu/ebt-bin/nph-dweb/dynaw...Generic__BookTextView/17383;cs=fullhtml;pt=14979 (5 of 38) [4/28/2000 9:46:36 PM]

OpenGL Programming Guide (Addison-Wesley Publishing Company)
c = ((((i&0x8)==0)^((j&0x8))==0))*255;
checkImage[i][j][0] = (GLubyte) c; checkImage[i][j][1] = (GLubyte) c; checkImage[i][j][2] = (GLubyte) c; checkImage[i][j][3] = (GLubyte) 255;
}
}
}
void init(void)
{
glClearColor (0.0, 0.0, 0.0, 0.0); glShadeModel(GL_FLAT); glEnable(GL_DEPTH_TEST);
makeCheckImage(); glPixelStorei(GL_UNPACK_ALIGNMENT, 1);
glGenTextures(1, &texName); glBindTexture(GL_TEXTURE_2D, texName);
glTexParameteri(GL_TEXTURE_2D, GL_TEXTURE_WRAP_S, GL_REPEAT); glTexParameteri(GL_TEXTURE_2D, GL_TEXTURE_WRAP_T, GL_REPEAT); glTexParameteri(GL_TEXTURE_2D, GL_TEXTURE_MAG_FILTER,
GL_NEAREST); glTexParameteri(GL_TEXTURE_2D, GL_TEXTURE_MIN_FILTER,
GL_NEAREST); glTexImage2D(GL_TEXTURE_2D, 0, GL_RGBA, checkImageWidth,
checkImageHeight, 0, GL_RGBA, GL_UNSIGNED_BYTE, checkImage);
}
void display(void)
{
glClear(GL_COLOR_BUFFER_BIT | GL_DEPTH_BUFFER_BIT); glEnable(GL_TEXTURE_2D);
glTexEnvf(GL_TEXTURE_ENV, GL_TEXTURE_ENV_MODE, GL_DECAL); glBindTexture(GL_TEXTURE_2D, texName);
glBegin(GL_QUADS);
glTexCoord2f(0.0, 0.0); glVertex3f(-2.0, -1.0, 0.0); glTexCoord2f(0.0, 1.0); glVertex3f(-2.0, 1.0, 0.0); glTexCoord2f(1.0, 1.0); glVertex3f(0.0, 1.0, 0.0); glTexCoord2f(1.0, 0.0); glVertex3f(0.0, -1.0, 0.0);
glTexCoord2f(0.0, 0.0); glVertex3f(1.0, -1.0, 0.0); glTexCoord2f(0.0, 1.0); glVertex3f(1.0, 1.0, 0.0); glTexCoord2f(1.0, 1.0); glVertex3f(2.41421, 1.0, -1.41421); glTexCoord2f(1.0, 0.0); glVertex3f(2.41421, -1.0, -1.41421); glEnd();
glFlush(); glDisable(GL_TEXTURE_2D);
}
http://heron.cc.ukans.edu/ebt-bin/nph-dweb/dynaw...Generic__BookTextView/17383;cs=fullhtml;pt=14979 (6 of 38) [4/28/2000 9:46:36 PM]

OpenGL Programming Guide (Addison-Wesley Publishing Company)
void reshape(int w, int h)
{
glViewport(0, 0, (GLsizei) w, (GLsizei) h); glMatrixMode(GL_PROJECTION); glLoadIdentity();
gluPerspective(60.0, (GLfloat) w/(GLfloat) h, 1.0, 30.0); glMatrixMode(GL_MODELVIEW);
glLoadIdentity(); glTranslatef(0.0, 0.0, -3.6);
}
void keyboard (unsigned char key, int x, int y)
{
switch (key) { case 27:
exit(0);
break;
default:
break;
}
}
int main(int argc, char** argv)
{
glutInit(&argc, argv);
glutInitDisplayMode(GLUT_SINGLE | GLUT_RGB | GLUT_DEPTH); glutInitWindowSize(250, 250); glutInitWindowPosition(100, 100); glutCreateWindow(argv[0]);
init();
glutDisplayFunc(display);
glutReshapeFunc(reshape);
glutKeyboardFunc(keyboard);
glutMainLoop(); return 0;
}
The checkerboard texture is generated in the routine makeCheckImage(), and all the texture-mapping initialization occurs in the routine init(). glGenTextures() and glBindTexture() name and create a texture object for a texture image. (See "Texture Objects.") The single, full-resolution texture map is specified by glTexImage2D(), whose parameters indicate the size of the image, type of the image, location of the image, and other properties of it. (See "Specifying the Texture" for more information about glTexImage2D().)
The four calls to glTexParameter*() specify how the texture is to be wrapped and how the colors are to be filtered if there isn't an exact match between pixels in the texture and pixels on the screen. (See "Repeating and Clamping Textures" and "Filtering.")
In display(), glEnable() turns on texturing. glTexEnv*() sets the drawing mode to GL_DECAL so that the textured polygons are drawn using the colors from the texture map (rather than taking into account what color the polygons would have been drawn without the texture).
Then, two polygons are drawn. Note that texture coordinates are specified along with vertex coordinates. The
http://heron.cc.ukans.edu/ebt-bin/nph-dweb/dynaw...Generic__BookTextView/17383;cs=fullhtml;pt=14979 (7 of 38) [4/28/2000 9:46:36 PM]

OpenGL Programming Guide (Addison-Wesley Publishing Company)
glTexCoord*() command behaves similarly to the glNormal() command. glTexCoord*() sets the current texture coordinates; any subsequent vertex command has those texture coordinates associated with it until glTexCoord*() is called again.
Note: The checkerboard image on the tilted polygon might look wrong when you compile and run it on your machine - for example, it might look like two triangles with different projections of the checkerboard image on them. If so, try setting the parameter GL_PERSPECTIVE_CORRECTION_HINT to GL_NICEST and running the example again. To do this, use glHint().
Specifying the Texture
The command glTexImage2D() defines a two-dimensional texture. It takes several arguments, which are described briefly here and in more detail in the subsections that follow. The related command for one-dimensional textures, glTexImage1D(), is described in "One-Dimensional Textures."
void glTexImage2D(GLenum target, GLint level, GLint internalFormat, GLsizei width, GLsizei height, GLint border,
GLenum format, GLenum type, const GLvoid *pixels);
Defines a two-dimensional texture. The target parameter is set to either the constant GL_TEXTURE_2D or GL_PROXY_TEXTURE_2D. You use the level parameter if you're supplying multiple resolutions of the texture map; with only one resolution, level should be 0. (See "Multiple Levels of Detail" for more information about using multiple resolutions.)
The next parameter, internalFormat, indicates which of the R, G, B, and A components or luminance or intensity values are selected for use in describing the texels of an image. The value of internalFormat is an integer from 1 to 4, or one of thirty-eight symbolic constants. The thirty-eight symbolic constants that are also legal values for internalFormat are GL_ALPHA, GL_ALPHA4, GL_ALPHA8, GL_ALPHA12, GL_ALPHA16, GL_LUMINANCE, GL_LUMINANCE4, GL_LUMINANCE8, GL_LUMINANCE12, GL_LUMINANCE16, GL_LUMINANCE_ALPHA, GL_LUMINANCE4_ALPHA4, GL_LUMINANCE6_ALPHA2, GL_LUMINANCE8_ALPHA8, GL_LUMINANCE12_ALPHA4, GL_LUMINANCE12_ALPHA12, GL_LUMINANCE16_ALPHA16, GL_INTENSITY, GL_INTENSITY4, GL_INTENSITY8, GL_INTENSITY12, GL_INTENSITY16, GL_RGB, GL_R3_G3_B2, GL_RGB4, GL_RGB5, GL_RGB8, GL_RGB10, GL_RGB12, GL_RGB16, GL_RGBA, GL_RGBA2, GL_RGBA4, GL_RGB5_A1, GL_RGBA8, GL_RGB10_A2, GL_RGBA12, and GL_RGBA16. (See "Texture Functions" for a discussion of how these selected components are applied.)
If internalFormat is one of the thirty-eight symbolic constants, then you are asking for specific components and perhaps the resolution of those components. For example, if internalFormat is GL_R3_G3_B2, you are asking that texels be 3 bits of red, 3 bits of green, and 2 bits of blue, but OpenGL is not guaranteed to deliver this.
OpenGL is only obligated to choose an internal representation that closely approximates what is requested, but an exact match is usually not required. By definition, GL_LUMINANCE, GL_LUMINANCE_ALPHA, GL_RGB, and GL_RGBA are lenient, because they do not ask for a specific resolution. (For compatibility with the OpenGL release 1.0, the numeric values 1, 2, 3, and 4, for internalFormat, are equivalent to the symbolic constants GL_LUMINANCE, GL_LUMINANCE_ALPHA, GL_RGB, and GL_RGBA, respectively.)
The width and height parameters give the dimensions of the texture image; border indicates the width of the border, which is either zero (no border) or one. (See "Using a Texture's Borders".) Both width and height must have the form 2m+2b, where m is a nonnegative integer (which can have a different value for width than for height) and b is the value of border. The maximum size of a texture map depends on the implementation of OpenGL, but it must be at least 64 × 64 (or 66 × 66 with borders).
The format and type parameters describe the format and data type of the texture image data. They have the same meaning as they do for glDrawPixels(). (See "Imaging Pipeline" in Chapter 8.) In fact, texture data is in the same format as the data used by glDrawPixels(), so the settings of glPixelStore*() and glPixelTransfer*() are applied.
http://heron.cc.ukans.edu/ebt-bin/nph-dweb/dynaw...Generic__BookTextView/17383;cs=fullhtml;pt=14979 (8 of 38) [4/28/2000 9:46:36 PM]