

The Official Guide to Learning OpenGL, Version 1.1 (Redbook Second Edition)
.pdfOpenGL Programming Guide (Addison-Wesley Publishing Company)
{
glBegin(GL_LINE_STRIP); while (1) {
switch (l->type) { case PT:
glVertex2fv(&l->x); break;
case STROKE: glVertex2fv(&l->x); glEnd(); glBegin(GL_LINE_STRIP); break;
case END: glVertex2fv(&l->x); glEnd();
glTranslatef(8.0, 0.0, 0.0); return;
}
l++;
}
} |
|
/* Create a display list for each of 6 characters |
*/ |
static void init (void) |
|
{ |
|
GLuint base; |
|
glShadeModel (GL_FLAT); |
|
base = glGenLists (128); |
|
glListBase(base); |
|
glNewList(base+'A', GL_COMPILE); drawLetter(Adata); |
|
glEndList(); |
|
glNewList(base+'E', GL_COMPILE); drawLetter(Edata); |
|
glEndList(); |
|
glNewList(base+'P', GL_COMPILE); drawLetter(Pdata); |
|
glEndList(); |
|
glNewList(base+'R', GL_COMPILE); drawLetter(Rdata); |
|
glEndList(); |
|
glNewList(base+'S', GL_COMPILE); drawLetter(Sdata); |
|
glEndList(); |
|
glNewList(base+' `, GL_COMPILE); |
|
glTranslatef(8.0, 0.0, 0.0); glEndList(); |
|
} |
|
char *test1 = "A SPARE SERAPE APPEARS AS"; |
|
http://heron.cc.ukans.edu/ebt-bin/nph-dweb/dynaw...Generic__BookTextView/14035;cs=fullhtml;pt=12800 (17 of 21) [4/28/2000 9:46:04 PM]

OpenGL Programming Guide (Addison-Wesley Publishing Company)
char *test2 = "APES PREPARE RARE PEPPERS";
static void printStrokedString(char *s)
{
GLsizei len = strlen(s); glCallLists(len, GL_BYTE, (GLbyte *)s);
}
void display(void)
{
glClear(GL_COLOR_BUFFER_BIT); glColor3f(1.0, 1.0, 1.0); glPushMatrix(); glScalef(2.0, 2.0, 2.0);
glTranslatef(10.0, 30.0, 0.0); printStrokedString(test1); glPopMatrix();
glPushMatrix(); glScalef(2.0, 2.0, 2.0);
glTranslatef(10.0, 13.0, 0.0); printStrokedString(test2); glPopMatrix();
glFlush();
}
void reshape(int w, int h)
{
glViewport(0, 0, (GLsizei) w, (GLsizei) h); glMatrixMode (GL_PROJECTION); glLoadIdentity ();
gluOrtho2D (0.0, (GLdouble) w, 0.0, (GLdouble) h);
}
void keyboard(unsigned char key, int x, int y)
{
switch (key) { case ` `:
glutPostRedisplay();
break; case 27:
exit(0);
}
}
int main(int argc, char** argv)
{
http://heron.cc.ukans.edu/ebt-bin/nph-dweb/dynaw...Generic__BookTextView/14035;cs=fullhtml;pt=12800 (18 of 21) [4/28/2000 9:46:04 PM]

OpenGL Programming Guide (Addison-Wesley Publishing Company)
glutInit(&argc, argv);
glutInitDisplayMode (GLUT_SINGLE | GLUT_RGB); glutInitWindowSize (440, 120); glutCreateWindow (argv[0]);
init (); glutReshapeFunc(reshape); glutKeyboardFunc(keyboard); glutDisplayFunc(display); glutMainLoop();
return 0;
}
Managing State Variables with Display Lists
A display list can contain calls that change the value of OpenGL state variables. These values change as the display list is executed, just as if the commands were called in immediate mode and the changes persist after execution of the display list is completed. As previously seen in Example 7-2 and in Example 7-6, which follows, the changes to the current color and current matrix made during the execution of the display list remain in effect after it has been called.
Example 7-6 : Persistence of State Changes after Execution of a Display List
glNewList(listIndex,GL_COMPILE); glColor3f(1.0, 0.0, 0.0); glBegin(GL_POLYGON);
glVertex2f(0.0,0.0);
glVertex2f(1.0,0.0);
glVertex2f(0.0,1.0);
glEnd();
glTranslatef(1.5,0.0,0.0);
glEndList();
So if you now call the following sequence, the line drawn after the display list is drawn with red as the current color and translated by an additional (1.5, 0.0, 0.0):
glCallList(listIndex); glBegin(GL_LINES);
glVertex2f(2.0,-1.0); glVertex2f(1.0,0.0);
glEnd();
Sometimes you want state changes to persist, but other times you want to save the values of state variables before executing a display list and then restore these values after the list has executed. Remember that you cannot use glGet*() in a display list, so you must use another way to query and store the values of state variables.
You can use glPushAttrib() to save a group of state variables and glPopAttrib() to restore the values
http://heron.cc.ukans.edu/ebt-bin/nph-dweb/dynaw...Generic__BookTextView/14035;cs=fullhtml;pt=12800 (19 of 21) [4/28/2000 9:46:04 PM]

OpenGL Programming Guide (Addison-Wesley Publishing Company)
when you're ready for them. To save and restore the current matrix, use glPushMatrix() and glPopMatrix() as described in "Manipulating the Matrix Stacks" in Chapter 3. These push and pop routines can be legally cached in a display list. To restore the state variables in Example 7-6, you might use the code shown in Example 7-7.
Example 7-7 : Restoring State Variables within a Display List
glNewList(listIndex,GL_COMPILE); glPushMatrix(); glPushAttrib(GL_CURRENT_BIT); glColor3f(1.0, 0.0, 0.0); glBegin(GL_POLYGON);
glVertex2f(0.0,0.0);
glVertex2f(1.0,0.0);
glVertex2f(0.0,1.0);
glEnd();
glTranslatef(1.5,0.0,0.0);
glPopAttrib();
glPopMatrix();
glEndList();
If you use the display list from Example 7-7, which restores values, the code in Example 7-8 draws a green, untranslated line. With the display list in Example 7-6, which doesn't save and restore values, the line is drawn red, and its position is translated ten times (1.5, 0.0, 0.0).
Example 7-8 : The Display List May or May Not Affect drawLine()
void display(void)
{
GLint i; |
|
|
|
glClear(GL_COLOR_BUFFER_BIT); |
|
||
glColor3f(0.0, 1.0, 0.0); |
/* |
set current color to green */ |
|
for (i = 0; i < 10; i++) |
|
|
|
glCallList(listIndex); |
/* |
display list called 10 times */ |
|
drawLine(); |
/* how and |
where does this line appear? */ |
|
glFlush(); |
|
|
|
}
Encapsulating Mode Changes
You can use display lists to organize and store groups of commands to change various modes or set various parameters. When you want to switch from one group of settings to another, using display lists might be more efficient than making the calls directly, since the settings might be cached in a format that matches the requirements of your graphics system.
Display lists may be more efficient than immediate mode for switching among various lighting, lighting-model, and material-parameter settings. You might also use display lists for stipple patterns, fog
http://heron.cc.ukans.edu/ebt-bin/nph-dweb/dynaw...Generic__BookTextView/14035;cs=fullhtml;pt=12800 (20 of 21) [4/28/2000 9:46:04 PM]
OpenGL Programming Guide (Addison-Wesley Publishing Company)
parameters, and clipping-plane equations. In general, you'll find that executing display lists is at least as fast as making the relevant calls directly, but remember that some overhead is involved in jumping to a display list.
Example 7-9 shows how to use display lists to switch among three different line stipples. First, you call glGenLists() to allocate a display list for each stipple pattern and create a display list for each pattern. Then, you use glCallList() to switch from one stipple pattern to another.
Example 7-9 : Display Lists for Mode Changes
GLuint offset;
offset = glGenLists(3);
glNewList (offset, GL_COMPILE); glDisable (GL_LINE_STIPPLE);
glEndList ();
glNewList (offset+1, GL_COMPILE); glEnable (GL_LINE_STIPPLE); glLineStipple (1, 0x0F0F);
glEndList ();
glNewList (offset+2, GL_COMPILE); glEnable (GL_LINE_STIPPLE); glLineStipple (1, 0x1111);
glEndList ();
#define drawOneLine(x1,y1,x2,y2) glBegin(GL_LINES); \ glVertex2f ((x1),(y1)); glVertex2f ((x2),(y2)); glEnd();
glCallList (offset);
drawOneLine (50.0, 125.0, 350.0, 125.0);
glCallList (offset+1);
drawOneLine (50.0, 100.0, 350.0, 100.0);
glCallList (offset+2);
drawOneLine (50.0, 75.0, 350.0, 75.0);
OpenGL Programming Guide (Addison-Wesley Publishing Company)
http://heron.cc.ukans.edu/ebt-bin/nph-dweb/dynaw...Generic__BookTextView/14035;cs=fullhtml;pt=12800 (21 of 21) [4/28/2000 9:46:04 PM]
OpenGL Programming Guide (Addison-Wesley Publishing Company)
OpenGL Programming Guide (Addison-Wesley Publishing Company)
Chapter 8
Drawing Pixels, Bitmaps, Fonts, and Images
Chapter Objectives
After reading this chapter, you'll be able to do the following:
●Position and draw bitmapped data
●Read pixel data (bitmaps and images) from the framebuffer into processor memory and from memory into the framebuffer
●Copy pixel data from one color buffer to another, or to another location in the same buffer
●Magnify or reduce an image as it's written to the framebuffer
●Control pixel-data formatting and perform other transformations as the data is moved to and from the framebuffer
So far, most of the discussion in this guide has concerned the rendering of geometric data - points, lines, and polygons. Two other important classes of data that can be rendered by OpenGL are
●Bitmaps, typically used for characters in fonts
●Image data, which might have been scanned in or calculated
Both bitmaps and image data take the form of rectangular arrays of pixels. One difference between them is that a bitmap consists of a single bit of information about each pixel, and image data typically includes several pieces of data per pixel (the complete red, green, blue, and alpha color components, for example). Also, bitmaps are like masks in that they're used to overlay another image, but image data simply overwrites or is blended with whatever data is in the framebuffer.
This chapter describes how to draw pixel data (bitmaps and images) from processor memory to the framebuffer and how to read pixel data from the framebuffer into processor memory. It also describes how to copy pixel data from one position to another, either from one buffer to another or within a single buffer. This chapter contains the following major sections:
●"Bitmaps and Fonts" describes the commands for positioning and drawing bitmapped data. Such data may describe a font.
●"Images" presents the basic information about drawing, reading and copying pixel data.
●"Imaging Pipeline" describes the operations that are performed on images and bitmaps when they are read from the framebuffer and when they are written to the framebuffer.
●"Reading and Drawing Pixel Rectangles" covers all the details of how pixel data is stored in memory and how to transform it as it's moved into or out of memory.
●"Tips for Improving Pixel Drawing Rates" lists tips for getting better performance when drawing pixel rectangles.
In most cases, the necessary pixel operations are simple, so the first three sections might be all you need to read for your application. However, pixel manipulation can be complex - there are many ways to store pixel data in memory, and you can
http://heron.cc.ukans.edu/ebt-bin/nph-dweb/dynaw...Generic__BookTextView/14979;cs=fullhtml;pt=14035 (1 of 27) [4/28/2000 9:46:17 PM]
OpenGL Programming Guide (Addison-Wesley Publishing Company)
apply any of several transformations to pixels as they're moved to and from the framebuffer. These details are the subject of the fourth section of this chapter. Most likely, you'll want to read this section only when you actually need to make use of the information. The last section provides useful tips to get the best performance when rendering bitmaps and images.
Bitmaps and Fonts
A bitmap is a rectangular array of 0s and 1s that serves as a drawing mask for a corresponding rectangular portion of the window. Suppose you're drawing a bitmap and that the current raster color is red. Wherever there's a 1 in the bitmap, the corresponding pixel is replaced by a red pixel (or combined with a red pixel, depending on which per-fragment operations are in effect. (See "Testing and Operating on Fragments" in Chapter 10.) If there's a 0 in the bitmap, the contents of the pixel are unaffected. The most common use of bitmaps is for drawing characters on the screen.
OpenGL provides only the lowest level of support for drawing strings of characters and manipulating fonts. The commands glRasterPos*() and glBitmap() position and draw a single bitmap on the screen. In addition, through the display-list mechanism, you can use a sequence of character codes to index into a corresponding series of bitmaps representing those characters. (See Chapter 7 for more information about display lists.) You'll have to write your own routines to provide any other support you need for manipulating bitmaps, fonts, and strings of characters.
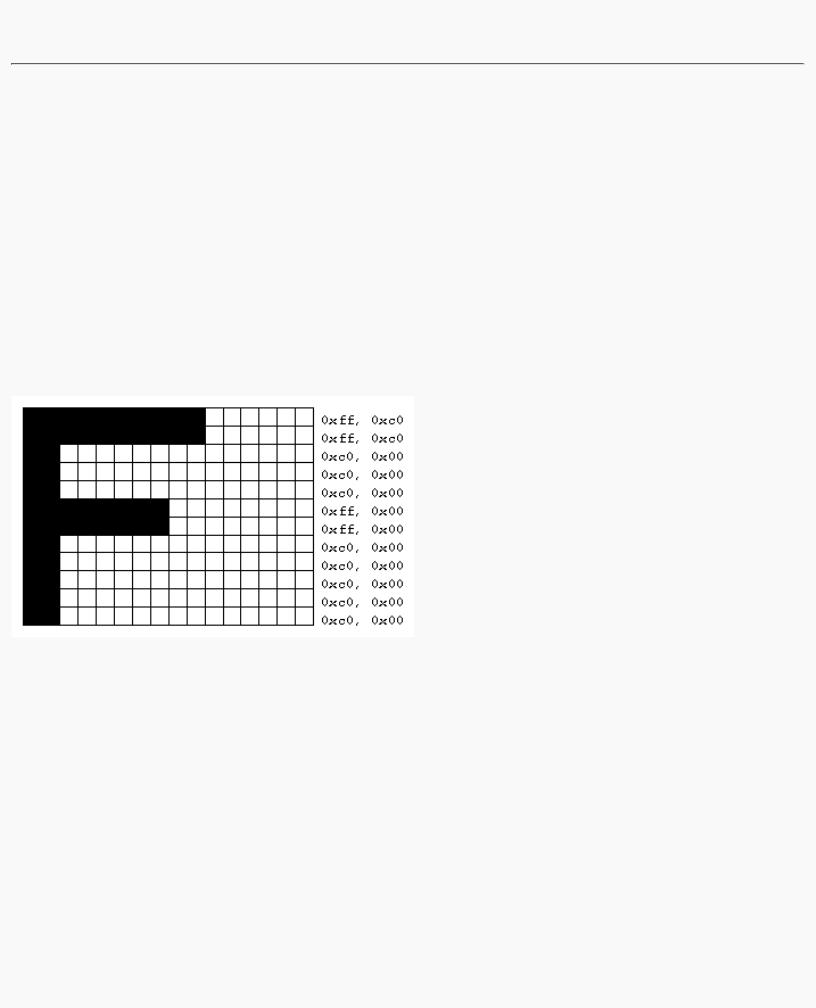
Consider Example 8-1, which draws the character F three times on the screen. Figure 8-1 shows the F as a bitmap and its corresponding bitmap data.
Figure 8-1 : Bitmapped F and Its Data
Example 8-1 : Drawing a Bitmapped Character: drawf.c
#include <GL/gl.h> #include <GL/glu.h> #include <GL/glut.h> #include <stdlib.h>
GLubyte rasters[24] = {
0xc0, 0x00, 0xc0, 0x00, 0xc0, 0x00, 0xc0, 0x00, 0xc0, 0x00, 0xff, 0x00, 0xff, 0x00, 0xc0, 0x00, 0xc0, 0x00, 0xc0, 0x00, 0xff, 0xc0, 0xff, 0xc0};
void init(void)
{
glPixelStorei (GL_UNPACK_ALIGNMENT, 1); glClearColor (0.0, 0.0, 0.0, 0.0);
http://heron.cc.ukans.edu/ebt-bin/nph-dweb/dynaw...Generic__BookTextView/14979;cs=fullhtml;pt=14035 (2 of 27) [4/28/2000 9:46:18 PM]

OpenGL Programming Guide (Addison-Wesley Publishing Company)
}
void display(void)
{
glClear(GL_COLOR_BUFFER_BIT); glColor3f (1.0, 1.0, 1.0); glRasterPos2i (20, 20);
glBitmap (10, 12, 0.0, 0.0, 11.0, 0.0, rasters); glBitmap (10, 12, 0.0, 0.0, 11.0, 0.0, rasters); glBitmap (10, 12, 0.0, 0.0, 11.0, 0.0, rasters); glFlush();
}
void reshape(int w, int h)
{
glViewport(0, 0, (GLsizei) w, (GLsizei) h); glMatrixMode(GL_PROJECTION); glLoadIdentity();
glOrtho (0, w, 0, h, -1.0, 1.0); glMatrixMode(GL_MODELVIEW);
}
void keyboard(unsigned char key, int x, int y)
{
switch (key) { case 27:
exit(0);
}
}
int main(int argc, char** argv)
{
glutInit(&argc, argv); glutInitDisplayMode(GLUT_SINGLE | GLUT_RGB); glutInitWindowSize(100, 100); glutInitWindowPosition(100, 100); glutCreateWindow(argv[0]);
init();
glutReshapeFunc(reshape);
glutKeyboardFunc(keyboard);
glutDisplayFunc(display);
glutMainLoop(); return 0;
}
In Figure 8-1, note that the visible part of the F character is at most 10 bits wide. Bitmap data is always stored in chunks that are multiples of 8 bits, but the width of the actual bitmap doesn't have to be a multiple of 8. The bits making up a bitmap are drawn starting from the lower-left corner: First, the bottom row is drawn, then the next row above it, and so on. As you can tell from the code, the bitmap is stored in memory in this order - the array of rasters begins with 0xc0, 0x00, 0xc0, 0x00 for the bottom two rows of the F and continues to 0xff, 0xc0, 0xff, 0xc0 for the top two rows.
The commands of interest in this example are glRasterPos2i() and glBitmap(); they're discussed in detail in the next section. For now, ignore the call to glPixelStorei(); it describes how the bitmap data is stored in computer memory. (See "Controlling Pixel-Storage Modes" for more information.)
http://heron.cc.ukans.edu/ebt-bin/nph-dweb/dynaw...Generic__BookTextView/14979;cs=fullhtml;pt=14035 (3 of 27) [4/28/2000 9:46:18 PM]

OpenGL Programming Guide (Addison-Wesley Publishing Company)
The Current Raster Position
The current raster position is the origin where the next bitmap (or image) is to be drawn. In the F example, the raster position was set by calling glRasterPos*() with coordinates (20, 20), which is where the lower-left corner of the F was drawn:
glRasterPos2i(20, 20);
void glRasterPos{234}{sifd}(TYPE x, TYPE y, TYPE z, TYPE w); void glRasterPos{234}{sifd}v(TYPE *coords);
Sets the current raster position. The x, y, z, and w arguments specify the coordinates of the raster position. If the vector form of the function is used, the coords array contains the coordinates of the raster position. If glRasterPos2*() is used, z is implicitly set to zero and w is implicitly set to one; similarly, with glRasterPos3*(), w is set to one.
The coordinates of the raster position are transformed to screen coordinates in exactly the same way as coordinates supplied with a glVertex*() command (that is, with the modelview and perspective matrices). After transformation, they either define a valid spot in the viewport, or they're clipped out because the coordinates were outside the viewing volume. If the transformed point is clipped out, the current raster position is invalid.
Note: If you want to specify the raster position in screen coordinates, you'll want to make sure you've specified the modelview and projection matrices for simple 2D rendering, with something like this sequence of commands, where width and height are also the size (in pixels) of the viewport:
glMatrixMode(GL_PROJECTION); glLoadIdentity();
gluOrtho2D(0.0, (GLfloat) width, 0.0, (GLfloat) height); glMatrixMode(GL_MODELVIEW);
glLoadIdentity();
To obtain the current raster position, you can use the query command glGetFloatv() with GL_CURRENT_RASTER_POSITION as the first argument. The second argument should be a pointer to an array that can hold the (x, y, z, w) values as floating-point numbers. Call glGetBooleanv() with GL_CURRENT_RASTER_POSITION_VALID as the first argument to determine whether the current raster position is valid.
Drawing the Bitmap
Once you've set the desired raster position, you can use the glBitmap() command to draw the data.
void glBitmap(GLsizei width, GLsizei height, GLfloat xbo, GLfloat ybo, GLfloat xbi,
GLfloat ybi, const GLubyte *bitmap);
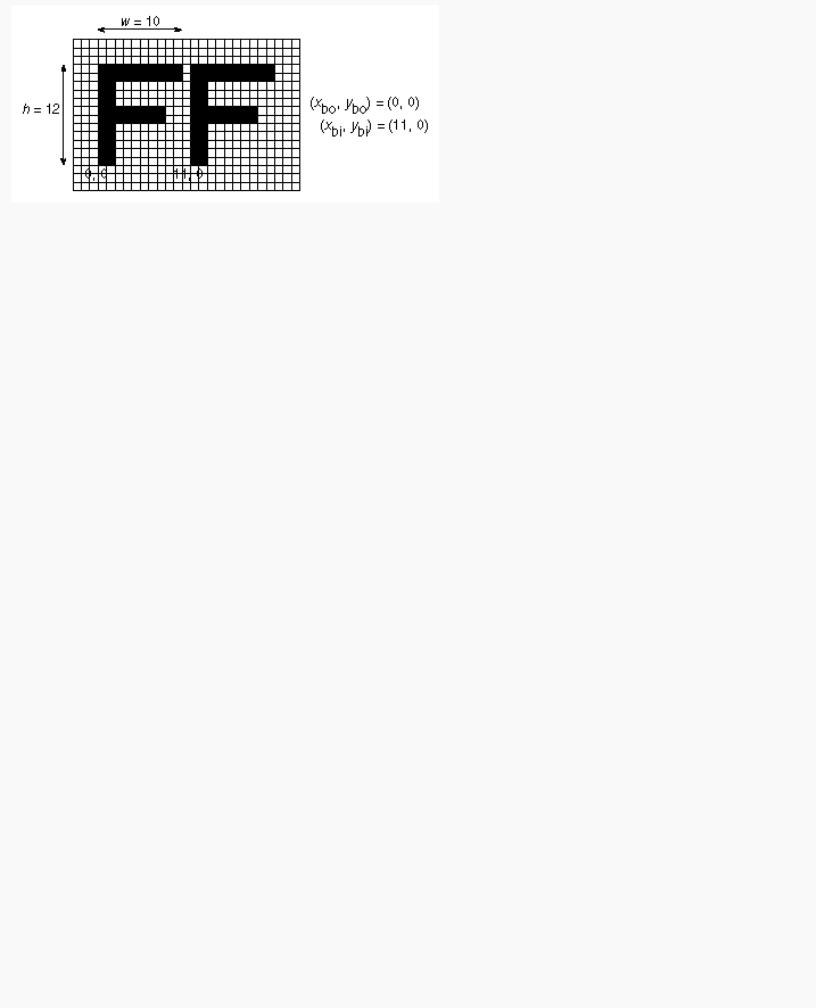
Draws the bitmap specified by bitmap, which is a pointer to the bitmap image. The origin of the bitmap is placed at the current raster position. If the current raster position is invalid, nothing is drawn, and the raster position remains invalid. The width and height arguments indicate the width and height, in pixels, of the bitmap. The width need not be a multiple of 8, although the data is stored in unsigned characters of 8 bits each. (In the F example, it wouldn't matter if there were garbage bits in the data beyond the tenth bit; since glBitmap() was called with a width of 10, only 10 bits of the row are rendered.) Use xbo and ybo to define the origin of the bitmap (positive values move the origin up and to the right of the raster position; negative values move it down and to the left); xbi and ybi indicate the x and y increments that are added to the raster position after the bitmap is rasterized (see Figure 8-2).
http://heron.cc.ukans.edu/ebt-bin/nph-dweb/dynaw...Generic__BookTextView/14979;cs=fullhtml;pt=14035 (4 of 27) [4/28/2000 9:46:18 PM]
OpenGL Programming Guide (Addison-Wesley Publishing Company)
Figure 8-2 : Bitmap and Its Associated Parameters
Allowing the origin of the bitmap to be placed arbitrarily makes it easy for characters to extend below the origin (typically used for characters with descenders, such as g, j, and y), or to extend beyond the left of the origin (used for various swash characters, which have extended flourishes, or for characters in fonts that lean to the left).
After the bitmap is drawn, the current raster position is advanced by xbi and ybi in the x- and y-directions, respectively. (If you just want to advance the current raster position without drawing anything, call glBitmap() with the bitmap parameter set to NULL and with the width and height set to zero.) For standard Latin fonts, ybi is typically 0.0 and xbi is positive (since successive characters are drawn from left to right). For Hebrew, where characters go from right to left, the xbi values would typically be negative. Fonts that draw successive characters vertically in columns would use zero for xbi and nonzero values for ybi. In Figure 8-2, each time the F is drawn, the current raster position advances by 11 pixels, allowing a 1-pixel space between successive characters.
Since xbo, ybo, xbi, and ybi are floating-point values, characters need not be an integral number of pixels apart. Actual characters are drawn on exact pixel boundaries, but the current raster position is kept in floating point so that each character is drawn as close as possible to where it belongs. For example, if the code in the F example was modified so that xbi is 11.5 instead of 12, and if more characters were drawn, the space between letters would alternate between 1 and 2 pixels, giving the best approximation to the requested 1.5-pixel space.
Note: You can't rotate bitmap fonts because the bitmap is always drawn aligned to the x and y framebuffer axes.
Choosing a Color for the Bitmap
You are familiar with using glColor*() and glIndex*() to set the current color or index to draw geometric primitives. The same commands are used to set different state variables, GL_CURRENT_RASTER_COLOR and GL_CURRENT_RASTER_INDEX, for rendering bitmaps. The raster color state variables are set when glRasterPos*() is called, which can lead to a trap. In the following sequence of code, what is the color of the bitmap?
glColor3f(1.0, 1.0, 1.0); /* white */ glRasterPos3fv(position); glColor3f(1.0, 0.0, 0.0); /* red */ glBitmap(....);
The bitmap is white! The GL_CURRENT_RASTER_COLOR is set to white when glRasterPos3fv() is called. The second call to glColor3f() changes the value of GL_CURRENT_COLOR for future geometric rendering, but the color used to render the bitmap is unchanged.
To obtain the current raster color or index, you can use the query commands glGetFloatv() or glGetIntegerv() with GL_CURRENT_RASTER_COLOR or GL_CURRENT_RASTER_INDEX as the first argument.
http://heron.cc.ukans.edu/ebt-bin/nph-dweb/dynaw...Generic__BookTextView/14979;cs=fullhtml;pt=14035 (5 of 27) [4/28/2000 9:46:18 PM]