

The Official Guide to Learning OpenGL, Version 1.1 (Redbook Second Edition)
.pdfOpenGL Programming Guide (Addison-Wesley Publishing Company)
processor memory. For such machines, you probably want to control the byte alignment. All the issues raised in this paragraph are controlled as pixel-storage modes, which are discussed in the next subsection. You specify these modes by using glPixelStore*(), which you've already seen used in a couple of example programs.
All the possible pixel-storage modes are controlled with the glPixelStore*() command. Typically, several successive calls are made with this command to set several parameter values.
void glPixelStore{if}(GLenum pname, TYPEparam);
Sets the pixel-storage modes, which affect the operation of glDrawPixels(), glReadPixels(), glBitmap(), glPolygonStipple(), glTexImage1D(), glTexImage2D(), glTexSubImage1D(), glTexSubImage2D(), and glGetTexImage(). The possible parameter names for pname are shown in Table 8-3, along with their data type, initial value, and valid range of values. The GL_UNPACK* parameters control how data is unpacked from memory by glDrawPixels(), glBitmap(), glPolygonStipple(), glTexImage1D(), glTexImage2D(), glTexSubImage1D(), and glTexSubImage2D(). The GL_PACK* parameters control how data is packed into memory by glReadPixels() and glGetTexImage().
Table 8-3 : glPixelStore() Parameters
Since the corresponding parameters for packing and unpacking have the same meanings, they're discussed together in the rest of this section and referred to without the GL_PACK or GL_UNPACK prefix. For example, *SWAP_BYTES refers to GL_PACK_SWAP_BYTES and GL_UNPACK_SWAP_BYTES.
If the *SWAP_BYTES parameter is FALSE (the default), the ordering of the bytes in memory is whatever is native for the OpenGL client; otherwise, the bytes are reversed. The byte reversal applies to any size element, but really only has a meaningful effect for multibyte elements.
Note: As long as your OpenGL application doesn't share images with other machines, you can ignore the issue of byte ordering. If your application must render an OpenGL image that was created on a different machine and the "endianness" of the two machines differs, byte ordering can be swapped using *SWAP_BYTES. However, *SWAP_BYTES does not allow you to reorder elements (for example, to swap red and green).
The *LSB_FIRST parameter applies when drawing or reading 1-bit images or bitmaps, for which a single bit of data is
http://heron.cc.ukans.edu/ebt-bin/nph-dweb/dynaw...Generic__BookTextView/14979;cs=fullhtml;pt=14035 (16 of 27) [4/28/2000 9:46:18 PM]
OpenGL Programming Guide (Addison-Wesley Publishing Company)
saved or restored for each pixel. If *LSB_FIRST is FALSE (the default), the bits are taken from the bytes starting with the most significant bit; otherwise, they're taken in the opposite order. For example, if *LSB_FIRST is FALSE, and the byte in question is 0x31, the bits, in order, are {0, 0, 1, 1, 0, 0, 0, 1}. If *LSB_FIRST is TRUE, the order is {1, 0, 0, 0, 1, 1, 0, 0}.
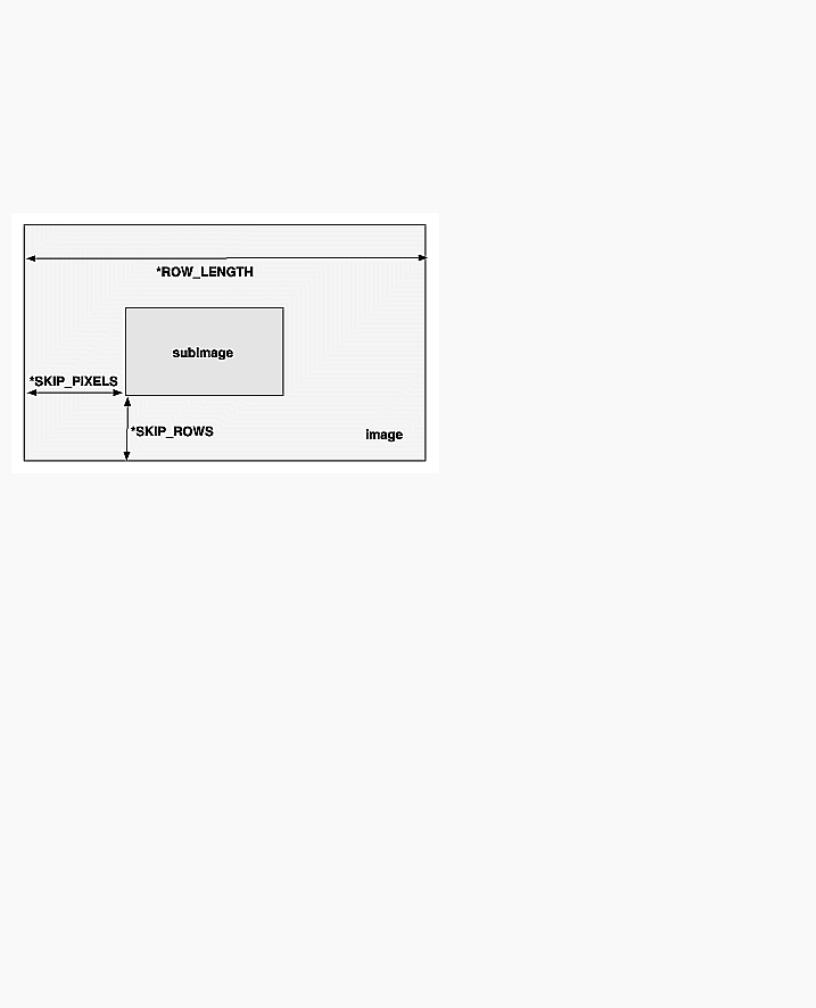
Sometimes you want to draw or read only a subrectangle of the entire rectangle of image data stored in memory. If the rectangle in memory is larger than the subrectangle that's being drawn or read, you need to specify the actual length (measured in pixels) of the larger rectangle with *ROW_LENGTH. If *ROW_LENGTH is zero (which it is by default), the row length is understood to be the same as the width that's specified with glReadPixels(), glDrawPixels(), or glCopyPixels(). You also need to specify the number of rows and pixels to skip before starting to copy the data for the subrectangle. These numbers are set using the parameters *SKIP_ROWS and *SKIP_PIXELS, as shown in Figure 8-9. By default, both parameters are 0, so you start at the lower-left corner.
Figure 8-9 : *SKIP_ROWS, *SKIP_PIXELS, and *ROW_LENGTH Parameters
Often a particular machine's hardware is optimized for moving pixel data to and from memory, if the data is saved in memory with a particular byte alignment. For example, in a machine with 32-bit words, hardware can often retrieve data much faster if it's initially aligned on a 32-bit boundary, which typically has an address that is a multiple of 4. Likewise, 64-bit architectures might work better when the data is aligned to 8-byte boundaries. On some machines, however, byte alignment makes no difference.
As an example, suppose your machine works better with pixel data aligned to a 4-byte boundary. Images are most efficiently saved by forcing the data for each row of the image to begin on a 4-byte boundary. If the image is 5 pixels wide and each pixel consists of 1 byte each of red, green, and blue information, a row requires 5 × 3 = 15 bytes of data. Maximum display efficiency can be achieved if the first row, and each successive row, begins on a 4-byte boundary, so there is 1 byte of waste in the memory storage for each row. If your data is stored like this, set the *ALIGNMENT parameter appropriately (to 4, in this case).
If *ALIGNMENT is set to 1, the next available byte is used. If it's 2, a byte is skipped if necessary at the end of each row so that the first byte of the next row has an address that's a multiple of 2. In the case of bitmaps (or 1-bit images) where a single bit is saved for each pixel, the same byte alignment works, although you have to count individual bits. For example, if you're saving a single bit per pixel, the row length is 75, and the alignment is 4, then each row requires 75/8, or 9 3/8 bytes. Since 12 is the smallest multiple of 4 that is bigger than 9 3/8, 12 bytes of memory are used for each row. If the alignment is 1, then 10 bytes are used for each row, as 9 3/8 is rounded up to the next byte. (There is a simple use of glPixelStorei() in Example 8-4.)
http://heron.cc.ukans.edu/ebt-bin/nph-dweb/dynaw...Generic__BookTextView/14979;cs=fullhtml;pt=14035 (17 of 27) [4/28/2000 9:46:18 PM]

OpenGL Programming Guide (Addison-Wesley Publishing Company)
Pixel-Transfer Operations
As image data is transferred from memory into the framebuffer, or from the framebuffer into memory, OpenGL can perform several operations on it. For example, the ranges of components can be altered - normally, the red component is between 0.0 and 1.0, but you might prefer to keep it in some other range; or perhaps the data you're using from a different graphics system stores the red component in a different range. You can even create maps to perform arbitrary conversion of color indices or color components during pixel transfer. Conversions such as these performed during the transfer of pixels to and from the framebuffer are called pixel-transfer operations. They're controlled with the glPixelTransfer*() and glPixelMap*() commands.
Be aware that although the color, depth, and stencil buffers have many similarities, they don't behave identically, and a few of the modes have special cases for special buffers. All the mode details are covered in this section and the sections that follow, including all the special cases.
Some of the pixel-transfer function characteristics are set with glPixelTransfer*(). The other characteristics are specified with glPixelMap*(), which is described in the next section.
void glPixelTransfer{if}(GLenum pname, TYPEparam);
Sets pixel-transfer modes that affect the operation of glDrawPixels(), glReadPixels(), glCopyPixels(), glTexImage1D(), glTexImage2D(), glCopyTexImage1D(), glCopyTexImage2D(), glTexSubImage1D(), glTexSubImage2D(), glCopyTexSubImage1D(), glCopyTexSubImage2D(), and glGetTexImage(). The parameter pname must be one of those listed in the first column of Table 8-4, and its value, param, must be in the valid range shown.
Table 8-4 : glPixelTransfer*() Parameters (continued)
http://heron.cc.ukans.edu/ebt-bin/nph-dweb/dynaw...Generic__BookTextView/14979;cs=fullhtml;pt=14035 (18 of 27) [4/28/2000 9:46:18 PM]
OpenGL Programming Guide (Addison-Wesley Publishing Company)
If the GL_MAP_COLOR or GL_MAP_STENCIL parameter is TRUE, then mapping is enabled. See the next subsection to learn how the mapping is done and how to change the contents of the maps. All the other parameters directly affect the pixel component values.
A scale and bias can be applied to the red, green, blue, alpha, and depth components. For example, you may wish to scale red, green, and blue components that were read from the framebuffer before converting them to a luminance format in processor memory. Luminance is computed as the sum of the red, green, and blue components, so if you use the default value for GL_RED_SCALE, GL_GREEN_SCALE and GL_BLUE_SCALE, the components all contribute equally to the final intensity or luminance value. If you want to convert RGB to luminance, according to the NTSC standard, you set GL_RED_SCALE to .30, GL_GREEN_SCALE to .59, and GL_BLUE_SCALE to .11.
Indices (color and stencil) can also be transformed. In the case of indices a shift and offset are applied. This is useful if you need to control which portion of the color table is used during rendering.
Pixel Mapping
All the color components, color indices, and stencil indices can be modified by means of a table lookup before they are placed in screen memory. The command for controlling this mapping is glPixelMap*().
void glPixelMap{ui us f}v(GLenum map, GLint mapsize, const TYPE *values);
Loads the pixel map indicated by map with mapsize entries, whose values are pointed to by values. Table 8-5 lists the map names and values; the default sizes are all 1 and the default values are all 0. Each map's size must be a power of 2.
Table 8-5 : glPixelMap*() Parameter Names and Values
http://heron.cc.ukans.edu/ebt-bin/nph-dweb/dynaw...Generic__BookTextView/14979;cs=fullhtml;pt=14035 (19 of 27) [4/28/2000 9:46:18 PM]
OpenGL Programming Guide (Addison-Wesley Publishing Company)
The maximum size of the maps is machine-dependent. You can find the sizes of the pixel maps supported on your machine with glGetIntegerv(). Use the query argument GL_MAX_PIXEL_MAP_TABLE to obtain the maximum size for all the pixel map tables, and use GL_PIXEL_MAP_*_TO_*_SIZE to obtain the current size of the specified map. The six maps whose address is a color index or stencil index must always be sized to an integral power of 2. The four RGBA maps can be any size from 1 through GL_MAX_PIXEL_MAP_TABLE.
To understand how a table works, consider a simple example. Suppose that you want to create a 256-entry table that maps color indices to color indices using GL_PIXEL_MAP_I_TO_I. You create a table with an entry for each of the values between 0 and 255 and initialize the table with glPixelMap*(). Assume you're using the table for thresholding and want to map indices below 101 (indices 0 to 100) to 0, and all indices 101 and above to 255. In this case, your table consists of 101 0s and 155 255s. The pixel map is enabled using the routine glPixelTransfer*() to set the parameter GL_MAP_COLOR to TRUE. Once the pixel map is loaded and enabled, incoming color indices below 101 come out as 0, and incoming pixels between 101 and 255 are mapped to 255. If the incoming pixel is larger than 255, it's first masked by 255, throwing out all the bits above the eighth, and the resulting masked value is looked up in the table. If the incoming index is a floating-point value (say 88.14585), it's rounded to the nearest integer value (giving 88), and that number is looked up in the table (giving 0).
Using pixel maps, you can also map stencil indices or convert color indices to RGB. (See "Reading and Drawing Pixel Rectangles" for information about the conversion of indices.)
Magnifying, Reducing, or Flipping an Image
After the pixel-storage modes and pixel-transfer operations are applied, images and bitmaps are rasterized. Normally, each pixel in an image is written to a single pixel on the screen. However, you can arbitrarily magnify, reduce, or even flip (reflect) an image by using glPixelZoom().
void glPixelZoom(GLfloat zoomx, GLfloat zoomy);
Sets the magnification or reduction factors for pixel-write operations (glDrawPixels() or glCopyPixels()), in the x- and y-dimensions. By default, zoomx and zoomy are 1.0. If they're both 2.0, each image pixel is drawn to 4 screen pixels. Note that fractional magnification or reduction factors are allowed, as are negative factors. Negative zoom factors reflect the resulting image about the current raster position.
During rasterization, each image pixel is treated as a zoomx × zoomy rectangle, and fragments are generated for all the pixels whose centers lie within the rectangle. More specifically, let (xrp, yrp) be the current raster position. If a particular group of elements (index or components) is the nth in a row and belongs to the mth column, consider the region in window coordinates bounded by the rectangle with corners at
(xrp + zoomx * n, yrp + zoomy * m) and (xrp + zoomx(n+1), yrp + zoomy(m+1))
Any fragments whose centers lie inside this rectangle (or on its bottom or left boundaries) are produced in correspondence with this particular group of elements.
A negative zoom can be useful for flipping an image. OpenGL describes images from the bottom row of pixels to the top (and from left to right). If you have a "top to bottom" image, such as a frame of video, you may want to use glPixelZoom(1.0, -1.0) to make the image right side up for OpenGL. Be sure that you reposition the current raster position
http://heron.cc.ukans.edu/ebt-bin/nph-dweb/dynaw...Generic__BookTextView/14979;cs=fullhtml;pt=14035 (20 of 27) [4/28/2000 9:46:18 PM]

OpenGL Programming Guide (Addison-Wesley Publishing Company)
appropriately, if needed.
Example 8-4 shows the use of glPixelZoom(). A checkerboard image is initially drawn in the lower-left corner of the window. Pressing a mouse button and moving the mouse uses glCopyPixels() to copy the lower-left corner of the window to the current cursor location. (If you copy the image onto itself, it looks wacky!) The copied image is zoomed, but initially it is zoomed by the default value of 1.0, so you won't notice. The `z' and `Z' keys increase and decrease the zoom factors by 0.5. Any window damage causes the contents of the window to be redrawn. Pressing the `r' key resets the image and the zoom factors.
Example 8-4 : Drawing, Copying, and Zooming Pixel Data: image.c
#include <GL/gl.h> #include <GL/glu.h> #include <GL/glut.h> #include <stdlib.h> #include <stdio.h>
#define checkImageWidth 64 #define checkImageHeight 64
GLubyte checkImage[checkImageHeight][checkImageWidth][3];
static GLdouble zoomFactor = 1.0; static GLint height;
void makeCheckImage(void)
{
int i, j, c;
for (i = 0; i < checkImageHeight; i++) { for (j = 0; j < checkImageWidth; j++) {
c = ((((i&0x8)==0)^((j&0x8))==0))*255;
checkImage[i][j][0] = (GLubyte) c; checkImage[i][j][1] = (GLubyte) c; checkImage[i][j][2] = (GLubyte) c;
}
}
}
void init(void)
{
glClearColor (0.0, 0.0, 0.0, 0.0); glShadeModel(GL_FLAT); makeCheckImage(); glPixelStorei(GL_UNPACK_ALIGNMENT, 1);
}
void display(void)
{
glClear(GL_COLOR_BUFFER_BIT); glRasterPos2i(0, 0);
glDrawPixels(checkImageWidth, checkImageHeight, GL_RGB, GL_UNSIGNED_BYTE, checkImage);
glFlush();
}
http://heron.cc.ukans.edu/ebt-bin/nph-dweb/dynaw...Generic__BookTextView/14979;cs=fullhtml;pt=14035 (21 of 27) [4/28/2000 9:46:18 PM]

OpenGL Programming Guide (Addison-Wesley Publishing Company)
void reshape(int w, int h)
{
glViewport(0, 0, (GLsizei) w, (GLsizei) h); height = (GLint) h; glMatrixMode(GL_PROJECTION); glLoadIdentity();
gluOrtho2D(0.0, (GLdouble) w, 0.0, (GLdouble) h); glMatrixMode(GL_MODELVIEW);
glLoadIdentity();
}
void motion(int x, int y)
{
static GLint screeny;
screeny = height - (GLint) y; glRasterPos2i (x, screeny); glPixelZoom (zoomFactor, zoomFactor);
glCopyPixels (0, 0, checkImageWidth, checkImageHeight, GL_COLOR);
glPixelZoom (1.0, 1.0); glFlush ();
}
void keyboard(unsigned char key, int x, int y)
{
switch (key) { case `r': case `R':
zoomFactor = 1.0; glutPostRedisplay();
printf ("zoomFactor reset to 1.0\n"); break;
case `z':
zoomFactor += 0.5;
if (zoomFactor >= 3.0) zoomFactor = 3.0;
printf ("zoomFactor is now %4.1f\n", zoomFactor); break;
case `Z':
zoomFactor -= 0.5;
if (zoomFactor <= 0.5) zoomFactor = 0.5;
printf ("zoomFactor is now %4.1f\n", zoomFactor); break;
case 27: exit(0); break;
default:
break;
}
}
int main(int argc, char** argv)
http://heron.cc.ukans.edu/ebt-bin/nph-dweb/dynaw...Generic__BookTextView/14979;cs=fullhtml;pt=14035 (22 of 27) [4/28/2000 9:46:18 PM]

OpenGL Programming Guide (Addison-Wesley Publishing Company)
{
glutInit(&argc, argv); glutInitDisplayMode(GLUT_SINGLE | GLUT_RGB); glutInitWindowSize(250, 250); glutInitWindowPosition(100, 100); glutCreateWindow(argv[0]);
init();
glutDisplayFunc(display);
glutReshapeFunc(reshape);
glutKeyboardFunc(keyboard);
glutMotionFunc(motion);
glutMainLoop(); return 0;
}
Reading and Drawing Pixel Rectangles
This section describes the reading and drawing processes in detail. The pixel conversions performed when going from framebuffer to memory (reading) are similar but not identical to the conversions performed when going in the opposite direction (drawing), as explained in the following sections. You may wish to skip this section the first time through, especially if you do not plan to use the pixel-transfer operations right away.
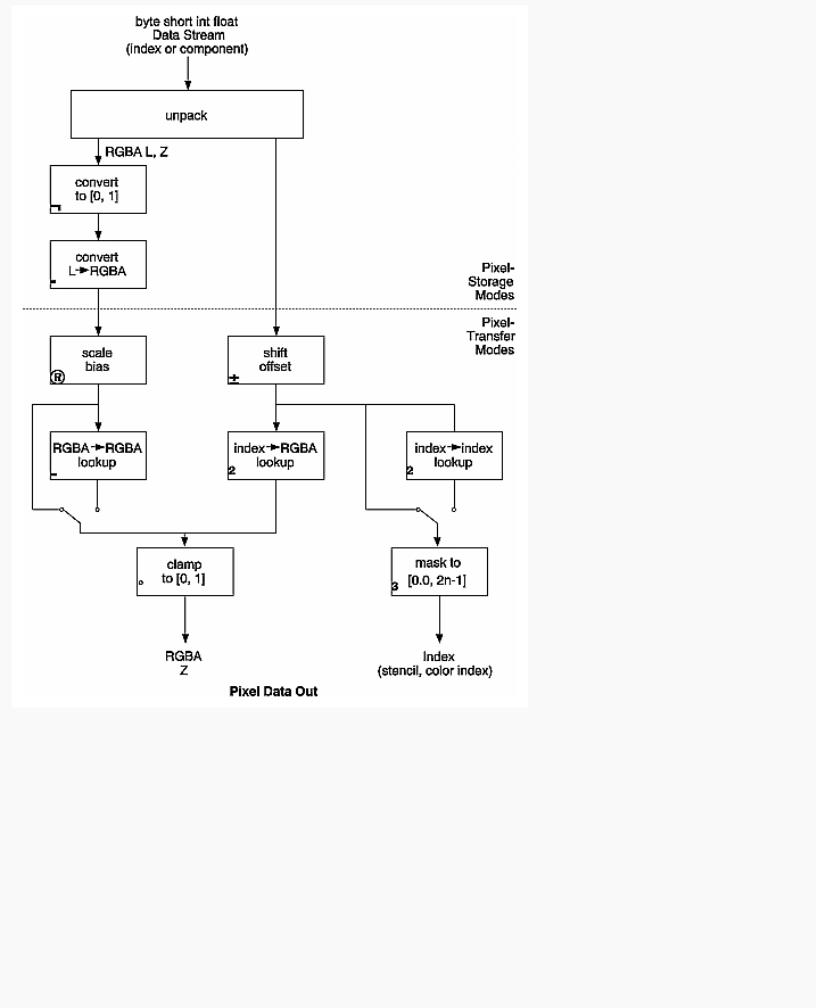
The Pixel Rectangle Drawing Process
Figure 8-10 and the following list describe the operation of drawing pixels into the framebuffer.
http://heron.cc.ukans.edu/ebt-bin/nph-dweb/dynaw...Generic__BookTextView/14979;cs=fullhtml;pt=14035 (23 of 27) [4/28/2000 9:46:18 PM]
OpenGL Programming Guide (Addison-Wesley Publishing Company)
Figure 8-10 : Drawing Pixels with glDrawPixels()
1.If the pixels aren't indices (that is, the format isn't GL_COLOR_INDEX or GL_STENCIL_INDEX), the first step is to convert the components to floating-point format if necessary. (See Table 4-1 for the details of the conversion.)
2.If the format is GL_LUMINANCE or GL_LUMINANCE_ALPHA, the luminance element is converted into R, G, and B, by using the luminance value for each of the R, G, and B components. In GL_LUMINANCE_ALPHA format, the alpha value becomes the A value. If GL_LUMINANCE is specified, the A value is set to 1.0.
3.Each component (R, G, B, A, or depth) is multiplied by the appropriate scale, and the appropriate bias is added. For example, the R component is multiplied by the value corresponding to GL_RED_SCALE and added to the value corresponding to GL_RED_BIAS.
http://heron.cc.ukans.edu/ebt-bin/nph-dweb/dynaw...Generic__BookTextView/14979;cs=fullhtml;pt=14035 (24 of 27) [4/28/2000 9:46:18 PM]

OpenGL Programming Guide (Addison-Wesley Publishing Company)
4.If GL_MAP_COLOR is true, each of the R, G, B, and A components is clamped to the range [0.0,1.0], multiplied by an integer one less than the table size, truncated, and looked up in the table. (See "Tips for Improving Pixel Drawing Rates" for more details.)
5.Next, the R, G, B, and A components are clamped to [0.0,1.0], if they weren't already, and converted to fixed-point with as many bits to the left of the binary point as there are in the corresponding framebuffer component.
6.If you're working with index values (stencil or color indices), then the values are first converted to fixed-point (if they were initially floating-point numbers) with some unspecified bits to the right of the binary point. Indices that were initially fixed-point remain so, and any bits to the right of the binary point are set to zero.
The resulting index value is then shifted right or left by the absolute value of GL_INDEX_SHIFT bits; the value is shifted left if GL_INDEX_SHIFT > 0 and right otherwise. Finally, GL_INDEX_OFFSET is added to the index.
7.The next step with indices depends on whether you're using RGBA mode or color-index mode. In RGBA mode, a color index is converted to RGBA using the color components specified by GL_PIXEL_MAP_I_TO_R, GL_PIXEL_MAP_I_TO_G, GL_PIXEL_MAP_I_TO_B, and GL_PIXEL_MAP_I_TO_A. (See "Pixel Mapping" for details.) Otherwise, if GL_MAP_COLOR is GL_TRUE, a color index is looked up through the table GL_PIXEL_MAP_I_TO_I. (If GL_MAP_COLOR is GL_FALSE, the index is unchanged.) If the image is made up of stencil indices rather than color indices, and if GL_MAP_STENCIL is GL_TRUE, the index is looked up in the table corresponding to GL_PIXEL_MAP_S_TO_S. If GL_MAP_STENCIL is FALSE, the stencil index is unchanged.
8.Finally, if the indices haven't been converted to RGBA, the indices are then masked to the number of bits of either the color-index or stencil buffer, whichever is appropriate.
The Pixel Rectangle Reading Process
Many of the conversions done during the pixel rectangle drawing process are also done during the pixel rectangle reading process. The pixel reading process is shown in Figure 8-11 and described in the following list.
http://heron.cc.ukans.edu/ebt-bin/nph-dweb/dynaw...Generic__BookTextView/14979;cs=fullhtml;pt=14035 (25 of 27) [4/28/2000 9:46:18 PM]